How to Add Google reCAPTCHA to Websites and Get an API Key
Protecting your website from spam, bots, and fraudulent activity is crucial. Google reCAPTCHA is a free service that helps you verify human users while blocking automated abuse. In this guide, you’ll learn how to add Google reCAPTCHA to your website, register for an API key pair, and integrate reCAPTCHA v2 using Bluehost. This article covers reCAPTCHA v2 (Checkbox and Invisible). For details on reCAPTCHA Enterprise, see: Comparison of reCAPTCHA versions.
Prerequisites
Before you begin, make sure:
- You have access to your website’s HTML and backend/server files.
- You are comfortable adding HTML and JavaScript code.
- You’ve chosen which type of reCAPTCHA you’d like to use (Checkbox or Invisible).
To use reCAPTCHA, you'll need an API key pair:
- Site Key – Used in your HTML to invoke the reCAPTCHA service.
- Secret Key – Used in server-side code to verify the user's response
Keep your Secret Key confidential.
Step 1: Register for a Google reCAPTCHA API Key
- Go to the Google reCAPTCHA Admin Console.
- Fill in the form:
- Label – Enter a name to identify your website.
- reCAPTCHA type – Choose "reCAPTCHA v2."
- Domains – Enter the domain(s) or package names where you'll use reCAPTCHA.
- Google Cloud Platform - Accept the Google Cloud Terms of Service and the terms of service of any applicable services and APIs.
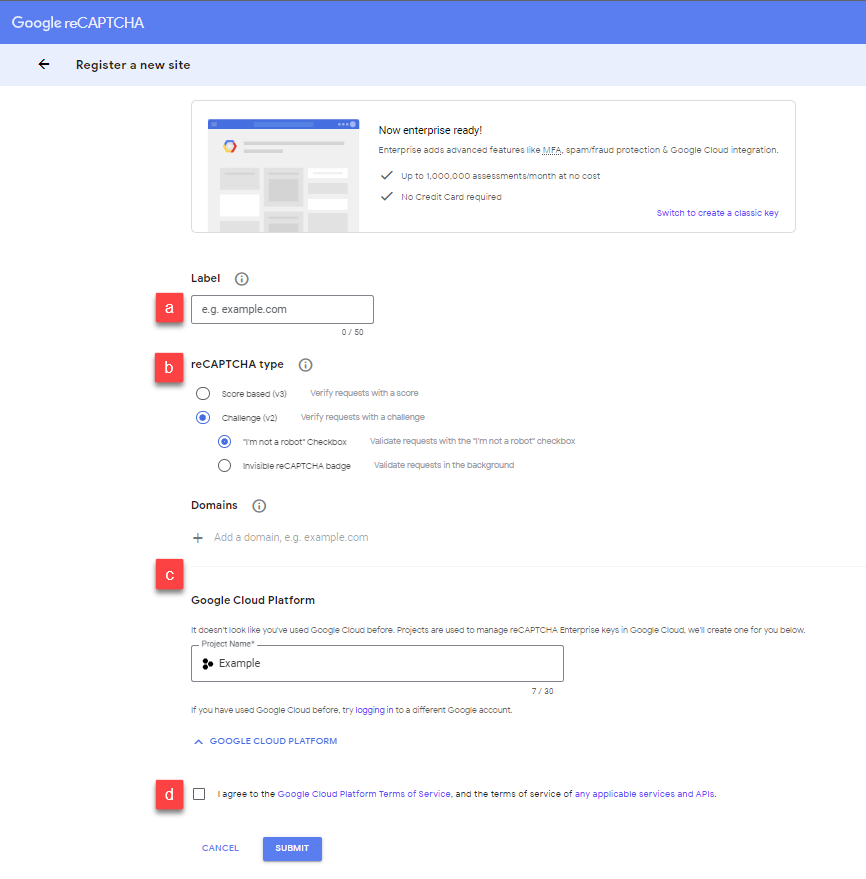
- Accept the Google terms of service.
- Click Submit.
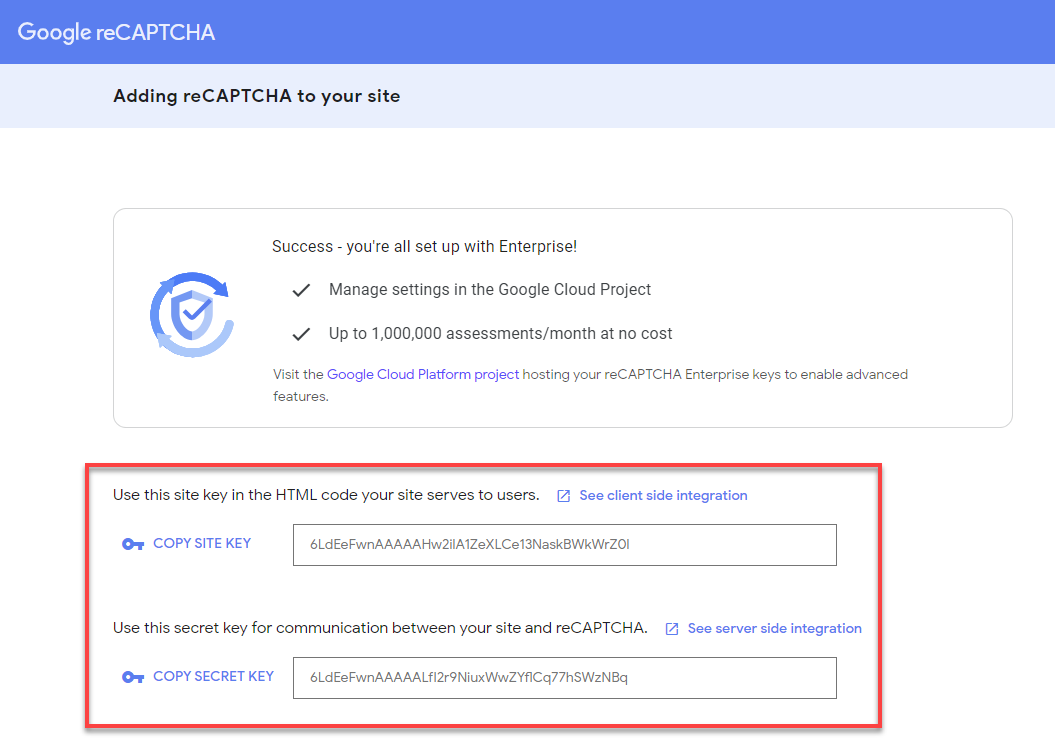
Once done, you’ll receive a Site Key and a Secret Key.
Step 2: Add reCAPTCHA v2 to Your Website
Choose from the two reCAPTCHA v2 types below:
- Option 1: Checkbox reCAPTCHA
- Option 2: Invisible reCAPTCHA
Checkbox reCAPTCHA
This section explains how to display and customize the reCAPTCHA v2 widget on your webpage. To display the widget, you can either do the following:
- See Configurations to learn how to customize your widgets. For example, the customer may want to specify the language or theme for the widget.
- See Verifying the user's response to check if the user successfully solved the CAPTCHA.
Automatically Render the Widget
The simplest way to render the reCAPTCHA widget on your page is to use the g-recaptcha tag and the required JavaScript resource. The DIV element with the class name g-recaptcha and its site key in the data-sitekey attribute is called a g-recaptcha tag.
<html>
  <head>
    <title>reCAPTCHA demo: Simple page</title>
    <script src="https://www.google.com/recaptcha/api.js" async defer></script>
  </head>
  <body>
    <form action="?" method="POST">
      <div class="g-recaptcha" data-sitekey="your_site_key"></div>
      <br/>
      <input type="submit" value="Submit">
    </form>
  </body>
</html>
Explicitly Render the Widget
The widget's render can be deferred by adding parameters to the JavaScript resource and specifying your onload callback function.
Advised to follow the steps below when rendering the reCAPTCHA widget explicitly:
- Specify the function for the
onloadcallback. When all the dependencies have loaded, theonloadcallback will get called.<script type="text/javascript"> var onloadCallback = function() { alert("grecaptcha is ready!"); }; </script> - Secondly, insert the JavaScript resource. In the JavaScript resource, the
onloadparameter will be set to the name of youronloadcallback function, and therenderparameter will be set toexplicit.<script src="https://www.google.com/recaptcha/api.js?onload=onloadCallback&render=explicit" async defer> </script>When your callback is executed, you can call the
grecaptcha.rendermethod from the JavaScript API.Before the reCAPTCHA API loads, youronloadcallback function must be defined. To ensure there are no race conditions, advise the customer to follow the steps below:- Order the scripts with the callback first, and then reCAPTCHA.
- Utilize
asyncanddeferparameters in the script tags.
Invisible reCAPTCHA
This section explains how to enable and customize the invisible reCAPTCHA on your webpage.
To invoke the invisible reCAPTCHA, you can either do the following:
- See Configurations to learn how to customize the invisible reCAPTCHA. For example, you may want to specify the language or badge location.
- See Verifying the user's response to check if the user successfully solved the CAPTCHA.
Automatically Bind the Challenge to a Button
The easiest method for using the invisible reCAPTCHA widget on your page is to include the necessary JavaScript resource and add a few attributes to your HTML button. The necessary attributes are the following:
- A class name
g-recaptcha - Site key in the
data-sitekeyattribute - The name of a JavaScript callback to handle the completion of the captcha in the
data-callbackattribute.<html> <head> <title>reCAPTCHA demo: Simple page</title> <script src="https://www.google.com/recaptcha/api.js" async defer></script> <script> function onSubmit(token) { document.getElementById("demo-form").submit(); } </script> </head> <body> <form id="demo-form" action="?" method="POST"> <button class="g-recaptcha" data-sitekey="your_site_key" data-callback="onSubmit">Submit</button> <br/> </form> </body> </html>The script can be included from any point on the page without restriction and must be loaded using the HTTPS protocol.
Programmatically Bind the Challenge to a Button
Deferring the binding can be achieved by adding parameters to the JavaScript resource and specifying your onload callback function. It functions in the same way as the normal reCAPTCHA challenge.
Explicitly Render the Widget
Programmatically calling execute and rendering the challenge in a div with an attribute data-size="invisible", Programmatically Invoking the reCAPTCHA verification can be achieved.
Please be advised to follow the steps below when invoking the challenge programmatically :
-
Create a
data-size="invisible"in your div.<div class="g-recaptcha" data-sitekey="_your_site_key_" data-callback="onSubmit" data-size="invisible"> -
Call
grecaptcha.executeusing a JavaScript method.grecaptcha.execute();
When your callback is executed, you can call the grecaptcha.render method from the JavaScript API.
onload callback function must be defined. To ensure there are no race conditions, advise the customer to follow the steps below:
- Order the scripts with the callback first, and then reCAPTCHA.
- Please utilize
asyncanddeferparameters in the script tags.
Step 3: Verify the User’s Response
After the reCAPTCHA challenge, you’ll need to verify the user’s response in your backend.
Web Users
For web users, there are three ways to get the user's response:
- When the user submits the form on your site, you can verify the user's response through the
g-recaptcha-responsePOST parameter. - Secondly, you can verify the user’s response through the
grecaptcha.getResponse(opt_widget_id)after the user completes the reCAPTCHA challenge. - Lastly, you can get the user's response as a string argument to your callback function (only if the
grecaptcha.rendermethod ordata-callbackparameter is specified in either theg-recaptchatag attribute).
Android Library Users
You can call the SafetyNetApi.RecaptchaTokenResult.getTokenResult() method to get a response token if the status returns successfully. See Verifying the User's Response to learn more.
Android Users: Play Integrity API (formerly SafetyNet)
The Play Integrity API assists in defending your applications and games from potentially harmful and dishonest interactions, such as cheating and illegal access. It lets you take the necessary countermeasures to stop assaults and lessen misuse.
When your app or game is used on a device that runs Android 4.4 (API level 19) or higher, the Play Integrity API provides a signed and encrypted response that includes the following information:
- Genuine app binary - This response determines whether Google Play recognizes the unmodified binary that you're interacting with.
- Genuine Play install - This response determines whether the current user account is licensed (meaning your app or game is installed or paid for by the user on Google Play).
- Genuine Android device - This response tells you whether the Android device is genuine and powered by Google Play services, where the app is being run.
Summary
By following this guide, you can add Google reCAPTCHA to your website using the v2 Checkbox or Invisible options. This helps secure your forms, login pages, and apps from spam and automated attacks. Bluehost makes integration simple with this step-by-step tutorial. Don't forget to keep your Secret Key secure and verify the user response properly.
If you need further assistance, Bluehost Chat Support is available 24 hours a day, 7days a week while Bluehost Phone Support is available 7 days a week from 7 am-12 midnight EST.
- Chat Support - While on our website, you should see a CHAT bubble in the bottom right-hand corner of the page. Click anywhere on the bubble to begin a chat session.
- Phone Support -
- US: 888-401-4678
- International: +1 801-765-9400
You may also refer to our Knowledge Base articles to help answer common questions and guide you through various setup, configuration, and troubleshooting steps.