SpamExperts: Features and Functions
Below are the most commonly used options on the SpamExperts dashboard, including an overview of SpamExperts features and functions you can use to professionally filter and scan your incoming emails for spam, viruses, phishing, and other email-related attacks by botnets and spammers with 99.98% accuracy.
Incoming - Protection Settings
Incoming - Protection Settings is one of the most common options used by SpamExperts. It includes:
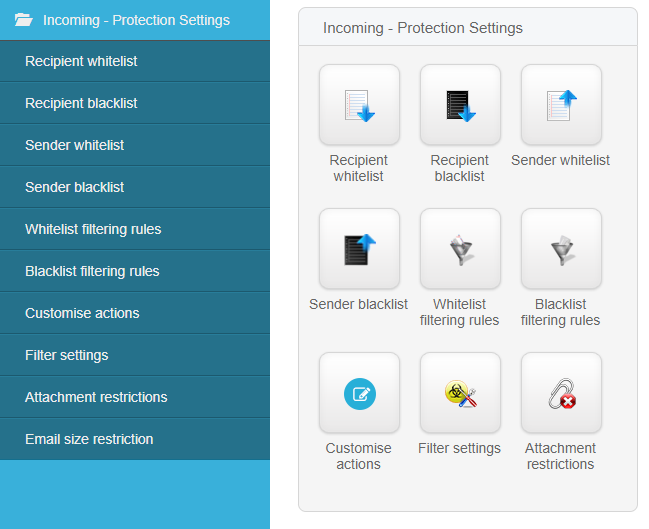
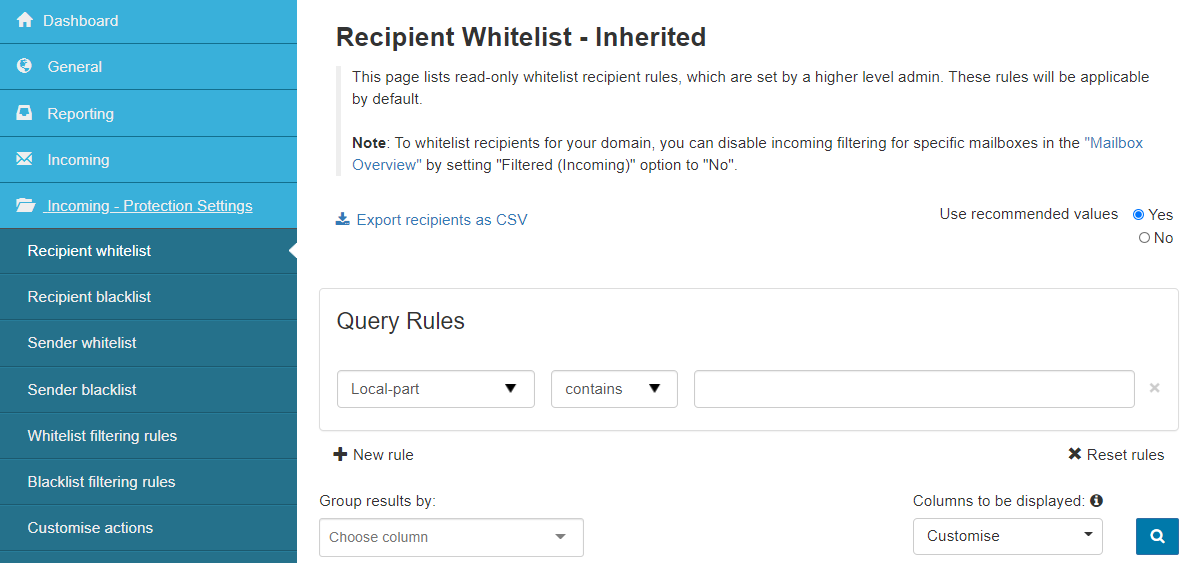
Recipient Whitelist
This page lists read-only whitelist recipient rules, which are set by a higher-level admin. These rules will be applicable by default.
Recipient Blacklist
- Recipient Blacklist - Domain: Messages to a blacklisted recipient will be rejected regardless of the message content. Note that only the envelope recipient is checked, not any address headers, such as To or CC. Messages are rejected prior to receiving the message content, so they are not available in the quarantine. To blacklist all recipients (i.e., accept no mail), use
*as the local part.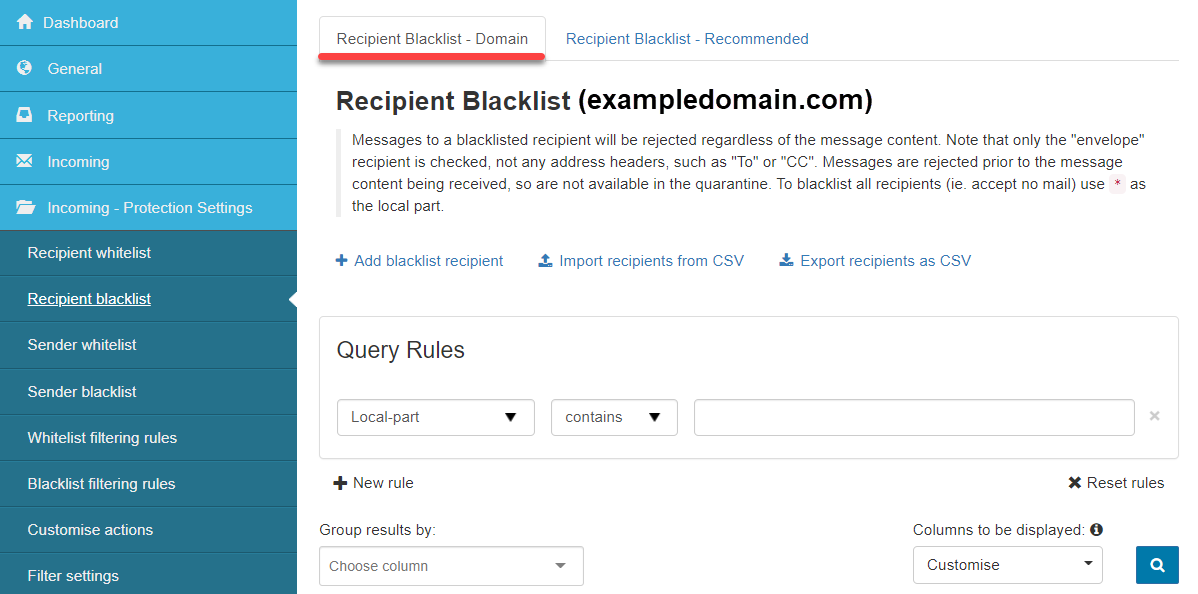
- Recipient Blacklist - Inherited: These addresses are recommended by your administrator and will apply in addition to any addresses configured for the domain. If you wish, you may disable using these addresses and only use the domain ones by changing Use recommended values to No. You may also copy a recommended address to your domain if you wish to use only some of the recommended addresses or use them in a modified format. As with domain addresses, an address of
*indicates that all mailboxes are listed.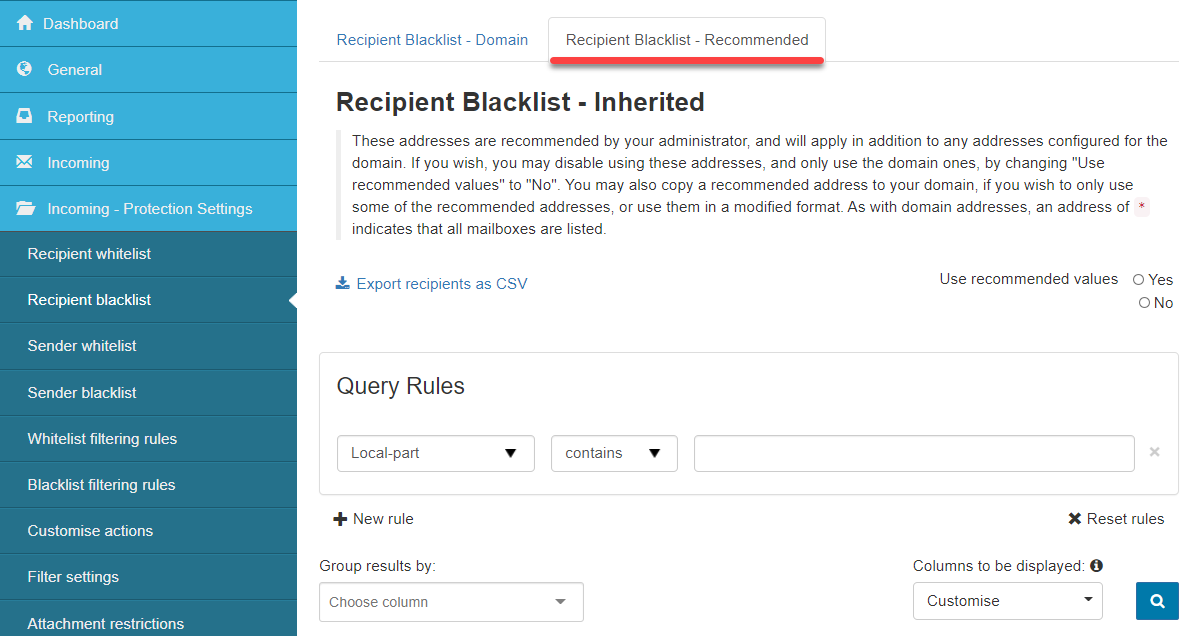
Sender Whitelist
- Sender Whitelist- Domain: If you wish to receive mail from a particular sender, regardless of the message content, you should whitelist it. You should only do this when you know the sender will verify their address and will only ever send legitimate, safe content.
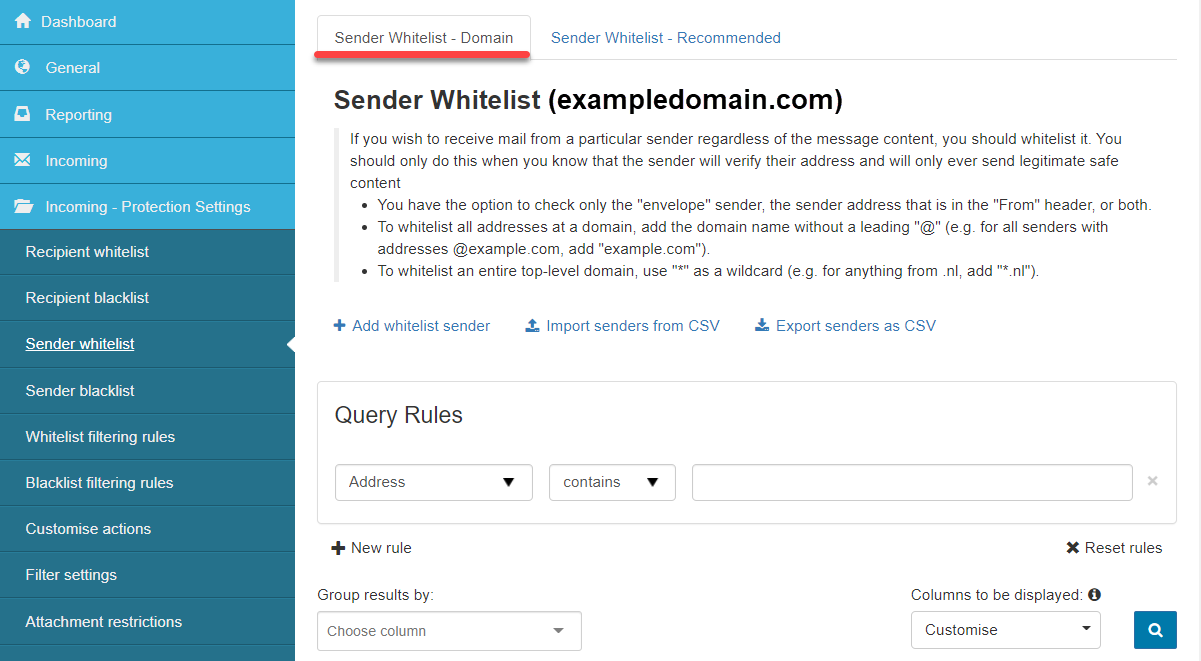
- You can check only the envelope sender, the sender's address in the From header, or both.
- To whitelist all addresses at a domain, add the domain name without a leading @ (e.g., for all senders with addresses @example.com, add example.com).
- To whitelist an entire top-level domain, use
*as a wildcard (e.g., for anything from .nl, add*.nl).
- Sender Whitelist - Recommended: These addresses are recommended by your administrator and will apply in addition to any addresses configured for the domain. If you wish, you may disable using these addresses and only use the domain ones by changing Use recommended values to No. You may also copy a recommended address to your domain if you wish to use only some of the recommended addresses or use them in a modified format. As with domain addresses, the address may apply only to the envelope sender, to the From header, or both; an address with no @ indicates that the entire domain is listed, and
*indicates that all subdomains of that domain are listed.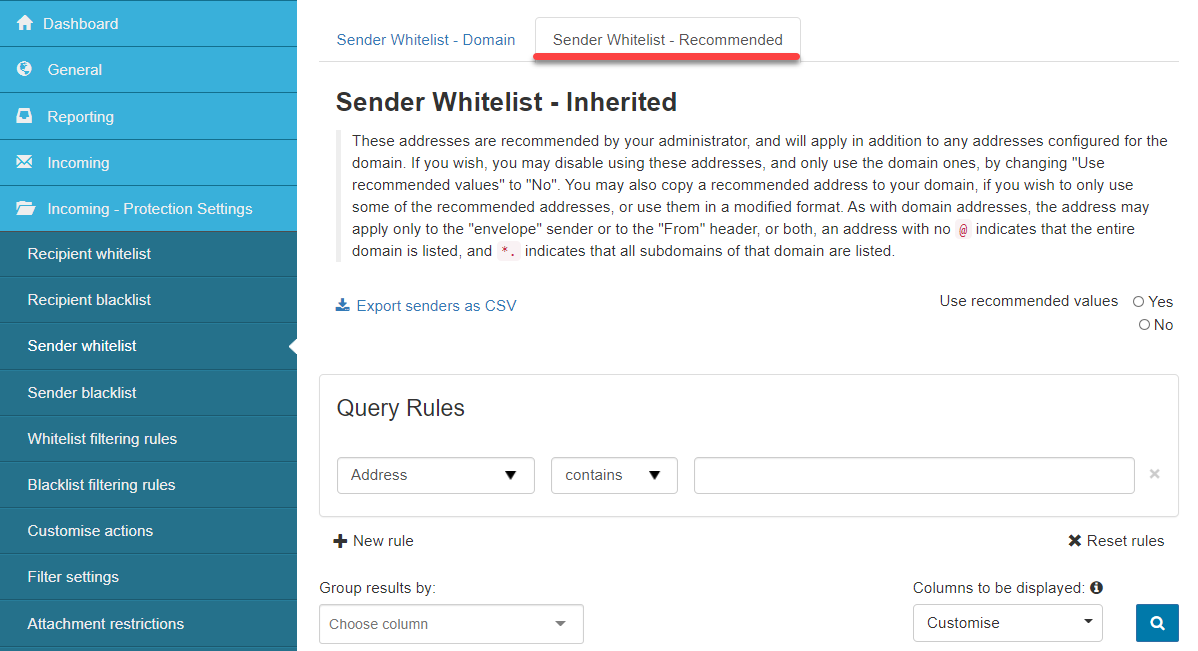
Sender Blacklist
- Sender Blacklist - Domain: If you never wish to receive mail from a particular sender, you may blacklist it. These messages will be rejected regardless of the message classification.
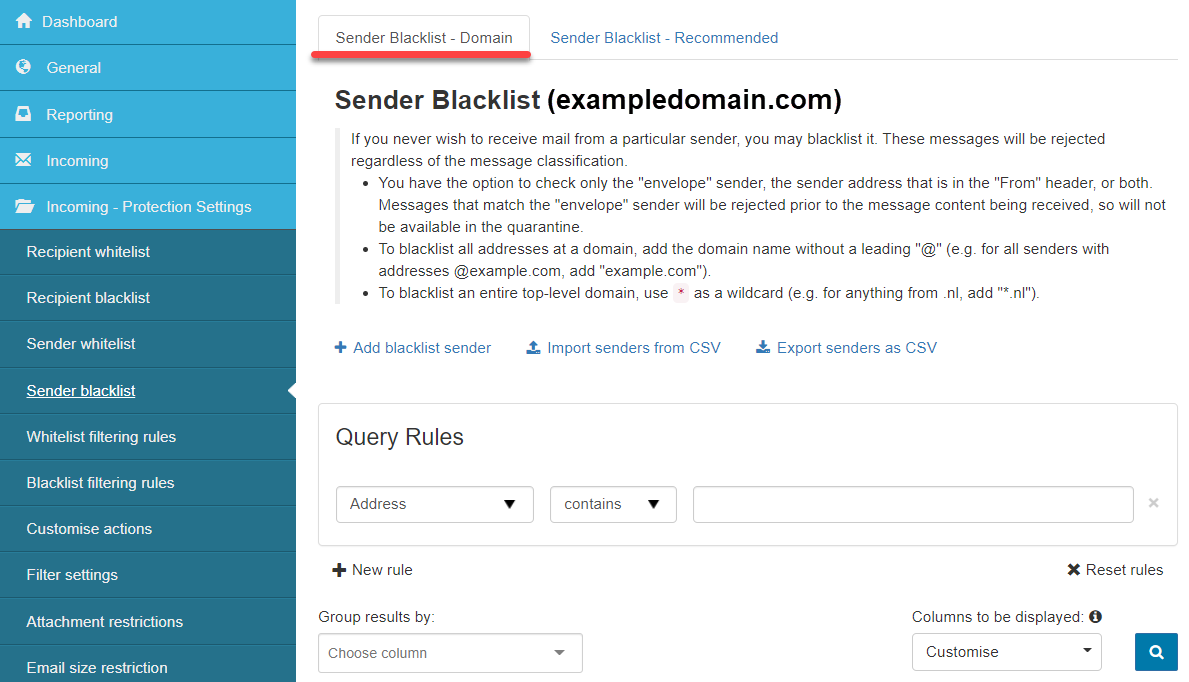
- You can check only the envelope sender, the sender's address in the From header, or both. Messages that match the envelope sender will be rejected before receiving the message content, so they will not be available in the quarantine.
- To blacklist all addresses at a domain, add the domain name without a leading @ (e.g., for all senders with addresses @example.com, add example.com).
- To blacklist an entire top-level domain, use
*as a wildcard (e.g., for anything from .nl, add*.nl).
- Sender Blacklist - Recommended: These addresses are recommended by your administrator and will apply in addition to any addresses configured for the domain. If you wish, you may disable using these addresses and only use the domain ones by changing Use recommended values to No. You may also copy a recommended address to your domain if you wish to use only some of the recommended addresses or use them in a modified format. As with domain addresses, the address may apply only to the envelope sender, to the From header, or both; an address with no @ indicates that the entire domain is listed, and
*.indicates that all subdomains of that domain are listed.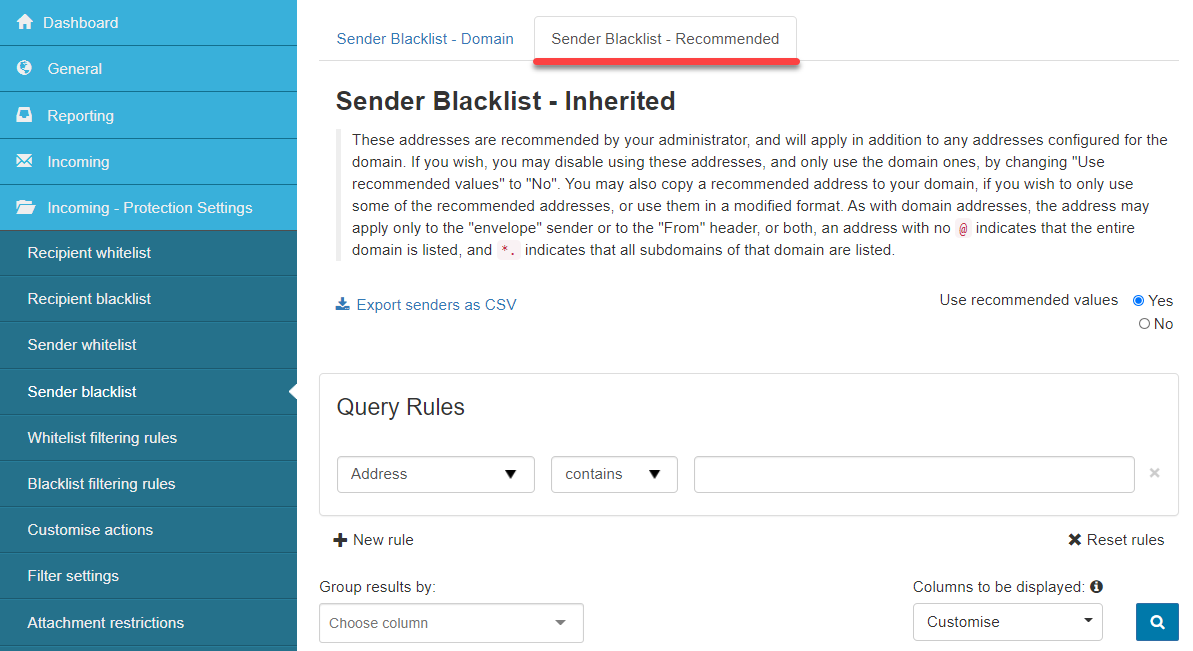
Whitelist Filtering rules
On the Incoming Whitelist Filtering Rules page, you can view all filtering rules that have been set up for your domain, and you can also add new ones. Incoming mail that matches any of the rules will always be delivered.
The rules are based on Python's regular expression (regex) syntax. (For more information on regular expressions, we recommend using an online regex checker tool to ensure any expression created is correct before applying it in SpamExperts.)
View Incoming Whitelist Filtering Rules
- In the Admin Level or Domain Level Control Panel, select Incoming - Protection Settings > Whitelist filtering rules.
The Incoming Whitelist filtering rules page is displayed and contains the following tabs:- Domain Rules - Rules that apply to a specific domain. You can add new rules in this tab - see Add an Incoming Whitelist Filtering Rule.
- Admin Rules - Rules that apply to all domains linked to this admin.
- Default Rules - Displays the default rules that apply to all domains using default settings (where no changes have been made at the Domain level to filtering settings, Whitelist, Blacklist, Quarantine Threshold, etc.).
- Global Rules - Displays all rules that apply to all domains regardless of default settings.
- Inherited Rules(Admin Level only) - View-only tab that displays all rules created by higher-level Admins.
All existing rules are displayed in the table.
- Use the Query Rules panel to filter existing rules and click on Show Results to display all matching results.
On this page, you can also:
- Add rule - Using the Add rule link - see Add an Incoming Whitelist Filtering Rule.
- Import rules from CSV - Using the Import rules from CSV link above the Query Rules panel.
- Export rules as CSV - Using the Export rules as CSV link above the Query Rules panel.
Add an Incoming Whitelist Filtering Rule
You can add rules that apply to a specific domain in the Domain Rules tab or access from the Admin Level to all domains linked to the logged-in admin in the Admin Rules tab.
- In the Admin Level or Domain Level Control Panel, select Incoming - Protection Settings > Whitelist filtering rules.
The Domain Rules tab is displayed on the Incoming Whitelist filtering rules page.
If you want to apply a rule to a domain, remain on this tab. If you are accessing from the Admin Level and want to apply a rule to a specific Admin, open the Admin Rules tab.
- Click on Add rule:
The dialog displayed here depends on whether you have enabled or disabled the 'Use advanced custom filtering rules' option on the User profile page.- If the option is inactive, you will see the 'Add a new simple Whitelist filtering rule' dialog:
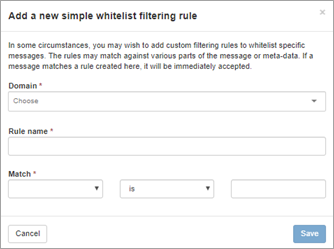
- If this is Active, you will see the 'Add a new advanced Whitelist filtering rule' dialog:
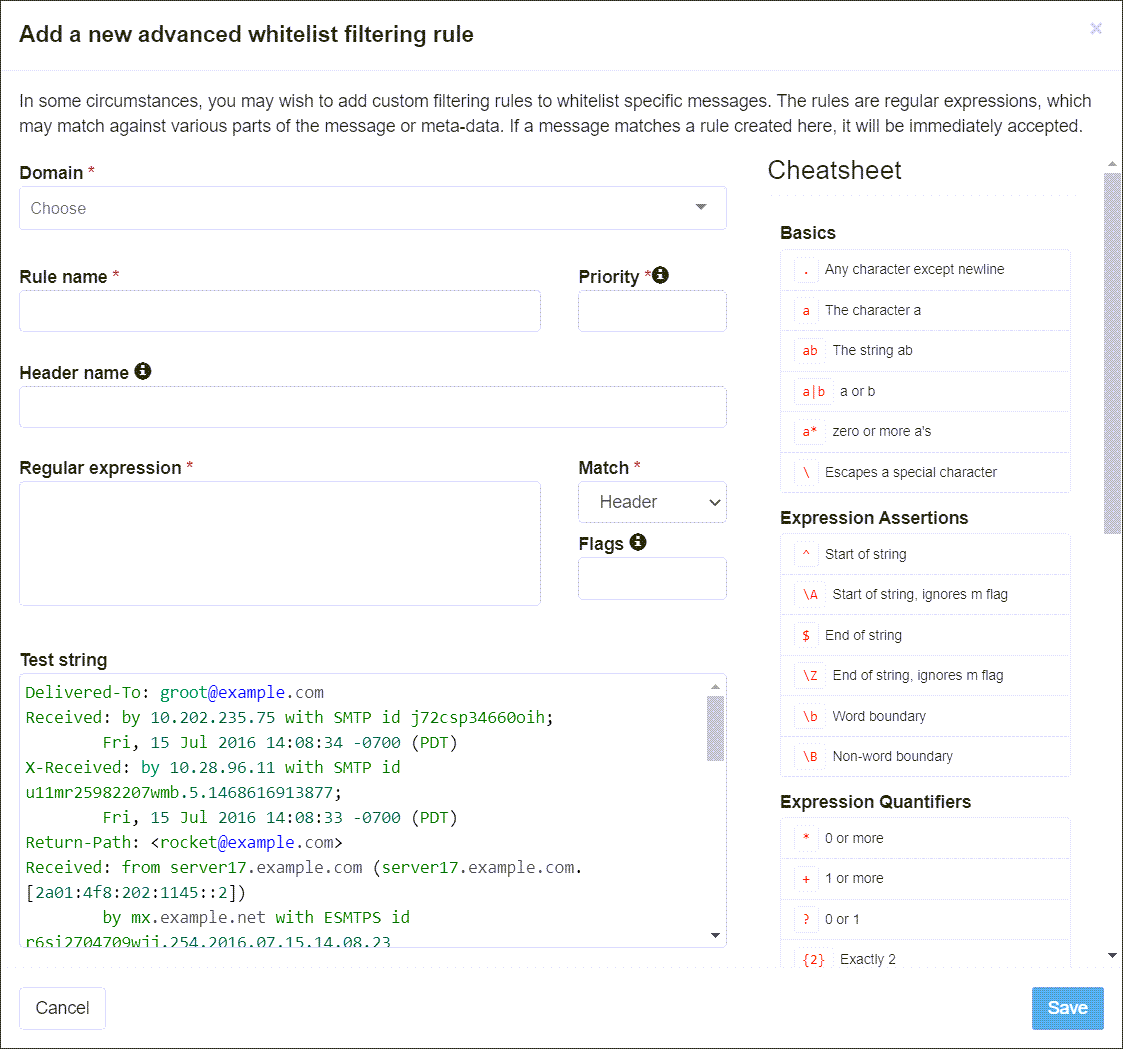
- If the option is inactive, you will see the 'Add a new simple Whitelist filtering rule' dialog:
-
Choose from the following filters:
Field/Option Description Simple page Domain (only displayed at Admin Level) Select the domain the rule will apply to. Rule name Add the name of this rule. Match Use the Match fields to structure your rule. Advanced page Domain (only displayed at Admin Level) Choose the domain to which you want to apply the rule from those available in the Domain dropdown. (When accessing this page at the Domain Level, the system applies the rule to the logged-in domain). Rule name Enter the name you want to give this rule in the Rule name field. Priority In the Priority field, enter a number to represent the priority given to the rule. Rules are evaluated by priority from the lowest number to the highest number until one match or all rules have been checked. All Whitelist rules are checked before Blacklist rules.
Header name If you want to restrict the check to a particular header, enter the Header name. You may enter a regular expression here if required. Regular expression Enter the regular expression for the rule in the Regular expression field.
Tip! Use the Cheatsheet panel on the right of the page for examples of how to build your regex.
Match Choose what you want the rule to match. The following options are available:
- Subject
- To
- From
- CC
- Country
- Continent
- Message Body
- Recipient
- Sender
- Sender IP
- Sender Hostname
- URL
- Language
- Attachment Type
- Attachment Name
- Attachment Type (auto-detect)
Flags The following flags are available: - i (ignore case)
- m (^ and $ match start and end of line),
- s (. matches newline)
- x (allow spaces and comments)
- Click Save when finished.
Blacklist Filtering rules
On the Incoming Blacklist Filtering Rules page, you can view all filtering rules that have been set up for your domain's incoming mail, and you can also add new ones. Incoming mail that matches any of the rules will always be blocked.
The rules are based on Python's regular expression (regex) syntax. (For more information on regular expressions, we recommend using an online regex checker tool to ensure any expression created is correct before applying it in SpamExperts.)
View Incoming Blacklist Filtering Rules
View all the Blacklist Filtering Rules that will always block matching incoming mail when applied to a domain.
- In the Admin Level or Domain Level Control Panel, select Incoming - Protection Settings > Blacklist filtering rules.
The Incoming Blacklist filtering rules page is displayed and contains the following tabs:- Domain Rules - Rules that apply to a specific domain. You can add new rules in this tab - see Add an Incoming Blacklist Filtering Rule.
- Admin Rules - Rules that apply to all domains linked to this Admin.
- Default Rules - Displays the default rules that apply to all domains using default settings (where no changes have been made at the Domain level to filtering settings, Whitelist, Blacklist, Quarantine Threshold, etc.).
- Global Rules - Displays all rules that apply to all domains regardless of default settings.
- Inherited Rules - View-only tab that displays all rules created by higher-level Admins.
All existing rules are displayed in the table.
- Use the Query Rules panel to filter existing rules and click on Show Results to display all matching results.
On this page, you can:
- Add rule - Using the Add rule link, see Add an Incoming Blacklist Filtering Rule for details.
- Import rules from CSV - Using the Import rules from CSV link above the Query Rules panel.
- Export rules as CSV - Using the Export rules as CSV link above the Query Rules panel.
Add an Incoming Blacklist Filtering Rule
You can add rules that apply to a specific domain in the Domain Rules tab or, if accessing from the Admin Level, to all domains linked to the logged-in Admin in the Admin Rules tab.
- In the Admin Level or Domain Level Control Panel, select Incoming - Protection Settings > Blacklist filtering rules.
The Domain Rules tab is displayed on the Incoming Blacklist filtering rules page.
If you want to apply a rule to a domain, remain on this tab. If you are accessing from the Admin Level and want to apply a rule to a specific Admin, open the Admin Rules tab.
- Click on Add rule.
The dialog displayed here depends on whether you have enabled or disabled the 'Use advanced custom filtering rules' option on the User profile page.- If the option is inactive, you will see the 'Add a new simple Blacklist filtering rule' dialog:
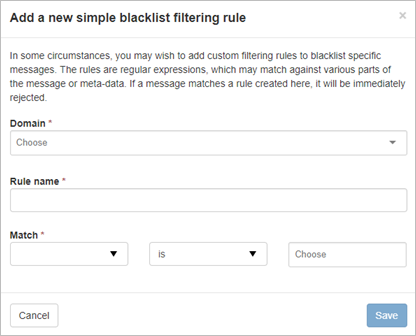
- If this is Active, you will see the 'Add a new advanced Blacklist filtering rule' dialog:
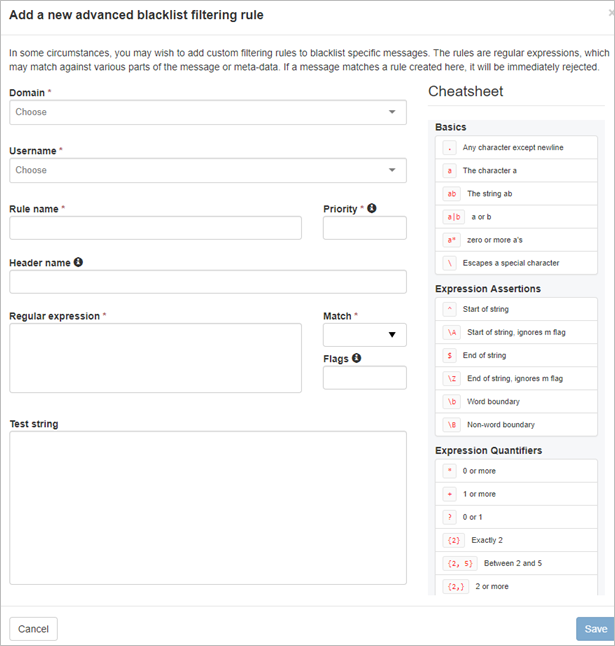
- If the option is inactive, you will see the 'Add a new simple Blacklist filtering rule' dialog:
- Choose from the following filters:
Field/Option Description Simple page Domain (only displayed at Admin Level) Select the domain the rule will apply to. Rule name Add the name of this rule. Match Use the Match fields to structure your rule. Advanced page Domain (only displayed at Admin Level) Choose the domain to which you want to apply the rule from those available in the Domain dropdown. (When accessing this page at the Domain Level, the system applies the rule to the logged-in domain). Rule name Enter the name you want to give this rule in the Rule name field. Priority In the Priority field, enter a number to represent the priority given to the rule. Rules are evaluated by priority from the lowest number to the highest number until one match or all rules have been checked. All Whitelist rules are checked before Blacklist rules.
Header name If you want to restrict the check to a particular header, enter the Header name. You may enter a regular expression here if required. Regular expression Enter the regular expression for the rule in the Regular expression field.
Tip! Use the Cheatsheet panel on the right of the page for examples of how to build your regex.
Match Choose what you want the rule to match. The following options are available: Flags The following flags are available: - i (ignore case)
- m (^ and $ match start and end of line),
- s (. matches newline)
- x (allow spaces and comments)
- Click Save when finished.
Customize Actions
Use this feature to customize actions for specific types of messages. For example, you can add rules to ensure these messages are rejected immediately instead of being placed in quarantine for messages failing the SPF check.
Add rules manually or use the Incoming Log Search to apply an action change to messages.
- In the Admin or Domain Level Control Panel, select Incoming - Protection Settings > Customise actions.
- Use the Query Rules panel to filter existing customized actions and click Show Results to display matches.
Add Customize Action
- Click + Add at the top of the page to open the Add a new custom action for emails dialog.
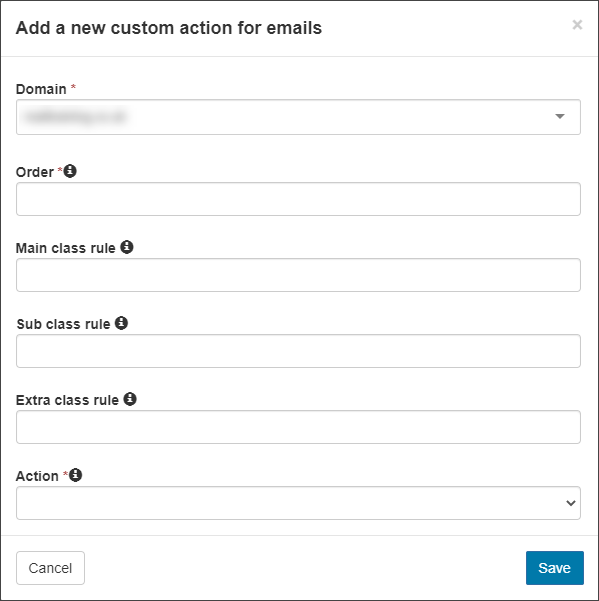
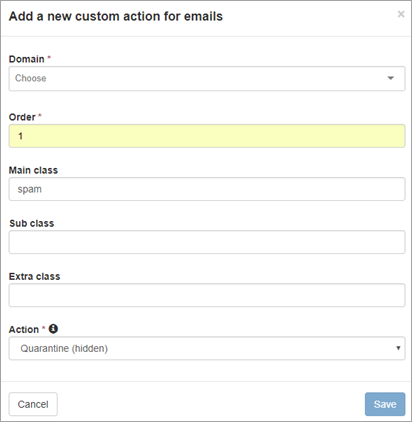
- Fill in the following fields:
This will not display if you are logged in as the Domain level user.
- Domain (only displayed at the Admin Level) - Select the domain to apply the custom action to
- Order - the order number you want this rule to be placed in, e.g., 1, to run this rule as a top priority over other rules.
- Main class rule (optional) - The log search results show the main class, e.g., phish.
- Sub-class rule (optional) - Further restrict the rule, e.g., SPF.
- Extra class rule (optional)- Further restrict the rule if required.
The main, sub, and extra classes are regular expressions, allowing you to match multiple classes with a custom action.
- Action:
- Permanently reject - message will be permanently rejected and will not be quarantined.
- Quarantine - message will be quarantined (550 SMTP response code).
- Accept - message will be accepted by the filter.
- Accept and notate spam - message will be accepted and delivered to the recipient, with the subject being notated as a spam message.
- Blackhole - message will be dropped without informing the sender.
- Accept and notate - message will be accepted and delivered to the recipient, with the subject being notated.
- Temporary reject - message will be temporarily rejected and will not be quarantined.
- Fake Accept - message will be quarantined, but the sender will not be informed (250 SMTP response code).
- Quarantine (hidden) - message will be quarantined but cannot be released (550 SMTP response code).
- Click Save.
Examples
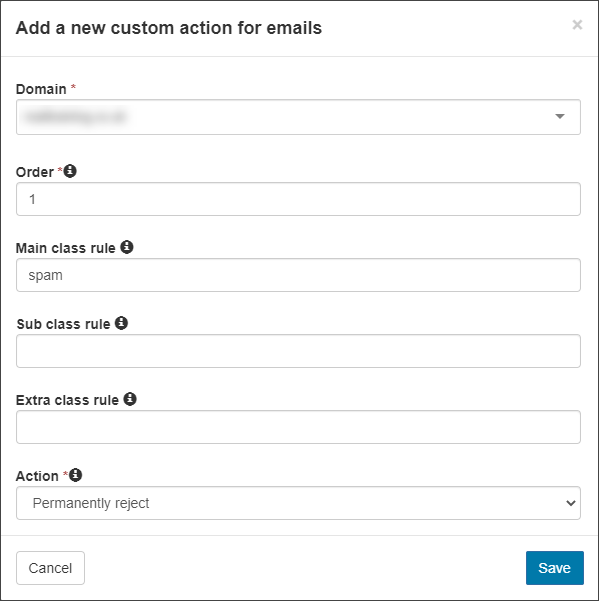
- If you wish for all messages where the Main Class has been determined to be spam to be permanently rejected:
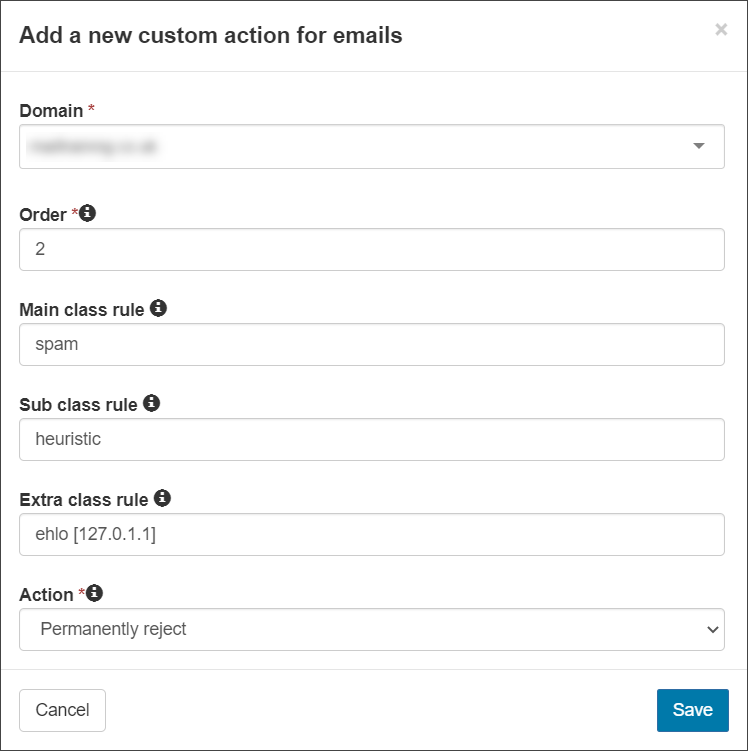
- If you wish for all messages where the Main Class has been determined to be spam due to a heuristic issue within the EHLO to be permanently rejected:
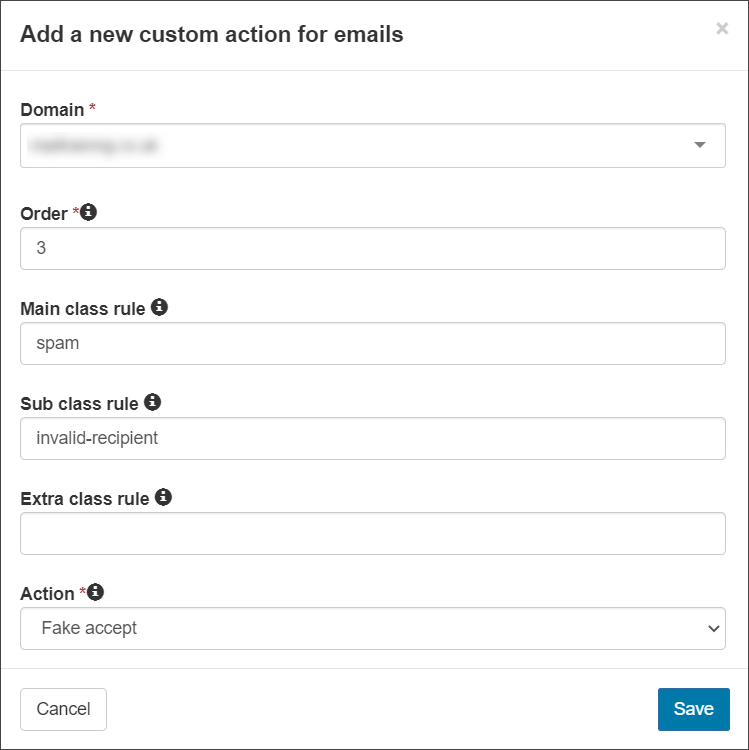
- If you wish for all messages where the Main Class has been determined to be spam due to an invalid recipient to be fake accepted:
Filter Settings
How do you set up spam threshold scores in Filter Settings? Explain the default value, the higher value, and the lower value.
Messages in SpamExperts with a combined score above this setting will be classed as spam and handled as spam. More messages will be seen as spam if this quarantine threshold setting is lowered from the default (recommended) value.
If this setting is increased to 1.0, fewer messages will be handled as spam. So, the potential for spam to be delivered is much higher.
For an in-depth explanation, please see Manage Quarantine Filter Settings.
Attachment Restrictions
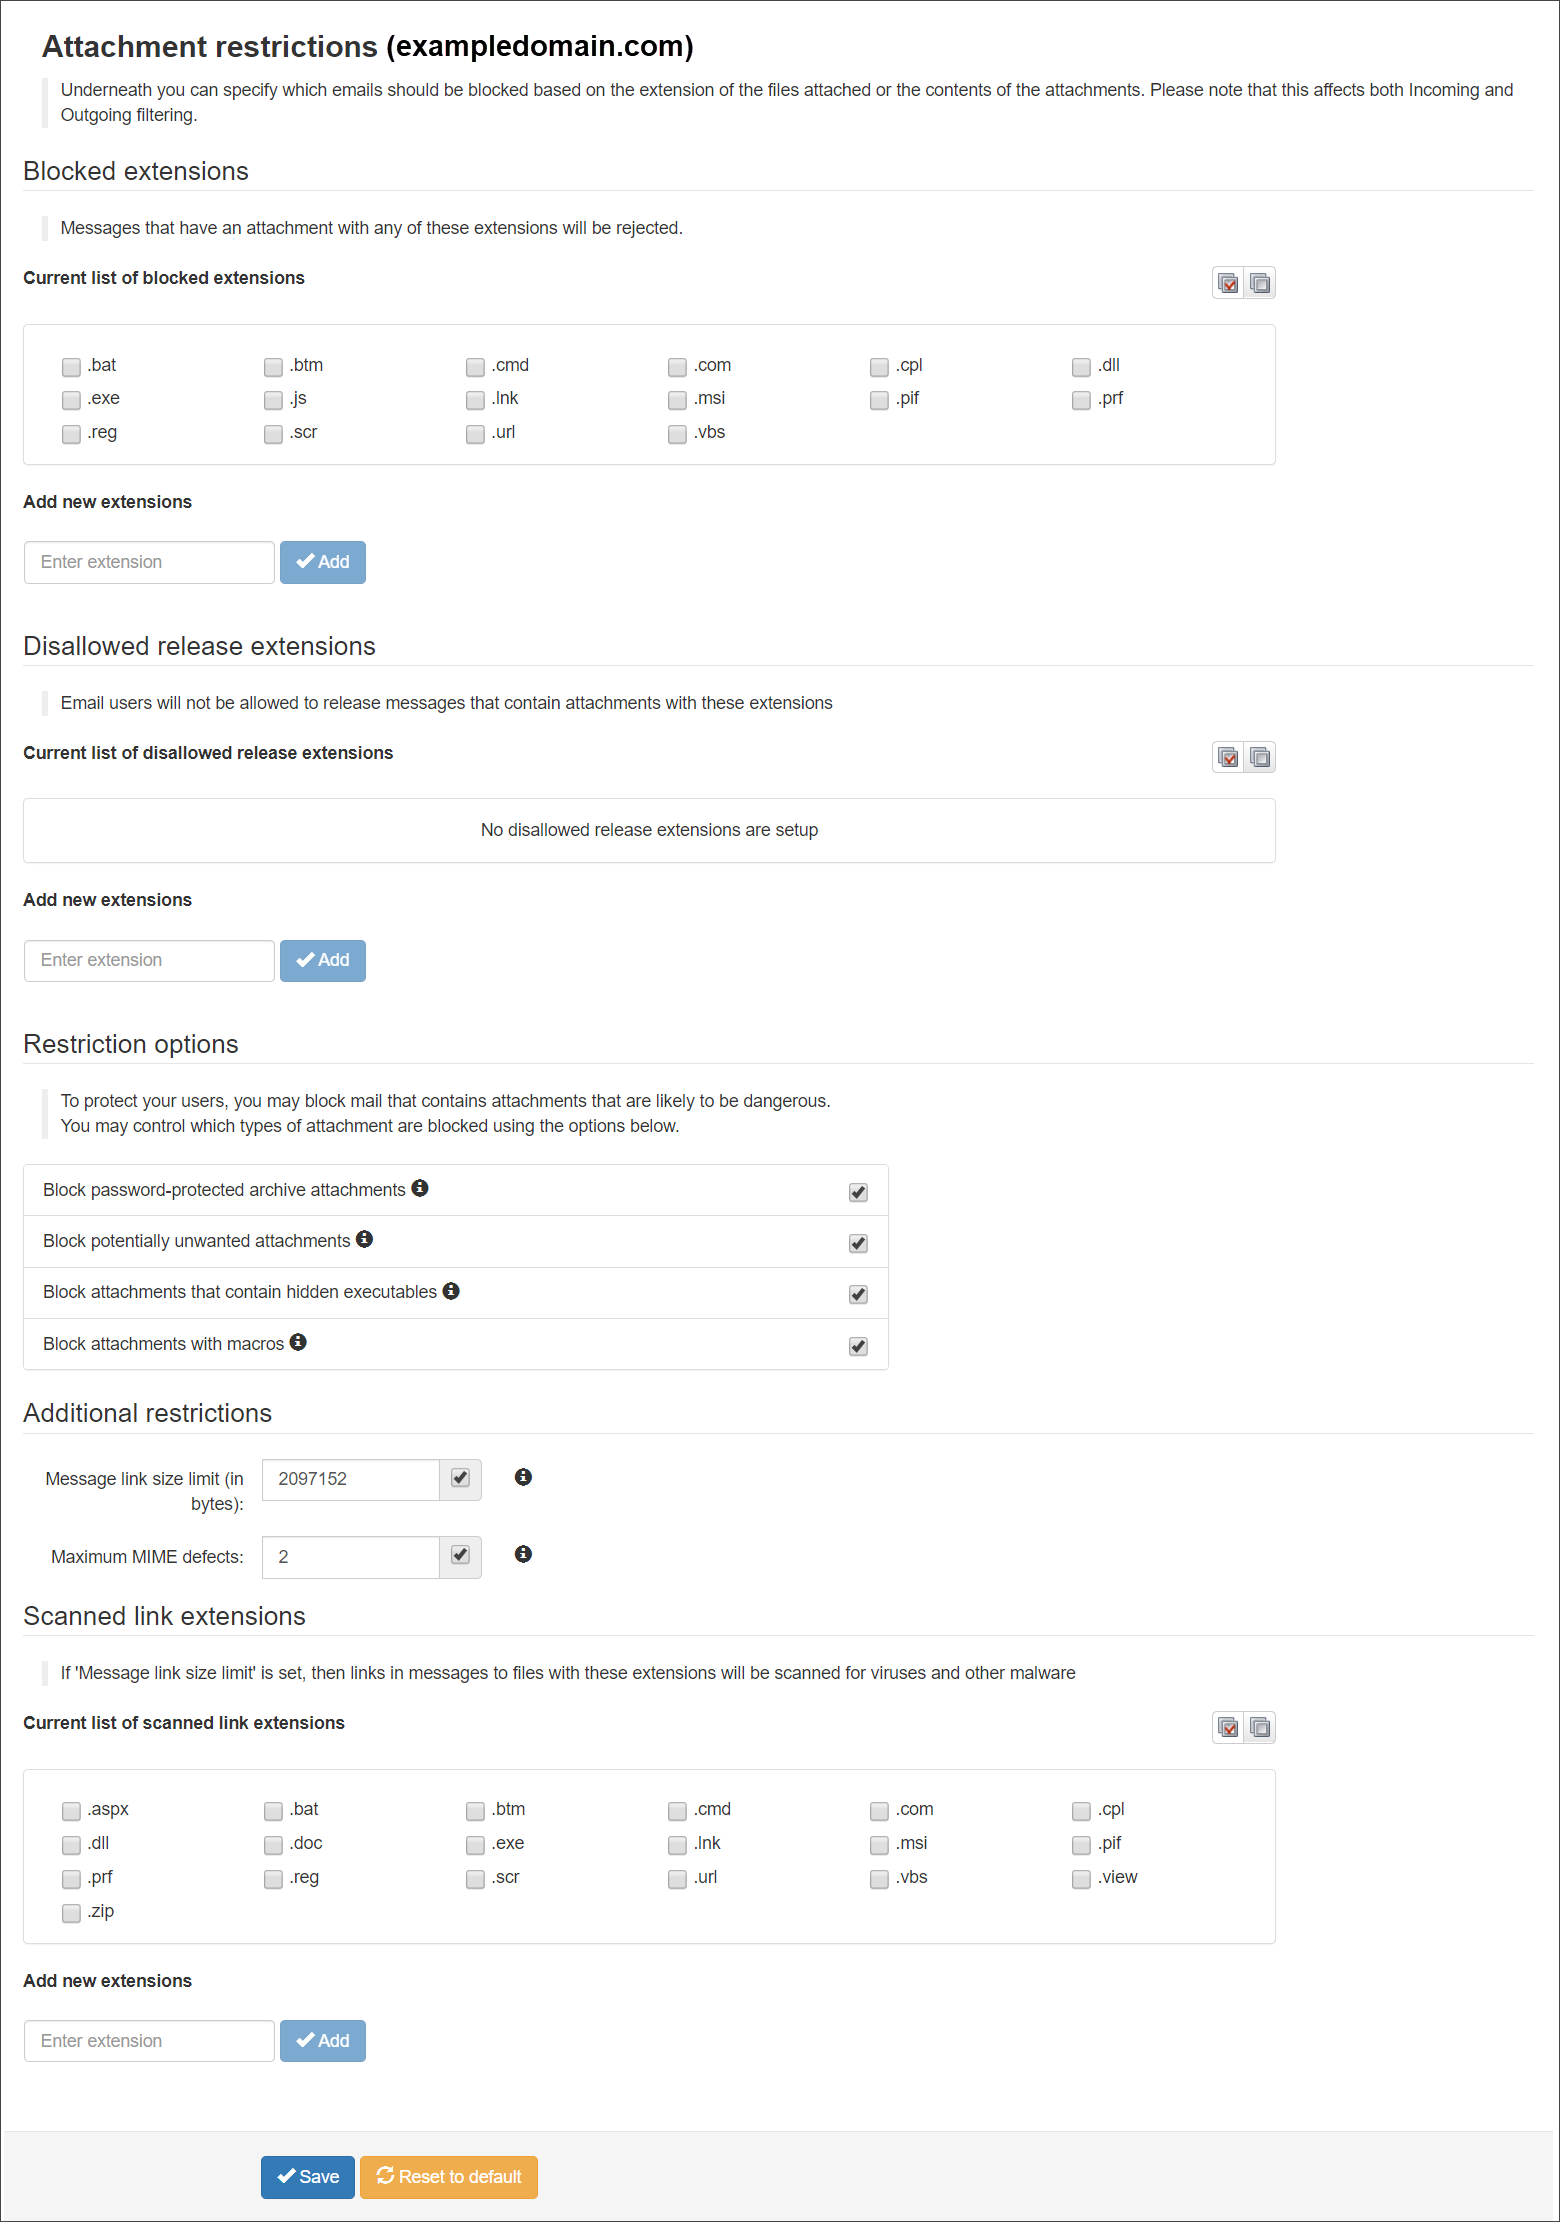
The Attachment restrictions page allows you to configure which email attachments to allow and which to block.
In the Domain Level Control Panel, select Incoming - Protection Settings > Attachment restrictions. The Attachment restrictions page is displayed:
| Restriction | Description |
| Blocked Extensions |
Messages that have an attachment with any of the selected extensions will be rejected. You can add new extensions to those listed using the Add new extension feature. |
| Disallowed release extensions |
Email users will not be allowed to release messages that contain attachments with the selected extensions. You can add extensions to this list using the Add new extension feature. |
| Restriction options |
|
| Additional restrictions |
|
| Scanned link extensions |
If the Message link size limit is set (above), then links in messages to files with the selected extensions will be scanned for viruses and other malware. You can add extensions to this list using the Add new extension feature. |
| Default (inherited) Blocked Extensions | Default (inherited) Scanned Link Extensions |
|
.ade |
.bat |
| .adp | .btm |
| .bat | .cmd |
| .btm | .cpl |
| .chm | .dll |
| .cmd | .exe |
| .com | .lnk |
| .cpl | .msi |
| .dll | .pif |
| .docm | .prf |
| .exe | .reg |
| .hta | .scr |
| .ins | .url |
| .isp | .vbs |
| .jar | |
| .js | |
| .jse | |
| .lib | |
| .lnk | |
| .mde | |
| .msc | |
| .msi | |
| .msp | |
| .mst | |
| .nsh | |
| .pif | |
| .prf | |
| .reg | |
| .scr | |
| .sct | |
| .shb | |
| .url | |
| .vb | |
| .vbe | |
| .vbs | |
| .vxd | |
| .wsc | |
| .wsf | |
| .wsh |
Block Specific Extension Types
You can also block messages based on their attachment type. You can add more attachment types to the list of default ones already set up in the system.
- In the Blocked extensions panel, tick the checkbox alongside the extension type you want to block.
- To add more extension types, use the Add new extensions field.
- Click Save.
Block Password-Protected Archives
Spammers often use the trick of sending password-encrypted archives in the hope of bypassing some filters and including the password in the body of the spam message. These messages can be blocked by enabling the Block Password Protected Attachments feature.
- In the Restriction Options panel, tick the Block password-protected archive attachments checkbox.
- Click Save.
Block Attachments Containing Hidden Executables at Domain Level
To block dangerous attachments for a specific domain only:
- In the Restriction Options panel, tick the Block attachments that contain the hidden executables checkbox.
- Click Save.
Block Attachments with Macros
This option (disabled by default) allows you to reject all incoming emails received with document-based attachments (.doc, .xls, .ppt, etc) containing macros. This can be enabled per domain by:
- In the Restriction Options panel, place a tick in the Block attachments with macros checkbox.
- Click Save.
Enable Scanned Link Extensions
This option (which is disabled by default) allows you to configure your domain(s) to allow the download of files of a specific extension type from links within an email. The system scans the files for any viruses or malware. It is usually located in the "scanreport.txt" file.
- In the Additional Restrictions panel, enter 2000000 in the Message link size limit (in bytes) field.
- In the Scanned Link Extensions panel, add the following extension types to the existing list using the Add new extensions field: zip, rar, jar, js, java, aspx, doc, docm, xls, xlsm.
- Click Save.
Email Size Restrictions
On the Email size restriction page, you can set the maximum accepted size for incoming and outgoing emails.
- In the Domain Level Control Panel, select Incoming - Protection Settings > Email size restriction:
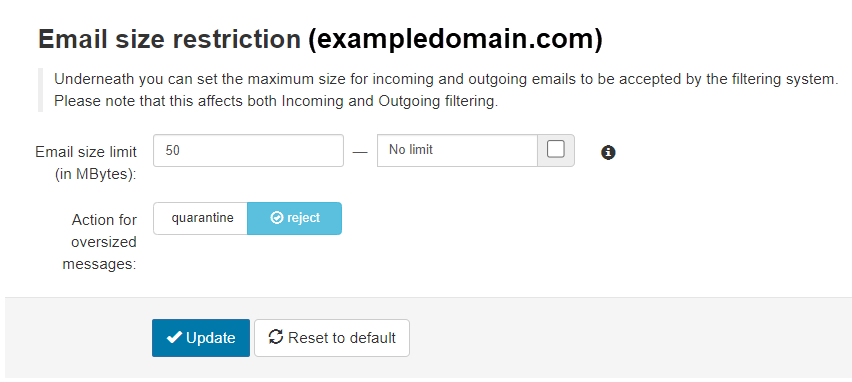
- Enter the email size limit (under 2048 MB) or select No limit if you want to use the default size limit to limit the emails.
The default size limit is 50 MB
- If you have set a limit, select the preferred Action for oversized messages - either quarantine or reject.
- Click Update to save your changes.
Incoming
The Incoming option includes:
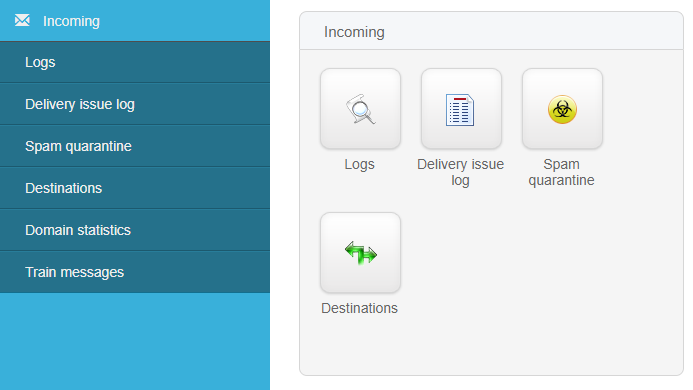
Logs
The Incoming Log Search is a comprehensive search tool that allows you to filter all incoming messages over the past 28 days. On this page, you can also access Quarantined messages, those in the Incoming Delivery Queue, and those in the Archived.
To access the Incoming Log Search, in the Admin, Domain, or Email level Control Panel, select Incoming > Logs.
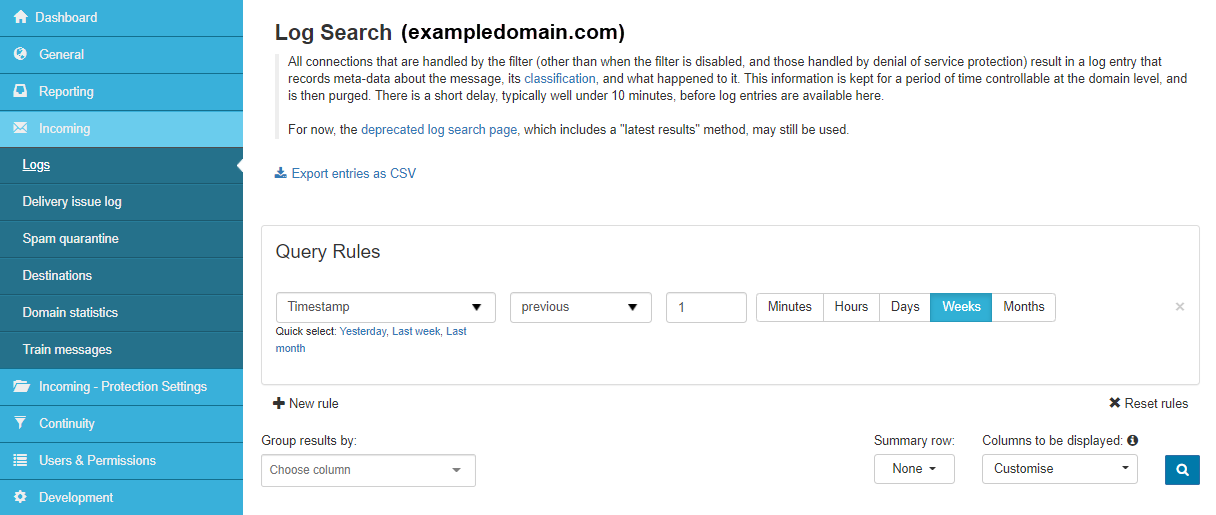
Using the Log Search, you can:
- Perform powerful filtering to find the results you need, including:
- Filtering on message size and the From, To, and CC headers
- Filtering on the outgoing IP used for delivering or attempting to deliver the message and the location of the sending server (based on the IP address) - See Run Custom Log Search.
- Perform various actions on single or multiple messages - See Actions Available on Log Search Results.
- Customize available actions on specific messages - Add Customised Action Using Log Search.
- Regenerate the index to search all archived message content - Regenerate Content Index.
- Export archived messages
- Create and email a report of your log search results (and schedule at a specified frequency)
Run Custom Log Search
In the Admin or Domain Level Control Panel, search incoming or outgoing logs by selecting Incoming > Logs.
Query Rules Panel
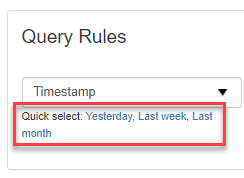
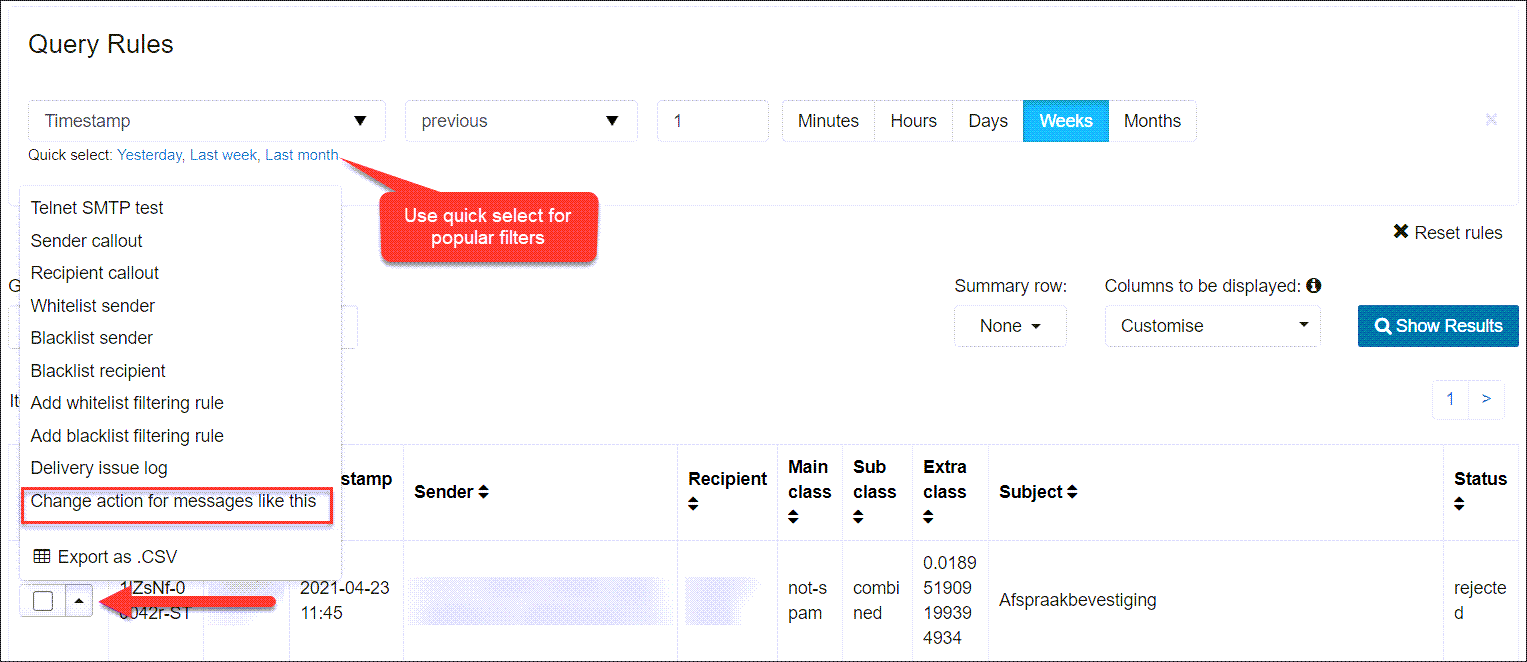
The Query Rules panel allows you to customize your search filters. The default query rule for the incoming Log Search is the Timestamp rule. Use the shortcuts beneath the Timestamp filter to quickly select results from Yesterday, the Last week, and Last month.
- Click on + New rule and select from the filter options available:
The Query Rules are constructed of three parts:
- The part of the message/metadata you are looking for - Select from the first dropdown in the Query Rules panel.
- The type of match, e.g., contains, does not start with, etc. - Select from the second dropdown in the Query Rules panel.
- The content you are trying to match.
The Status of a message tells you what stage the message has reached in the filtering process, e.g., rejected, queued for delivery, quarantined, etc. To search for messages with a specific status, use the Status rule and tick the checkboxes of the statuses you wish to include.

- If you wish, you can use the Quick select shortcuts provided, e.g., Accepted; Not accepted.
Quick-select options differ depending on the query rule selected, so check the options below the rule to see what is available at that time.
- Once you have added the rules, use the Customise dropdown to select the fields you want to be displayed in the search results.
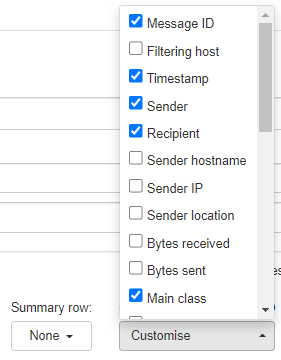
There are many options available, with the most popular choices outside of the defaults being:
- Main Class - How the message was classified determines what happens to the message (e.g., temporarily or permanently rejected, for example, spam).
- Sub Class - Why the message was given to the Main Class that it was given. For example, if the message was classed as spam, the Sub Class may be DNSBL (DNS Blacklisted).
- Delivery Data - Shows the destination mail server's most recent response to the filtering server's attempt to deliver. For example, if a message is accepted by the filter but can't be found in the recipient's Inbox, this field will show if the message was delivered to the destination mail server or not. To see all delivery attempts that have been made for a message, see the Delivery Issue Log page.
- Status - Shows the current status of the message. For example, Delivered, Rejected, Quarantined, Queued, etc. Note that Rejected includes both temporary rejections (where the sender will most likely automatically retry delivery later) and permanent rejections (where the sender will not automatically retry).
- You may also choose to display a summary row at the bottom of the table.
There are three options available for this: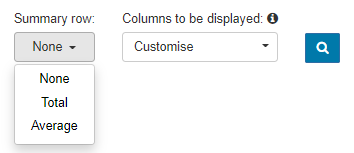
- None - This will disable the summary row, so nothing will be displayed.
- Total - This will display a row at the bottom of the table that will calculate the total of any columns containing number values, such as Bytes Sent and Bytes Received.
- Average - this will display a row at the bottom of the table, which will calculate the average of any columns containing number values, such as Bytes Sent and Bytes Received.
- Use the Group results by: dropdown and select from the list if you want to group the results by category. For example, to group the results by sender, select Sender.
- Once you have specified your filters, click on Show Results to run the search and display the results at the bottom of the page.
Actions Available on Log Search Results
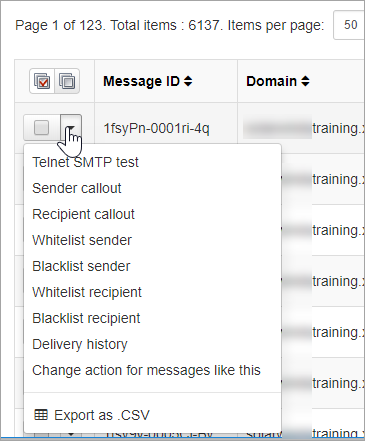
In the Search Results listed, you can carry out a variety of actions. These differ depending on the status of the message, but include, but are not limited to:
- Telnet SMTP test
- Sender callout
- Recipient callout
- Whitelist Sender
- Blacklist Sender
- Whitelist Recipient
- Blacklist Recipient
- Add Whitelist/Blacklist filtering rule.
- View Delivery History
- Change action for specific messages - See Add Customised Action Using Log Search.
- Export Log Search Results - Download the report in Excel CSV format - using the Export button.
- Remove from quarantine
- Release from quarantine
- Release and train from quarantine
- Download the quarantined message
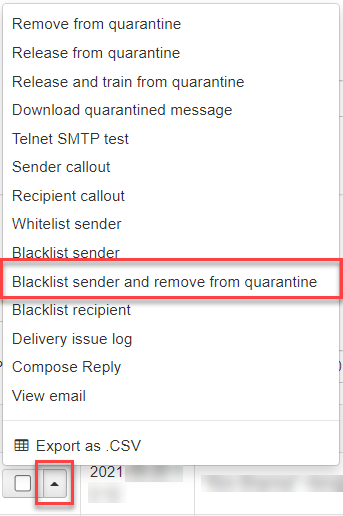
- Blacklist the sender and remove from quarantine
- Compose reply
- View email
Regenerate Content Index
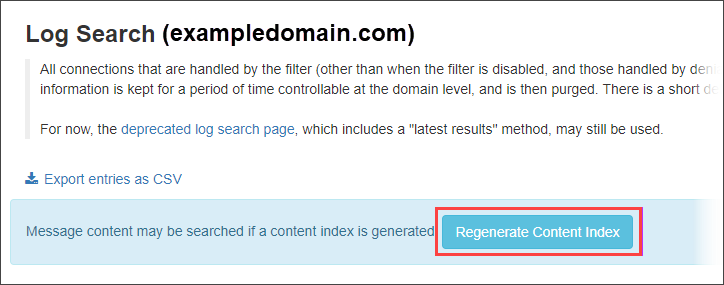
If you want to be able to search all archived message content in your domain, click on the Regenerate Content Index button at the top of the Domain Level Log Search page.
Add Customised Action Using Log Search
- Once you have run your log search and the search results are listed, select the dropdown to the left of the message and select Change action for messages like this.
- The Add a new custom action for emails dialog is displayed with the fields pre-populated according to the message.
- Click Save.
The new custom action is listed on the Customise actions page, accessible from the Admin and Domain Level Control Panels.
You can now use the dropdown to the left of the new action and select Find similar messages to redirect you to the Log Search, where the query based on your rule is automatically run, and matching results are listed. Alternatively, you can set up custom actions manually on the Customise Actions page. However, using the log search, as described here, is quicker, easier, and more versatile.
Delivery Issue Log
Diagnose message delivery problems for incoming and outgoing mail over the previous 28 days.
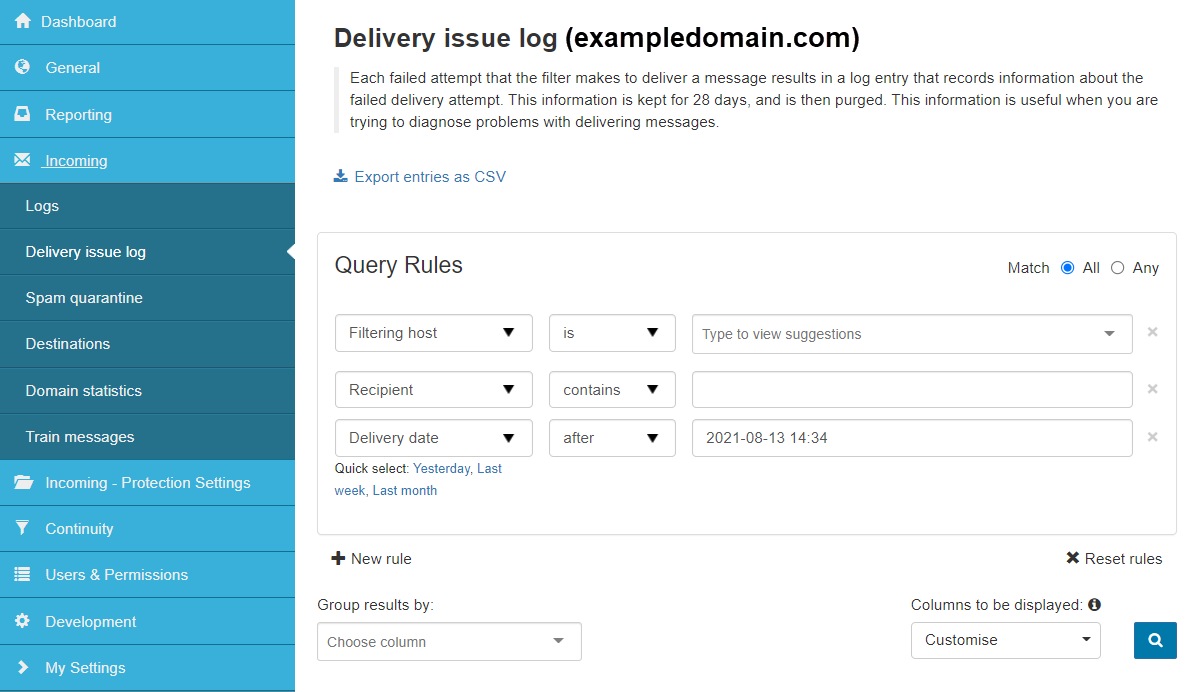
Each attempt the filtering server makes to deliver a message results in creating a log entry detailing that message delivery attempt. The Log Search results already reveal the destination mail server's most recent delivery attempt (by selecting a Delivery date from the Customise dropdown). However, the new Delivery Issue Log reveals all delivery attempts over the previous four weeks.
The following actions are available from the dropdown to the left of each individual message:
- In the Admin, Domain, or Email Level Control Panel, select Incoming > Delivery Issue Log.
- The Query rules panel already displays the Delivery date filter - you can change this if necessary.
- You can also filter further by adding more rules - click on + New rule to do this.
- Click Show Results to list all matching messages.
- Show details - Opens the Log Search result for that message ID and recipient.
- Retry delivery - Forces the email to retry delivery.
- Telnet test - Redirects you to the Network Tools page to run a Telnet test.
- Recipient callout - Redirects you to the Network Tools page to run a Recipient Callout.
- Ping destination - Redirects you to the Network Tools page to ping the destination mail server.
- Trace route to destination - Redirects you to the Network Tools page to run a Traceroute.
- Export entries as .CSV - Save the entry locally in CSV format.
Generally, emails are delivered directly to the destination server. However, if the delivery attempt to the destination server returns a temporary failure, all email messages sent to known, valid recipients are queued locally on the filtering servers for delivery retry, and you can see them under the Delivery Issue Log.
Emails that the destination server has permanently rejected with a 5xx error code will not be queued and will be rejected by the system. They can also be seen here, indicating the probable reason; this information is useful when diagnosing problems with delivering messages.
Spam Quarantine
View incoming mail that has been blocked and quarantined and take action where necessary. The incoming spam quarantine holds incoming messages that the filtering system rejects with a 5xx SMTP rejection code at the SMTP level. Legitimate sending servers inform the sender about the rejection.
By default, the quarantined spam is stored for 14 days. Spam messages temporarily rejected at the SMTP level are not listed in the quarantine. They will be automatically retried by legitimate sending servers.
What do you want to do?
- Enable the Quarantine
- Access the Quarantine
- View Domain Level Incoming Spam Quarantine
- View Email Level Spam Quarantine
- Classifications
- IMAP Access
- IMAP folders
- Manage Quarantine Filter Settings
- View Quarantined Message Content
- Release Quarantined Messages
- Release and Train Quarantined Messages
- Release and Whitelist Quarantined Messages
- Remove Messages from Quarantine
- Remove and Blacklist Quarantined Messages
Enable the Quarantine
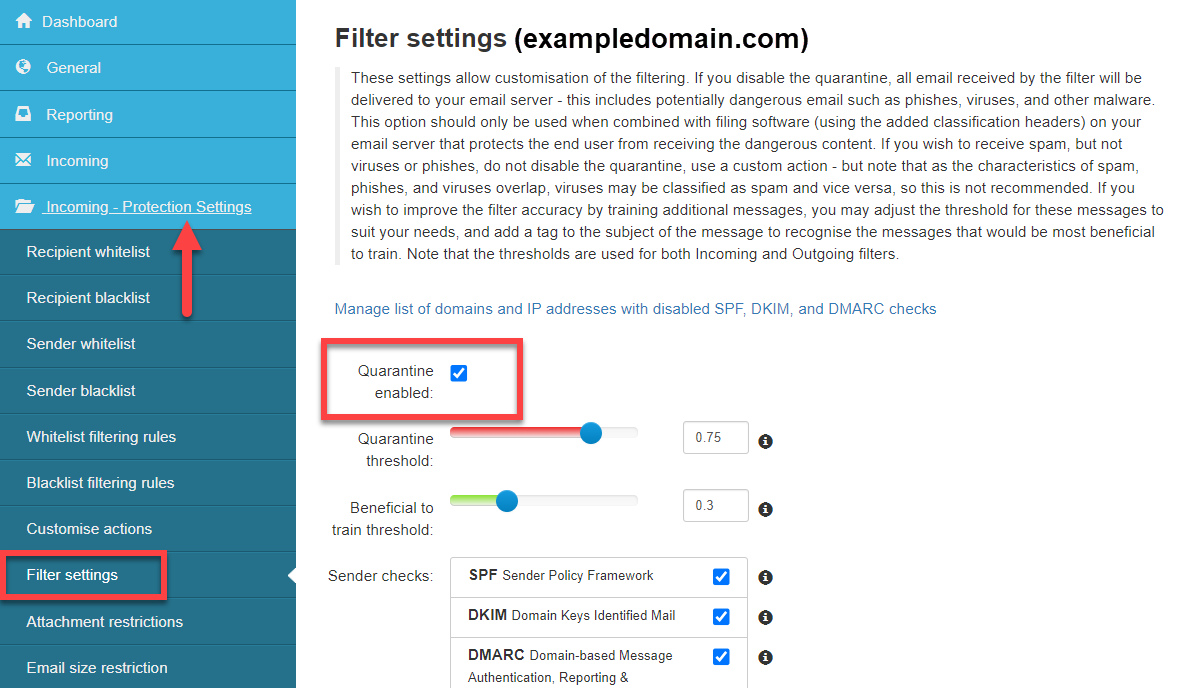
Enabling the quarantine is optional, but you must enable it for it to start rejecting messages and for you to view those messages:
In the Domain Level Control Panel, select Incoming - Protection Settings > Filter Settings and ensure the Quarantine enabled box is ticked:
Access the Quarantine
You can access the Quarantine from the Domain Level and Email Level Control Panels.
View Domain Level Incoming Spam Quarantine
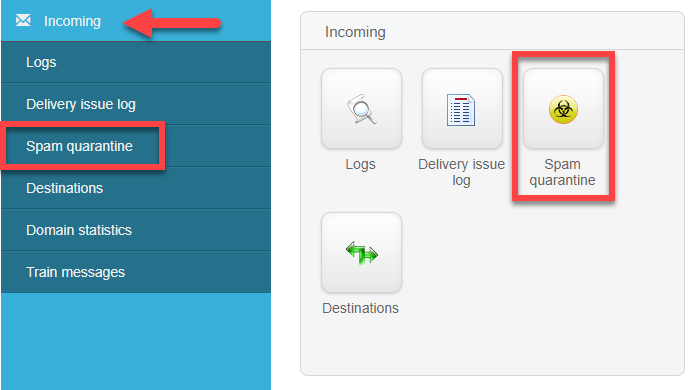
In the Domain Level Control Panel, select Incoming > Spam Quarantine:
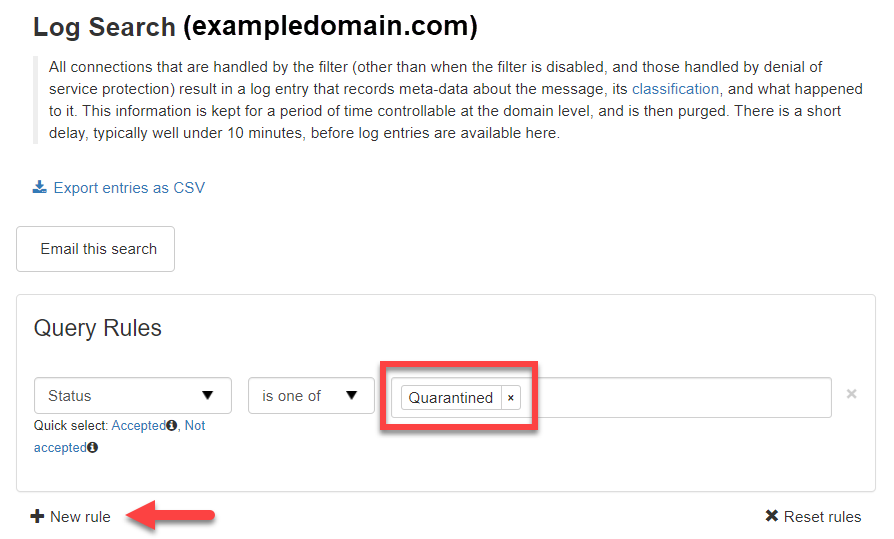
On this page, you can:
- Search for a quarantined message - Use the Query rules panel - and remove all rules to see unfiltered results.
- Preview quarantined message content - Click on the message link in the Subject column. See View Quarantined Message Content.
- Release quarantined messages - Allow messages to be delivered to the recipient. See Release Quarantined Messages.
- Release and train messages - Submit quarantined message(s) to be delivered, and for training as not spam. See Release and Train Quarantined Messages.
- Release and Whitelist messages - Allow messages to be delivered and Whitelist the sender. See Release and Whitelist Quarantined Messages.
- Remove messages - See Remove Messages from Quarantine.
- Blacklist sender and remove from quarantine - Remove the message and Blacklist the sender. See Remove and Blacklist Quarantined Messages.
View Email Level Spam Quarantine
Access the Spam quarantine to view incoming messages that have been blocked as spam. Select Incoming > Spam quarantine.
The Spam quarantine page is displayed, listing all messages that have been quarantined. On this page, you can:
- Search for a quarantined message - Use the Search fields at the top of the page.
- Preview quarantined message content - Click on the message link in the Subject column. See View Quarantined Message Content.
- Release quarantined messages - Allow messages to be delivered to the recipient. See Release Quarantined Messages.
- Release and train messages - Submit quarantined message(s) to be delivered and for training as not spam. See Release and Train Quarantined Messages.
- Remove messages - See Remove Messages from Quarantine.
Classifications
A list of Message Classifications can be found by clicking on Classifications in the description at the top of the Log Search page.
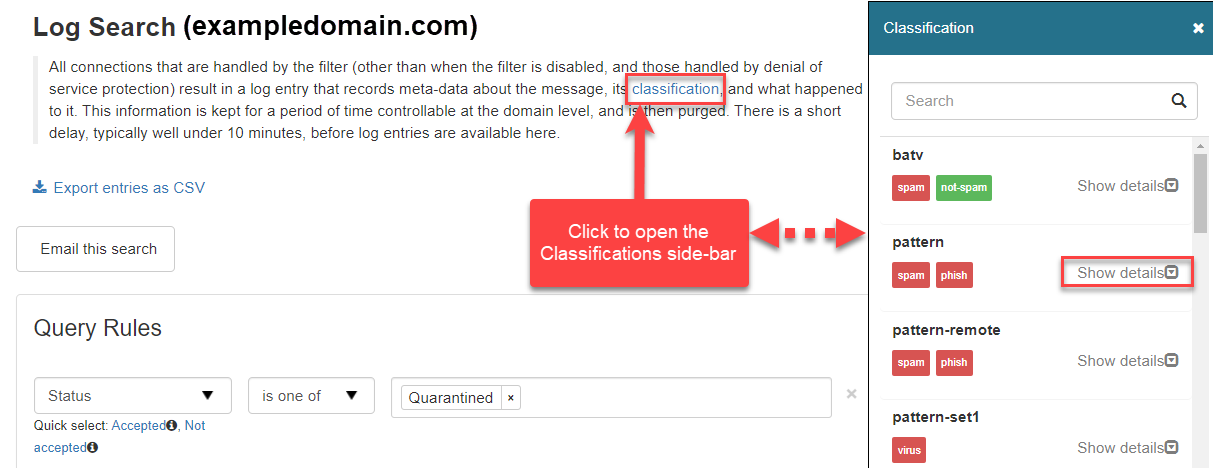
Classifications relate to the message Sub Classes that can be found by adding the Sub Class and Extra Class columns to the view using the Columns to be displayed dropdown.
More information on what classifications mean and how these can be dealt with can be found here:
Message Classifications**
IMAP Access
The quarantine system is powered by an IMAP backend. The backend is accessible as a super-administrator (using the special "global" account), domain (using the domain name), and recipient (using the email address). Customers using the SpamExperts hosted cloud can connect to quarantine.antispamcloud.com.
Users on a SpamExperts Local Cloud can use the hostname of the primary server in that cluster (or a CNAME associated with it). We have instructions available for Outlook. Using IMAP, you can also apply mass actions to specific emails by dragging them to specific folders.
For Local Cloud users, a special "global" account can be used to retrieve IMAP access to all quarantined messages. This is for super administrators only.
IMAP folders
There are several special folders in the IMAP account:
- Caught: All incoming messages that have been quarantined can be found in this folder. It's unnecessary to report these emails as spam again, as they have already been classified. These emails will automatically expire.
- Caught (Outgoing): All outgoing messages that have been quarantined can be found in this folder (optional). It's unnecessary to report these emails as spam again, as they have already been classified. These emails will automatically expire.
- Training Requested: This is only relevant if a special option has been activated via the Software API to store a copy of unsure classifications in this folder. These messages have been delivered but can be manually dragged/dropped to "Not Spam" or "Spam" to fine-tune the systems further. Please contact support if you would like more information on this one.
- Release & Train: This is a write-only folder (which cannot be accessed by the email client). Emails dragged/dropped from "Caught" to this folder will be delivered to the recipient and reported as a classification mistake to our central systems.
- Release: This is a write-only folder (which cannot be accessed by the email client). Emails dragged/dropped from "Caught" to this folder will be delivered to the recipient only.
- Not Spam: This is a write-only folder (which cannot be accessed by the email client). Emails dragged/dropped from "Caught" or "Training Requested" to this folder will be reported as a classification mistake to our central systems (it will not be delivered to the recipient)
- Spam: This is a write-only folder (which cannot be accessed by the email client). Emails dragged/dropped to this folder will be reported as spam to our central systems (it will not be delivered to the recipient). This is useful to report spam that was not blocked correctly, directly from the email client.
Manage Quarantine Filter Settings
On this page, you can enable/disable your quarantine and manage your quarantine filter settings for incoming emails.
In the Domain Level Control Panel, select Incoming - Protection Settings > Filter settings.
The Filter settings page for your domain is displayed:
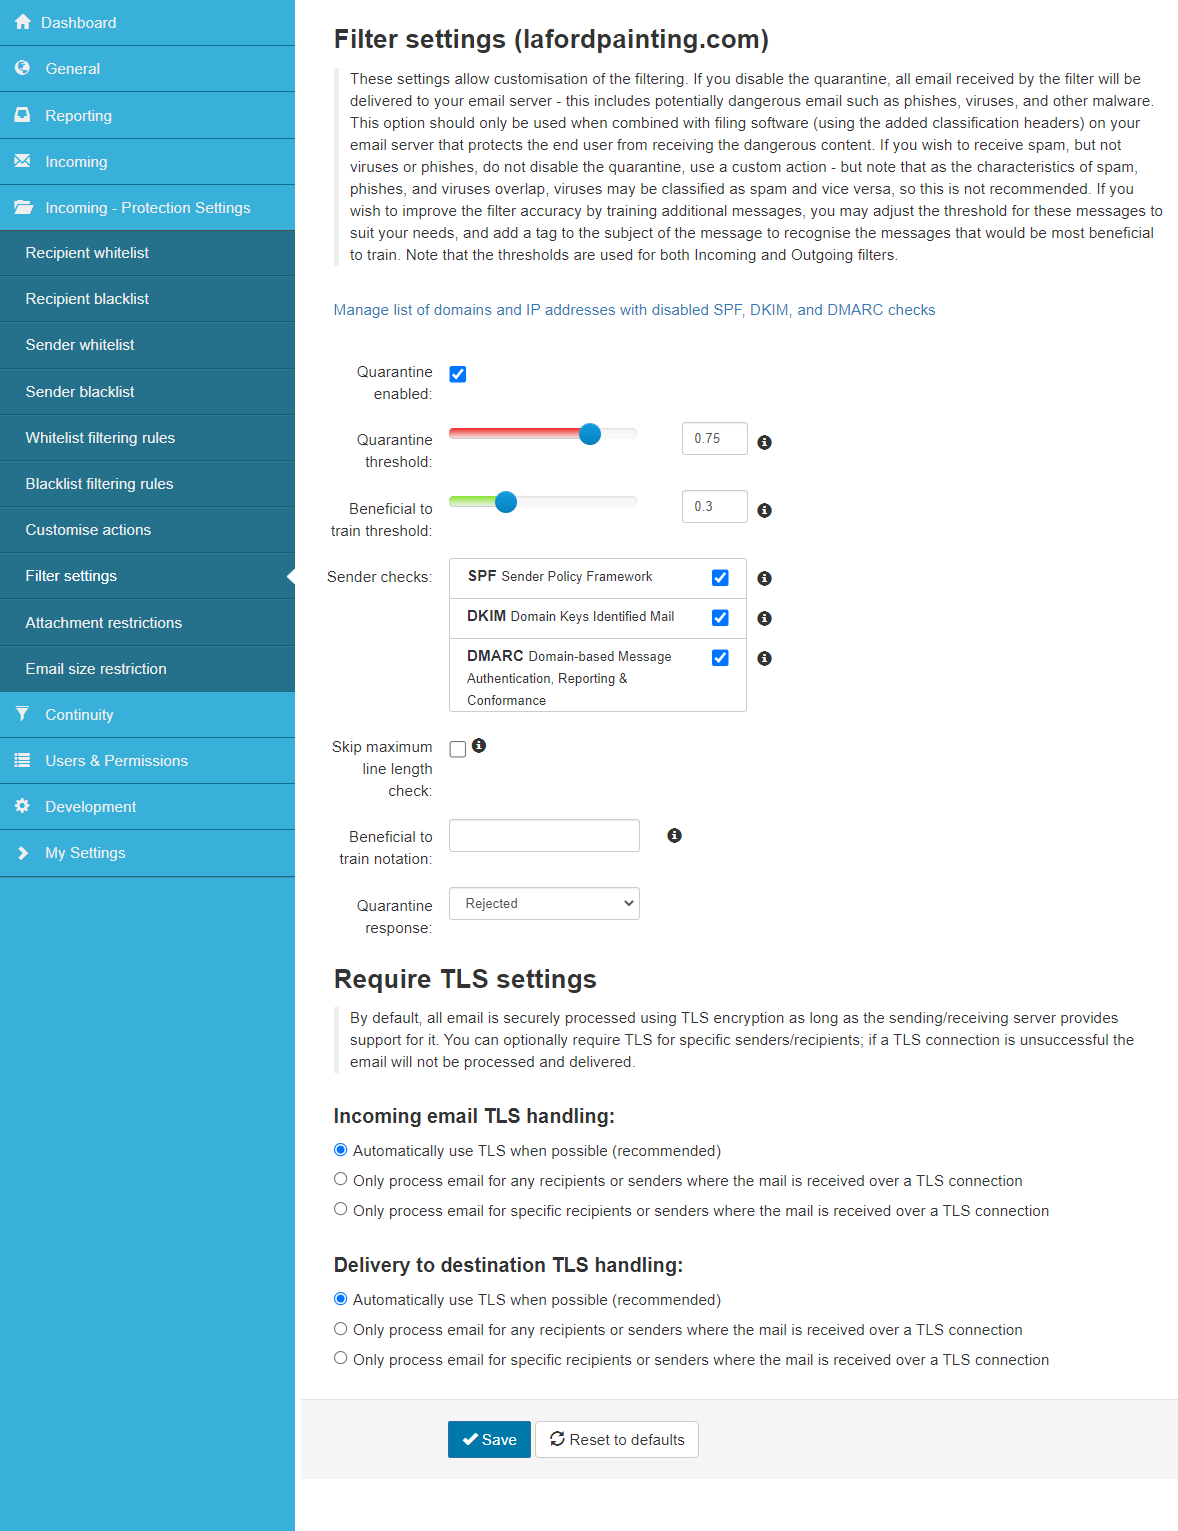
The following settings are available:
| Setting | Description | |
| Manage a list of domains and IP addresses with disabled SPF, DKIM, and DMARC checks | This link opens a page that allows you to disable SPF, DKIM, and DMARC checks for specific domains, IPs, or subnets - so that if, for example, an SPF check fails for any of the specified domains or sender IPs, the system will continue to process the message. | |
| Quarantine enabled |
Enables/disables the quarantine. Important: If you choose to disable your quarantine, all emails detected as spam will be delivered to your email server unfiltered. |
|
| Quarantine threshold |
Messages in SpamExperts that have a combined score above this setting will be classified as spam and handled as spam. If this quarantine threshold setting is lowered from the default (recommended) value, more messages will be seen as spam. If this setting is increased towards 1.0, fewer messages will be handled as spam. So, the potential for spam to be delivered is much higher. We do not recommend making any changes to this setting. Any changes should be small, either increasing the aggressiveness of the filter by setting a lower numeric value closer to 0.0 or lowering the aggressiveness by setting a value closer to 1.0. |
|
| Beneficial to train threshold | Messages in SpamExperts with a combined score between the Beneficial to train threshold and the Quarantine threshold will be considered unsure by the filter. A Beneficial train notation is available to prepend the subject line of messages receiving this classification (as a warning that this message scored above the threshold, which is considered good mail or "Ham"). This setting is used to tag messages with a specific notation, considered suspicious to the filter but not suspicious enough to be treated as spam. All messages with a score below this threshold will be delivered. | |
| Sender checks |
SPF (Sender Policy Framework) - This is a common check that allows the sender to indicate which IPs are allowed to deliver email for the sender's domain. We advise keeping this enabled to block spam. DKIM (DomainKeys Identified Mail) - lets an organization take responsibility for a message that is in transit. The organization is a handler of the messages, either as its originator or as an intermediary. Their reputation is the basis for evaluating whether to trust the message for further handling, such as delivery. DMARC (Domain-based Message Authentication, Reporting & Conformance) - An email authentication protocol that builds on SPF and DKIM by adding a reporting function that allows senders and receivers to improve and monitor the protection of the domain from fraudulent email. |
|
| Skip maximum line length check | There are strict regulations on allowed line length in emails, which are automatically enforced by the email software. Some applications or poorly developed scripts do not adhere to the official specifications, exceeding the maximum allowed line length. This check can be disabled by ticking this box, but we advise enabling it to block spam. | |
| Beneficial to train notation | Text added here is prepended to the subject line of all messages classed as unsure. | |
| Quarantine response | When an incoming message is detected as spam and quarantined, the response you send to the Sender can be Rejected or Accepted.
The default and advised setting for incoming mail is 'Rejected'.
|
|
| Require TLS Settings | By default, all emails are securely processed using TLS encryption as long as the sending/receiving server supports it.
Using these settings, you can specify that TLS is compulsory for specific senders/recipients; if a TLS connection is unsuccessful, the email will not be processed and delivered. |
|
View Quarantined Message Content
- From the Domain Level or Email Level Control panel, select Incoming > Spam quarantine.
- Locate the message you want to view - you can use the search facility to help you do this quickly.
- Click on the link in the Subject column of the message.
The subject is only clickable for messages still in quarantine. If a message is not in the quarantine, the subject will not be available to open.
- The Mail preview page is displayed.
- The Normal tab shows the message details and content in HTML format.
- The Plain tab shows the message details and content in plain text.
- The Raw tab shows the raw message data.
- To quickly see why the message has been quarantined, open the Raw tab and look for the X-MailAssure-Class and X-MailAssure-Evidence lines. In the example below, the message has been rejected because it has been classified as phishing by the DMARC. Check:
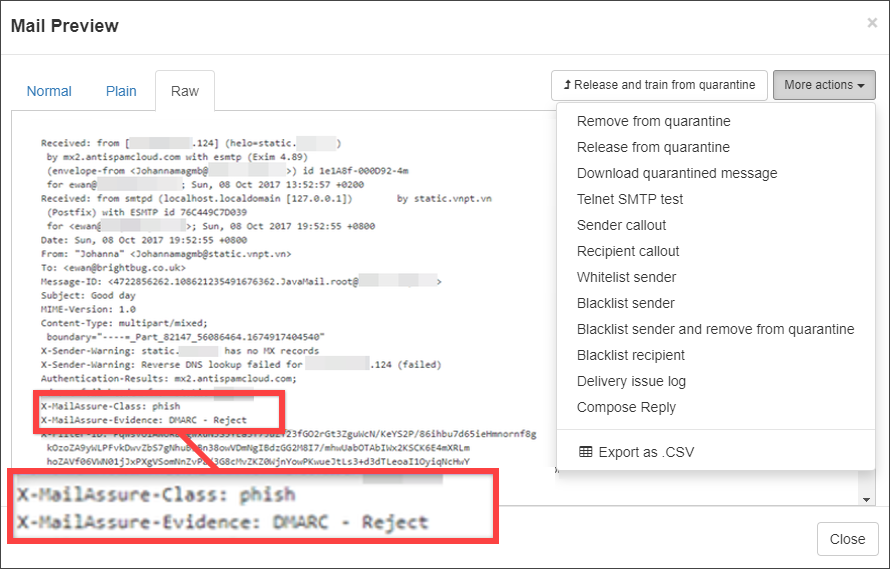
On this page, you can also perform the following actions on the message:
- Release - Release from quarantine and deliver the message.
Releasing a message from quarantine may also result in it being reported as a classification mistake to correct our systems - this is dependent on the classification type. For example, a rejected phishing attempt, when released, will report a classification mistake and correct the system. Conversely, releasing a message that has been quarantined because the date header is more than 7 days in the past or in the future will only deliver the message to the recipient. For more information on the classifications used to describe why a message is rejected or temporarily rejected, see Message Classifications.
Releasing a message from quarantine may also result in it being reported as a classification mistake to correct our systems - this depends on the classification type. For example, when released, a rejected phishing attempt will report a classification mistake and correct the system; conversely, releasing a message that has been quarantined because the date header is more than 7 days in the past or the future will only deliver the message to the recipient. For more information on the classifications that describe why a message is rejected or temporarily rejected, see Message Classifications.
From the More actions dropdown, you can choose to:
- Remove from quarantine
- Release from quarantine
- Download the quarantined message
- Telnet SMTP test
- Sender callout
- Recipient callout
- Whitelist sender
- Blacklist sender
- Blacklist the sender and remove from quarantine
- Blacklist recipient
- Delivery issue log
- Compose Reply
- Export as .CSV
Release Quarantined Messages
- Select Incoming > Spam quarantine.
- Click on the dropdown to the left of the message and select Release from Quarantine.
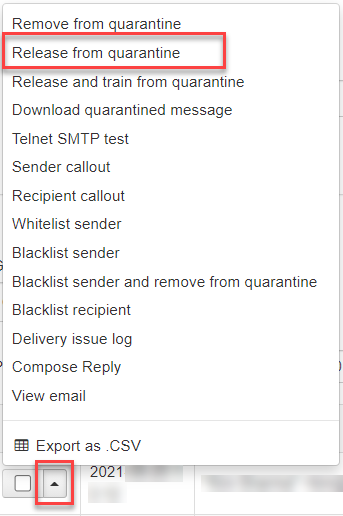
- If you want to release multiple messages, place a tick in the box to the left of each message and, from the --select action-- dropdown at the bottom of the page, select Release from Quarantine and click Apply.
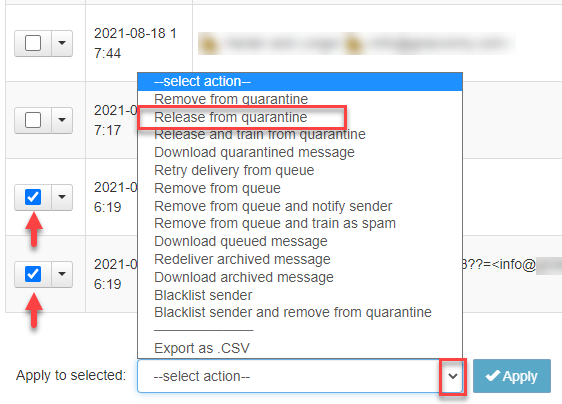
The message(s) will be released from quarantine and delivered to the intended recipient(s).
Release and Train Quarantined Messages
When logged into the dashboard as an administrator, you can submit quarantined message(s) for delivery, and for training as not spam, and report the message as a false positive. These options are accessible from the Domain and Email Level Control Panels.
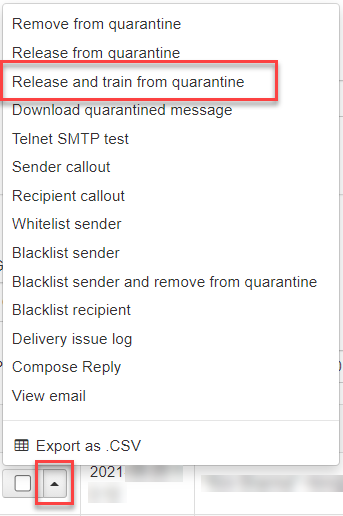
You can release and train a single message by using the dropdown to the left of the message and selecting Release and train from quarantine.
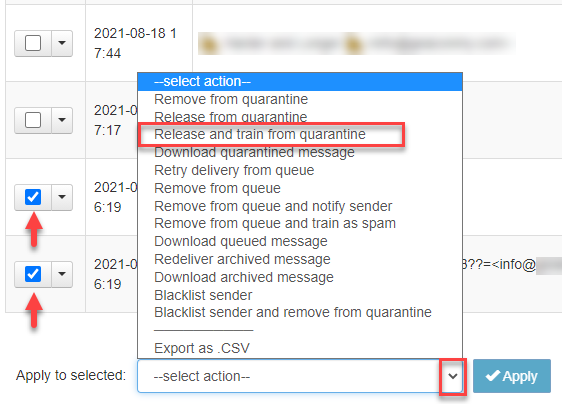
To release and train multiple messages, place a tick in the box to the left of all messages that apply, and from the dropdown at the bottom of the page select Release and train from quarantine - then click Apply.
Release and Whitelist Quarantined Messages
This facility is only available at the Domain Level.
- Select Incoming > Spam quarantine.
- From the dropdown alongside the message, select Release and Whitelist.
- To Release and Whitelist multiple messages at once, place a tick in the box alongside each message, and from the --select action-- dropdown at the bottom of the page, select Release and Whitelist.
- All selected messages will be delivered to the intended recipient(s), and the sender will be added to the acceptance list so that future messages from this sender will bypass filtering and be delivered automatically.
Remove Messages from Quarantine
Removing a message from the quarantine is the same as moving the message to your bin. This is the equivalent of saying you do not wish to see the message or its content, but also that you do not need to take any other action against the sender, such as Blacklisting.
The message(s) will be removed from the system completely.
- Select Incoming > Spam quarantine.
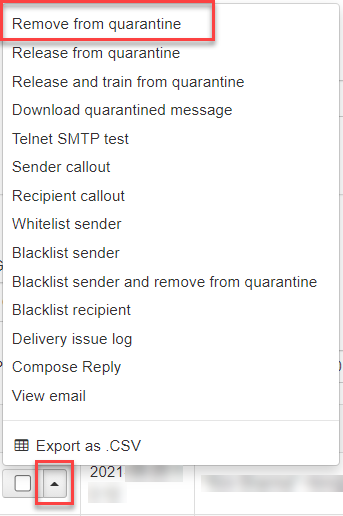
- To remove a single message, select Remove from the dropdown to the left of the message.
- To remove multiple messages, place a tick in the box alongside each message you want to remove. Select Remove from the --select action-- dropdown at the bottom of the page - and click Apply.
Remove and Blacklist Quarantined Messages
This facility is only available from the Domain Level Spam Quarantine.
- From the Domain Level Control Panel, select Incoming > Spam quarantine. The Spam quarantine page is displayed, showing all quarantined messages for this domain.
- Click on the dropdown to the left of the message and select Blacklist sender and remove from quarantine.
- To Blacklist and remove multiple messages, tick the box alongside each message. From the --select action-- dropdown at the bottom of the page, select Blacklist sender and remove from quarantine.

- The message(s) will be removed from the system completely, and the sender will be blocked so that future messages from this sender will be rejected.
Destinations
Add and check your destination mail server route(s). After incoming messages are processed, they are delivered to the destinations configured here - typically the recipient's final mail server. Delivery is attempted to each destination, from the lowest priority to the highest (as with MX records). Destinations with identical property values are attempted randomly and do NOT have deliveries spread across them.
The Destination Routes you set up when adding a domain are listed here automatically, but you can also add any manually. On this page, you can:
- Add, edit, and delete destinations.
- Perform a connection check.
- Perform a catch-all check - Discover whether the destination mail server is a 'catch-all' for a specified domain (accepting mail for any address at that domain)
- Check Routes for Open Relays
- Carry out a Telnet test for a route by clicking on the checkbox alongside the route.
To access this page, go to Incoming > Destinations in the Domain Level Control Panel.
Add Destination
In the Admin or Domain Level Control Panel, select Incoming > Destinations. All existing destination servers are listed.
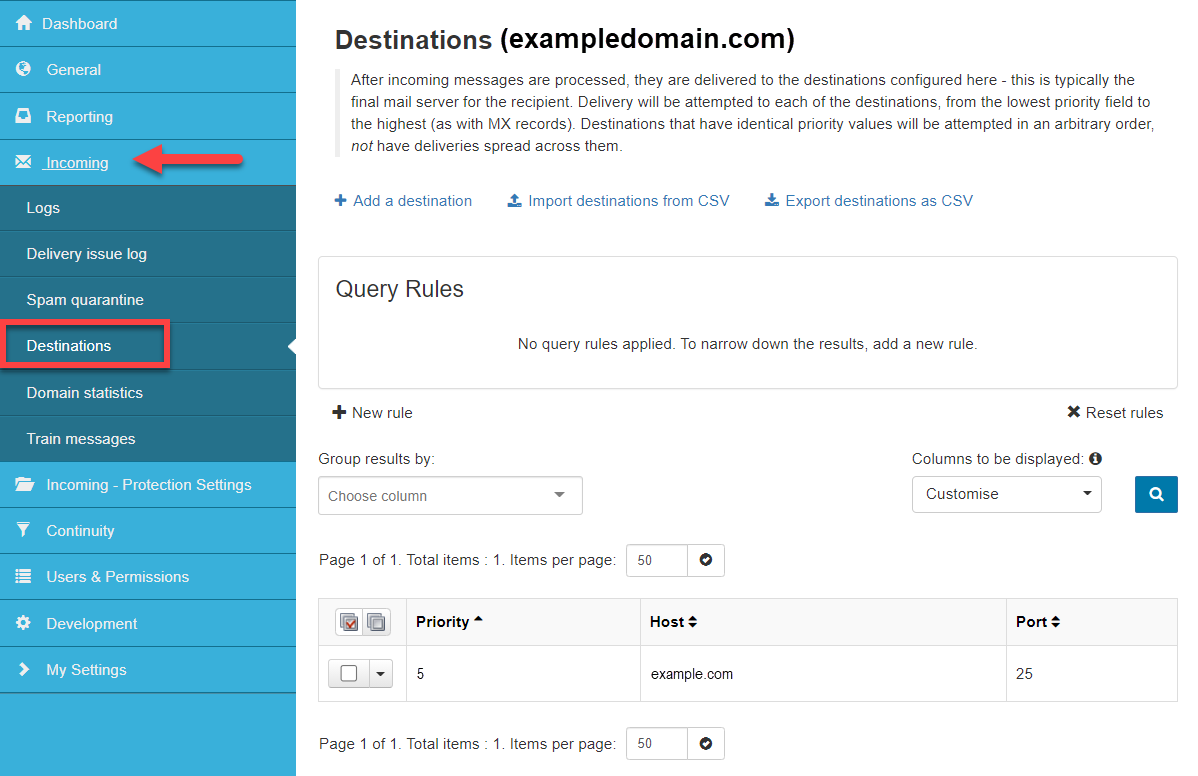
- Click on + Add a destination at the top of the page.
- In the Add a destination dialog, enter:
- Priority - delivery is attempted from lowest priority to highest
- Host - destination server address
- Port - destination port
- Click Save.
Perform Network Checks on Destination Server
You can perform a Connection check, Catch all check, or Open relay check on a destination server.
- In the Admin or Domain Level Control Panel, select Incoming > Destinations.
- In the list of destinations displayed, locate the destination to check.
- Click on the dropdown to the left of the destination and select from the following:
- Connection check
- Catch all check
- Open relay check
The SMTP tab in the Network Tools page is displayed while the check is running.
Domain Statistics
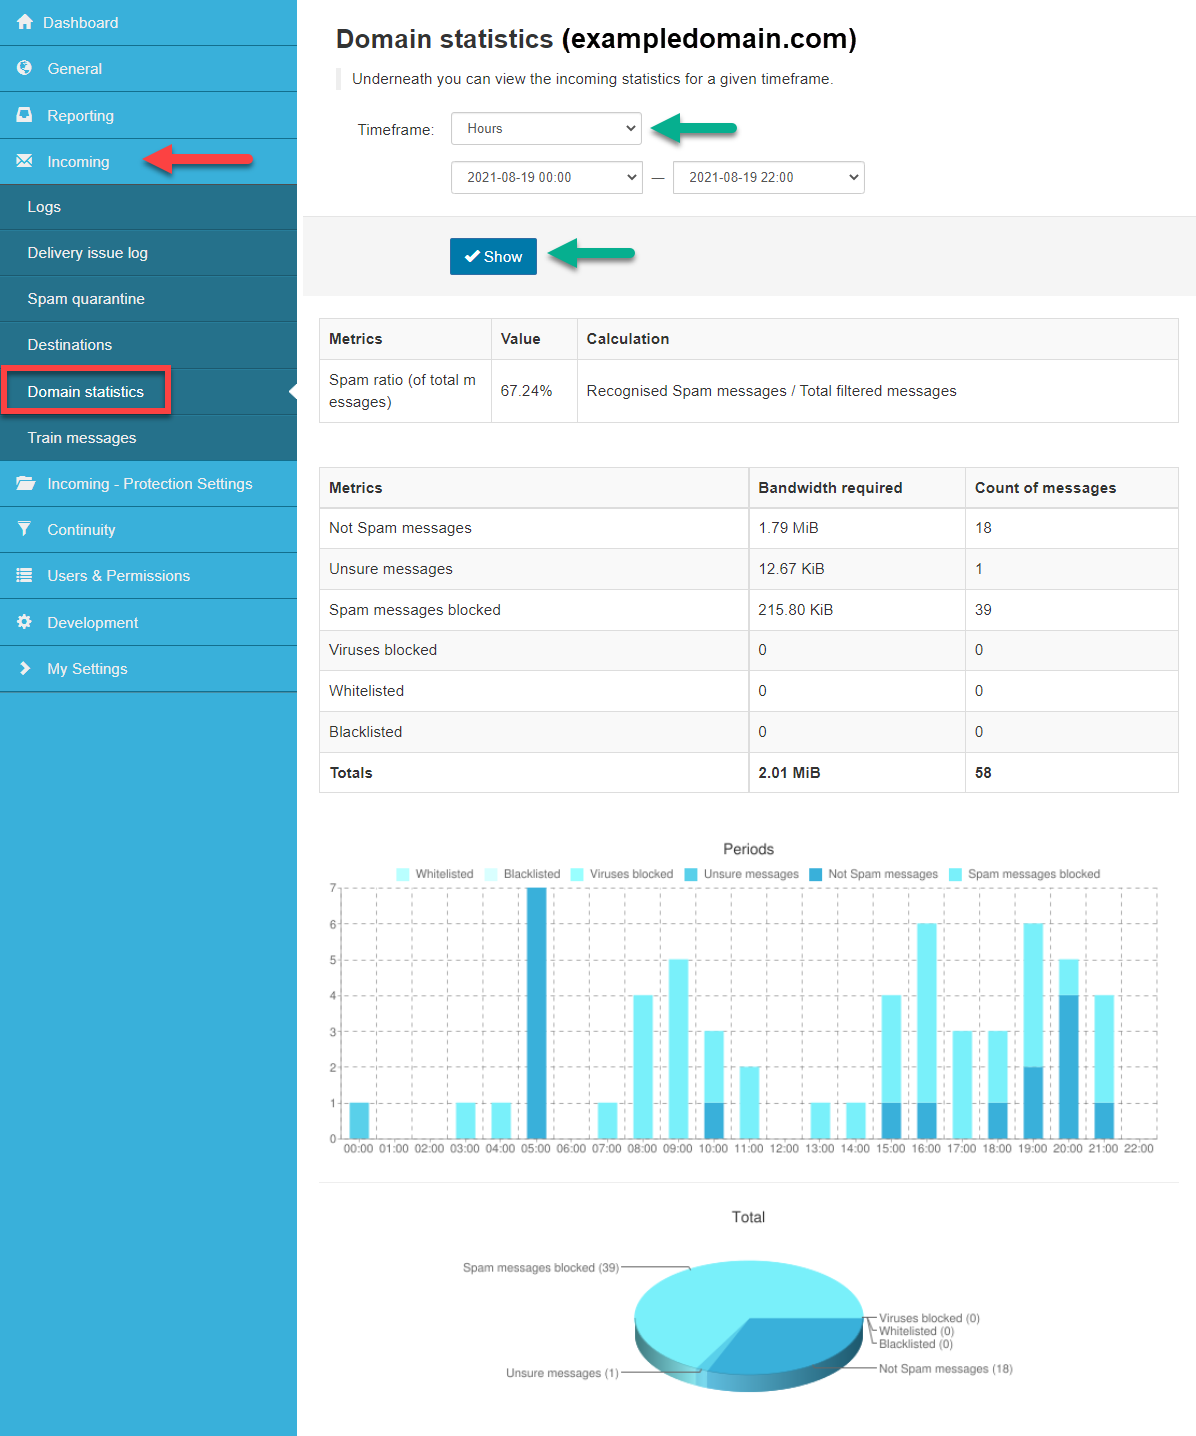
View incoming statistics over a specified time frame for all the domains you manage in graphical and tabular formats. Includes the General Accuracy percentage and the spam ratio of spam emails to all filtered emails. It also shows the following Metrics: Not Spam messages, Unsure messages, Spam messages blocked, Viruses blocked, Whitelisted and Blacklisted, and indicates the Bandwidth required for each metric and the number of messages in each category. Access this from the Admin-level Control Panel.
As an Admin user, you may view the Incoming global statistics for all domains owned by this admin for the given time frames from the Incoming > Global Statistics page.
- Using the time-frame selections at the top of the page, you may filter for:
- Hours
- Days
- Weeks
- Months
- Years
- Click Show.
Train messages
Upload messages you want the system to treat as legitimate (not spam) or spam.
- In the Domain Level or Email Level Control Panel, select Incoming > Train messages.
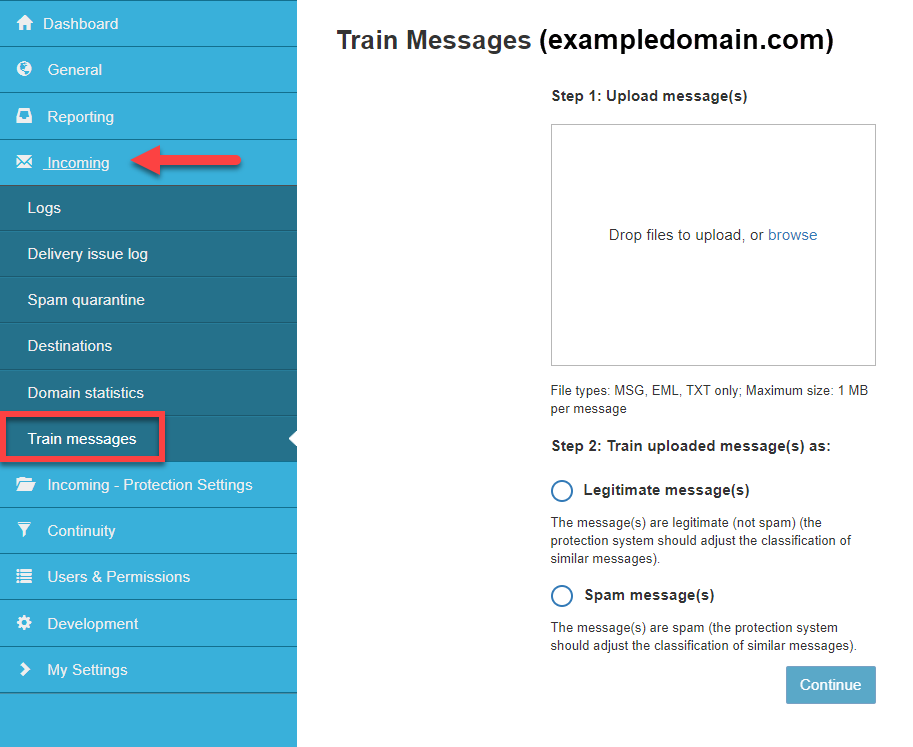
- In the Train messages page, drag and drop or browse for and upload messages you want the system to treat differently. Messages can be in .msg, .eml, or .txt format only.
The maximum size limit per message through the dashboard is 1 MB. For messages over this size, please use other methods of reporting spam or not spam.
- Select whether the message(s) should be recognized as legitimate or spam.
- Click Continue.
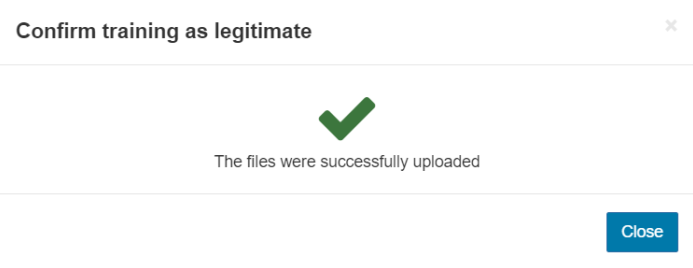
- You will be asked to confirm you wish to train a message, click Report as spam/Report as legitimate.
- Close the dialog box once you see the file(s) have been successfully uploaded.
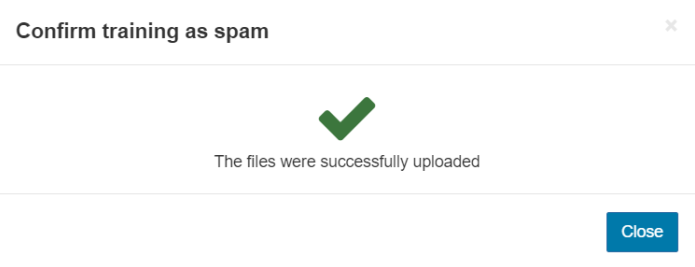
The emails reported via all methods must be in .msg, .eml (IETF RFC 5322), or .txt format and contain the full unmodified message headers.
Summary
The SpamExperts dashboard allows administrators and domain users to manage incoming email security through customizable protection settings, filtering rules, and quarantine controls. Users can whitelist or blacklist senders and recipients, create regex-based filtering rules, adjust spam thresholds, restrict attachments, review delivery logs, manage quarantined messages, and analyze domain statistics. These features help ensure safe, reliable email delivery while maintaining flexibility and control over spam filtering behavior.
If you need further assistance, feel free to contact us via Chat or Phone:
- Chat Support - While on our website, you should see a CHAT bubble in the bottom right-hand corner of the page. Click anywhere on the bubble to begin a chat session.
- Phone Support -
- US: 888-401-4678
- International: +1 801-765-9400
You may also refer to our Knowledge Base articles to help answer common questions and guide you through various setup, configuration, and troubleshooting steps.