How to Manage Users and Roles in Account Manager
This article covers everything you need to know about how to manage users and roles in your Account Manager. You’ll learn how to add, update, or remove users, assign or change their roles, and understand the permissions tied to each one—so it’s clear what users can and can’t do when logged in.
This guide also explains what to do when users need to contact Bluehost for support, including how their role might affect the kind of help they receive. With this resource, every user—regardless of their role—can confidently navigate the system while keeping their account information secure and well-managed.
Here are the topics discussed in this article.
Understanding Account Users and Their Roles
The Account Manager is designed to accommodate various users by assigning them specific permissions based on their role or user type. This setup ensures that users can access the functionalities necessary for their responsibilities while maintaining a secure and organized account structure. The user types are categorized as follows:
Primary Contact
This role is unique and can only be designated to one user per account. The Primary Contact is responsible for the account, acting as the main point of communication and making high-level decisions.
Admin Contact
Users assigned as Admin Contacts have administrative permissions that enable them to manage settings and permissions for other users (except the Primary Contact) and perform a wide range of tasks crucial for maintaining and securing the account. Depending on the size and requirements of the organization, there might be multiple Admin Contacts within an account.
Tech Contact
The Tech Contact is focused on the technical aspects of managing the account. This could include managing API access, troubleshooting technical issues, and implementing technical configurations. Like Admin Contacts, an account can have multiple Tech Contacts to cover technical duties adequately.
Here’s a quick breakdown of the different account roles and their access:
| Permissions | Primary | Admin | Tech |
|---|---|---|---|
|
Edit Account Holder and/or Primary Contact information |
Yes |
No |
No |
|
Edit Account Payment Information |
Yes |
Yes |
No |
|
Add/Edit/Delete other user roles |
Yes |
Yes |
No |
|
Purchase new products |
Yes |
Yes |
No |
|
Manage products and services |
Yes |
Yes |
Yes |
|
Renew products and services |
Yes |
Yes |
Yes |
|
Edit domains' WHOIS Registrant contact information |
Yes |
No |
No |
|
Edit domains' WHOIS Admin and Tech user information |
Yes |
Yes |
Yes |
Each of these roles is essential for the smooth operation and management of the account. They ensure that tasks are divided according to expertise and authority level, which helps maintain an efficient and secure system.
How to Add Admin and/or Tech Users
- Log in to your Account Manager.
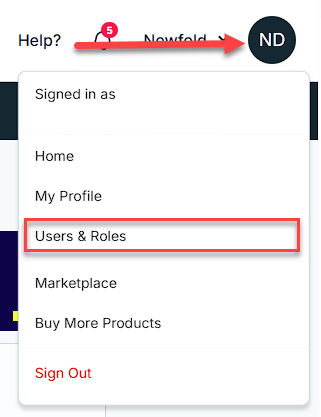
- Click your profile icon in the top-right corner, then select Users & Roles from the list of options.
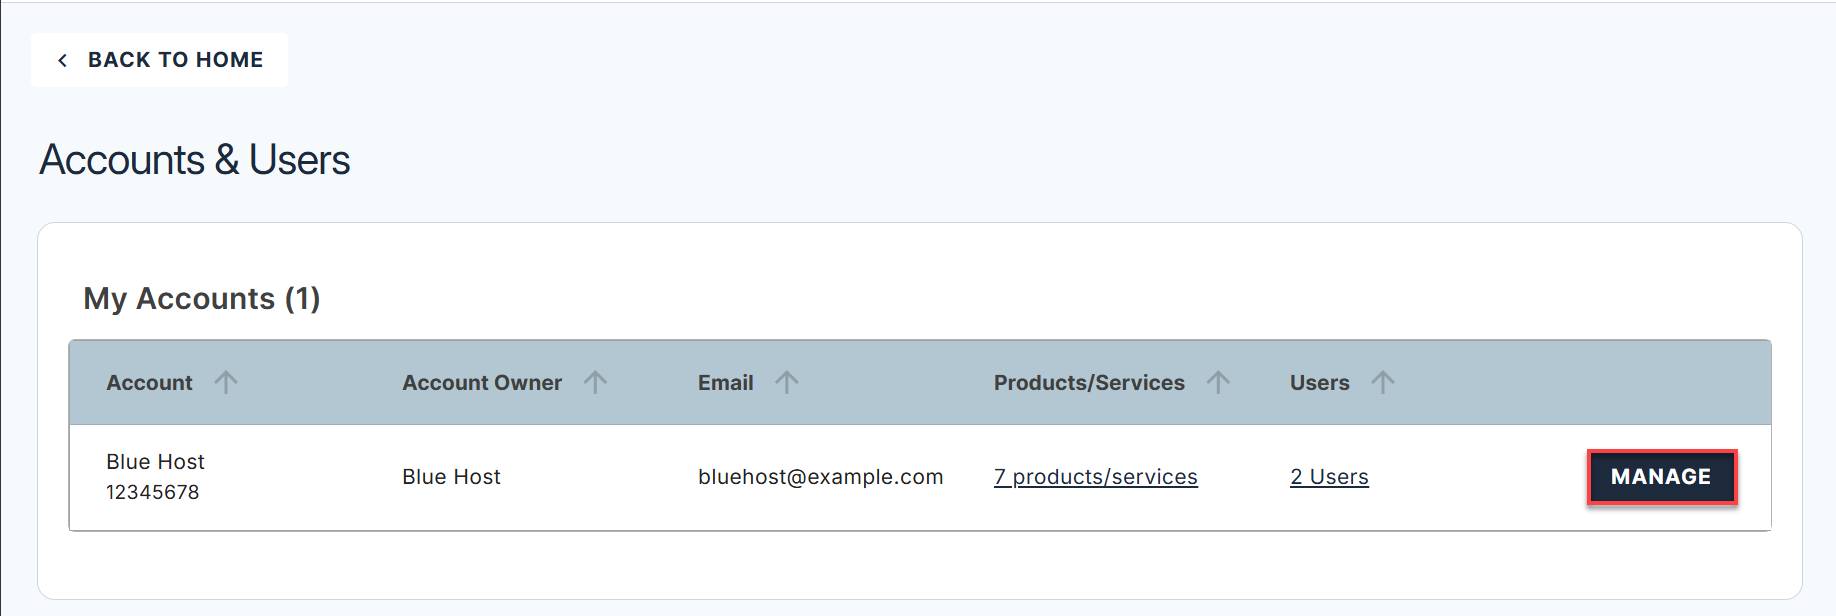
- Click the MANAGE button for the account you wish to manage the users and roles.
- Scroll down to the User Roles & Permissions section, and click the + ADD USER button.

- Enter the name and email address of the user you would like to add, select the role they will have in your account, and then click the INVITE button.
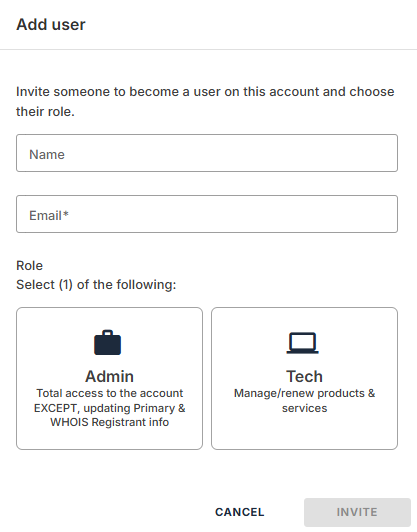
An invite will be sent to the email address provided. The user will be able to set their own user ID, password, and security questions. Once the user has accepted, they will appear in the User Roles & Permissions section.
How to Manage User Roles and Permissions
To request a change in ownership, please verify and submit the Request Account and/or Domain Ownership form.
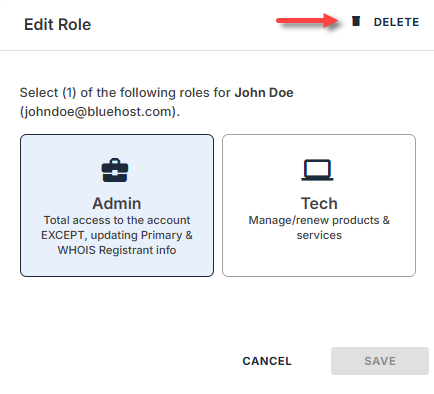
From the User Roles & Permissions section, you can also edit or remove users' roles.
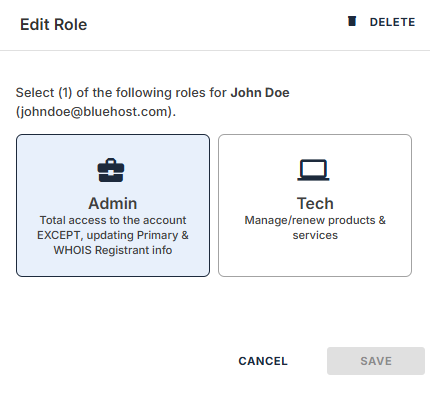
- Click EDIT next to the user you need to manage.

-
To edit the user's role, select the role you wish to update the user to, then click SAVE.
-
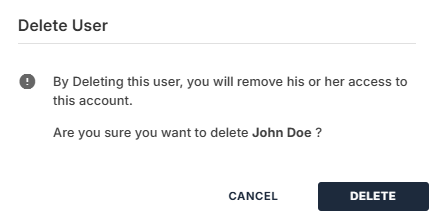
To remove the user, click the DELETE icon in the top-right corner of the pop-up window.
Confirm by clicking the DELETE button.
Summary
Learning how to manage users and roles in Account Manager is important for maintaining a secure and smoothly running system. By clearly defining each role’s responsibilities and permissions, organizations can grant users the necessary access—without compromising the account's security and integrity.
If you need further assistance, feel free to contact us via Chat or Phone:
- Chat Support - While on our website, you should see a CHAT bubble in the bottom right-hand corner of the page. Click anywhere on the bubble to begin a chat session.
- Phone Support -
- US: 888-401-4678
- International: +1 801-765-9400
You may also refer to our Knowledge Base articles to help answer common questions and guide you through various setup, configuration, and troubleshooting steps.