Bluehost Self-Managed VPS: How to Use Portainer Template
Bluehost Self-Managed VPS includes an AlmaLinux 9 VPS template with Portainer Community Edition (CE). This template simplifies Docker container management (pre-installed) through an intuitive web interface, making it easy to deploy, monitor, and manage containerized applications.
Portainer is an open-source container management platform that provides a graphical interface for Docker and Kubernetes environments, reducing complexity and improving efficiency.
Why Use Portainer on Bluehost VPS?
Using Docker on a Bluehost Self-Managed VPS is a great way to install and run templates/applications in isolated containers, but managing those containers via the command line isn't always ideal for every user. Portainer simplifies this process by providing a clean, web-based dashboard that lets you manage your Docker environment entirely through your browser. This makes it easy to deploy, monitor, and control containers without needing to use SSH or terminal commands.
Step 1 – Access Your Portainer Dashboard
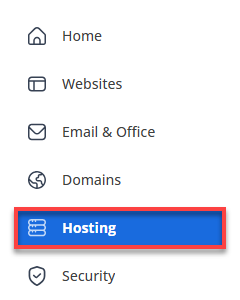
- Log in to your Bluehost Portal.
- Click Hosting in the left-hand menu.
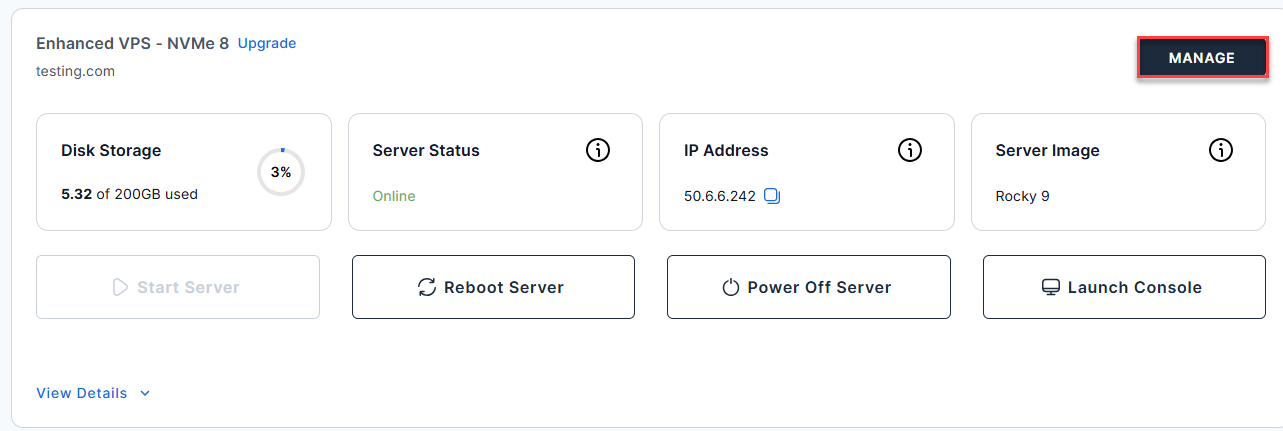
- Click the Self-Managed VPS package where Portainer is installed, and click Manage.
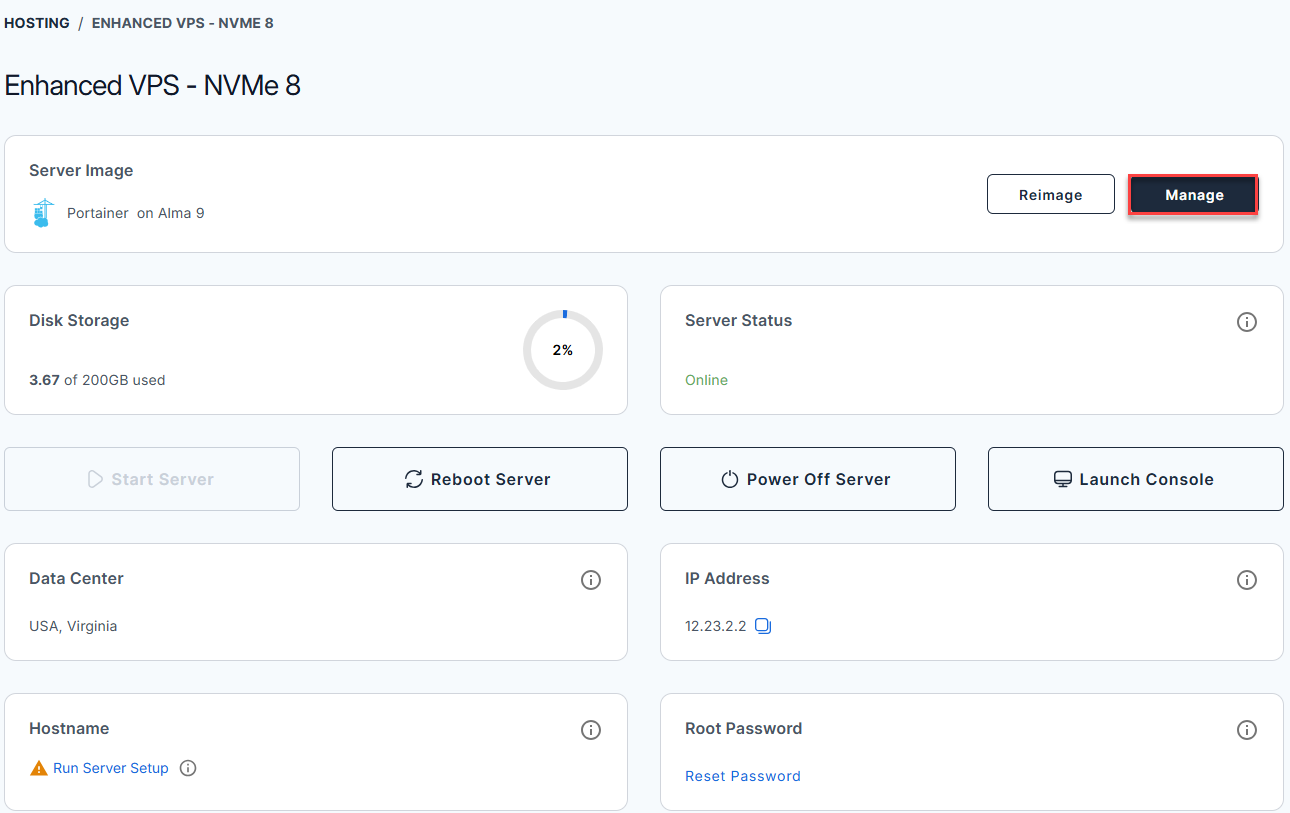
- In the Application tab, click Manage under the Server Image tab.
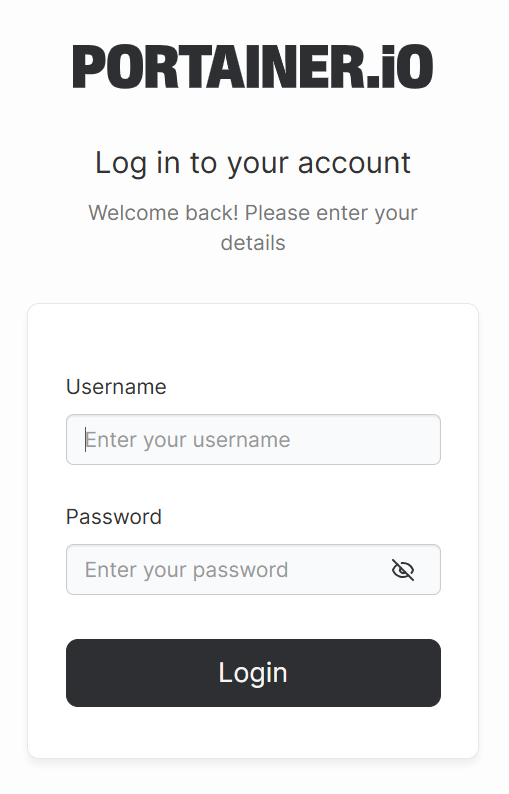
- The Portainer dashboard login page will open in a new browser tab.
OR
- Access via browser.
Open your browser and enter your VPS IP address, followed by port
9000:http://your_vps_ip:9000ReplaceYOUR_VPS_IP- If it's your first time logging in, create an admin account by setting a username and password.
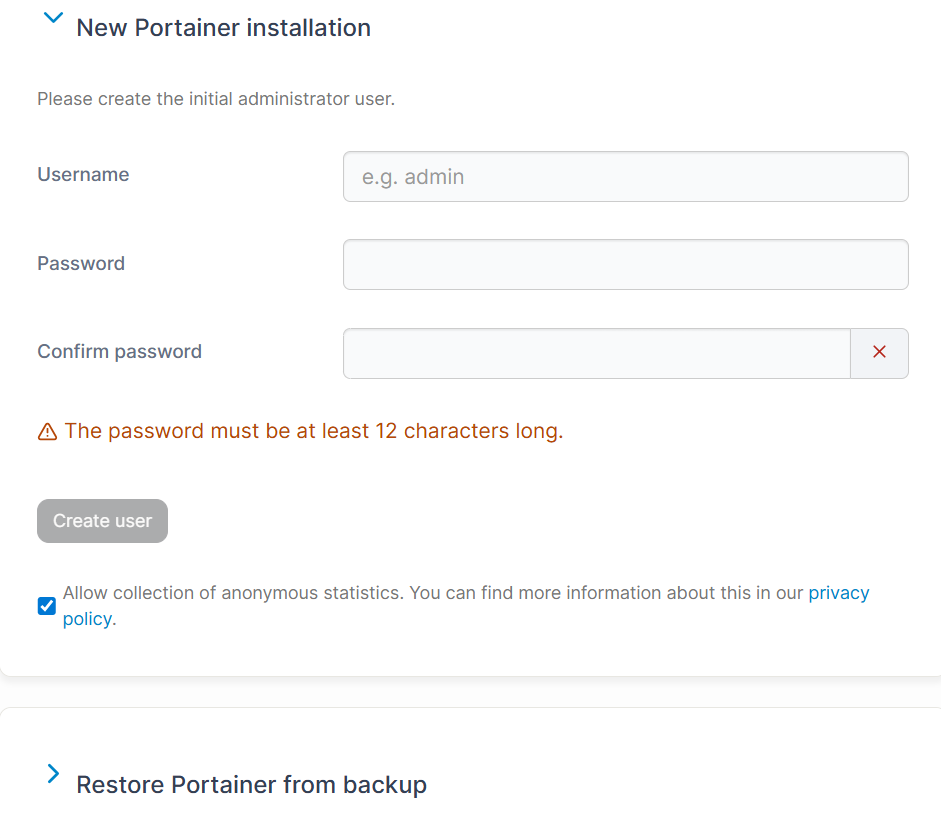
- You have 5 minutes to create the admin user during initial setup.
- If you miss this window, Portainer stops accepting requests.
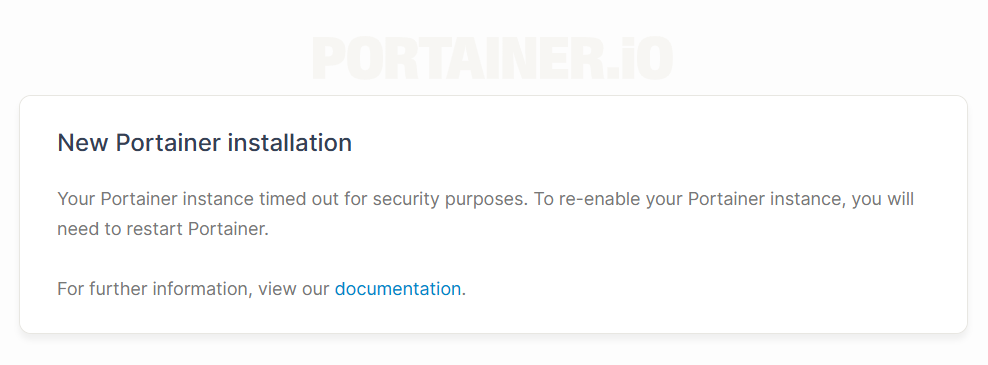
- To regain access, stop and restart the Portainer container on your VPS.
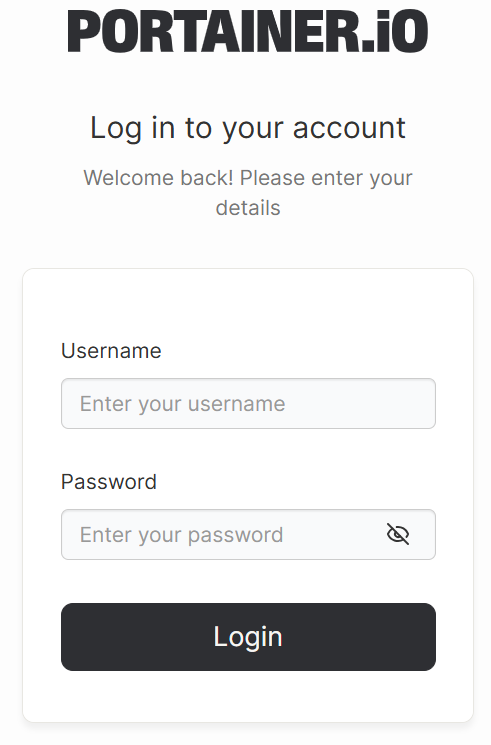
- If an admin account already exists, enter your login details.
- If it's your first time logging in, create an admin account by setting a username and password.
- After logging in, you'll land on the Portainer dashboard, where you can manage containers, images, networks, and volumes.
- Click the Live connect button to connect to your pre-installed Docker environment.
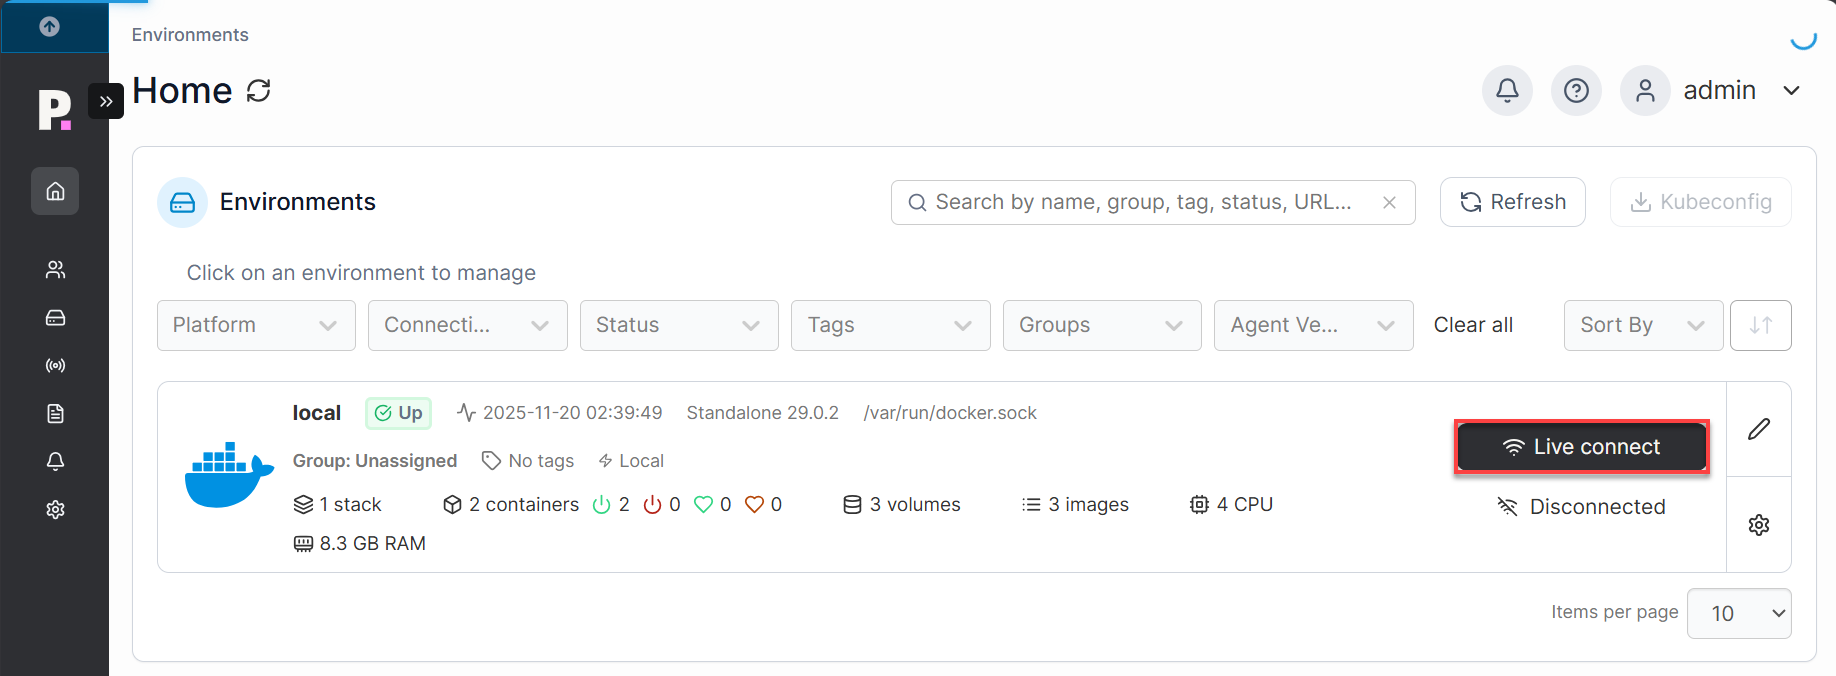
- After clicking Live connect, you will enter the environment dashboard.
Step 2 – Deploy Your First Docker Container
- In the Portainer dashboard, click Containers on the left sidebar.
- Select Add Container.
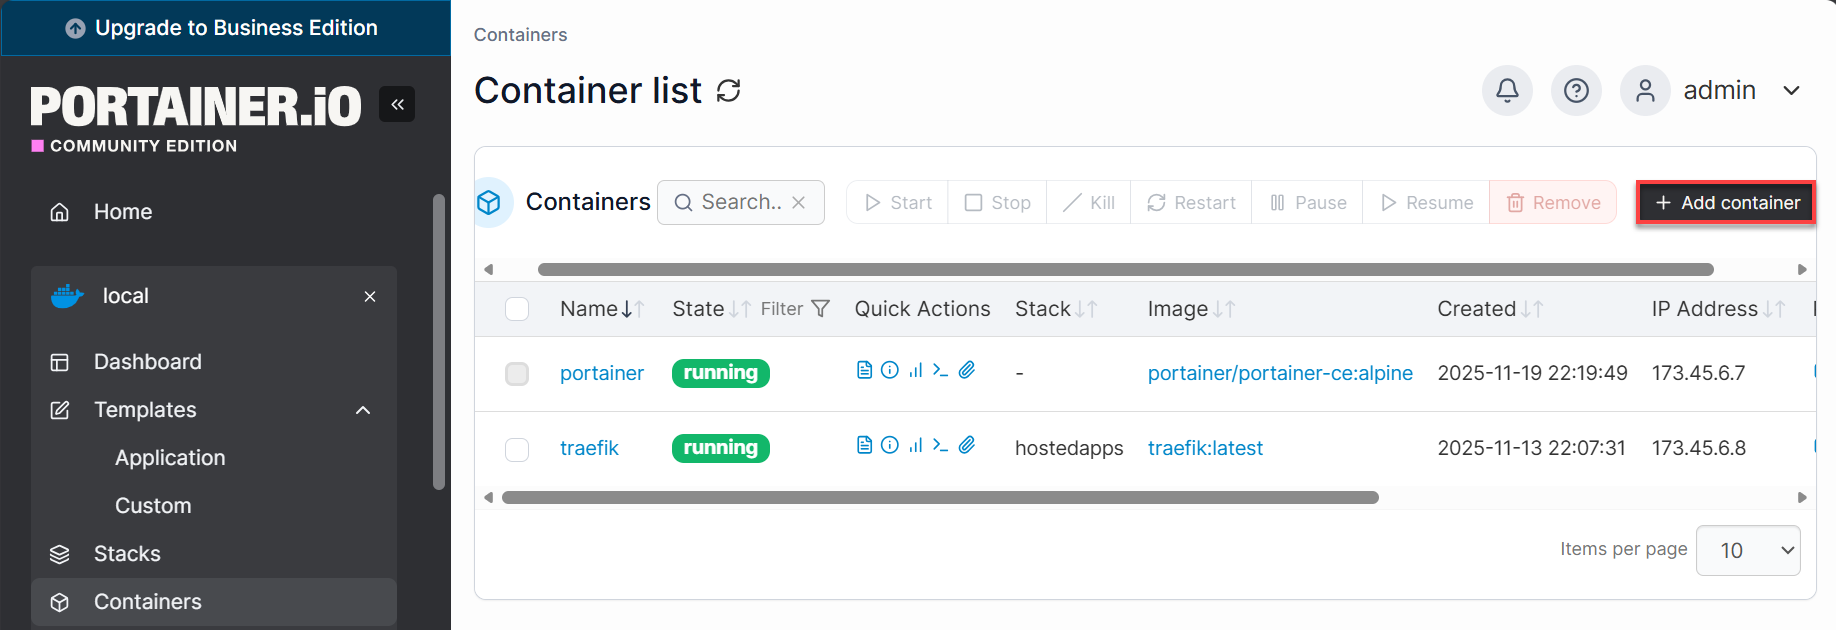
- Fill in:
- Container name
- Docker image
- Ports and volumes as needed

- Click Deploy the container to create and start it.
Portainer allows you to:
- Manage existing containers
- Create and deploy new containers
- Pull container images from Docker Hub
- Manage volumes and networks easily
Step 3 – Manage Your Containers
Portainer makes container lifecycle management easy:
- Update a container: Pull a newer image and click Recreate.
- Scale containers: Use Duplicate/Edit to create multiple instances.
- Stop or remove containers: Click Stop or Remove.
Removing a container does not delete its data unless you remove associated volumes.
Exploring Portainer's Dashboard
From here, you can manage:
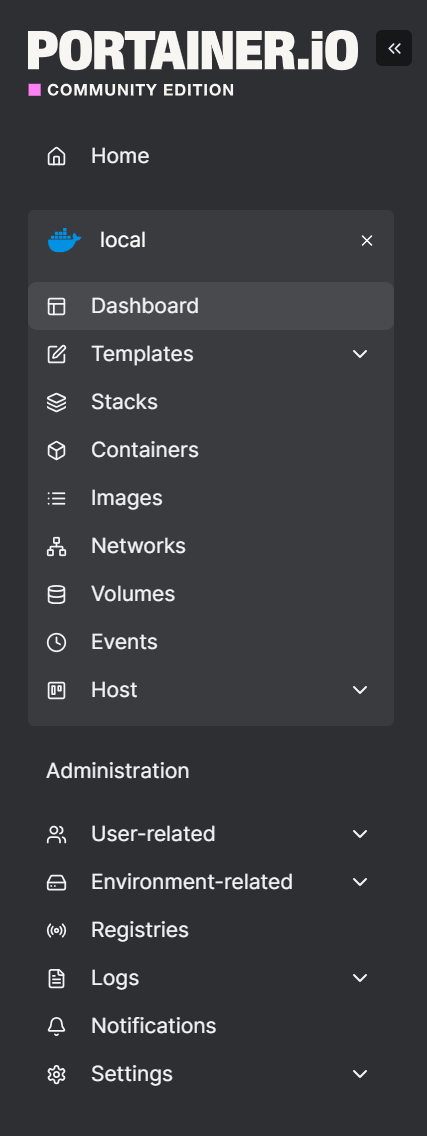
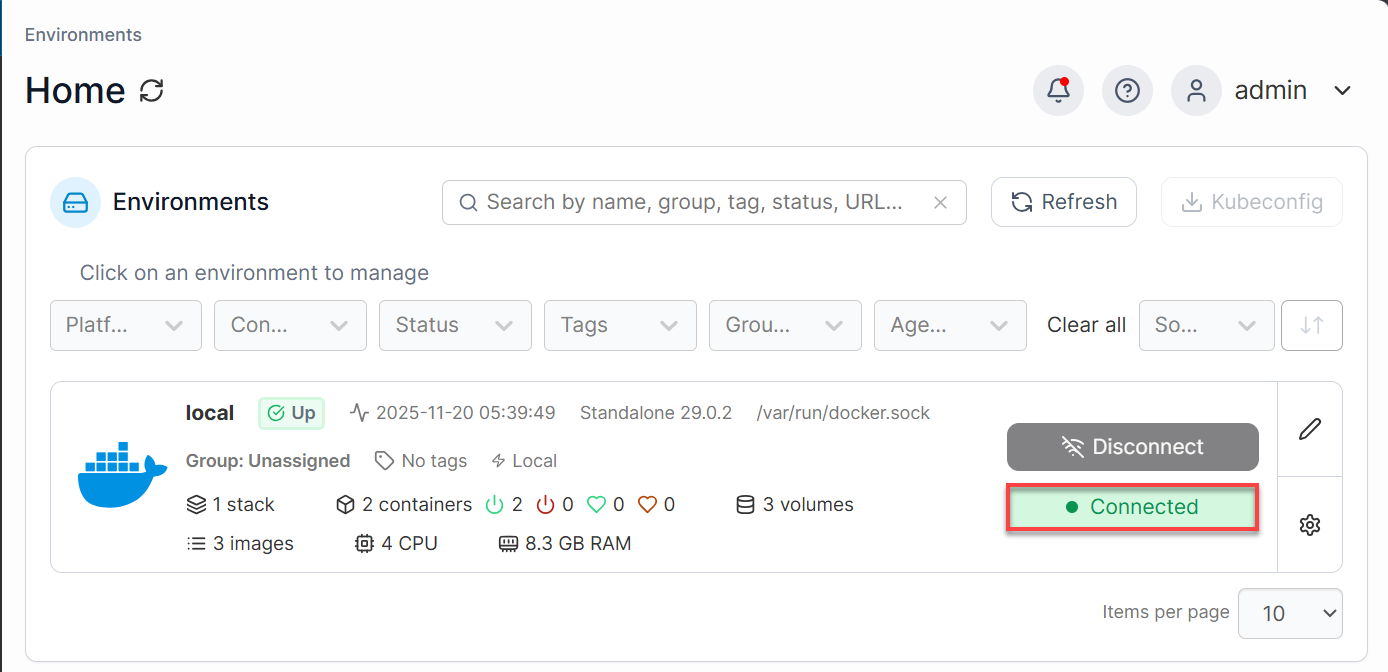
Home
The Home page shows your Docker environment details, including:
- Environment name (e.g.,
local) - Status (Up/Disconnected)
- Docker version and socket path
- Resource summary: stacks, containers, images, volumes, CPU, and RAM
From here, you can select an environment to manage before creating templates.
Environment Dashboard (Docker)
-
Dashboard: Displays an overview of your Docker environment, including containers, images, volumes, and resource usage.
- Template
-
Application: Predefined templates for deploying common applications.
-
Custom: Create a Custom Template.
-
- Stacks:
- Deploy and manage multi-container applications using Docker Compose files.
- Useful for complex setups that require multiple services.
-
Containers
-
Start: Launch stopped containers.
-
Stop: Halt running containers.
-
Create: Deploy new containers from images.
-
Remove: Delete unused or unwanted containers.
-
- Images
-
Pull: Download new images from Docker Hub or other registries.
-
Manage: View, tag, or remove existing images.
-
-
Networks: Configure Docker networks for container communication.
-
Volumes: Create and manage persistent storage for containers.
-
Events: View logs and events related to your Docker environment.
- Host
-
Details: Displays host and engine details.
-
Setup: Make changes to the environment, enabling and disabling features and security settings.
-
Registries: Configure and manage Docker registries for pulling private images.
-
Administration Dashboard
- User-related
-
Users
Manage individual user accounts. You can create, edit, or delete users and assign permissions. -
Teams
Organize users into teams for easier access control and resource management. -
Roles
Define and manage roles with specific permissions to control what users or teams can do.
-
- Environment-related
-
Environments
Add and manage Docker environments (local or remote) that Portainer will control. -
Groups
Group multiple environments together for simplified management. -
Tags
Apply tags to environments for better organization and filtering.
-
-
Registries: Configure Docker registries (public or private) for pulling images securely.
- Logs
-
Authentication
View logs related to user authentication events (logins, failures). -
Activity
Track user actions and system activities for auditing purposes.
-
-
Notifications: Set up notifications for system events or environment changes.
- Settings
-
General
Configure global Portainer settings like UI preferences and system options. -
Authentication
Manage authentication methods (local, LDAP, OAuth). -
Edge Compute
Configure edge agents and manage edge computing environments. -
Get Help
Access documentation, support links, and troubleshooting resources.
-
How to Install Application Templates
- From the Portainer Home dashboard, make sure that the environment is Connected.
- In the Environment dashboard, click on Template. You will have two options to select from: either use one from the Application templates list or create Custom Templates.
Application Templates List
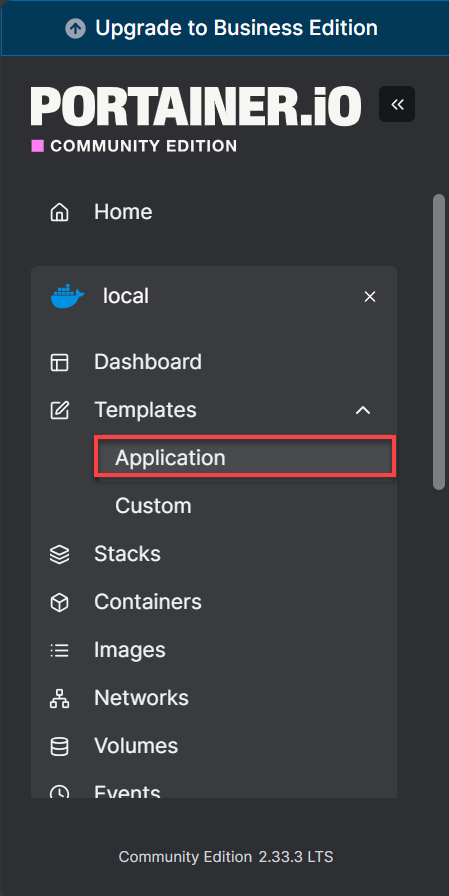
- In the left-hand menu, navigate to Templates and select Application.
- Browse through the available templates (e.g., Caddy, Drupal, Elasticsearch, WordPress, etc.).
You can use the Category and Type filters or the Sort By dropdown to find the template you need.
- Click on the template you want to deploy.
- In the Configuration section:
- Enter a Name for your application (required).
- Optionally, enable Access Control:
- Administrators: Restrict management to admins only.
- Restricted: Assign specific users or teams.
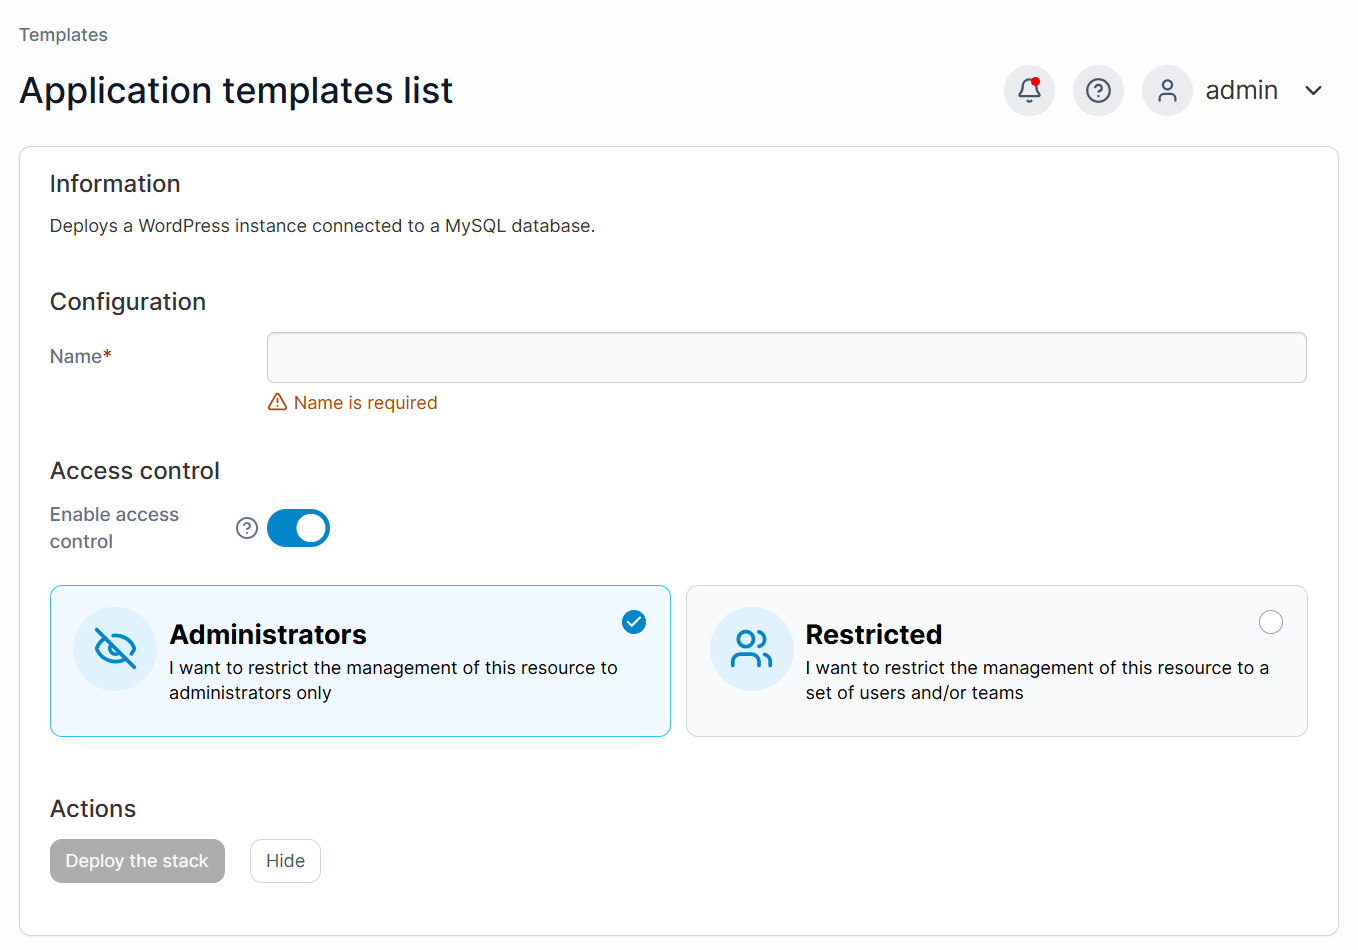
- After configuration, click Deploy the stack.
- Portainer will pull the required Docker image and create the container based on the template.
- Go to Stacks or Containers in the left menu to check the status and ensure the container is running and healthy.
- Depending on the template, you can access the application via:
- Container IP and exposed port
- Or through any configured domain name.
- Make sure your Docker environment is properly connected to Portainer.
- If the template requires environment variables or volumes, configure them before deploying.
- Use Logs in the container view to troubleshoot any issues.
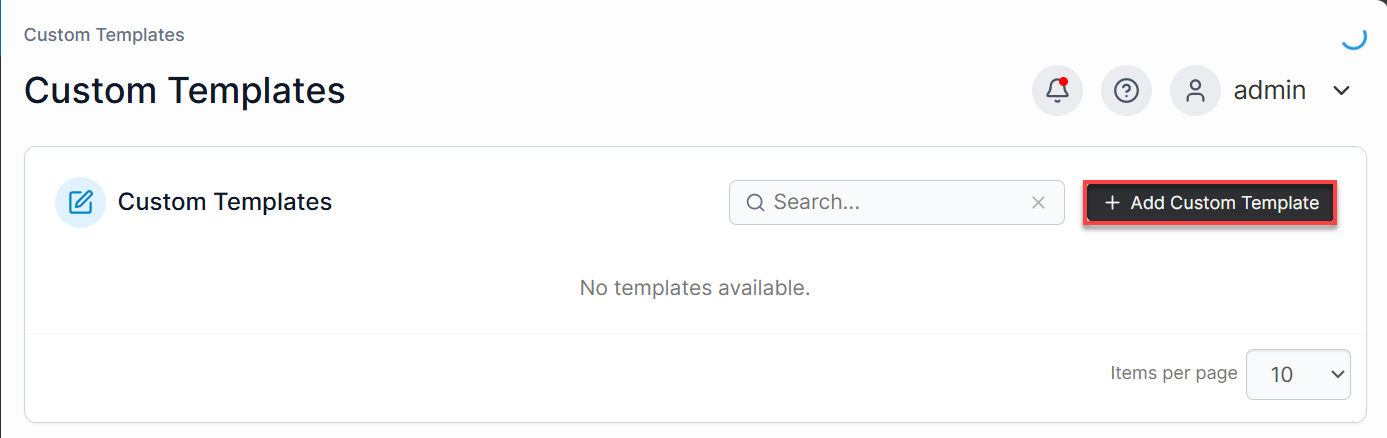
Custom Templates
- In the left-hand menu, navigate to Templates and select Custom.
- Click the + Add Custom Template button on the top-right.
- You will be prompted to fill in details for your custom template:
- Title
- Description
- Note
- Logo
- Platform:
- Linux
- Windows
- Type:
- Stack
- Container
- Build method:
- Web editor
- Upload
- Repository
- Access Control (Optional)
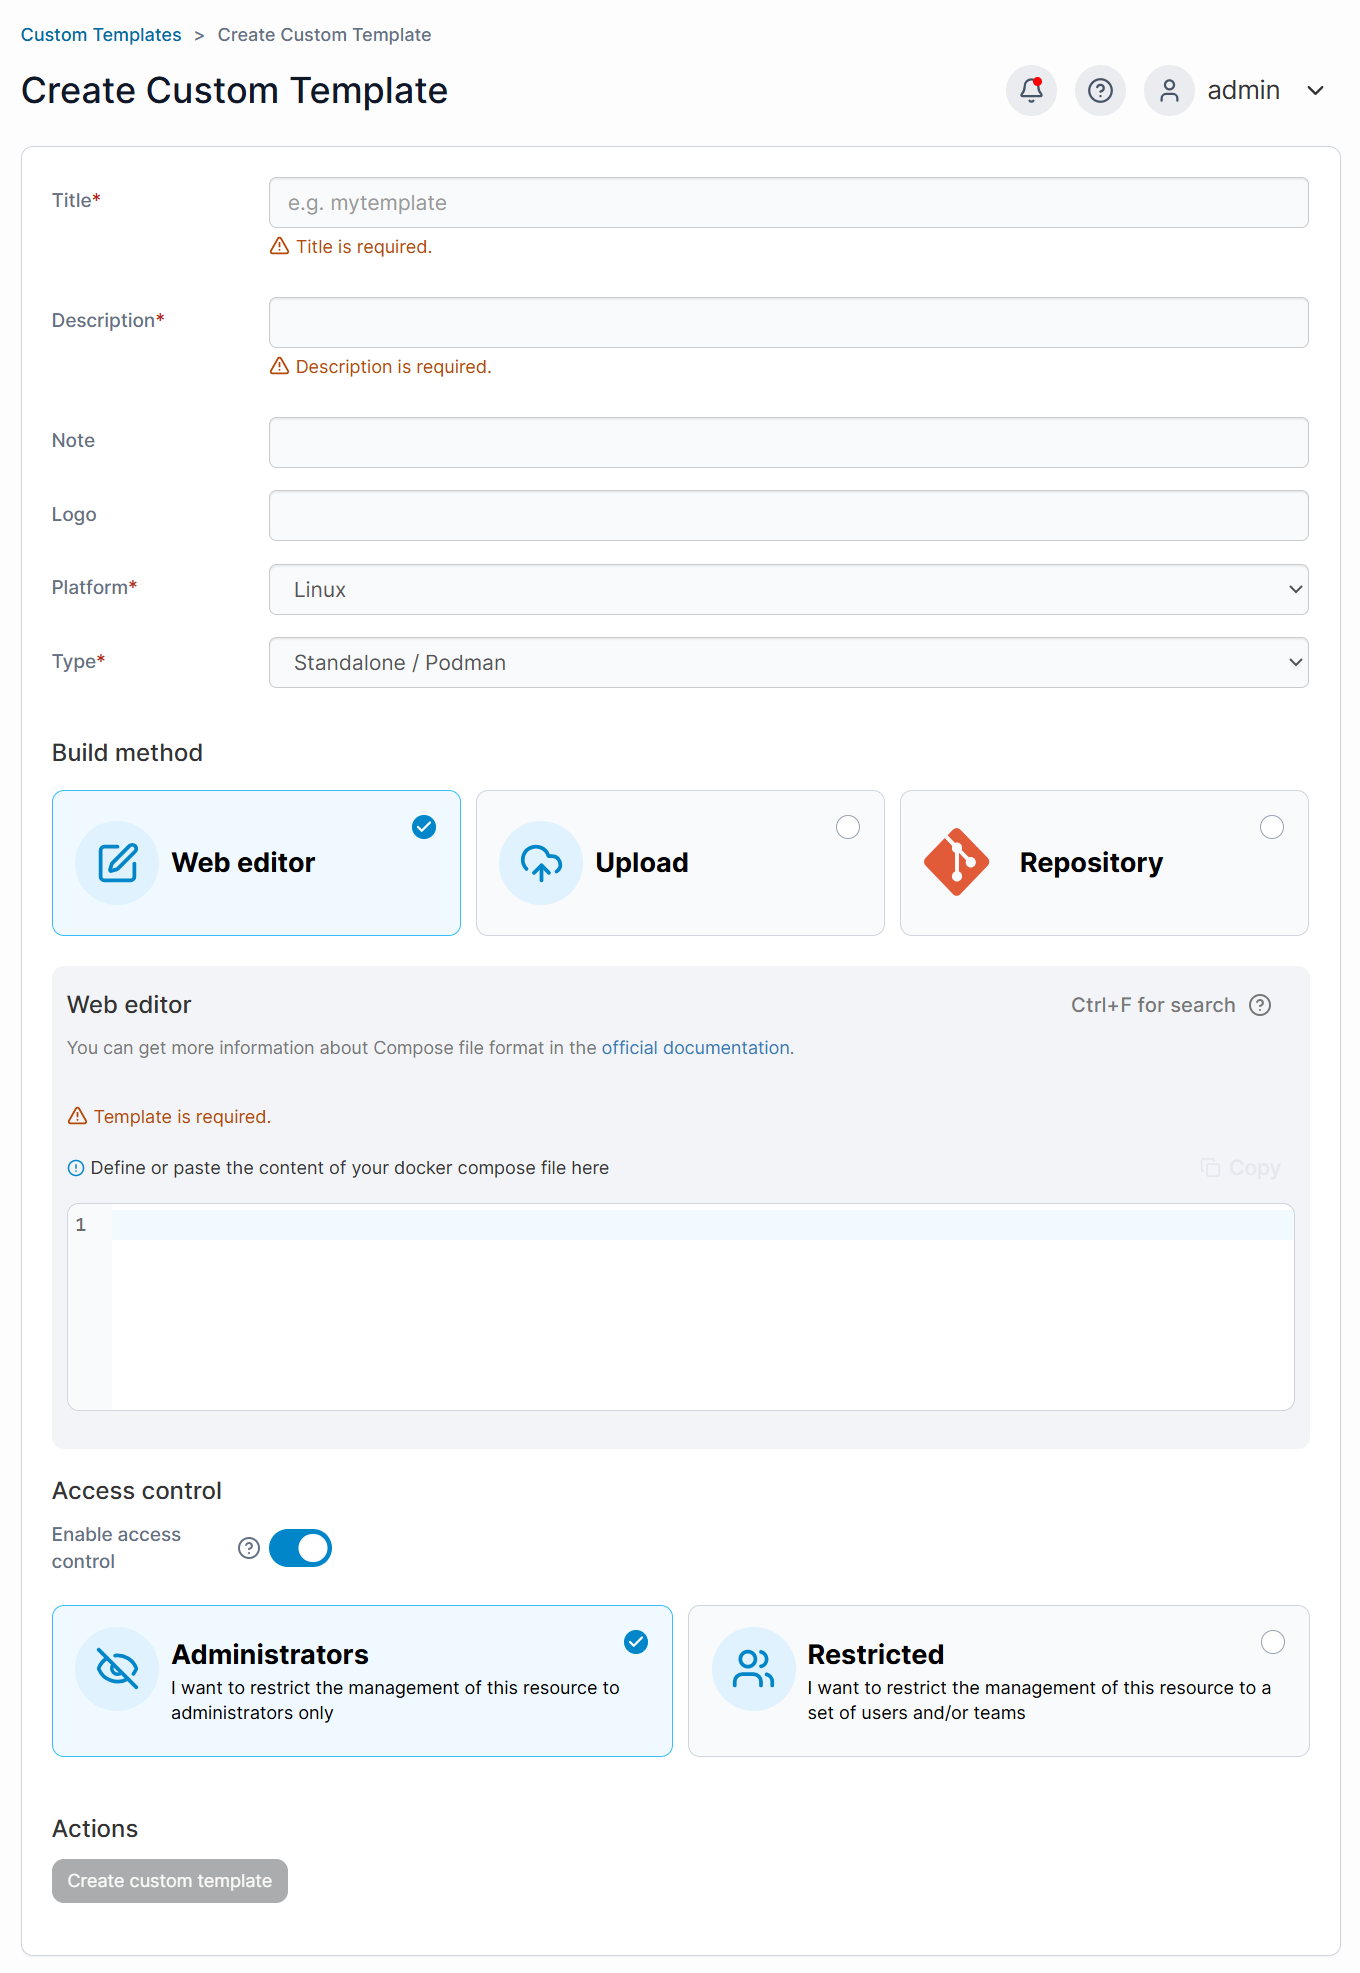
- After filling in all required fields, click Create custom template.
- Once created, your template will appear in the Custom Templates.
- Click on the template and then Deploy the stack or Create container.
- Portainer will pull the image(s) and set up the application based on your template.
- Go to Stacks or Containers in the left menu to confirm the deployment.
- Check logs and status to ensure everything is running correctly.
- Use Docker Hub official images or trusted sources.
- Validate your Docker Compose file before adding it.
- Include environment variables and volume mappings in the template for flexibility.
Summary
Using the Bluehost Self-Managed VPS Portainer template gives you a powerful yet easy-to-use solution for managing Docker containers. With Portainer's intuitive dashboard, you can deploy, monitor, and scale applications without complex command-line operations. Whether you're running a single container or managing multiple services, this setup streamlines your workflow and helps you get the most out of your VPS hosting.
For detailed instructions and to fully leverage Portainer's capabilities, review the official Portainer documentation.