How to Change PHP Versions on VPS and Dedicated Servers
Managing your website's performance and ensuring compatibility with the latest PHP versions is crucial for its smooth operation. If you're a Bluehost VPS or Dedicated Hosting user, this guide will show you how to easily change PHP versions on VPS and Dedicated servers and configure essential settings using EasyApache 4 and Web Host Manager (WHM).
- Why It's Important to Update Your PHP Version
- How to Change PHP Versions on VPS and Dedicated Servers Using EasyApache 4
- How to Change PHP Versions on VPS and Dedicated Servers Using MultiPHP Manager
- Common PHP Compatibility Issues When Changing Versions
- FAQs and Support
- Summary
Why It's Important to Update Your PHP Version
Keeping your PHP version up to date helps your site run faster, stay secure, and work well with new web tools. If you use an old PHP version, your site may load slowly, be less safe, or have problems with platforms like WordPress or Magento. Here's why updating your PHP version matters:
- Security: New PHP versions often come with security patches for known vulnerabilities.
- Performance: Modern PHP versions include optimizations that improve your site's speed.
- Compatibility: Upgrading ensures your site is compatible with the latest versions of themes, plugins, and scripts.
How to Change PHP Versions on VPS and Dedicated Servers Using EasyApache 4
EasyApache 4 is a powerful tool for managing PHP versions on your server. Below are the detailed steps to switch to the latest PHP version on your BRAND VPS or Dedicated Hosting using EasyApache 4.
Installing a New PHP Version with EasyApache 4
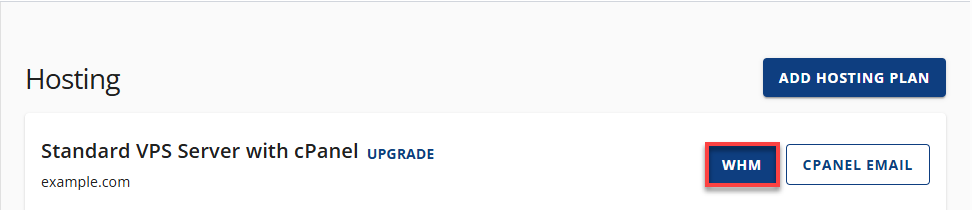
- Log in to your Bluehost Portal.
- Click Hosting in the left-hand menu.
- In the hosting details page, click the WHM button.
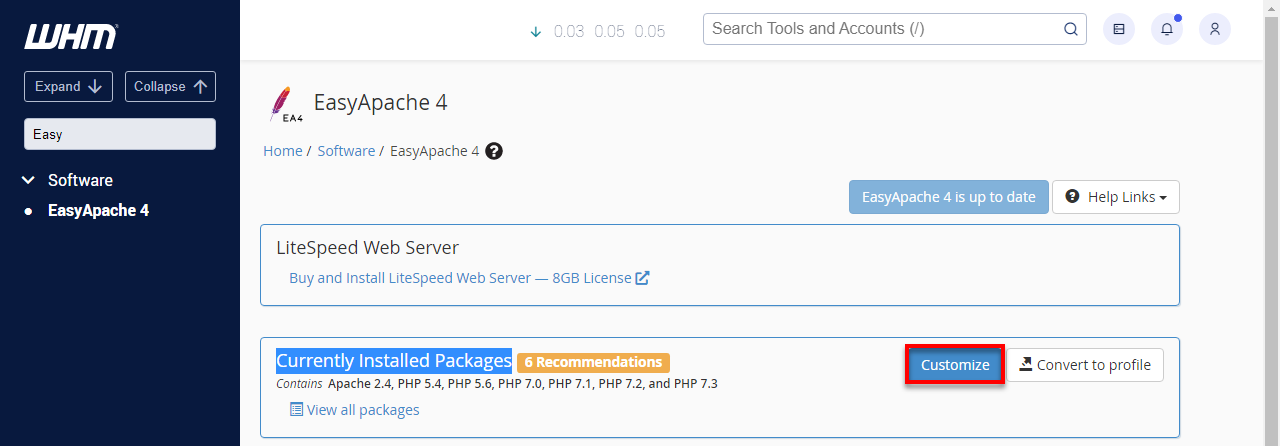
- In the Search bar, type Easy and click on EasyApache 4 under the Software section.

- Customize Installation: Click the Customize button in the Currently Installed Packages box.
- Select PHP Versions: From the menu on the left, select PHP Versions. Choose the PHP version you want to install, and click Review.
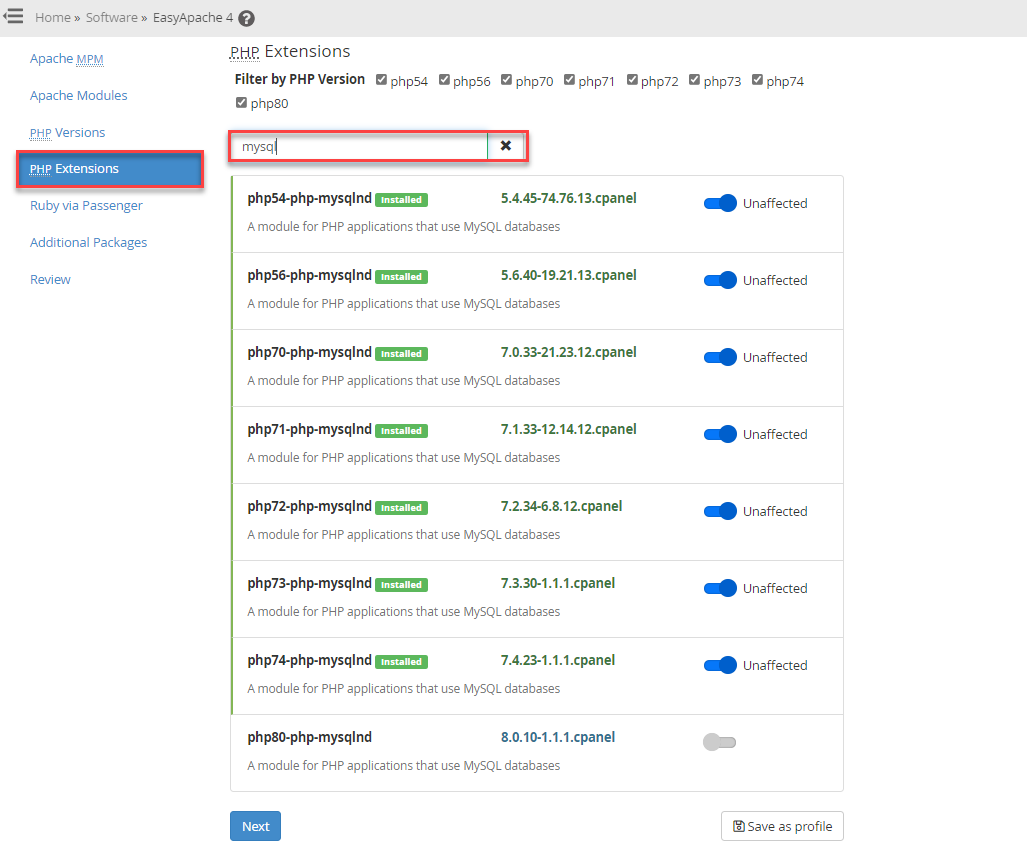
You will be asked to install extensions if you upgrade your PHP version. We recommend that you upgrade those simultaneously with the new version of PHP so that the MySQL extension is correct.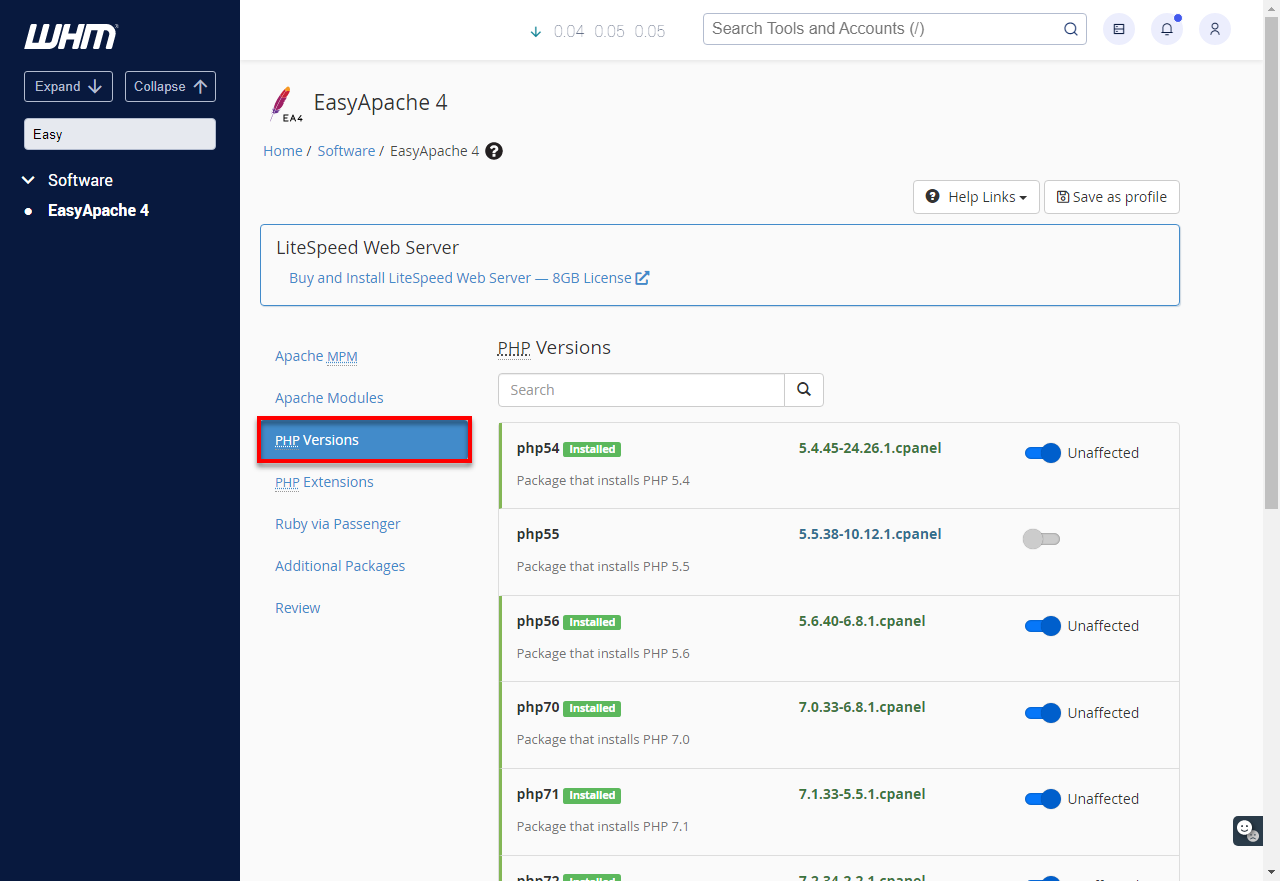
- Access (WHM >> Home >> Software >> EasyApache 4 >> PHP Extensions) by entering the field in the search box and typing in MySQL to access the PHP extensions.
- Access (WHM >> Home >> Software >> EasyApache 4 >> PHP Extensions) by entering the field in the search box and typing in MySQL to access the PHP extensions.
- Select the button PHP x.x and Extensions.
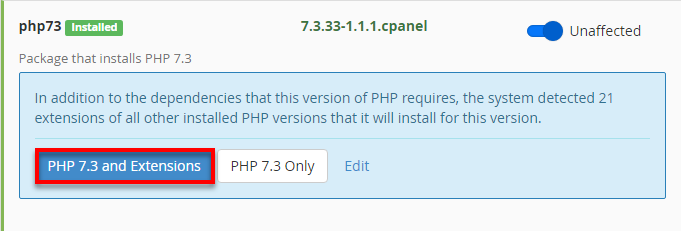
- Complete Installation: After reviewing the options, select Provision at the bottom to install the new PHP version.
Configuring PHP Settings for Optimal Performance
Once your new PHP version is installed, you must configure settings for optimal performance. Use the MultiPHP INI Editor to adjust PHP settings, such as memory_limit, max_execution_time, and others.
- Log in to your Bluehost Portal.
- Click Hosting in the left-hand menu.
- In the hosting details page, click the WHM button.
- Go to Software and click on MultiPHP INI Editor.

- Select PHP Version: Choose the version you want to configure using the dropdown menu.
You can change the most common settings in Basic Mode. To do this, find the Setting column and either click the button to enable or disable an option or enter the appropriate value in the field. After making your changes, click the Apply button at the bottom of the screen.
- Most servers and web applications do not need a memory_limit higher than 384 MB or a max_execution_time longer than 30 seconds. If a script needs more resources than this, it usually means a problem with the application should be fixed.
- While it might be tempting to set high values for memory_limit and max_execution_time, doing so can cause problems. It may lead to the server running out of memory or freezing, especially on smaller servers with limited resources. Raising these limits will not make your site faster.
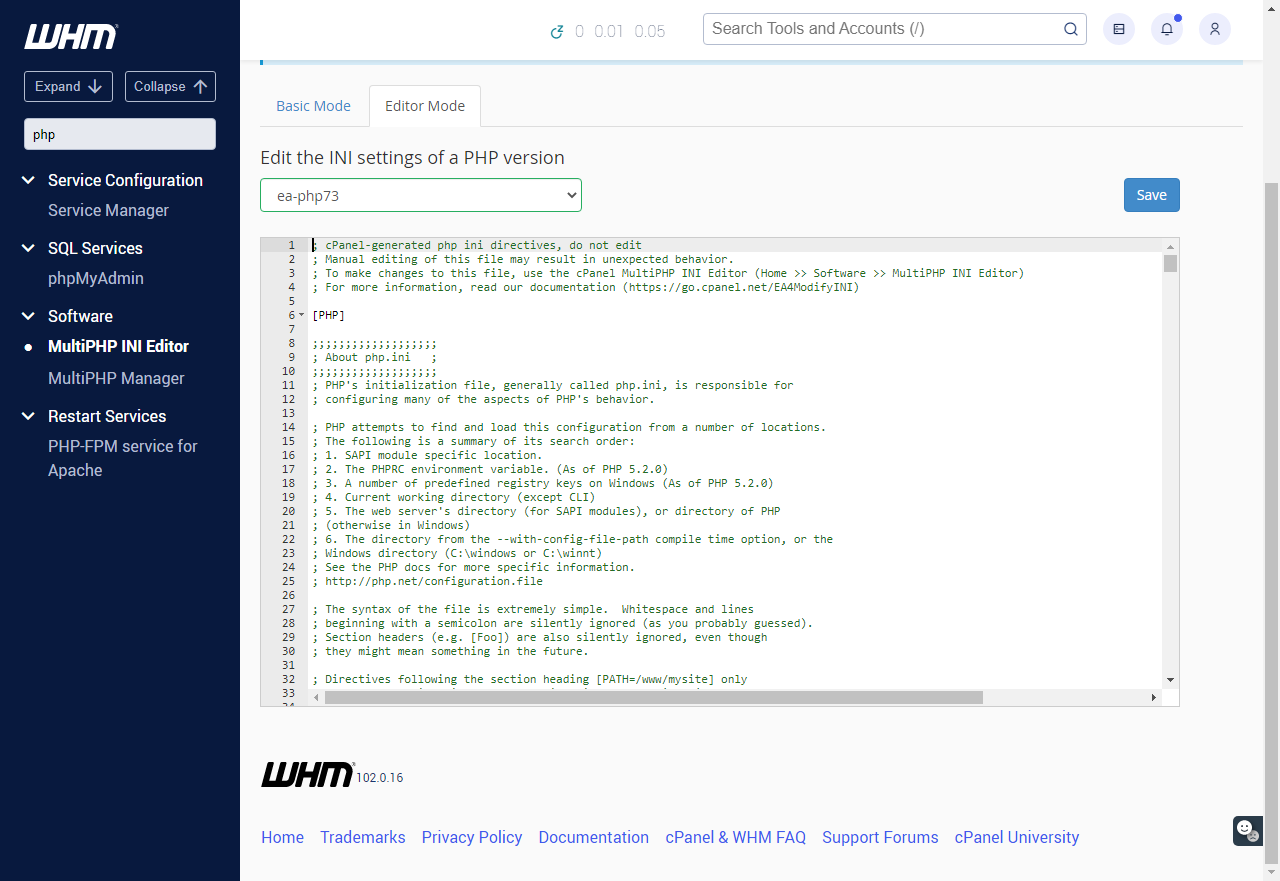
- If the setting you want to change isn’t in Basic Mode, switch to Editor Mode and choose the PHP version there to view all options, such as error_reporting. Once you finish, click the Save button on the right side of the screen.
Here is a simple overview of the options available in the basic editor.Basic Editor Settings Allow_url_fopen It is advisable to keep this feature disabled for security reasons, unless it is necessary for your PHP applications to have it activated. Display_errors Leave this off unless you currently use it to debug your PHP applications. Once finished, this should be disabled. File_uploads This feature must allow media uploads directly through your website dashboards. Max_execution_time This is set by default to 30 seconds and should not be changed. This is the length of time PHP processes are allowed to run on the server. Setting this high will allow PHP processes to run for days until the server runs out of memory or Apache locks up. Max_input_time This will set the maximum number of seconds a script should take to parse input data, such as POST, GET, and file uploads. Something like a media upload might take this long. If the process takes more than 60 seconds, it should be uploaded through FTP. Max_input_vars It is set to 1000 by default, and this should not be done, as this may raise the DDoS effectiveness and may crash the server. Memory_limit The amount of RAM on the server enables a PHP process to operate. Most WordPress sites don't need more than 128M of memory to run. It should not be set higher than 384M unless it is necessary. For instance, if your server has 2GB of RAM, you would set the memory limit to 512M, and that might leave your server out of memory when running just 4 PHP processes. If your PHP application uses more than 512M, such as Magento, we recommend a minimum of 4G RAM. Post_max_size The maximum upload size in PHP applies to actions like uploading files to the media library or submitting an entirely new blog post. It is, by default, 8M. Most of your website's content shouldn't be as big as small images, and media should make for a faster site. However, it can be adjusted if something is over 8M. We recommend that you reduce it after you upload the big file. Session.gc_maxlifetime This is the number of seconds the server will remember PHP sessions. This configuration should not be changed unless you are the administrator on the server and plan to change it. Session.save_path This is where all the PHP sessions above are stored. Do not edit this unless you must become a server administrator; it must be edited for you. Upload_max_filesize This is all in tandem with post_max_size. This is the maximum size that files may be uploaded through PHP, such as uploading images to your media library or single images within a blog post. It defaults to 2M. Most everything you'll upload to this site won't be remotely this big, as smaller images and media help make your site speedier. Still, it's something that, if it is greater than 2M, you can turn it up if you have a large image or movie. We'd suggest dialing it back down when that's all done. Zlib.output_compression This compression compresses your PHP coding before sending it from the server. This turned-off default setting must be enabled to compress the content meant for the PHP website in question.
- When done, click Apply at the bottom to save your settings.
How to Change PHP Versions on VPS and Dedicated Servers Using MultiPHP Manager
If you need to switch the PHP version for specific domains on your server, follow these steps in WHM.
- Log in to your Bluehost Portal.
- Click Hosting in the left-hand menu.
- In the hosting details page, click the WHM button.
- In the search bar, type MultiPHP Manager and select it from the Software section.

- Select PHP Version per Domain: In the Set PHP Version per Domain tab, you'll see a list of domains hosted on the server.
- Choose PHP Version: Use the dropdown menu next to each domain to select the desired PHP version.
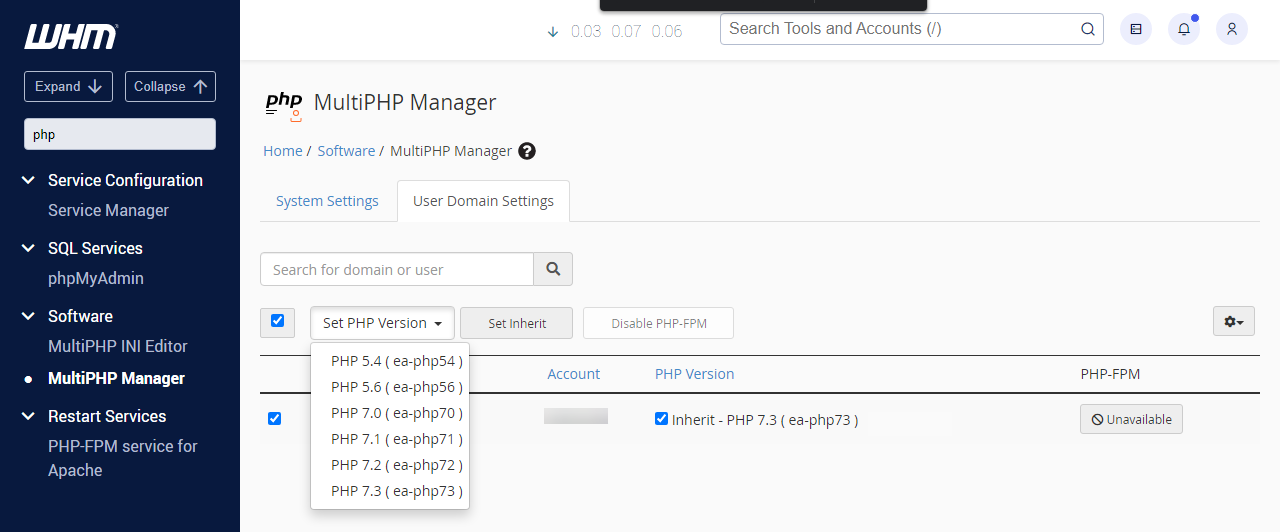
- Apply Changes: The change will take effect instantly. You can go back to the earlier version using the same approach if you experience any problems.
Common PHP Compatibility Issues When Changing Versions
When upgrading your PHP version, you may encounter compatibility issues. Below are some common problems and how to troubleshoot them.
- Problem: After upgrading PHP, specific themes or plugins may stop working.
- Solution: Check for plugin/theme updates that support the newer PHP version. If no updates are available, consider contacting the plugin developer for assistance.
- Problem: PHP-FPM may not function correctly after changing the PHP version.
- Solution: Ensure PHP-FPM is enabled for the correct PHP version. In WHM, go to MultiPHP Manager, select the domain, and ensure PHP-FPM is enabled for the active PHP version.
- Problem: Some functions may be deprecated or removed in the newer PHP version, causing errors.
- Solution: Review error logs to identify deprecated functions and update your codebase accordingly. Check for updates addressing these issues if you're using a CMS.
- Problem: You may encounter a "500 Internal Server Error" after upgrading PHP.
- Solution: This could be caused by incorrect PHP settings or incompatible scripts. Check the error_log in your server's file manager to pinpoint the issue. Try reverting to the previous PHP version and resolving the issue before re-upgrading.
FAQs and Support
Summary
Keeping your PHP version up-to-date is essential for your website's security, performance, and compatibility. By following the instructions provided in this guide, you can conveniently switch PHP versions on VPS and Dedicated servers as well as adjust settings using EasyApache 4 and WHM.
If you encounter any issues or need assistance, our support team is here to help. We recommend upgrading your PHP version and extensions simultaneously to ensure everything functions smoothly.
If you need further assistance, Bluehost Chat Support is available 24 hours a day, 7days a week while Bluehost Phone Support is available 7 days a week from 7 am-12 midnight EST.
- Chat Support - While on our website, you should see a CHAT bubble in the bottom right-hand corner of the page. Click anywhere on the bubble to begin a chat session.
- Phone Support -
- US: 888-401-4678
- International: +1 801-765-9400
You may also refer to our Knowledge Base articles to help answer common questions and guide you through various setup, configuration, and troubleshooting steps.