How to Set Up Apple Mail on Mac: Step-by-Step Guide
Learn how to set up Apple Mail to manage your email accounts all in one place. Whether you're adding a Gmail, iCloud, Outlook, or a professional email address, this step-by-step guide walks you through the process of setting up email on a Mac quickly and efficiently.
Add a New Account
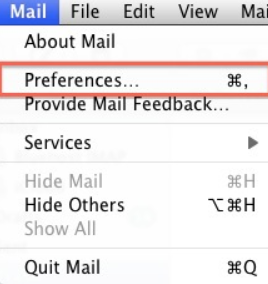
- Click the Mail menu in the upper left corner of the screen.
- From the top menu bar, select Mail and then Preferences.
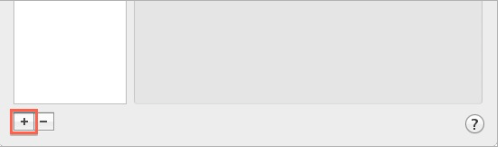
- In the Mail Preferences window, click on the Accounts tab.
- Click the + (plus) sign to add a new account.
Account Settings
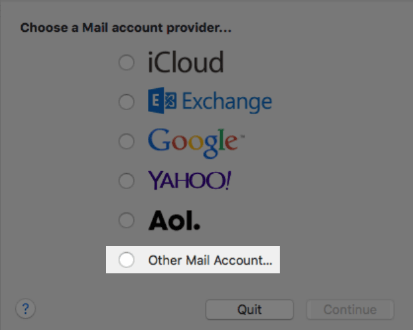
- Choose Other Mail Account when prompted.
- Enter the following details:
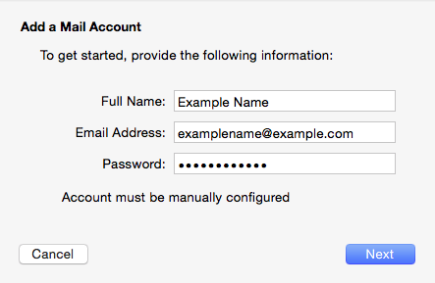
- Full Name: The name you want to display on sent messages.
- Email Address: Enter your email address (for example, name@[yourdomain].com).
- Password: Enter the password for your email account.
- Select Sign In.
If you receive a prompt saying Account must be manually configured, click Next.
Incoming and Outgoing Mail Server Settings
When setting up your email account, you'll need to configure the incoming mail server and outgoing mail server.
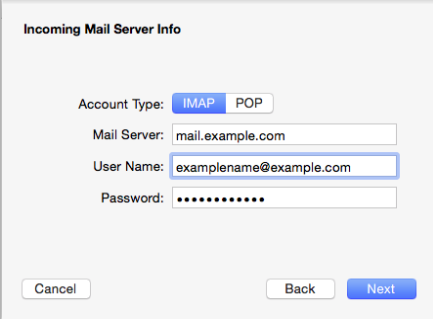
- Incoming Mail Server (IMAP/POP): mail.[yourdomain].com
- User Name:– Enter your full email address.
- Password: Enter your email password.
- Outgoing Mail Server (SMTP): mail.[yourdomain].com
Next, configure the outgoing mail server (SMTP):
- Outgoing Mail Server: Enter mail.[yourdomain].com.
- User Name: Enter your full email address.
- Password: Enter your email password.
- Port: Use 465 or 587 (465 is SMTP SSL while 587 is plain SMTP).
- Authentication: Set to Password.
Select OK to save your settings. Your account is now ready, and you can send and receive email in Apple Mail.
That's it! Your email account should be added to your Apple Mail client.
SSL Certificate Warning
If you choose to use SSL for secure connections, you may see a warning that the certificate is not trusted. To resolve this:
- Click Show Certificate.
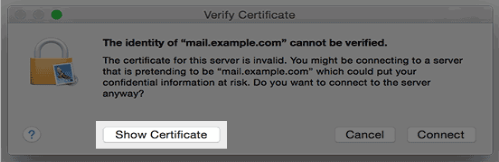
- Select Always trust this certificate.
- Click Connect.
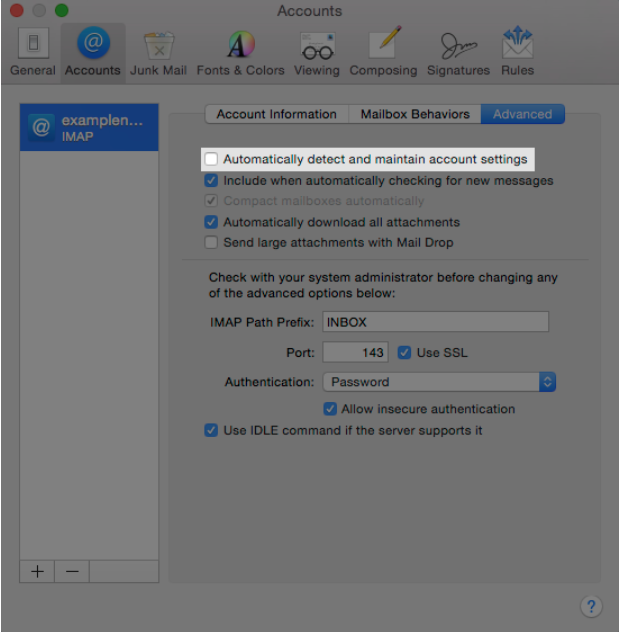
Complete Set Up on Yosemite OS (Optional)
If you are still running macOS Yosemite, follow these extra steps to avoid automatic changes to your settings:
- In the Mail app, go to Mail, select Preferences.
- Select the Accounts tab.
- Click Advanced and uncheck Automatically detect and maintain account settings.
- Now, click on the Account Information tab.
- Click the Advanced tab and uncheck Automatically detect and maintain account settings.
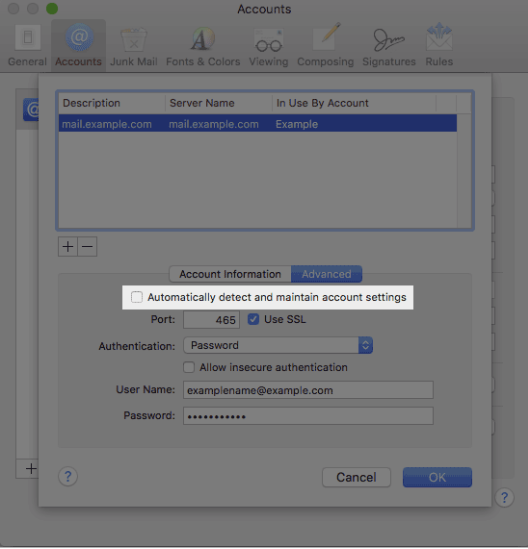
- Select OK to save changes.
Summary
Setting up Apple Mail on a Mac is quick and easy. Just add a new account, enter your email address and password, then configure the incoming and outgoing mail server. Choose IMAP or POP, enable SSL if needed, and you’re ready to send and receive emails across devices.
If you need further assistance, Bluehost Chat Support is available 24 hours a day, 7days a week while Bluehost Phone Support is available 7 days a week from 7 am-12 midnight EST.
- Chat Support - While on our website, you should see a CHAT bubble in the bottom right-hand corner of the page. Click anywhere on the bubble to begin a chat session.
- Phone Support -
- US: 888-401-4678
- International: +1 801-765-9400
You may also refer to our Knowledge Base articles to help answer common questions and guide you through various setup, configuration, and troubleshooting steps.