Self-Service Migration - How to Migrate a WordPress Website
This guide walks you through the complete WordPress site migration process—from start to finish—using Bluehost’s self‑service migration tool powered by InstaWP. Whether you’re moving an existing site or creating a new WordPress installation, this step‑by‑step guide helps you migrate a WordPress website—transfer your files, database, and content securely and efficiently.
Bluehost has partnered with InstaWP to deliver a streamlined WordPress migration experience. Using a branded Bluehost plugin powered by InstaWP’s industry‑leading migration technology, you can easily transfer WordPress sites from other hosting providers with minimal effort.
The tool is designed to reduce complexity, improve success rates, and provide support options for edge cases that require additional assistance.
Key Benefits
-
Reduced Complexity
A guided, user-friendly interface minimizes the technical knowledge required to complete a migration. -
Seamless User Experience
Easily migrate WordPress sites with minimal disruption. -
High Migration Success Rate
Designed to achieve a success rate of at least 85% in collaboration with our partner team. -
Enhanced Customer Support
Manual support is available for migration issues beyond standard Bluehost support capabilities.
This solution removes common technical barriers and helps users migrate faster and with greater confidence.
Migrate a WordPress Website
Here’s a quick and easy tutorial to help you migrate your website to Bluehost.
There are two supported ways to migrate your WordPress site:
Both methods use the same InstaWP‑powered migration plugin.
Migrate an Existing WordPress Site
Follow the steps below to move your existing WordPress site from another hosting provider to Bluehost using our self‑service migration tool.
- Log in to your Bluehost Portal.
- In the left-hand menu, click Websites.
- Click the Add Website button.
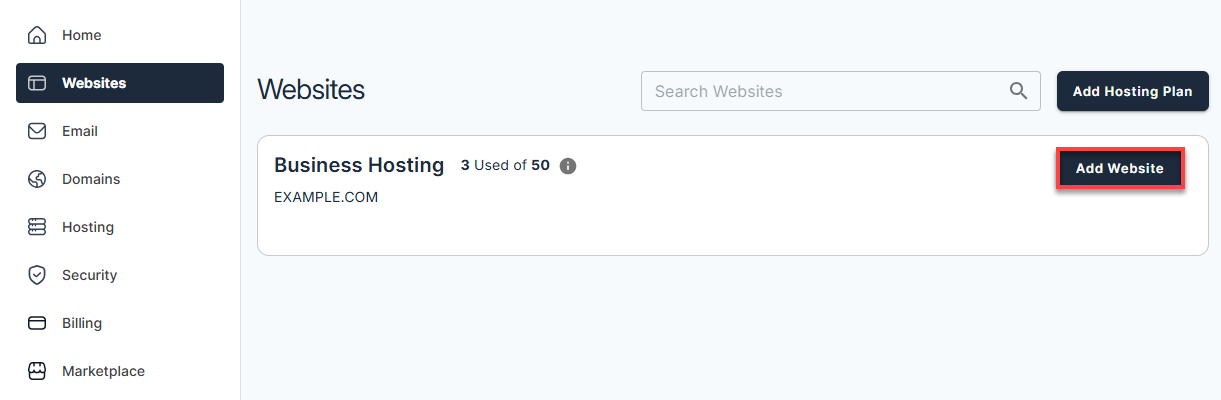
- Click Transfer WordPress Website to begin migrating your existing WordPress site to Bluehost.

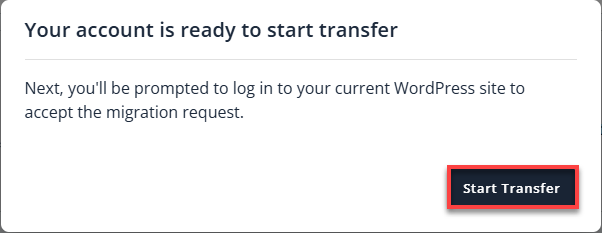
- Wait while Bluehost prepares your account for importing your WordPress site. This may take a few seconds.
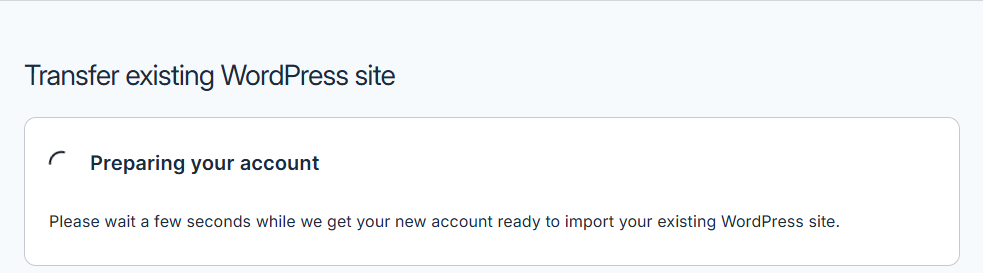
- Once your account is ready, click Start Transfer to continue.
- Wait while Bluehost prepares your account for migration.
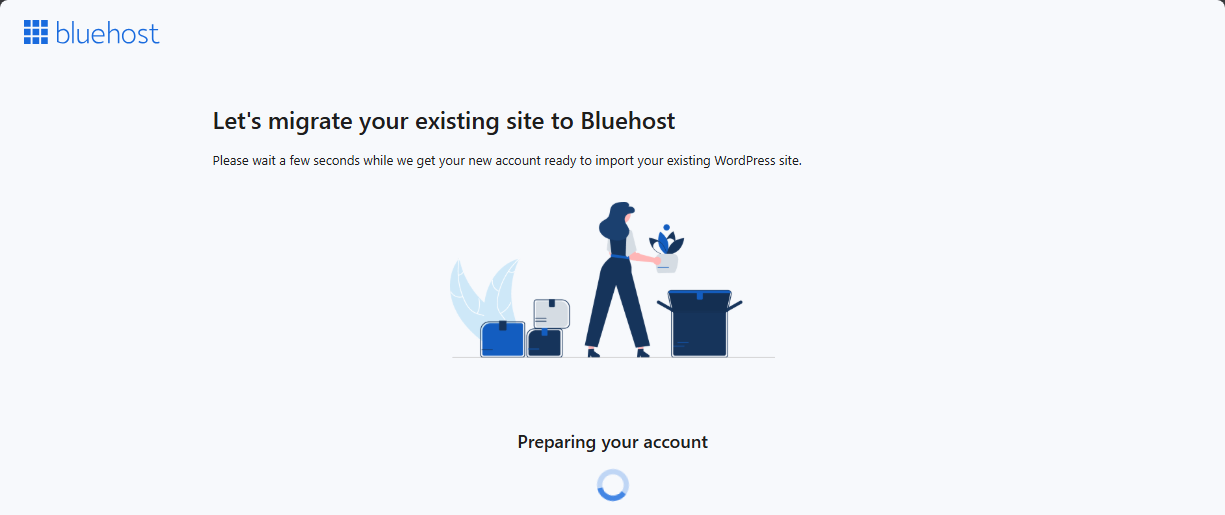
Do not close or refresh this page while the process is in progress. - Connect your website:
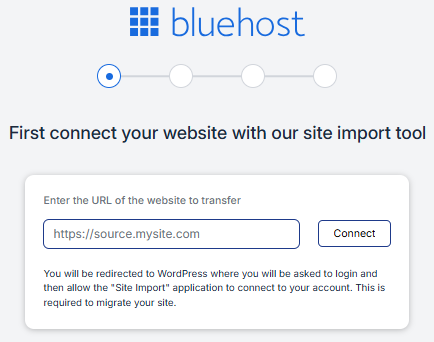
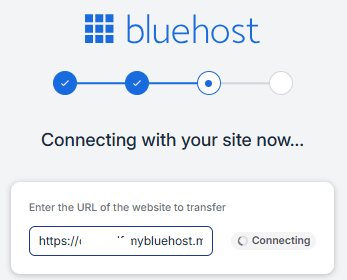
- Enter the URL of the WordPress site you want to transfer
(example:https://source.mysite.com). - Click Connect.
- Proceed by clicking Yes, Continue to Login.
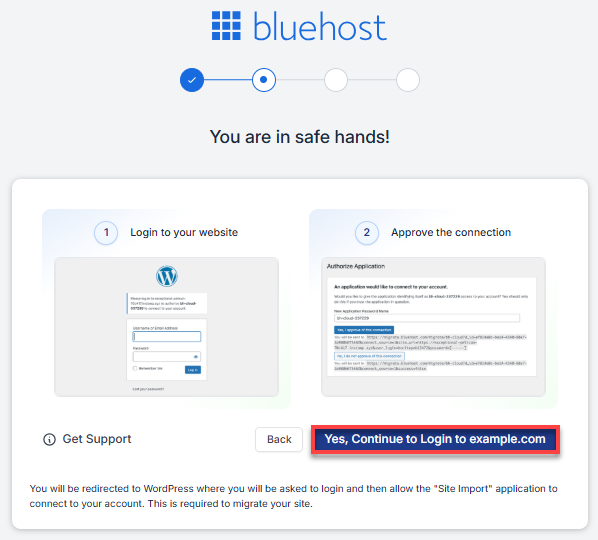
You’ll be redirected to your WordPress site to log in and authorize the connection. This step is required to migrate your site.
- Enter the URL of the WordPress site you want to transfer
- Log in to your WordPress site using your credentials:
- Enter your username or email address.
- Enter your password
- Click Log In
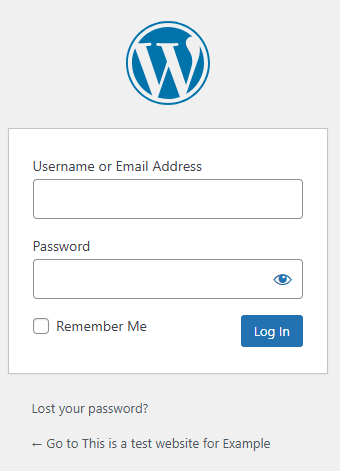
If you don’t remember your password, use the Lost your password? link to reset it.
- Authorize the Application. Click Yes, I approve this connection to allow Bluehost to connect to your WordPress site.
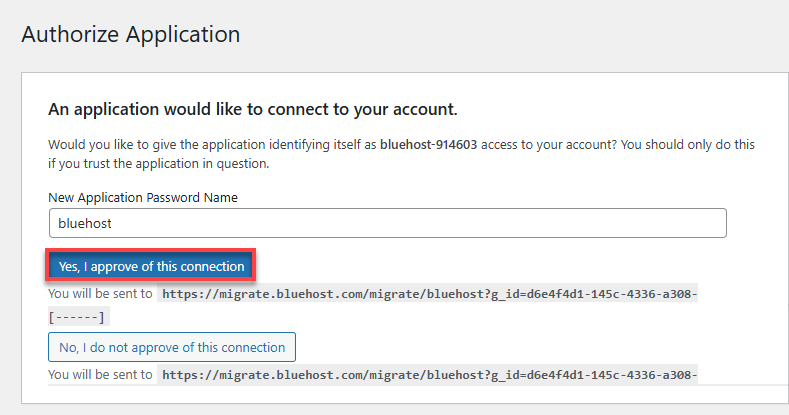
Without approval, the migration cannot continue. - Wait while Bluehost connects to your site.
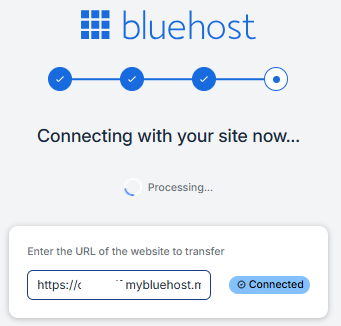
Once connected, Bluehost will automatically begin migrating your site.
- The status will change from Connecting to Connected.
- Do not close or refresh the page during this step.
- The status will change from Connecting to Connected.
- Your files, content, and database will now be transferred to Bluehost.
- Progress bars for Files and the Database will update as the migration runs.
- Do not close or refresh the page while migration is in progress.
- If needed, you can click Stop site transfer to cancel the migration.
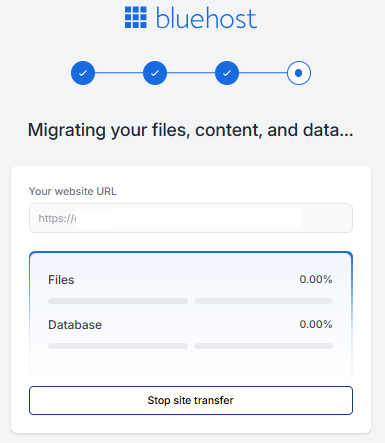
- At 50% progress, the system begins copying files and databases.
- You may safely close your browser—migration continues in the background.
- Email notifications are sent when the migration:
- Starts
- Completes successfully
- Fail
- If a migration fails:
- You may opt for paid pro‑services migration, or
- Submit a support ticket via the InstaWP support form
Self‑service migrations are monitored to identify failure patterns and continuously improve success rates.
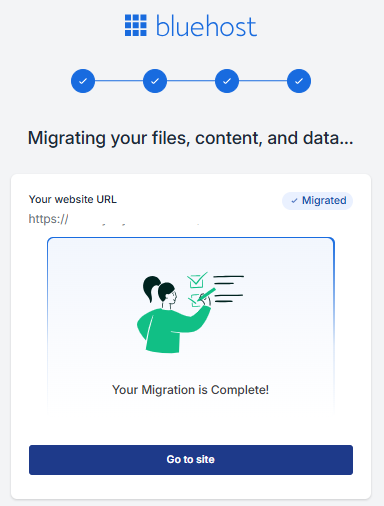
When migration is finished, you’ll see Your Migration is Complete! along with your site’s URL. Click Go to site to view your newly migrated WordPress site on Bluehost.
Migrate to a New WordPress Installation
Follow these steps if you want to create a new WordPress site on Bluehost first, then import content from an existing WordPress site hosted elsewhere.
- Install a new WordPress site from your Bluehost Portal.
- Once the installation is complete, click Import an Existing WordPress Site.

At this point, the migration process is the same as migrating an existing WordPress site.
Continue with Option 1: Migrate an Existing WordPress Site, starting from Step 7.
All remaining steps—including connecting your website, authorizing access, transferring files and the database, and completing the migration—are identical.
Summary
Bluehost, in partnership with InstaWP, offers a custom WordPress migration plugin that simplifies transferring sites from other hosts. With an intuitive workflow, real‑time updates, and expert support for complex cases, this self‑service solution delivers a faster and more reliable migration experience—helping you confidently migrate a WordPress website to Bluehost.
If you need further assistance, Bluehost Chat Support is available 24 hours a day, 7days a week while Bluehost Phone Support is available 7 days a week from 7 am-12 midnight EST.
- Chat Support - While on our website, you should see a CHAT bubble in the bottom right-hand corner of the page. Click anywhere on the bubble to begin a chat session.
- Phone Support -
- US: 888-401-4678
- International: +1 801-765-9400
You may also refer to our Knowledge Base articles to help answer common questions and guide you through various setup, configuration, and troubleshooting steps.