How to Setup FTP in Dreamweaver
Setting up FTP in Dreamweaver allows you to easily upload, manage, and publish your website files directly from the software. Whether you’re using Dreamweaver MX, MX 2004, CS5, or CC 2014, the FTP configuration process makes it possible to connect your site to your hosting server and streamline your workflow.
You’ll need to download and install the Dreamweaver software on your computer to get started. Once done, you can open the program and start setting up your workspace.
To set up FTP in Dreamweaver, follow these steps based on your version:
Configuring FTP for Dreamweaver (Version MX)
- Open DreamWeaver MX. Click on Site and choose New Site.
- Click on the Advanced tab.
- Under the site name, enter a phrase that describes your site. Dreamweaver will choose a local root folder for you.
- You must also enter your HTTP address and click on the Remote Info category.
- Change Access to FTP. Then, enter your FTP host, which is your domain name (for example, mysite.com) or the IP address of your server. For Host Directory, please type in public_html. Then, enter your login name and password. The login name will be the character username you received in your sign-up confirmation email.
- On the same screen, place a check in Automatically upload files to the server on save.
- Click on the Connect to remote site button.
- Make sure the second drop-down reads Remote View. You will see a list of files in your public_html folder.
- Double-click any file, edit it, and choose save. Dreamweaver will automatically update it on the server.
- Select local view from the site drop-down if you ever add images or other files that need to be uploaded.
- Select the files that need uploading and click the PUT button (up arrow).
Configuring FTP for Dreamweaver MX 2004
- Open DreamWeaver MX 2004. Click on Site and choose Manage Sites.
- Click the New button and choose Site.
- Under the Advanced Tab, fill in the Site name and HTTP Address (your domain name).
- Click the Remote Info category. Set Access Type to FTP.
- Ensure the host is your domain name (for example, mysite.com) or the server's IP address.
- Type public_html as the host directory.
- Type in your username and password, and click OK at the bottom.
- Click Done in the Manage Sites window.
- Now open your website and click Site, then choose Put.
- Dreamweaver will upload your files to the server.
FTP Setup on Dreamweaver CC 2014
Steps will vary slightly for Adobe Dreamweaver CC 2014.
Adding the FTP Server
- Go to the Site menu and click on New Site.
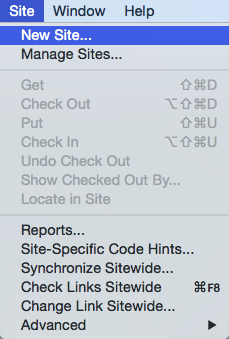
- On the Site Setup page, enter a name for this site. Then, choose a folder for storing your site on your computer.
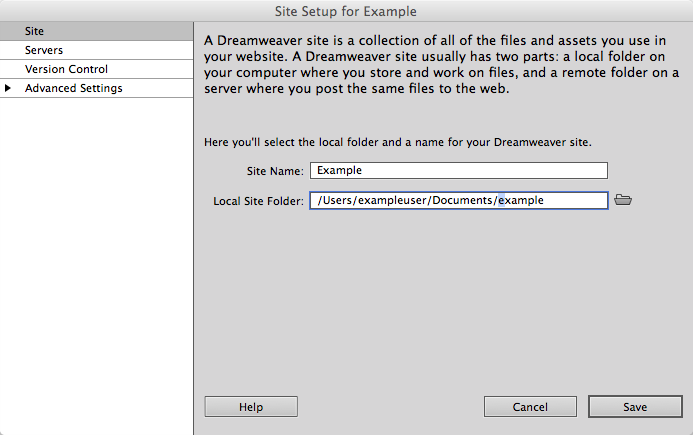
- Click Servers on the right side of the setup window.
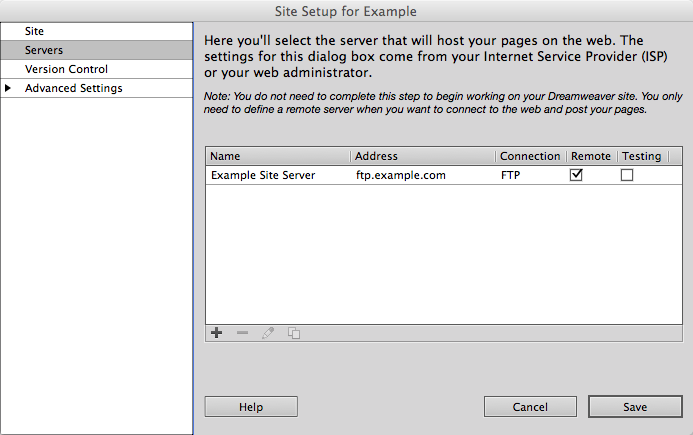
- On the Servers page, click the plus symbol or + to add a new server.
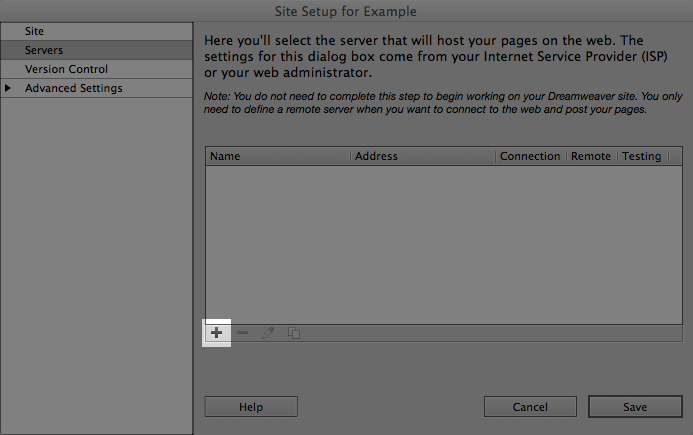
- On the new server page, fill out the FTP server settings.
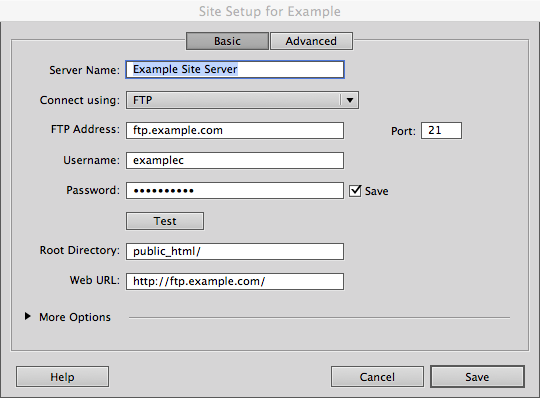
- The server name is any name you would like to give this server.
- The "Connect Using" setting should be set to FTP.
- The FTP Address is normally your domain with "ftp." added in front. If my domain were example.com, I would use ftp.example.com.
- The username should be your hosting account username.
- The Password should be your hosting account password.
- The Root Directory is normally public_html. If your site is hosted in another folder, use that folder.
- Web URL should be just the URL you access the site from.
- Click the test button to ensure the settings work and make any necessary corrections.
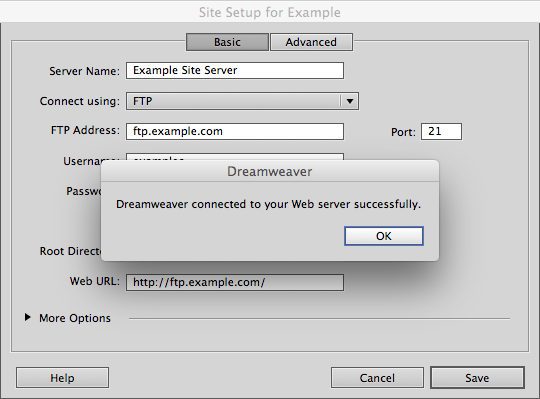
- Click Save.
- You should see the server in the list of servers for the site now. Click Save.
Publishing The Files
After you have followed the steps for adding the FTP Server, publishing the site is simple.
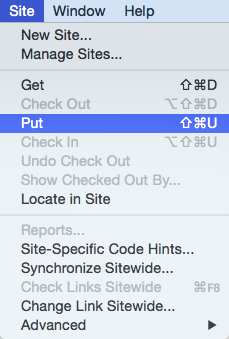
- Go to the Site menu and click on Put.
- Click yes if it asks you to publish dependent files.
That's It! You will see a progress box indicating it is publishing your files. When finished, it will go away automatically.
Publishing with DreamWeaver CS5
The steps for connecting Adobe Dreamweaver CS5, CS5.5, and CS6 are the same. This article will walk you through how to set up your site.
Configuring FTP
- Open Dreamweaver CS5. Click Site and choose New Site.
- For the site name, enter a phrase that describes your site.
- Click Servers from the left-hand side.
- Click the + button to add a server.
- Enter a server name.
- Connect using FTP. Then, enter your FTP host, which is your domain name (for example, mysite.com) or the IP address of your server.
- The Host or Root Directory should be public_html if this is your main site with us.
- Enter your login name and password. The login name will be the character username you received in your sign-up confirmation email. If you do not know it, please log in to the Bluehost Portal and go to the FTP accounts. It is the 8-character one. The password is the same one you set up when creating your account.
- Click more options.
- Click-use passive FTP.
- Save this information and connect to your account.
The message "Dreamweaver connected to your Web server successfully" indicates that you successfully connected to the FTP server.
Additional Troubleshooting
To continue troubleshooting, proceed to the section Verify login credentials. If you cannot log in to your FTP server, please check your firewall and make changes to allow FTP traffic. (Ports 20 and 21).
Dreamweaver MX
Problem:
How do I set up Dreamweaver MX for PHP and MySQL?
Solution:
Here are the settings for Dreamweaver MX with PHP and MySQL:
Create the MySQL Database and User
- Log in to your Bluehost account and click on MySQL Databases.
- Create a new database if needed. Create a MySQL database using our helpful MySQL database guide.
- Under Users, create a new user and password if you don't already have one you want to use. To create MySQL users, read our helpful guide on creating MySQL users.
- Add that user to the database. It is common to grant all permissions unless otherwise instructed.
- Add your IP address to the Allowed Host listing. Alternatively, you may add the * symbol. This is a wildcard and will allow connection from any computer if they have the correct username and password.
Now open Dreamweaver, create a new blank PHP page, then at the top bar, click on Site, then New.
Leave the "Local Info" as it is. Use the following Remote and Testing Server settings:
Remote Info:
- Access: FTP
- FTP Host: domainname.com
- Host Directory: public_html (this is the folder that your site loads to)
- Login: *********
- Password: *********
- The Passive FTP Box is checked!
Testing Server:
- Server Model: PHP/MySQL
- Access: FTP
- FTP Host: domainname.com
- Host Directory: public_html
- Login: *********
- Password: *********
- The Passive FTP box is checked!
- Url Prefix: http://www.domainname.com
Open the MySQL Connections Dialog Box. It is in the application window (on the left side) under the databases tab.
MySQL Connections Dialog Box:
- Connection Name: (whatever you name your connection)
- MySQL Server: localhost.
- User Name: (a database username that has access to the MySQL database(s)).
- Password: *******
- Database: (you have to specify one database name)
Dreamweaver 8
- Open up a file in Dreamweaver or select Create a New File.
- Select Site | Manage Sites
- Select the name of the site and click Edit
- This will show the site's Local Info.
- Select Remote Info.
The following settings should be entered:
- Access: FTP
- FTP host: ftp.yourdomain.ext
- Host directory: public_html/
- Login: username
- Password: ********
- Check the Save box next to the password
- Use passive FTP should be marked
- Click the Test button.
Summary
Dreamweaver is a popular web development tool used by both professionals and amateurs. The setup process might initially seem daunting, but it's quite simple. You'll need to download and install the Dreamweaver software on your computer to get started. Once done, you can open the program and start setting up your workspace.
To set up FTP in Dreamweaver, you should follow the steps based on your version, which include configuring FTP for Dreamweaver MX, Dreamweaver MX 2004, Dreamweaver CC 2014, and publishing with Dreamweaver CS5. Additional troubleshooting steps are provided if you face any issues during the process.
If you need further assistance, feel free to contact us via Chat or Phone:
- Chat Support - While on our website, you should see a CHAT bubble in the bottom right-hand corner of the page. Click anywhere on the bubble to begin a chat session.
- Phone Support -
- US: 888-401-4678
- International: +1 801-765-9400
You may also refer to our Knowledge Base articles to help answer common questions and guide you through various setup, configuration, and troubleshooting steps.