 ChatGPT,
  Claude,
  Gemini,
  Grok — all four for
 Generate SSH Keys: Windows & macOS/Unix (PowerShell, PuTTY)
SSH keys offer increased security and a convenient alternative to traditional password-based login for SSH (Secure Shell) connections. No username/password is required to connect to the server via SSH. Instead, the unique public and private keys provide secure authentication.
This article will walk you through how to generate and use SSH keys for secure server access.
What are SSH Keys, and How Does It Work?
You generate SSH keys as a pair. They consist of a Public key and a Private key.
- Private key - This is the key that stays on your local machine. Do not share this with anyone.
- Public key - This is the key placed on the server you want to connect to, so it can match your private key.
When you connect to a server, your SSH client uses a private key to verify your identity, and the server checks it with a public key. If the two match, you'll be granted remote access to the server. This removes the need to send a password to the server, making the process both safer and more convenient.
Benefits of Using SSH Keys
- Secure Authentication: SSH keys are a secure way to verify users and systems on remote servers, replacing the less secure method of using passwords.
- Encrypted Communication: SSH encrypts communication between devices, helping protect data in transit during remote access or file transfer.
- Automation of Secure Access: SSH keys allow automated scripts and processes to securely access servers or other remote devices without the need for you to enter your manual credentials each time.
- Remote Server Access: SSH keys are used to access servers remotely, allowing you to manage websites or databases securely without the risks of using passwords.
- Enhanced Security: SSH keys reduce exposure to password-based attacks, since the private key is never transmitted over the network.
- Convenience: With SSH keys, you don't need to remember complex passwords, as they allow password-less authentication, which makes remote server access faster and more convenient.
- Stronger Authentication: SSH keys use asymmetric cryptography, which provides much stronger authentication than a typical password.
How to Generate SSH Keys
In this section, we will discuss how you can generate SSH keys on various platforms.
Generate SSH Keys in Windows using PowerShell
Windows includes OpenSSH, which you can use in the command prompt or PowerShell.
- Press Windows + X or open the Start menu, and launch the PowerShell application.
- Type the following command in PowerShell to generate the SSH Key Pair.
ssh-keygen
Note: On current OpenSSH versions,ssh-keygengenerates an Ed25519 key by default. - Press Enter when you see the following prompt.
Enter a file in which to save the key (C:\Users\<username>\.ssh\id_ed25519):
- You will be prompted again to set a passphrase for added security.
- For additional protection, enter a passphrase, then press Enter.
- If you choose to skip this part, just press Enter twice.
- Once done, you will see a prompt similar to the following:
Your identification has been saved in C:\Users\<username>\.ssh\id_ed25519.
Your public key has been saved in C:\Users\<username>\.ssh\id_ed25519.pub.
The key fingerprint is:
SHA256: xxxxxxxxxxxxxxx...
- To check whether the keys were created successfully, navigate to the .ssh folder by running the following command.
cd ~\.ssh
You should see these two files:
- id_ed25519 (private key)
- id_ed25519.pub (public key)
Note: If the server or application you are connecting to does not support Ed25519, you can generate an RSA key instead. Use the following command to generate a 4096-bit RSA key:
ssh-keygen -t rsa -b 4096
The resulting files will be:
- id_rsa (private key)
- id_rsa.pub (public key)
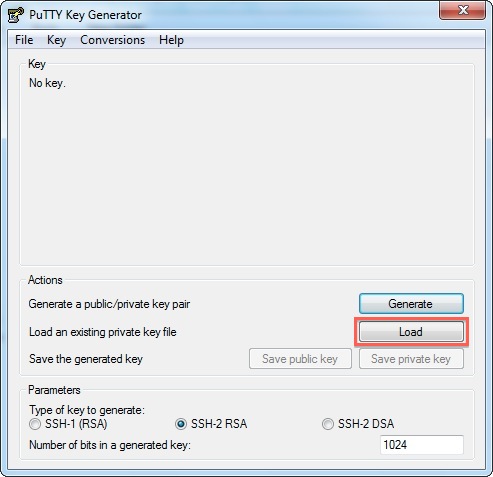
If you are using PuTTY, you will need your private key in .ppk format. To obtain this, download and open the PuTTYgen application. Take note that the steps provided are specific to using PuTTY.
- Click the Load button and locate the private SSH key you generated.
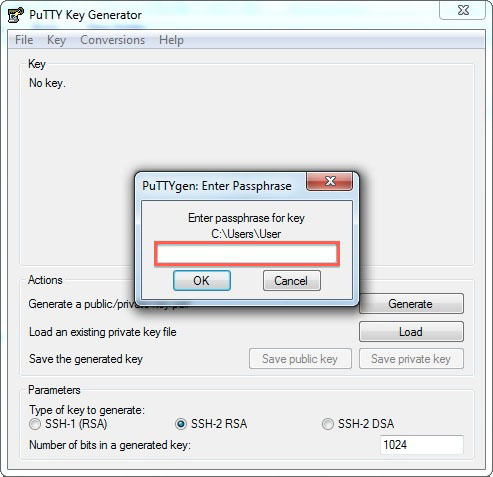
- Type in the passphrase for your SSH Key (if you previously opted for one).
- Click the Save private key button to create the .ppk file.
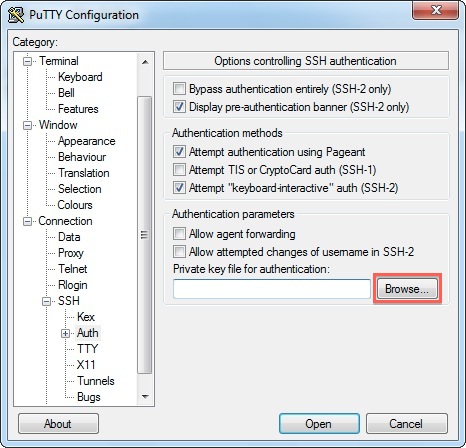
Once the SSH Key pair is generated, add the public key to the server you're connecting to. This should allow the server to authenticate you using the public key.
Visit the Manage SSH Keys in your Bluehost Portal article to learn how to add the public key to the SSH Management panel of your Bluehost Portal.
Generate SSH Keys in Unix or macOS Terminal
This section applies to OpenSSH users on Unix-like operating systems, including Linux, macOS, and BSD.
For most users, Ed25519 is the recommended key type.
- Launch your terminal application.
- Type the following command in your terminal.
ssh-keygen -t ed25519
- When you see the prompt "Enter file in which to save the key," press Enter again.
- Type a secure passphrase, then press Enter.
- Type the secure passphrase again to confirm, and then press Enter.
- You will receive a successful message with the details regarding the key you generated.
username@localhost ~ $ ssh-keygen -t ed25519
Generating public/private ed25519 key pair.
Enter file in which to save the key (/home/<username>/.ssh/id_ed25519):
Enter passphrase (empty for no passphrase):
Enter same passphrase again:
Your identification has been saved in /home/<username>/.ssh/id_ed25519.
Your public key has been saved in /home/<username>/.ssh/id_ed25519.pub.
The key fingerprint is:
SHA256:xxxxxxxxxxxxxxxxxxxxxxxxxxxxxxxxxxxxxxxxxxx username@localhost
The key's randomart image is:
+--[ED25519]--+
|    .         |
|   . .        |
|  . . .       |
| . . . .      |
|  .  .S.      |
| . . o .      |
|  . + +       |
|   o + .      |
|    . .       |
+----[SHA256]-----+
- (Optional) Check to ensure your ~/.ssh folder has the correct permissions. Type the following command:
chmod 0700 ~/.ssh
- Correct the file permissions within the ~/.ssh folder.
chmod 0600 ~/.ssh/*
You will receive a prompt similar to:
Your public key has been saved in /home/<username>/.ssh/id_ed25519.pub.
The text in the id_ed25519.pub file is your public key, which you need to add to your server.
Visit the Manage SSH Keys in your Bluehost Portal article to learn how to add the public key to the SSH Management panel of your Bluehost Portal.
Generate an RSA Key
If the server or application you are connecting to does not support Ed25519, you can generate a 4096-bit RSA key instead.
- Launch your terminal application.
- Type the following command in your terminal.
ssh-keygen -t rsa -b 4096
- When you see the prompt "Enter file in which to save the key," press Enter again.
- Type a secure passphrase, then press Enter.
- Type the secure passphrase again to confirm, and then press Enter.
- You will receive a successful message with the details regarding the key you generated.
username@localhost ~ $ ssh-keygen -t rsa -b 4096
Generating public/private rsa key pair.
Enter file in which to save the key (/home/<username>/.ssh/id_rsa):
Enter passphrase (empty for no passphrase):
Enter same passphrase again:
Your identification has been saved in /home/<username>/.ssh/id_rsa.
Your public key has been saved in /home/<username>/.ssh/id_rsa.pub.
The key fingerprint is:
SHA256:xxxxxxxxxxxxxxxxxxxxxxxxxxxxxxxxxxxxxxxxxxx username@localhost
The key's randomart image is:
+---[RSA 4096]----+
| .+.+=           |
| . *+            |
| o oo.*.         |
| + * ==.o        |
| S * =o++.       |
| = =+E=          |
| . = + .**       |
| = + oooo        |
| o ..o           |
+----[SHA256]-----+
- (Optional) Check to ensure your ~/.ssh folder has the correct permissions. Type the following command:
chmod 0700 ~/.ssh
- Correct the file permissions within the ~/.ssh folder.
chmod 0600 ~/.ssh/*
You will receive a prompt similar to:
Your public key has been saved in /home/<username>/.ssh/id_rsa.pub.
The text in the id_rsa.pub file is your public key, which you need to add to your server.
Visit the Manage SSH Keys in your Bluehost Portal article to learn how to add the public key to the SSH Management panel of your Bluehost Portal.
Generate SSH Keys in Windows using PuTTY
PuTTY is a well-known third-party application used to configure SSH access. If you prefer using this tool instead of the terminal, follow these steps.
- Launch the PuTTYgen application (PuTTY Key Generator).
- Once launched, select Ed25519 from the Type of key to generate options if it is available.
- If the server or application you are connecting to does not support Ed25519, select RSA instead.
- If you selected RSA, for the Number of bits in a generated key, use 4096.
- Select the Generate button to generate the key pair. Keep moving your mouse over the PuTTYgen window until the progress bar is full.
- (Optional) You can type a comment in the Key comment field to help identify this SSH key pair.
- (Optional but recommended) You can also type a secure passphrase in the Key passphrase and Confirm passphrase fields.
- Select the Save private key button to save your private key to your computer. The private key is saved in PuTTY's .ppk format. Keep this file secure and do not share it.
- Click on the Save public key button. You can also copy the public key from the text box or just click the button to save it in a separate file.
- To check if you saved both keys, locate the files you saved. Depending on the key type you selected, you will have a private key and a corresponding public key.
- To log into your remote server with an SSH key pair, you first need to upload your public key to the server.
Visit the Manage SSH Keys in your Bluehost Portal article to learn how to add the public key to the SSH Management panel of your Bluehost Portal.
How to Connect to Your Server Using SSH
Follow the instructions below to connect to your server using SSH from Windows, Linux, or macOS.
Windows
To log in to your server with PuTTY and a public key, please see Using SSH on Windows (PuTTY) for step-by-step instructions.
Linux or macOS
To log in to your server with an SSH key using Linux or macOS:
- Open your Terminal.
- Enter the following command. Replace port with the port number, ssh-key with the file path, and IP with your IP address.
ssh -p port -i ssh-key user@IP
For example:
ssh -p 22 -i ~/.ssh/id_ed25519 [email protected]
Replace 22 with your SSH port, ~/.ssh/id_ed25519 with the path to your private key, username with your SSH username, and 203.0.113.10 with your server's IP address.
- Enter the passphrase for the key. Using a passphrase with your SSH key is important because it helps protect your private key if someone obtains a copy of the key file. Without a passphrase, anyone who obtains a copy of your private key file could use it to access your server.
For example:
~/.ssh/id_ed25519
Note: If you generated an RSA key instead, replaceid_ed25519withid_rsa.
After entering the passphrase, you'll be connected to the server.
Summary
SSH keys offer a more secure and convenient alternative to passwords for SSH connections. This article explains how SSH keys work, detailing the benefits of using SSH keys for secure authentication, encrypted communication, and automated access. Understand how to generate SSH keys on Windows using PowerShell or PuTTYgen, and Unix/macOS using Terminal. For most current OpenSSH installations, ssh-keygen generates an Ed25519 key by default. If Ed25519 is not supported by the server or application, you can generate a 4096-bit RSA key instead. The guide covers generating SSH keys, adding your public SSH key to a server, and connecting to your server using SSH keys.
If you need further assistance, Bluehost Chat Support is available 24 hours a day, 7days a week while Bluehost Phone Support is available 7 days a week from 7 am-12 midnight EST.
- Chat Support - While on our website, you should see a CHAT bubble in the bottom right-hand corner of the page. Click anywhere on the bubble to begin a chat session.
- Phone Support -
- US: 888-401-4678
- International: +1 801-765-9400
You may also refer to our Knowledge Base articles to help answer common questions and guide you through various setup, configuration, and troubleshooting steps.