A Guide to Free SSL Certificates with Let's Encrypt
Keeping your website secured at all times is important, and activating a free SSL certificate is an effective way to do it. SSL certificates make a secure connection between your site and visitors, keeping shared information private, such as passwords and credit card details. Websites with SSL certificates display the "https" in their URL and a padlock logo in the browser, indicating they are secure and trustworthy.
Here are the topics discussed in this article:
- Manage the Free SSL Certificate, Let's Encrypt
- Force HTTPS via the .htaccess File
- Why Do I Need an SSL Certificate?
- Summary
Here is a video showing how to set up your Free SSL, Let's Encrypt.
Manage the Free SSL Certificate, Let's Encrypt
To activate your Free SSL certificate, Let's Encrypt, make sure to connect your website to your Bluehost hosting account. If it's already connected, redirect visitors from HTTP to HTTPS via your site's .htaccess file.
For domains managed elsewhere, create an A record in your provider's DNS and link the domain to Bluehost to activate the Free SSL.
- Log in to your Bluehost Account Manager.
- In the left-hand menu, click Websites.
- Click the Manage button located next to the website you want to manage.

- On the website management page, you'll find different functionalities for your website, including the SSL certificate.
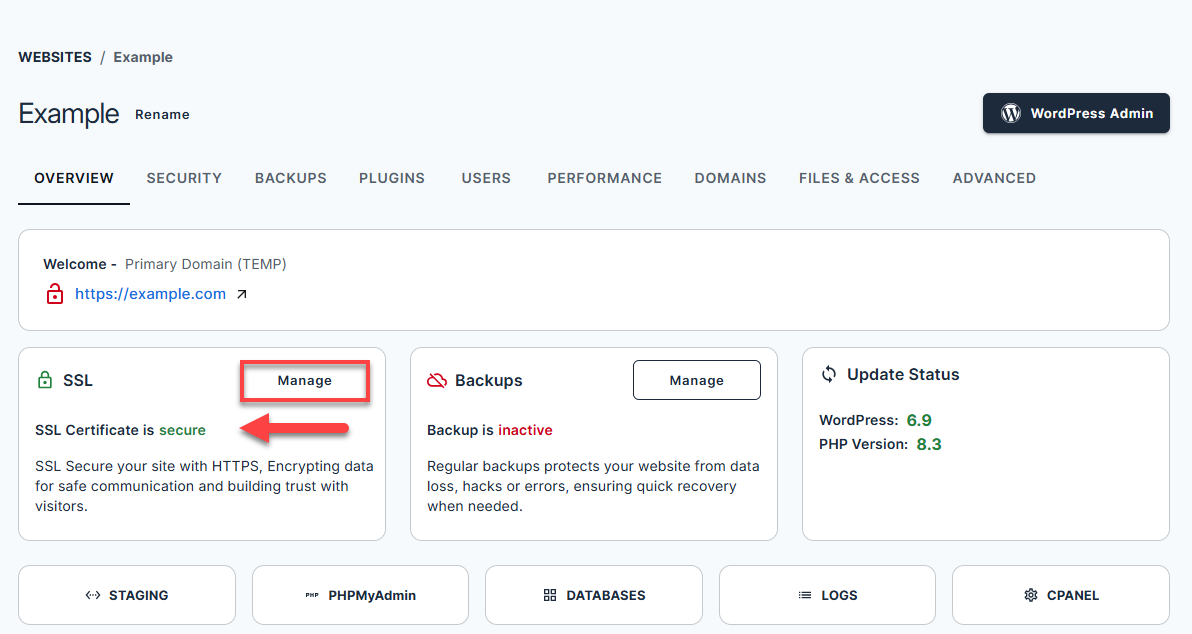
- If the SSL certificate is properly configured, the SSL card will show as "SSL Certificate is secure."
- If the SSL certificate is not properly set up, it will show as "SSL Certificate is not secure."
- Click the MANAGE button under the SSL card or the SECURITY tab.
- Under the SSL Certificates card, the type and status of your SSL will be displayed.
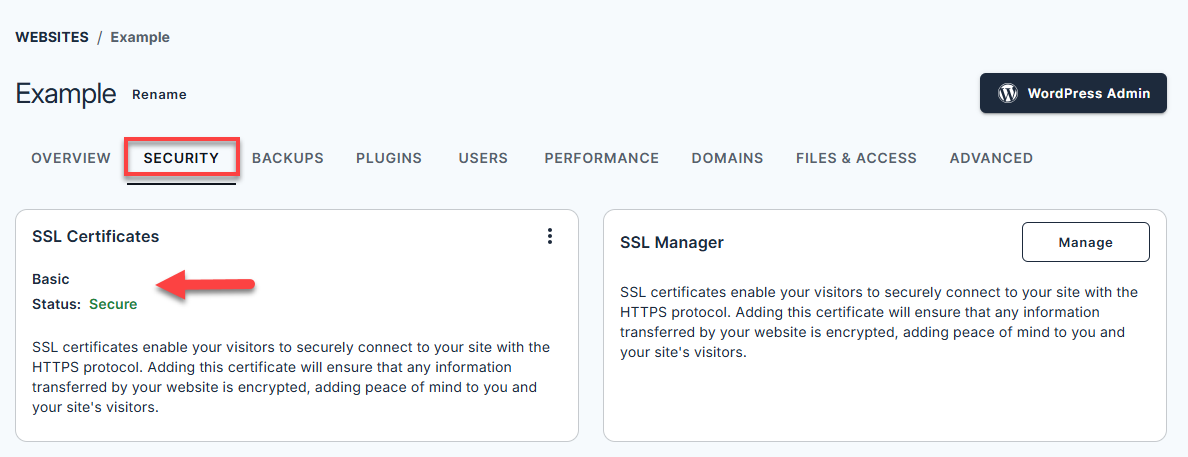
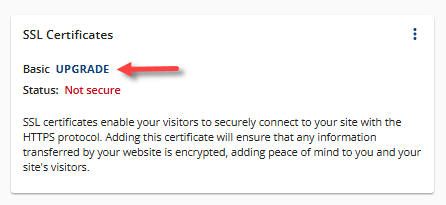
- If you see Basic, your site is currently using the Free SSL, Let's Encrypt.
- If you see Basic, your site is currently using the Free SSL, Let's Encrypt.
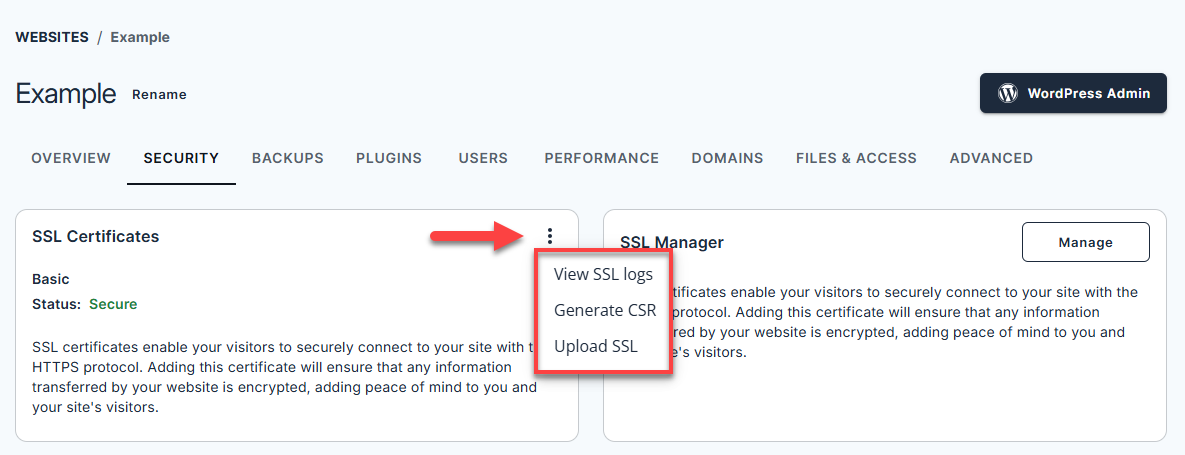
- Select the vertical ellipsis icon on the right to view additional options—View SSL logs, Generate CSR, and Upload SSL.
Activate the Free SSL Certificate
- If the SSL Certificates card shows as "Not secure," click the vertical ellipsis icon, then select View SSL logs.
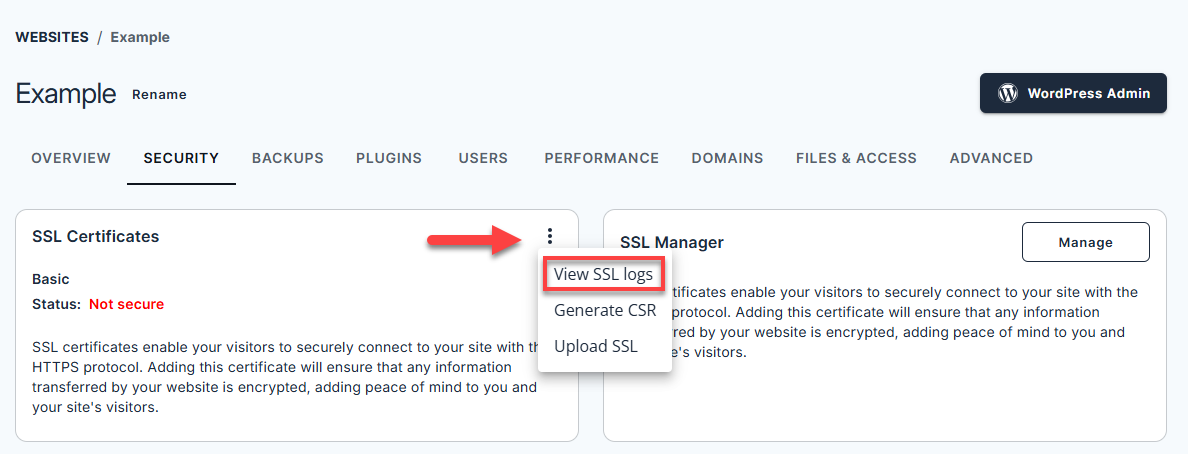
- You will be redirected to your cPanel's SSL/TLS Status section in a new tab. Select the domain name you want to activate Let's Encrypt.
- Next, click the Run AutoSSL button.
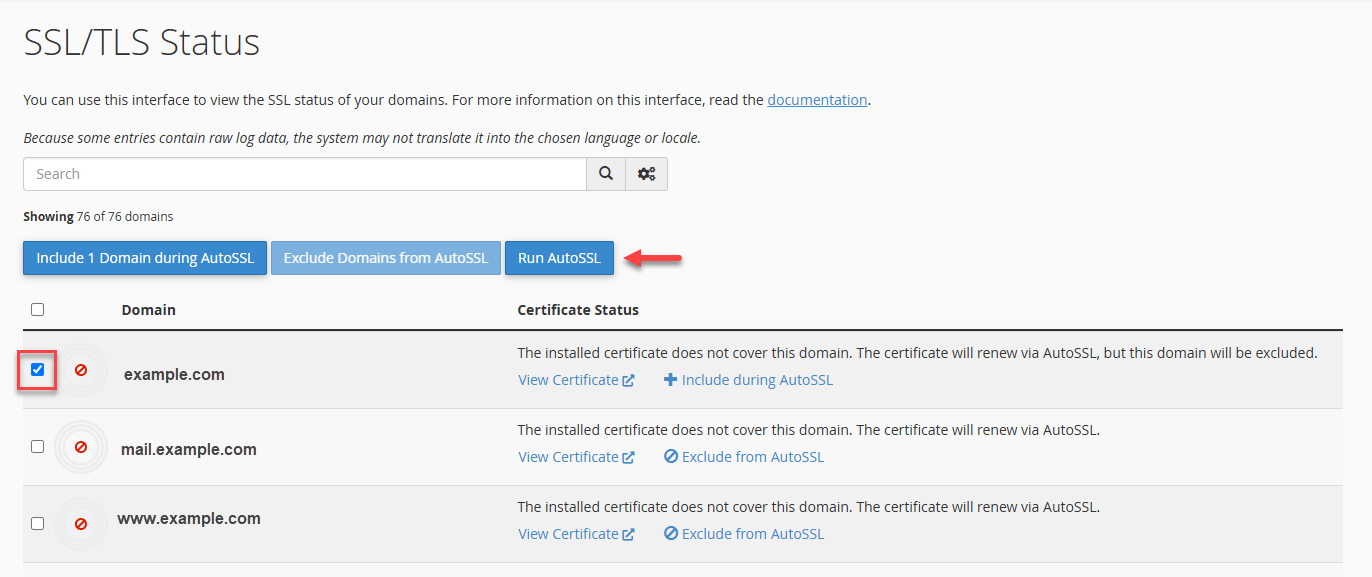
If you previously stopped or "excluded" your domain from AutoSSL, click the + Include during AutoSSL link, then click Run AutoSSL.

A notification will appear at the top: "Success: The following domains have had their AutoSSL exclusion removed: “example.com."
- This may take a few minutes. Once successful, it will show you "AutoSSL Domain Validated."

Uninstall the Free SSL Certificate
Uninstalling the Free SSL Certificates will leave your website unsecured unless you plan to use another SSL Certificate to keep your site protected and maintain the "https" display in your visitors' browsers.
- Within the cPanel's SSL/TLS section, select the domain name for which you need to uninstall the free SSL certificate.
- Select Exclude from AutoSSL.

- A notification will appear at the top:
Success: The following domains will now be excluded from the AutoSSL process: “example.info."
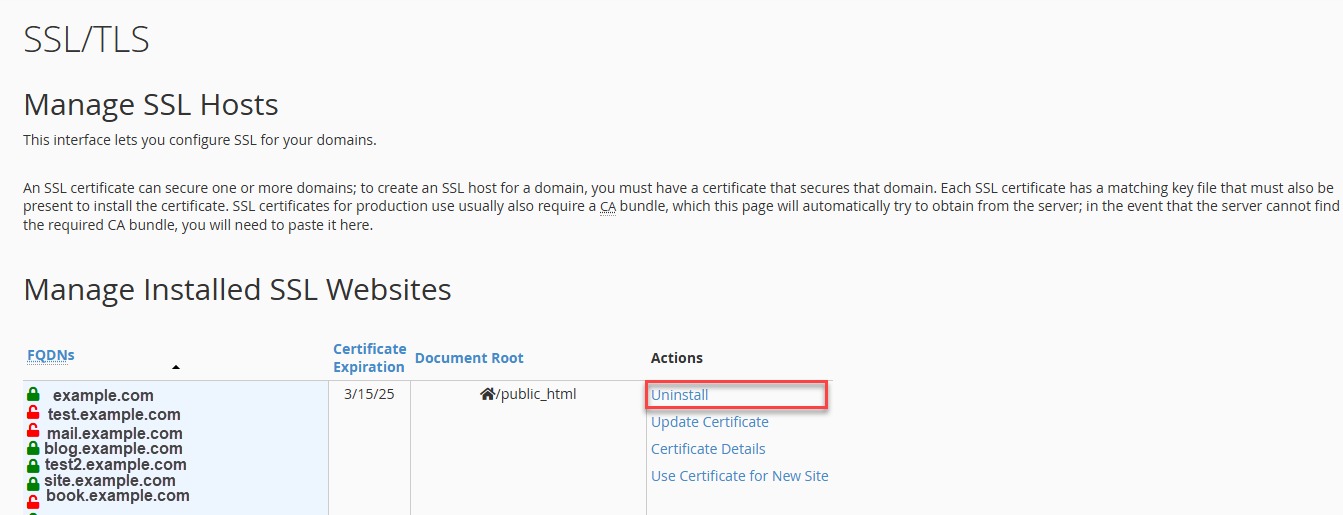
- Click View Certificate.

- You'll be redirected to the Manage SSL Hosts section of your cPanel. Look for the domain's panel, then click Uninstall under the Actions column.
Upgrade from Free SSL to Paid SSL
For business owners, switching from a free SSL to a paid SSL might be your top choice to boost website security. Paid SSL certificates frequently include warranty coverage and support for multiple domains or subdomains, making them ideal for e-commerce or websites handling sensitive data, compared to free SSL certificates, which have some limitations in that case. Upgrades are straightforward and can be completed through your Account Manager.
To upgrade your free SSL certificate to the paid SSL certificate offered by Bluehost, please follow these steps:
- Click the UPGRADE link under the SSL Certificates card.
- A pop-up will appear showing the available SSL plans. Select your preferred SSL plan.
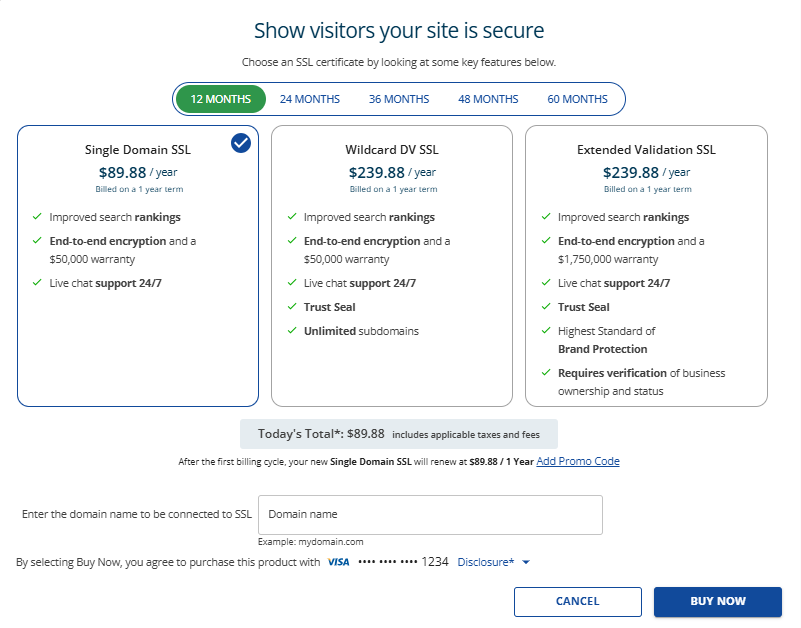
The prices shown in the image above may change in the future.
- Click the BUY NOW button. You may need to add a payment method if you don't have one on file.
- Complete the payment transaction.
Force HTTPS via the .htaccess File
The Free SSL does not automatically enforce HTTPS on your domain or subdomain; it must be activated manually. This can be done by updating the .htaccess file to apply HTTPS across all pages. The steps for enabling Free SSL may differ based on how your website was created. To learn more about it, check out our article How To Force HTTPS On All Pages In .htaccess File.
Why Do I Need an SSL Certificate?
Bluehost offers free SSL certificates for all domain names that are assigned or parked in your account. For the most part, the SSL will install and assign itself to all of your domains — new and old — but certain users might need to manually enable the certificate.
There are different reasons why you need to install an SSL Certificate for your website, such as:
- Security: It encrypts the data exchanged between your website and your visitors, protecting it from being intercepted by hackers. This is crucial for any website that handles confidential information, such as credit card details, login credentials, or personal data.
- Trust: Websites with SSL certificates display a padlock icon in the address bar, signaling to visitors that their connection is secure. This builds trust and credibility with your audience, showing that you value their privacy and security.
- SEO Ranking: Google and other search engines prefer websites that are secure. Having an SSL certificate can help improve your website’s search engine ranking, making it more visible to potential visitors.
- Compliance: Certain regulations and standards, like the Payment Card Industry Data Security Standard (PCI DSS), require websites that process credit card information to have an SSL certificate as part of their compliance measures.
- Preventing "Not Secure" Warnings: Modern browsers alert users if they're visiting a non-HTTPS website, often displaying a "Not Secure" warning. This can deter visitors from staying on your site. An SSL certificate ensures your website is accessed via HTTPS, preventing these warnings.
Summary
Securing your WordPress website is essential for protecting user data and building trust. This article walks you through managing, activating, uninstalling, and upgrading a free SSL certificate using Let's Encrypt via your Bluehost Account Manager and cPanel. It also highlights the benefits of SSL for security, SEO, compliance, and user trust.
If you need further assistance, feel free to contact us via Chat or Phone:
- Chat Support - While on our website, you should see a CHAT bubble in the bottom right-hand corner of the page. Click anywhere on the bubble to begin a chat session.
- Phone Support -
- US: 888-401-4678
- International: +1 801-765-9400
You may also refer to our Knowledge Base articles to help answer common questions and guide you through various setup, configuration, and troubleshooting steps.