Jetpack Backup and Restore
Jetpack Backup and Restore is a powerful tool that lets you restore or download your site at any time, like a magic undo button for WordPress. With Jetpack Backup and Restore, you can confidently develop your site without worrying about losing any content, whether a word, image, page, or anything else.
The best part is that Jetpack Backup and Restore automatically create backups for you, so you don't have to worry about manually saving your work whenever you change. This means you can focus on creating great content and building your site without the stress of losing anything important.
- Why Choose Jetpack Backup and Restore?
- How do I Get Jetpack Backup and Restore?
- Getting Started
- What Data Is Backed Up in Jetpack Backup and Restore?
- What Does Real-Time Mean?
- When Do Daily Backups Occur?
- Does Jetpack Backup and Restore Support Multisite?
- Where Are Backups Stored?
- Restoring With Jetpack Backup and Restore
- Summary
Why Choose Jetpack Backup and Restore?
Jetpack offers several compelling advantages for WordPress site owners because of its convenience, security, and peace of mind. Check out its standout benefits:
- Automated, real-time backups. Jetpack provides real-time, automated backups that ensure every change made to your site is instantly saved. This is particularly beneficial for dynamic websites that frequently update content, products, or user information. You don't have to remember to manually back up your site because Jetpack does it for you.
- Off-site storage. Backups are safely kept in a remote, secure location that safeguards your data against server failures, hacking, and data loss scenarios. This separation ensures that even if your website is compromised, your backup files remain readily accessible.
- One-click restores. With Jetpack, restoring your site from a backup is straightforward. Whether dealing with a minor issue or recovering from a significant problem, you can restore your site to any previous state with just one click from the dashboard. This simplicity minimizes downtime and gets your site back up and running quickly.
- Incremental backups. Jetpack's approach to incremental backups means only the changes since the last backup are saved. This reduces server load and ensures efficient resource use. This method is less intrusive and allows your site to operate smoothly without the performance hits associated with full-site backups.
- Activity log for easy troubleshooting. The integrated activity log tracks all changes and enables you to pinpoint when specific changes were made. This is crucial for troubleshooting issues because you'll be able to identify when a problem first appeared, and then you can choose the optimal restore point.
- Expert support. Premium plans come with specialist support from WordPress experts. Suppose you encounter any issues with your backups or restores. In that case, you can easily reach experienced support staff who are ready to guide you through any challenges and resolve your concerns.
- Versatility and convenience. Jetpack's backup and restore services are part of the plugin's broader suite of tools, from security enhancements to performance optimizations. This integration means you're getting a backup solution and a comprehensive package to improve and secure your WordPress site.
How do I get Jetpack Backup and Restore?
Jetpack Backup and Restore and the Jetpack account require WordPress.com credentials. Please see Jetpack - Create WordPress and Account Setup for a complete step-by-step guide on creating a free WordPress.com account to begin with Jetpack.
Jetpack Backup and Restore is available to users who have purchased the standalone Jetpack Backup solution, Jetpack Security, and Jetpack Complete.
Getting Started
Once Jetpack is activated, your first backup will be created as soon as you purchase.
At the top of your activity log, you’ll be prompted to enter your site's remote access or server credentials. They’re also required for site restores. If you don’t see a notification at the top of the activity log indicating that a backup is running, you can add those credentials to start backups.

These credentials allow you to connect for backups if the Jetpack connection isn’t working. They’re also required for site restores. If you don’t see a notification at the top of the activity log indicating that a backup is running, you can add those credentials to start backups.
As soon as backups start, you’ll see a Backup complete event in your activity log. They’ll run either daily or whenever you make changes, ensuring your site is securely backed up.

Click the three dots to the event's right to show available restore and download options.
If Jetpack loses contact with your site and your backups stop working, it will email you after the second failed backup attempt.
What Data Is Backed Up in Jetpack Backup and Restore?
We back up the following data:
- Your WordPress database. (Specifically, any tables that begin with your WordPress table prefix and have a unique or primary key.)
- Every file in the uploads, themes, mu-plugins, and plugins directories.
- Everything in your WordPress root directory that's not another WordPress install.
- Other select files inside the wp-content directory.
This data set contains all your unique and valuable WordPress data and everything seamlessly integrated within your WordPress setup.
We do not back up:
- WordPress’ core files can be downloaded from WordPress.org at any time.
- Files are located outside the directories mentioned above.
- Database tables that are unrelated to WordPress.
- Database tables where the rows do not have a unique identifier.
- Cache and backup directories.
- Additional WordPress installs. (In subdirectories, for example.)
Additionally, we'll exclude any directory containing a file named .donotbackup. You can create these files to prevent specific directories from being backed up. If a directory name do-not-backup is added, we will also exclude all files contained within that directory.
What Does Real-Time Mean?
Jetpack Backup and Restore uses WordPress’ built-in “hooks” system to receive alerts when specific data on your site changes. Jetpack quickly syncs those changes with our servers to produce a backup of your site.
Information that’s backed up in real-time includes changes to:
- WordPress’ core database tables.
- WooCommerce database tables.
- Any associated file changes (uploaded media, for example).
Other changes are backed up daily.
When Do Daily Backups Occur?
Daily backups typically occur 24 hours after the previous backup. However, setting a specific time window for daily backups is impossible.
Does Jetpack Backup and Restore Support Multisite?
At the moment, Jetpack Backup and Restore cannot support multisite.
Where Are Backup and Restore Stored?
Jetpack stores your backups on servers in our secure data centers worldwide.
While it isn’t impossible to restrict data storage to a particular geographic location, we offer the Standard Contractual Clauses as part of our Data Processing Agreement (DPA). DPAs act as contractual instruments for websites and companies. They commit to demonstrating to their customers, vendors, and partners that their data management adheres to legal standards, including the transfer of data from the EU.
Restoring With Jetpack Backup and Restore
You can now restore from a backup in just a few clicks.
There are three different ways to restore your site:
- Restore your site to a particular event (if your plan includes real-time backups).
- Restore your site to a specific day.
- Download a backup and restore manually.
Restore Your Site to a Particular Event
- Log in to your Bluehost Account Manager.
- In the left-hand menu, click Websites.
- Click the Manage button located next to the website you want to manage.

- From the horizontal menu, select the Backups tab.

- Click on the Manage button.

- Open your Activity Log.
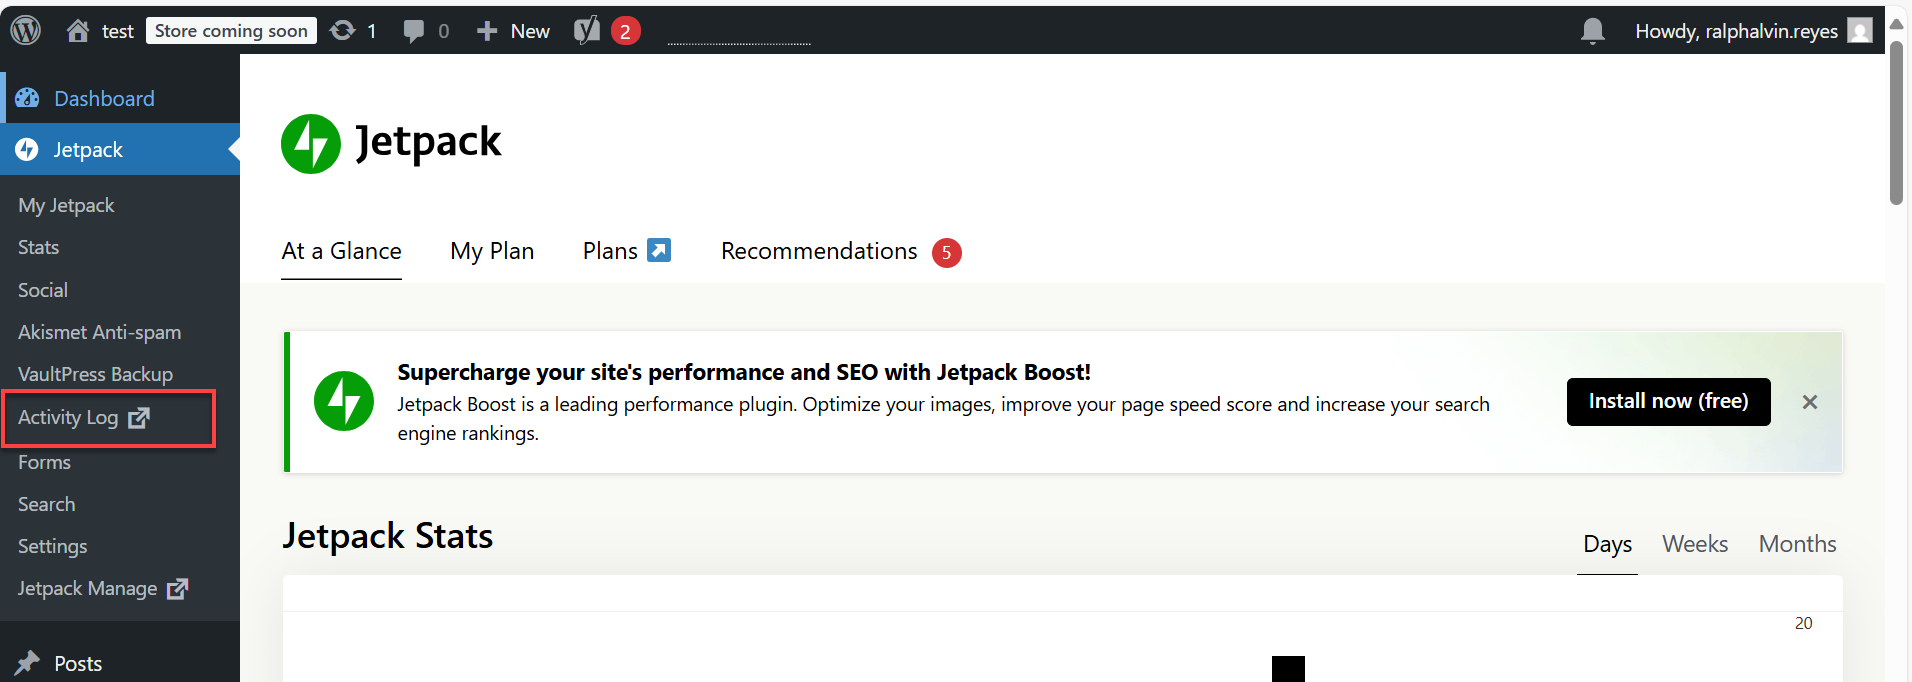
- Use the filters to search by selected day(s) and find the event you want to restore.
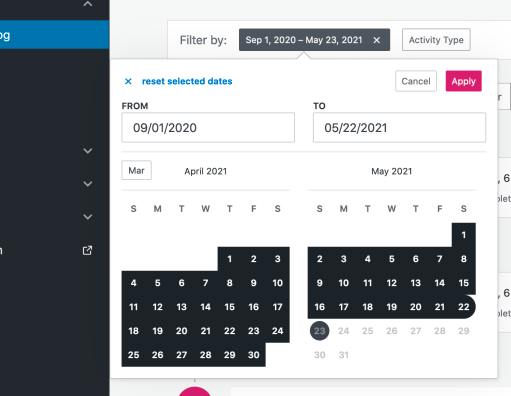
- Click the ellipsis (three dots) icon, then click Restore to this point to open the Restore Site dialog box.

- Click Confirm Restore.
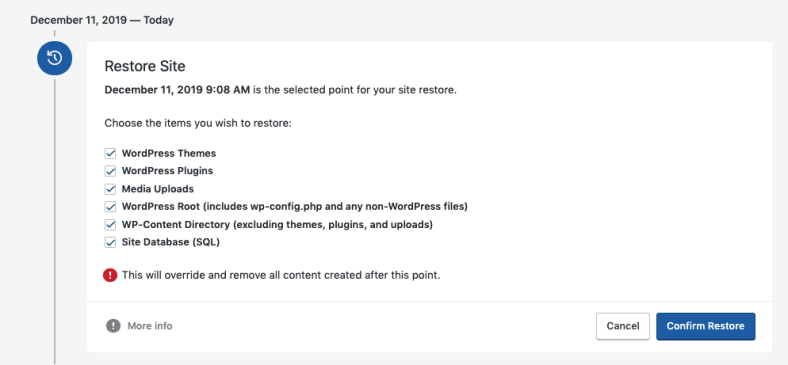
- Your restore to the specific point in time you have selected will begin. You can track the restoration's progress at the top of the activity log. Email updates regarding the status of your restoration will also be sent to you.

- A confirmation message will appear once the restore is finished.
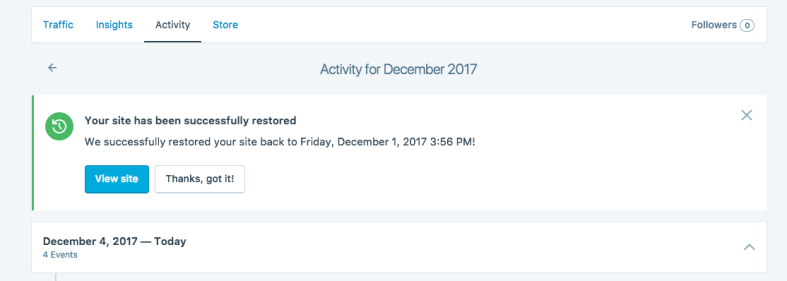
- Click View Site to see your site restored to your selected event.
Restore Your Site to a Particular Day
- The most recent backup of your website will be displayed. (Or the time of your next backup, if you haven't completed one today).
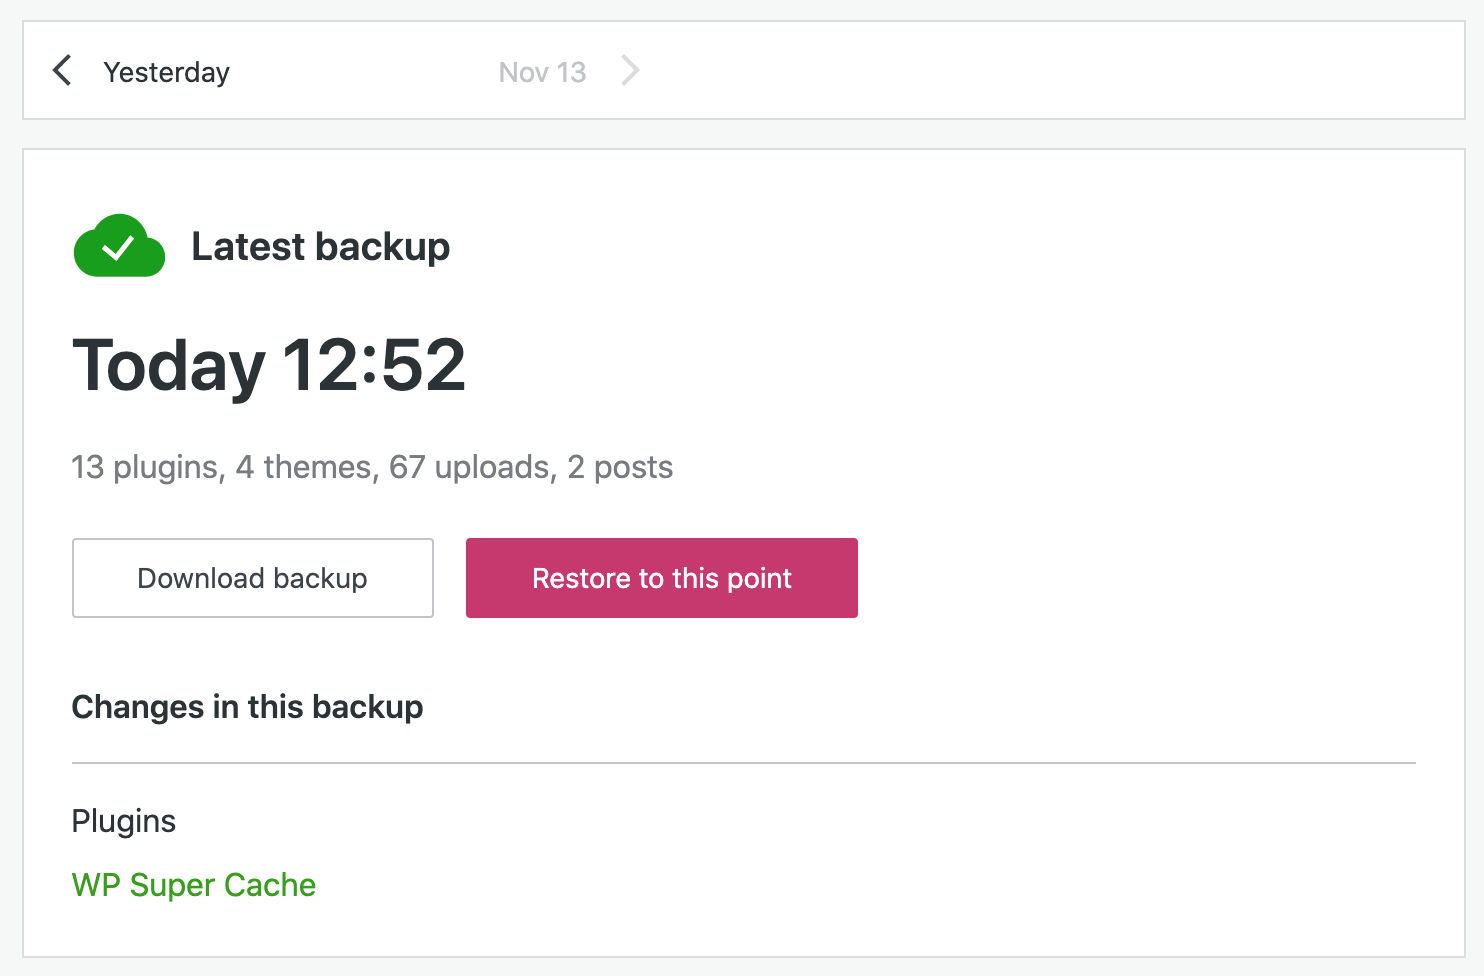
- Use the navigation bar to find the day you want to restore to. Each day, it will show the time of the latest backup and any changes included in that backup.
- When you find the day you want, click Restore to this point to restore to the latest backup point for that day. Decide which objects you want to restore, then click Confirm Restore.
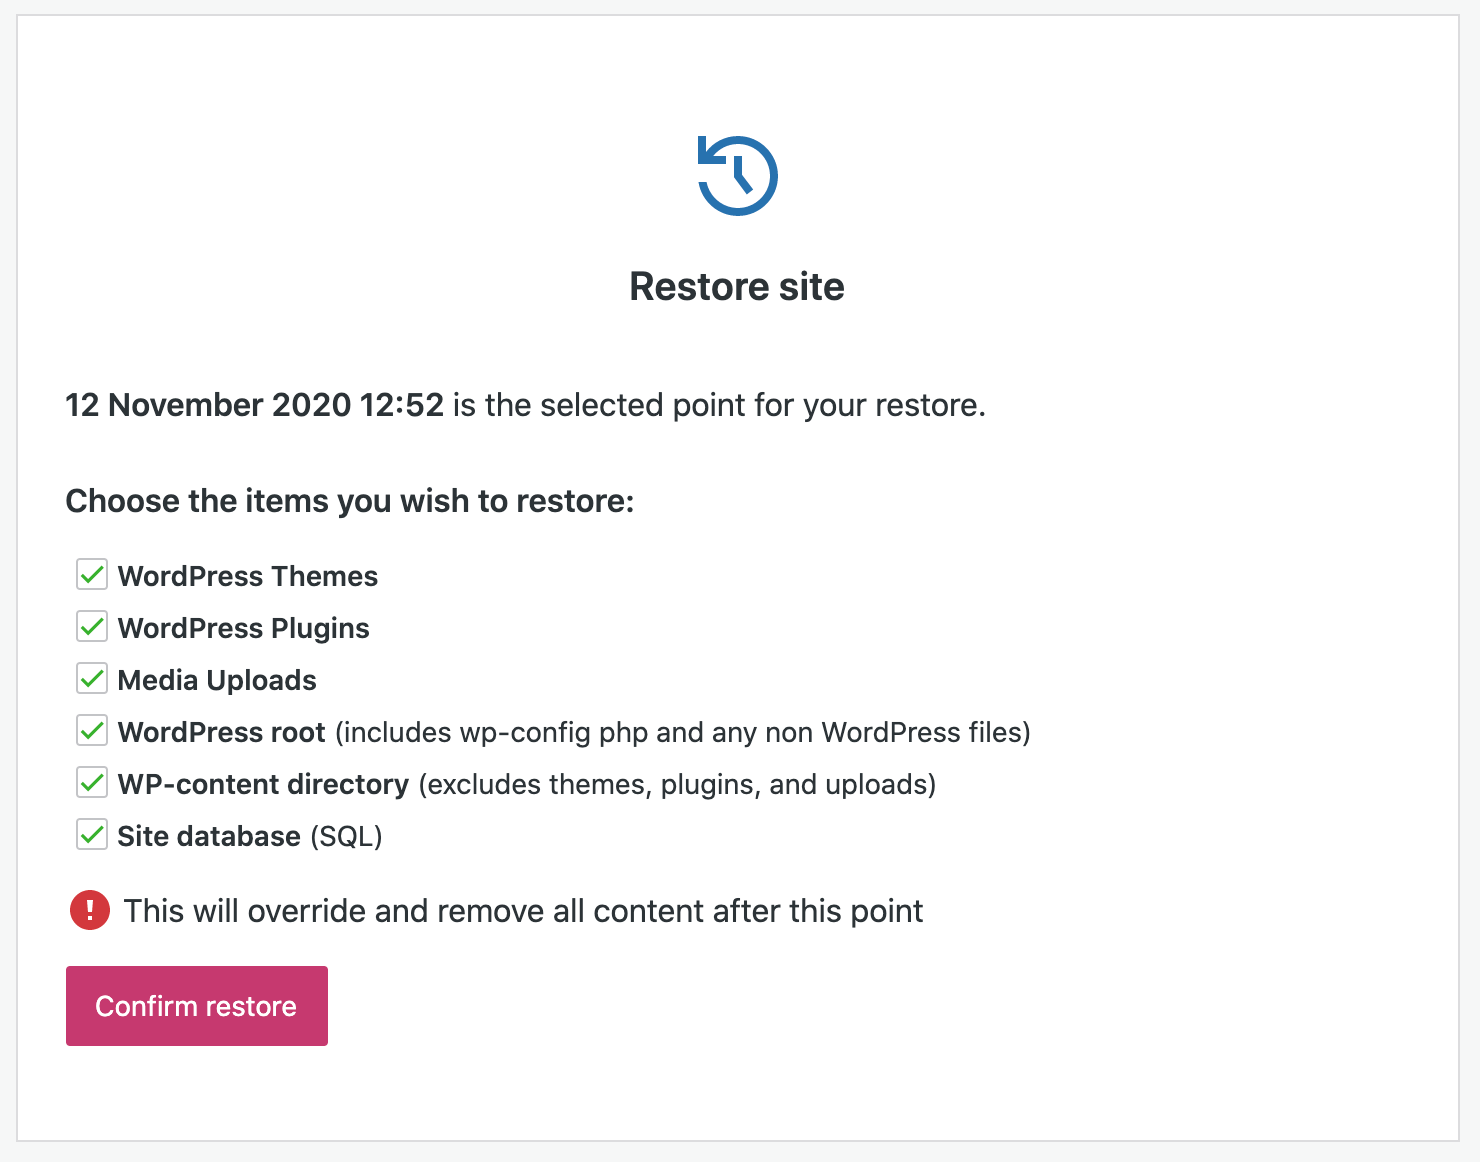
- If you have one of our ‘real-time’ backup solutions, other events for that day will be listed below the latest backup, so you can restore to a different point on that day if you wish.
Download a Backup
- Log in to your Bluehost Account Manager.
- In the left-hand menu, click Websites.
- Click the Manage button located next to the website you want to manage.

- From the horizontal menu, select the Backups tab.

- Click on the Manage button.

- Open your Activity Log.

- Use the filters to search by selected day(s).

- Find the event you’d like to use, click the ellipsis or the three dots icon, and choose Download backup.

- On the Create downloadable backup page, click Create download.

- At the top of the activity log, you can follow the progress of the download creation.

- When it has been completed, you’ll see a confirmation message. You can use the Download button to download the backup. You'll also receive an email with a link that you can use to download the backup.

Once you have downloaded the backup, you can manually restore the site if you wish.
Summary
Jetpack Backup and Restore is an excellent tool that can assist you in downloading or restoring a backup of your WordPress website from a certain moment in time. You can stop manually saving your work every time you make changes by using automatic backups. It's a reliable and helpful solution that lets you devote your energy to producing quality content and developing your site. Site without the stress of losing anything important. With the information provided, you can better understand how Jetpack Backup and Restore work, what data is backed up, and how to get started with this powerful tool.
If you need further assistance, feel free to contact us via Chat or Phone:
- Chat Support - While on our website, you should see a CHAT bubble in the bottom right-hand corner of the page. Click anywhere on the bubble to begin a chat session.
- Phone Support -
- US: 888-401-4678
- International: +1 801-765-9400
You may also refer to our Knowledge Base articles to help answer common questions and guide you through various setup, configuration, and troubleshooting steps.