Knowledge Base
Categories: Website Builders
Website Builder (for WordPress) - How to Add a Favicon
Adding a favicon helps brand your website and makes it easy for your site visitors to get back to your site if they have multiple tabs open. Most websites use their logo.
The image should be around 16x16 pixels. Keep reading to learn how-to add or update a favicon.
Adding a Favicon
To begin, you will need to access the Website Builder.
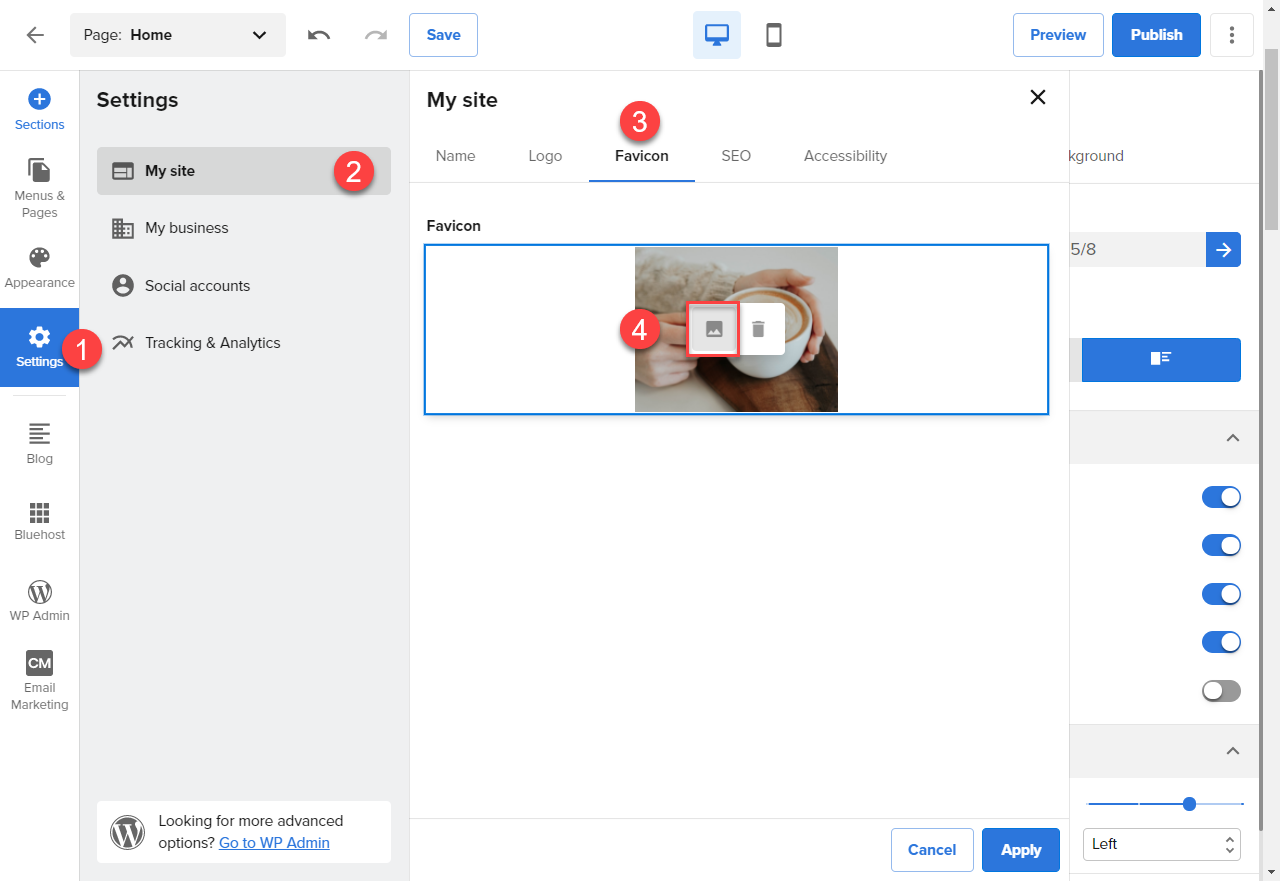
- From the side menu on the left, select Settings, and the “Settings” menu will open.
- Select My site, and the My site panel will appear.
- Select the Favicon.
- Select Click to upload favicon to open the image options.

- Under Images Library, you will see images currently being used on your site. You can use one of those images or click on the following: search stock photos, WordPress images, and upload image.

- Click Apply when you’re finished.
Changing your Favicon
- From the side menu on the left, select Settings, and the “Settings” menu will open.
- Select My site, and the My site panel will appear.
- Select Favicon, and you’ll see your current favicon.
- Hover over the image, and a menu will appear. Select the ‘image’ icon to open the image options.

- Under Images Library, you will see images currently being used on your site. You can use one of those images or click on the following: search stock photos, WordPress images, and upload image
- Click Apply when you’re finished.
Important: Your edits and updates are reflected instantly in Website Builder, but don’t forget to hit Save or Publish to save your work.
If you need further assistance, feel free to contact us via Chat or Phone:
- Chat Support - While on our website, you should see a CHAT bubble in the bottom right-hand corner of the page. Click anywhere on the bubble to begin a chat session.
- Phone Support -
- US: 888-401-4678
- International: +1 801-765-9400
You may also refer to our Knowledge Base articles to help answer common questions and guide you through various setup, configuration, and troubleshooting steps.
* Your feedback is too short