Website Builder (for WordPress) - How to Add and Manage Images
Images are key to telling your story and creating a compelling website. Bluehost Website Builder makes it easy to add and manage the images on your website. It even comes with a built-in library of stock images to get you started.
- How to Add an Image
- Replacing Existing Images
- Adding a Stock Image
- Adding your own Image
- Adding an Image from your WordPress Account
- Adding an Image as a Section Background
- Adding an Image by Adding a New Section
- Adding Images with Text
- Adding Cover Images
- Adding Galleries
- Editing an Image
- Zooming In/Out of an Image
- Adding a Hyperlink to an Image
- Reshaping Images
- Adding Hover Images
- Adding Alt Text to Images
How to Add an Image
To begin, you will need to access the Bluehost Website Builder.
You have many options when it comes to adding images to your site. Many of the Website Builder’s building blocks, or sections, are designed to display an image. Plus, most of the sections give you the option to add an image as a background. You can use images from the Unsplash stock image library or images you own and stored on your computer.
Note: Since Bluehost Website Builder automatically adds placeholder stock images to help you visualize where photos will go, adding an image always means replacing an existing image. You can keep the stock image or swap it with something else.
Replacing Existing Images
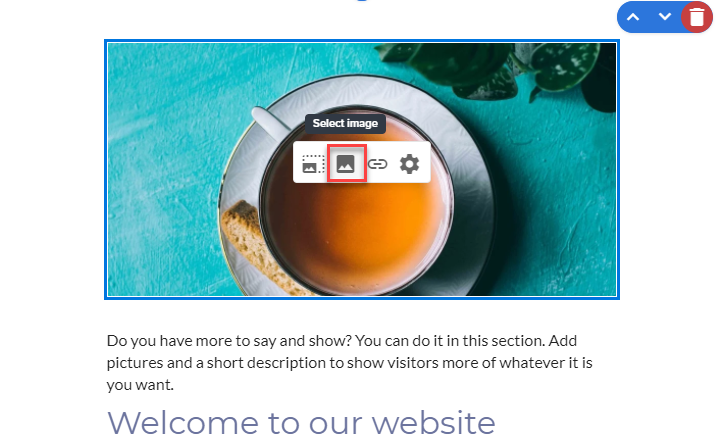
- Select the image you want to replace, and the image menu will appear over the image. If no image menu appears, the image is part of the background (see below for more info on adding an image as a background).
- Select the image icon (Select image)
- Decide if you want to add a stock image, your own image, or an image from your WordPress account, and then follow the instructions below.
Adding a Stock Image
- From the “Unsplash” tab, click Search stock Photos.

- Choose the stock image by typing in the keywords in the search bar.
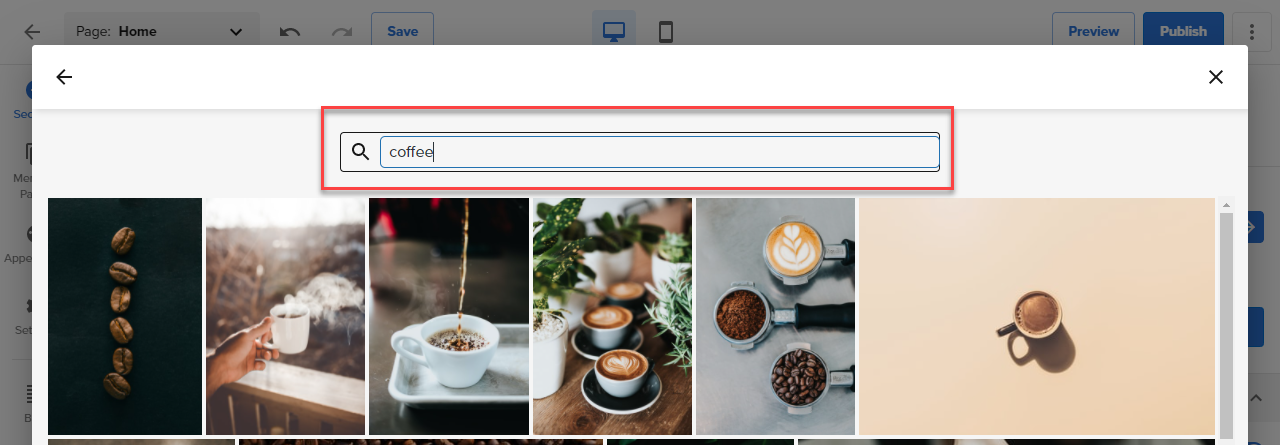
- Select the image that will be added to your site.
Adding your own Image
- Click the Upload Image button.

- Drag & drop an image from your computer, or select Browse files to see your computer. You can also add an image from a public link by entering a URL for the image and selecting Save.
Adding an Image from your WordPress Account
- Click WordPress Images.

- Then select the image you want to add.
Adding an Image as a Section Background
Every section you add to your site has its own background. The background can be an image, a video, a color, or a pattern. To add an image, follow these steps:
- Select the section where you want to add a new background image.
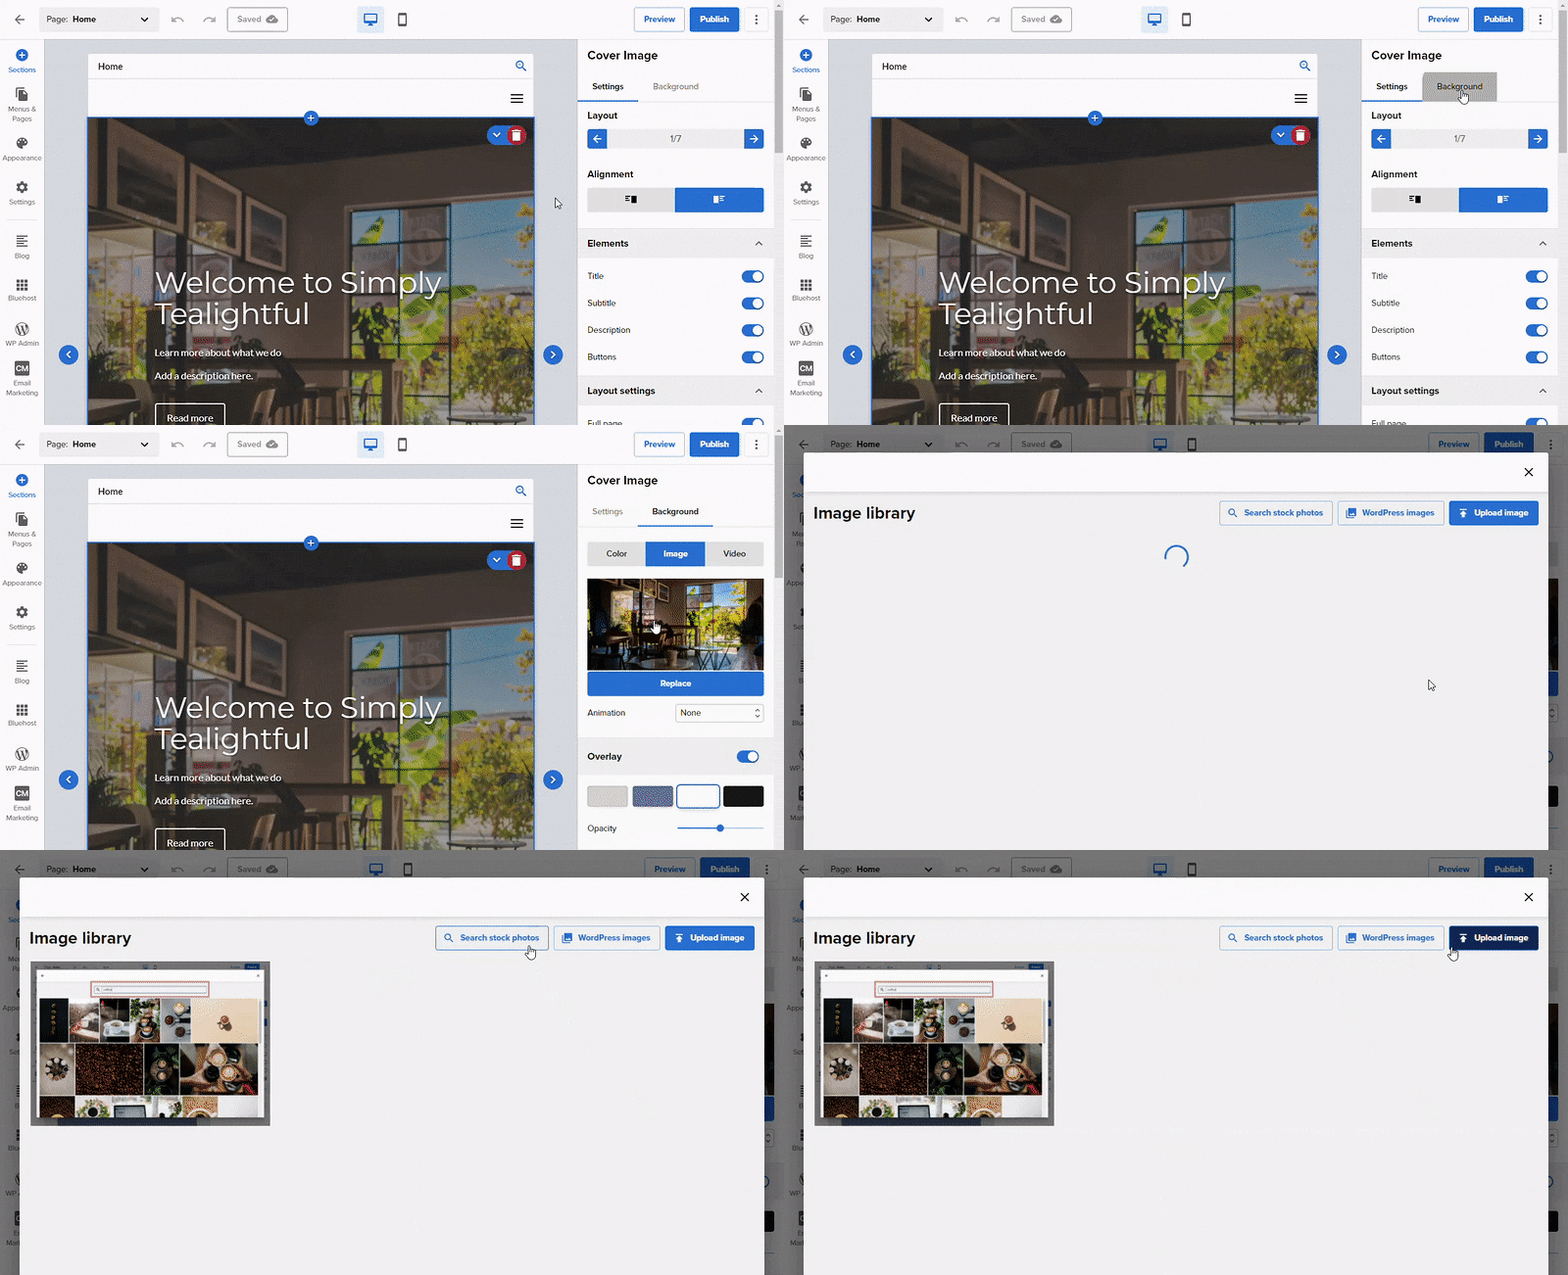
- From the menu on the right, select the Background tab.
- Select Image.
- Click the Select button.
- From here, you can either use a stock image from the “Unsplash” tab or use one of your own images from the “Upload Image” or “WordPress Images” tabs.
Adding an Image by Adding a New Section
While you can add images to many section options, these sections are specifically designed for images: media/text, cover images, and galleries. Get more info on how to add images to those sections below.
Adding Images with Text
- Select the + (Add Section) icon, then choose Media/text from the Sections menu.
- Choose a layout option, and the new section will be added to your site.
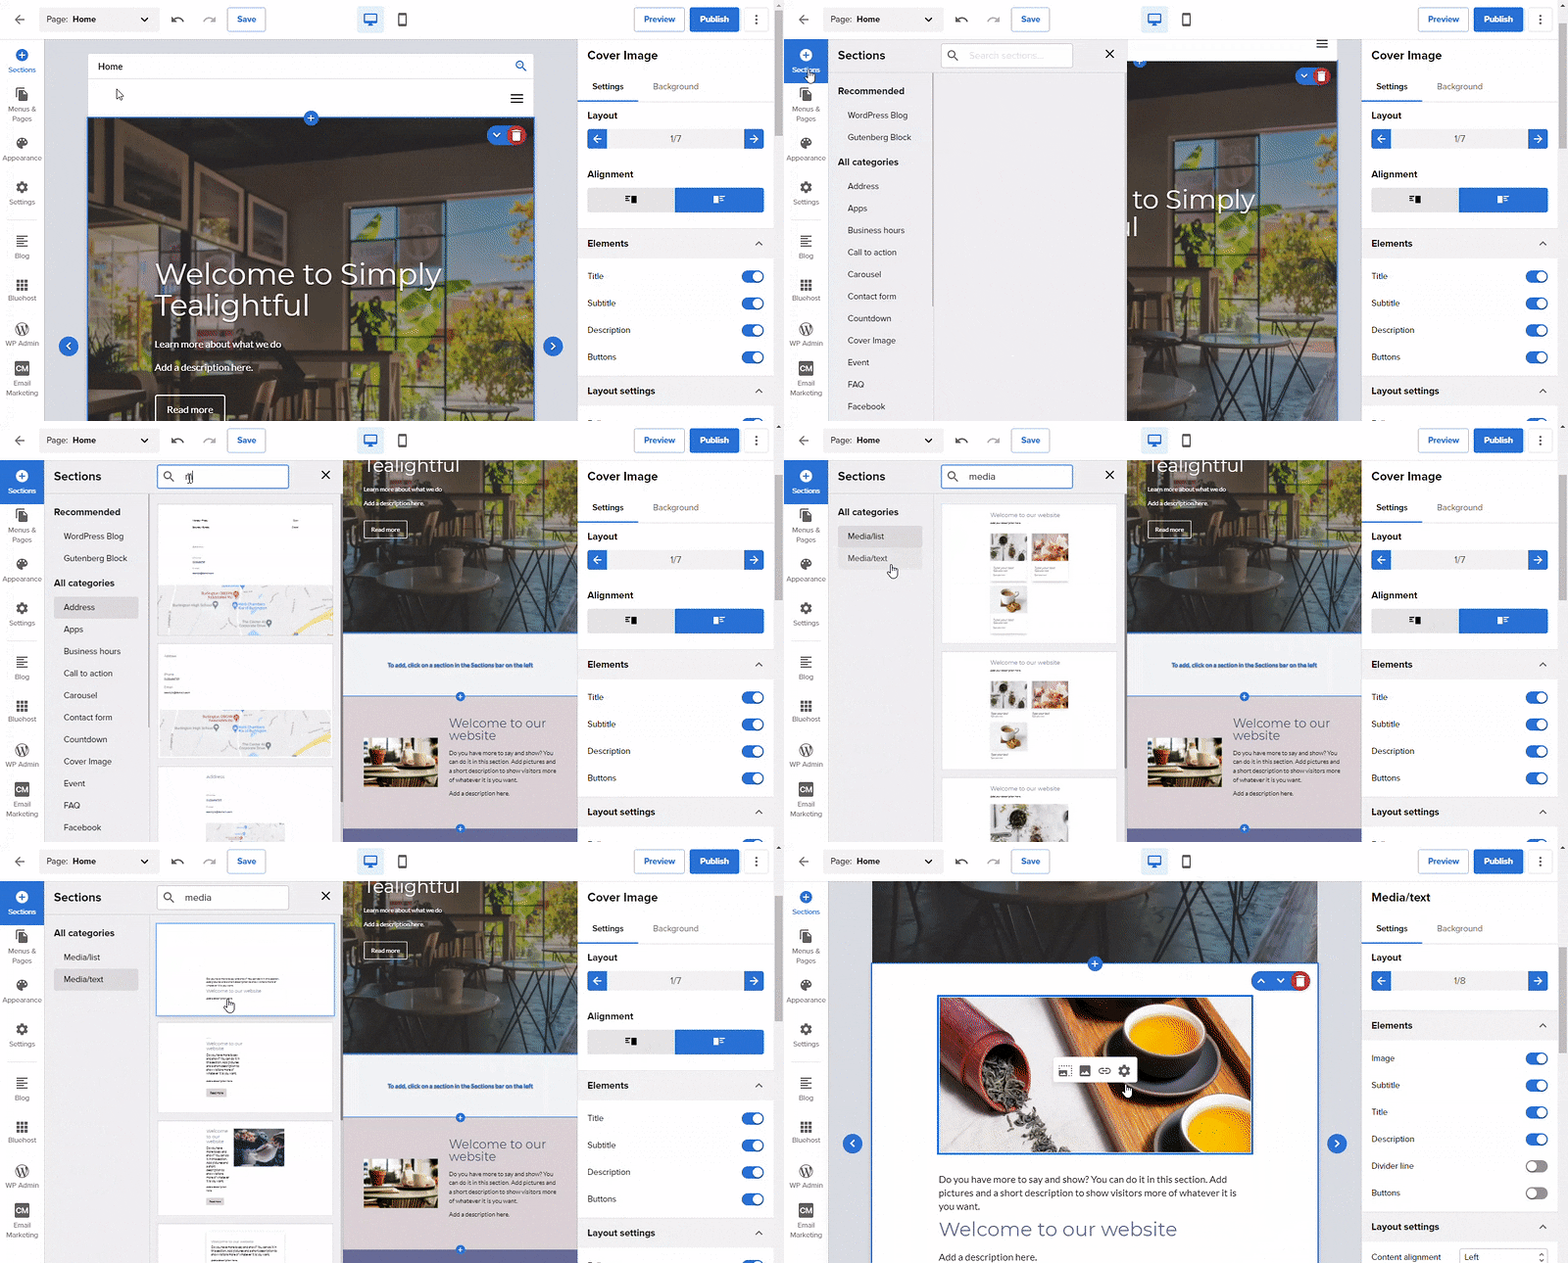
- Select the image, and the image menu will appear.
- Select the image icon (Select image), and the “Choose an image” menu will appear.
- From here, you can choose a stock image from the “Unsplash” tab or use one of your own images by selecting “Upload Image" or “WordPress Images.”
Adding Cover Images
- Select the + (Add Section) icon, then choose Cover Image from the Sections menu on the left.
- Choose a layout option. Stock images will be used as placeholders to give you an idea of where your image will appear in the section.
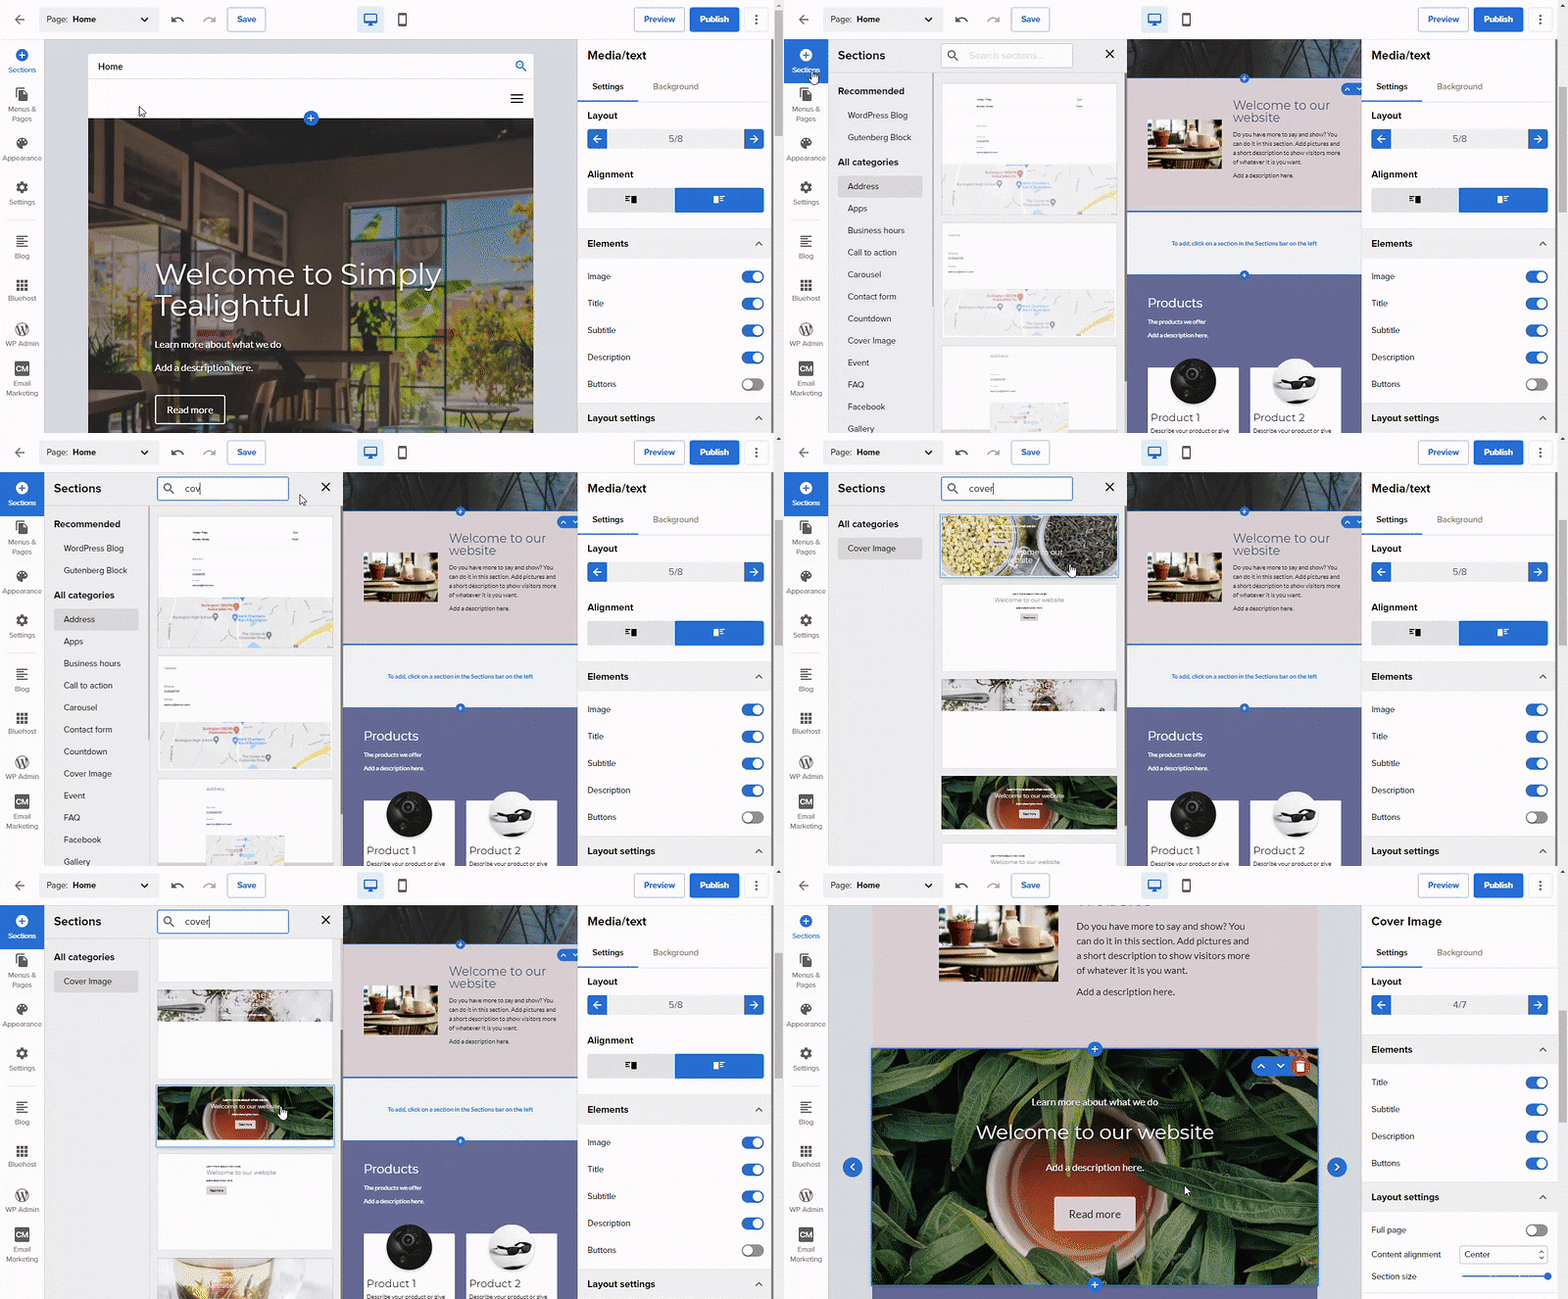
- Depending on the layout you choose, your image will appear as an image element or section background.
- If it’s an image element, select the image and then select the image icon (Select image) to replace it. If it’s a background, select Background from the menu on the right, then select Image to choose a new image.
Adding Galleries
- Select the + (Add Section) icon, then choose Gallery from the 'All Categories' list.
- Choose a layout to display your gallery, and the new section will be added to your site.
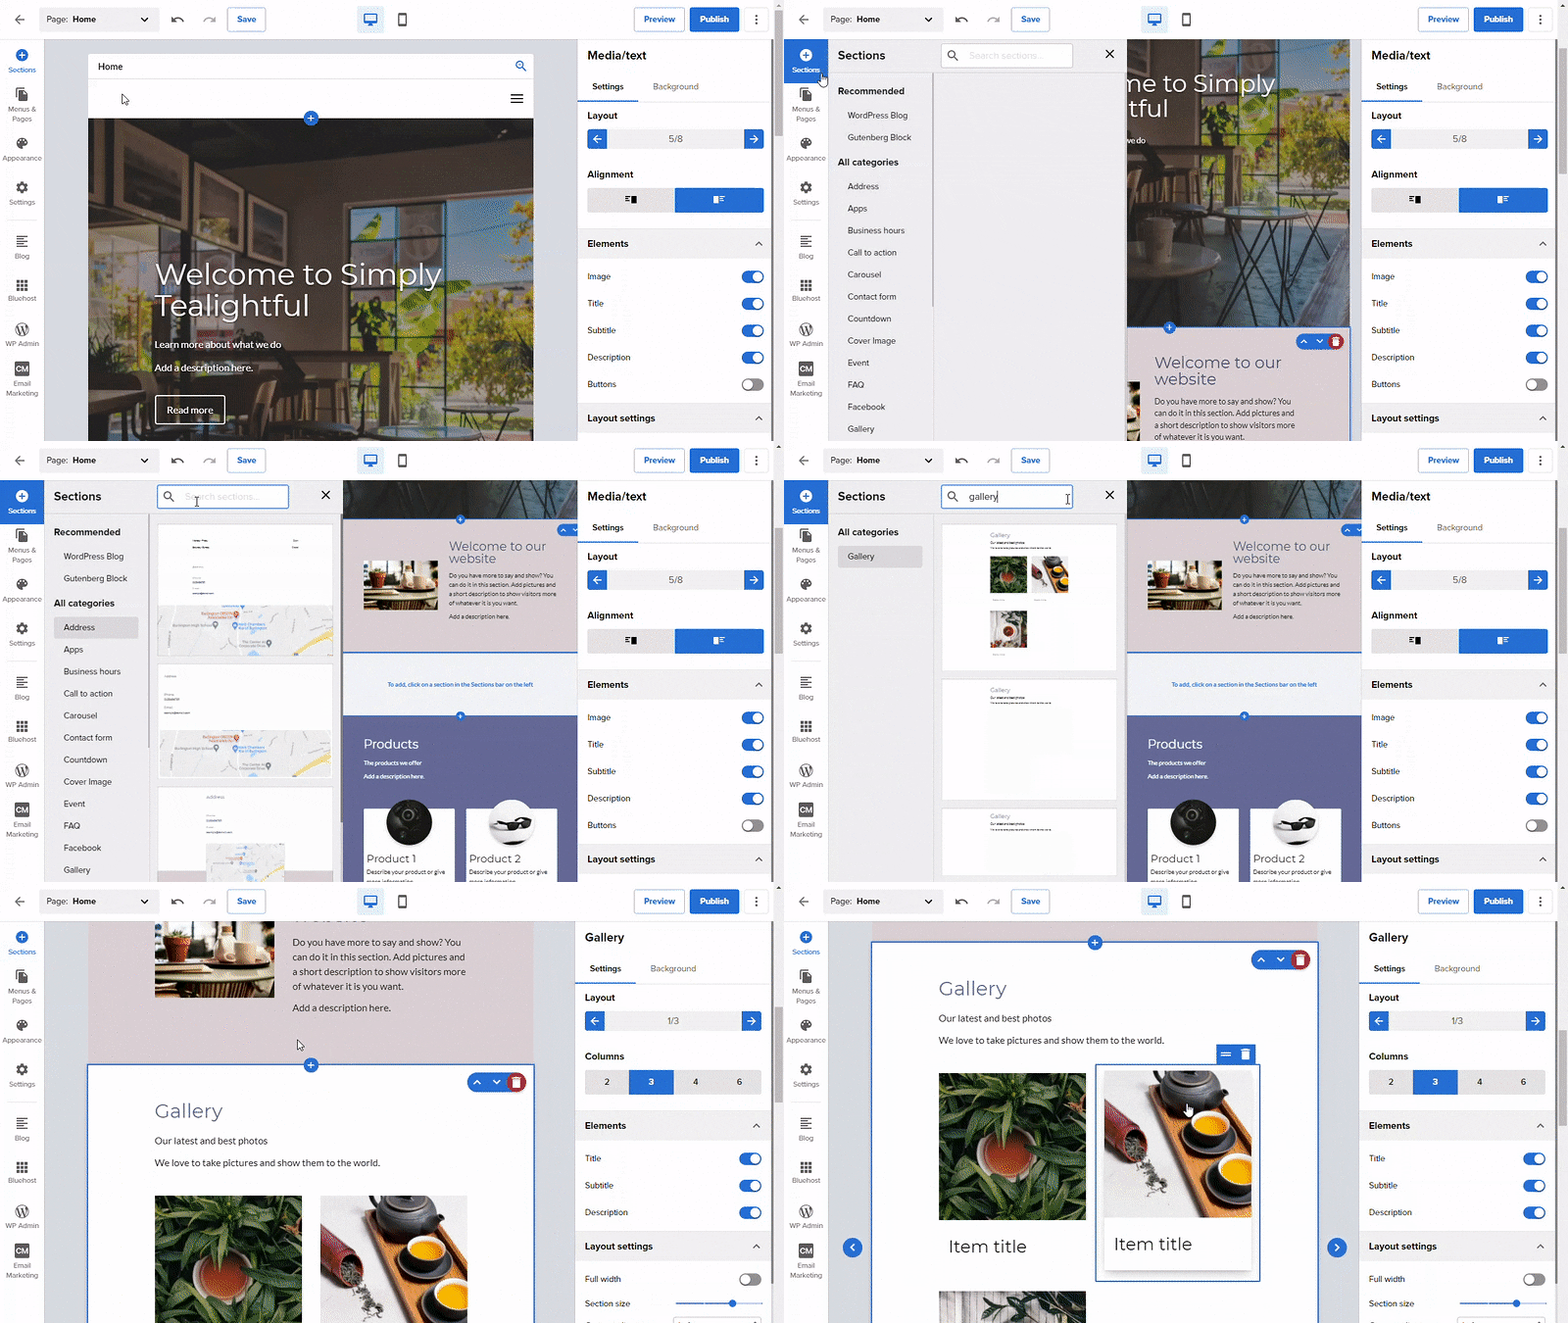
- Select the image you want to change, and the image menu will appear.
- Select the image icon (Select image), and the “Choose an image” menu will appear.
- From here, you can choose a stock image from the “Unsplash” tab or use one of your own images by selecting “Upload Image.”
To add an image to your gallery, select the Add item button. A new stock image will appear in the gallery section.
Editing an Image
Once you have your images uploaded, you can zoom in/out of, reshape, add hyperlinks, add hover effects, and add alt text to your images.
Zooming In/Out of an Image
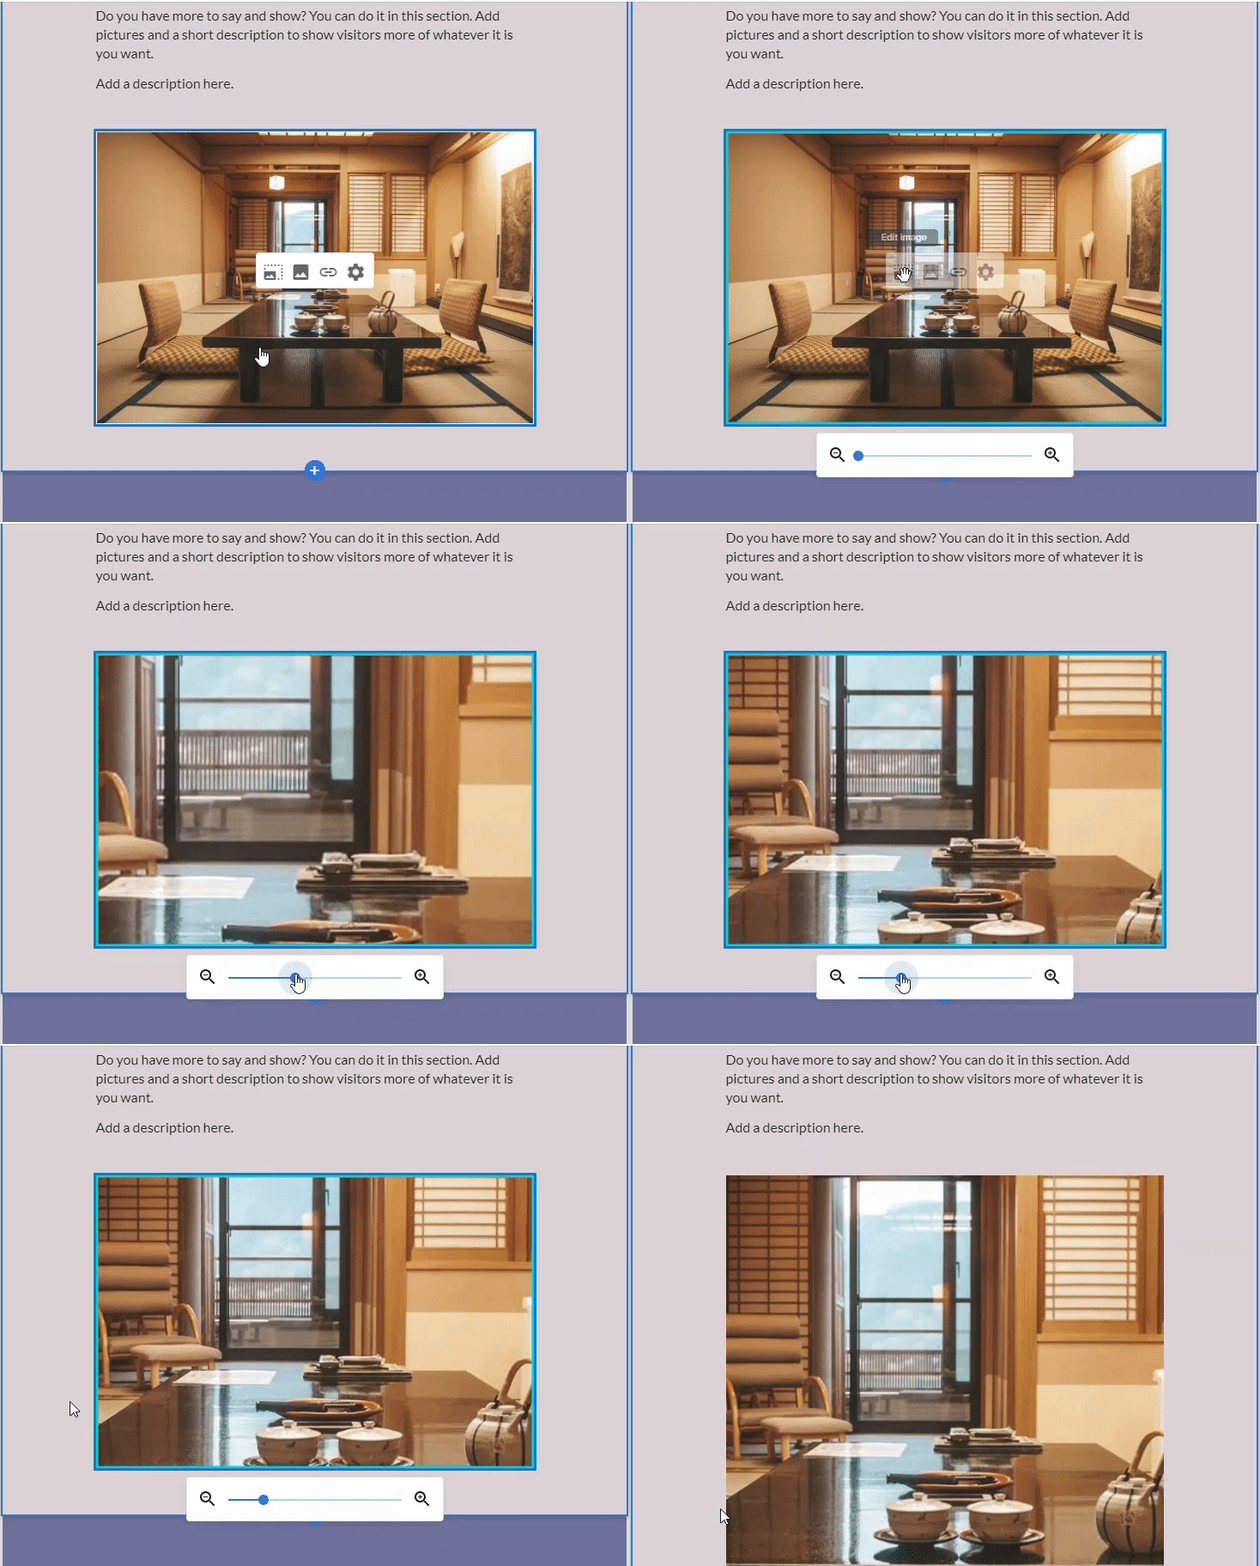
- Select the image you would like to zoom in or out of and select the edit (Edit image) icon.
- Drag the dot towards the + magnifying glass icon to zoom in.
- Drag the dot towards the - magnifying glass icon to zoom out.
- Select and drag the image to change its position within the frame.
Adding a Hyperlink to an Image
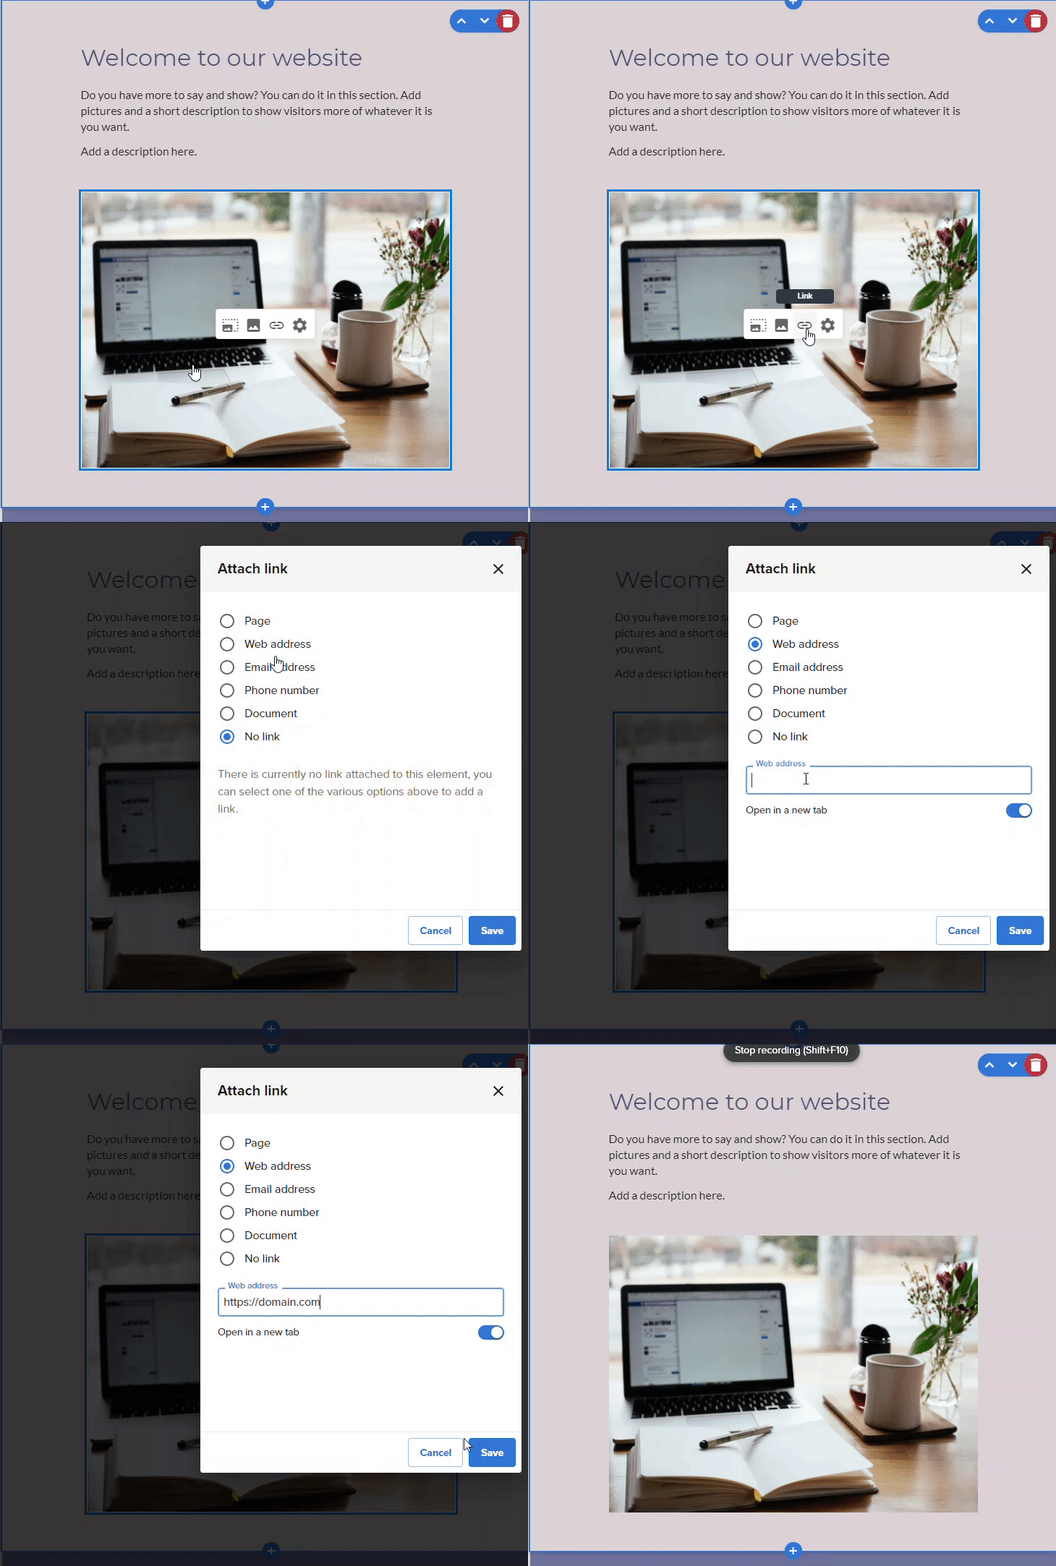
- Select the image you would like to add a link to and select the 'chainlink' (Link) icon.
- Choose what you would like this image linked to, and enter details.
- Save changes when finished.
Reshaping Images
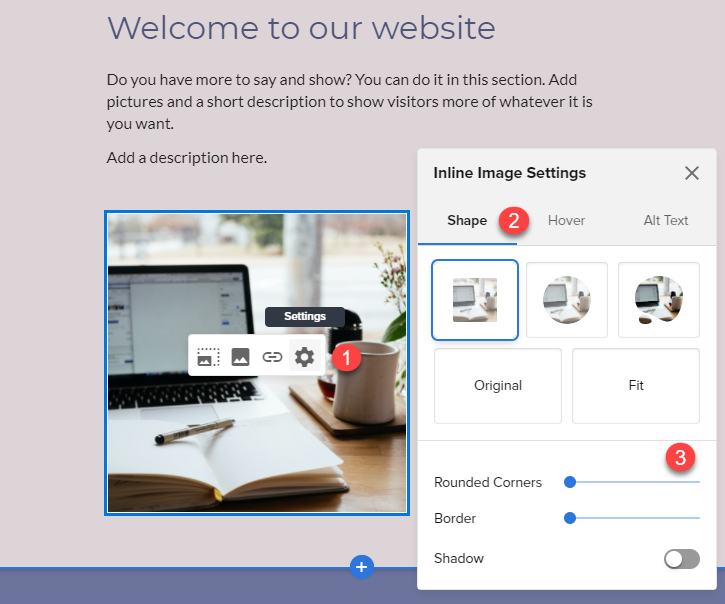
- Select the image you want to reshape and select the 'gear' (Settings) icon.
- From the “Shape” tab, choose your preferred image shape.
- Use the Rounded Corners, Border, and Shadow settings to customize your image shape further.
Adding Hover Images
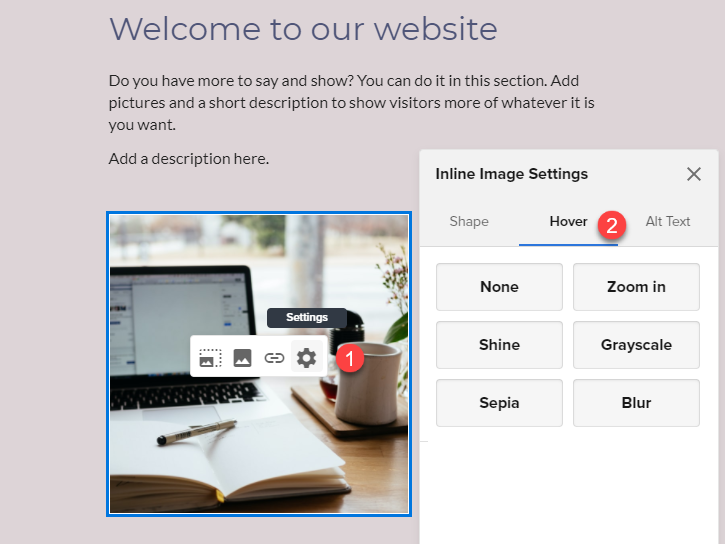
- Select the image you would like to add a hover effect to and select the 'gear' (Settings) icon.
- From the Hover tab, select different options to add effects to your image. To see the effects in action, click the Preview button towards the top right of your Website Builder.
Adding Alt Text to Images
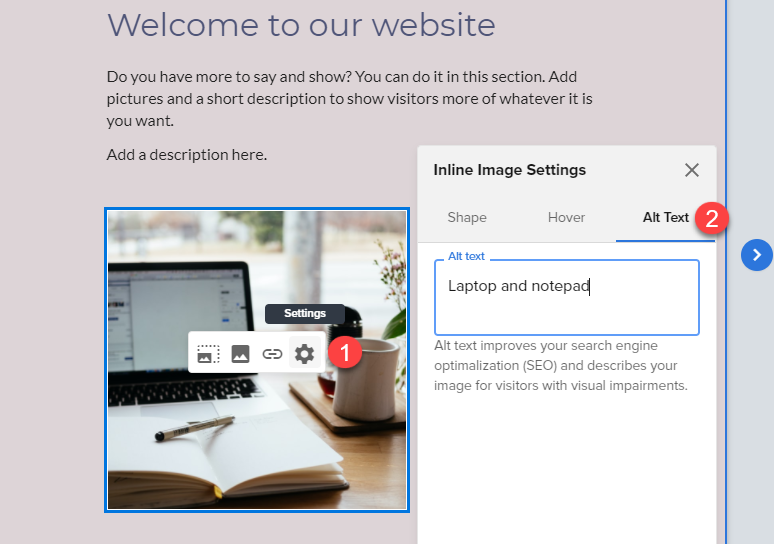
- Select the image where you want to add alt text and select the 'gear' (Settings) icon.
- From the Alt Text tab, enter the alt text for your image.
Important: Your edits and updates are reflected instantly in Website Builder, but don’t forget to hit Save or Publish to save your work.
If you need further assistance, feel free to contact us via Chat or Phone:
- Chat Support - While on our website, you should see a CHAT bubble in the bottom right-hand corner of the page. Click anywhere on the bubble to begin a chat session.
- Phone Support -
- US: 888-401-4678
- International: +1 801-765-9400
You may also refer to our Knowledge Base articles to help answer common questions and guide you through various setup, configuration, and troubleshooting steps.