WordPress - How to Install a New WordPress Theme from the Admin Dashboard
In this article, you’ll discover how to install a new WordPress theme for any free or paid theme on a WordPress site. You may install and add multiple WordPress themes to store for later use in your WordPress dashboard, but you may only have one theme appear on your live website.
Here is a video we created to guide you through the steps.
What's a WordPress Theme For
WordPress themes let you create a professional-looking website quickly and affordably, without knowing how to code. Whether you're starting a blog, business site, or online store, there's a theme for you.
Here are some key aspects of WordPress' themes:
- Professional Designs: WordPress themes provide professional-looking templates that enable users to create a unique visual appeal and online presence.
- Customization Options: Themes offer customizable design options, such as colors, fonts, and layout, so that users can match their site to their brand without coding.
- Responsive Design: WordPress themes focus on mobile-first design principles and are built to ensure that websites look and function seamlessly across all devices. This responsiveness guarantees users a positive viewing experience, whether they access the site on a smartphone, tablet, or desktop.
- SEO Friendly: Themes are optimized for search engines right out of the box. They follow the best web design and development strategies, such as quick load times and mobile compatibility, which are essential for higher search rankings. Potential customers and viewers of your website will increase rapidly after your website is prioritized.
- Cost-Effective: WordPress offers a wide selection of themes, including both free and premium options. Free themes are an excellent solution for those on a tight budget, providing a cost-effective way to create a professional-looking site. Premium themes may be pricey, but you get superior functionality, expert support, and frequent enhancements.
- Regular Updates: Theme developers provide regular updates for their products. These updates introduce new features and aesthetic improvements, address security vulnerabilities, and work seamlessly with the latest WordPress version and widely used plugins. This ongoing support keeps websites secure and functioning smoothly over time.
If this is your first time hearing about WordPress themes, or it's been a while and you forgot, you don't need to worry! We will give you a guide on WordPress-Getting Started with Themes.
Checklist Before Installing a Theme
Before you install and activate a new WordPress theme, safeguard your website and ensure a smooth transition by following these steps:
- Create a backup of your website: This is a must-do step! Make sure to create a complete backup of your website files and database. If anything goes wrong during the theme change, you can revert instantly.
- Use a staging site: It is recommended to set up a staging site to test a new theme for compatibility with your website's existing plugins and to check its overall appearance before making it live. Visit the How to Create a Staging WordPress Site article for more information on how to create one. If you're on Cloud hosting, refer to the What is Bluehost Cloud Staging for Safe Site Update article.
- Check the new theme's compatibility: You may want to check the theme's documentation to ensure it is compatible with the latest version of WordPress and the plugins currently installed on your site. Some Premium themes may have specific setup instructions or require certain plugins to be activated for optimal functionality.
- Clear your browser's cache: Before and after activation of your new theme, clear your browser cache to make sure you're seeing the latest and updated version of your website.
How to Install a New WordPress Theme
There are several methods for installing a WordPress theme.
Method 1: Install a Theme Using the WordPress Theme Directory
For this method, you can search, install, and activate a new theme in the Themes section of your WordPress dashboard.
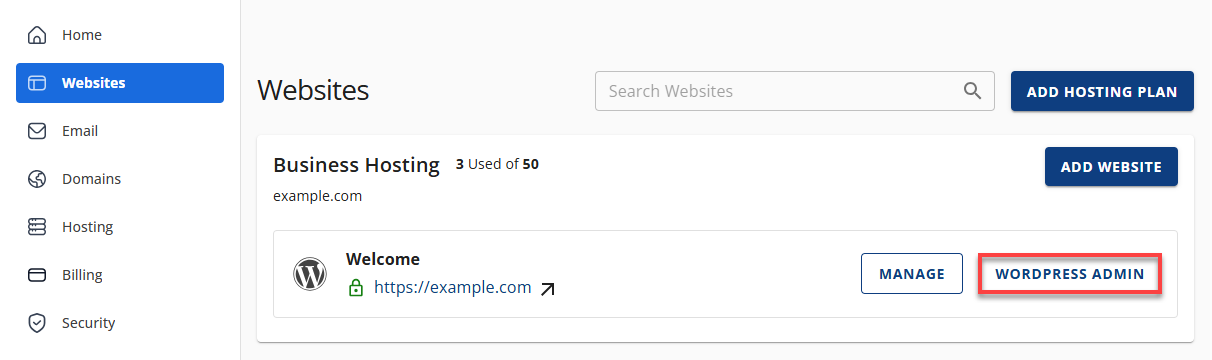
- Log in to your Bluehost Portal.
- In the left-hand menu, click Websites.
- Click the WordPress Admin button located next to the website you want to manage.
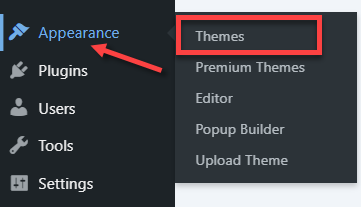
- Once logged in to your WordPress Dashboard, click Appearance in the left menu, then select Themes.
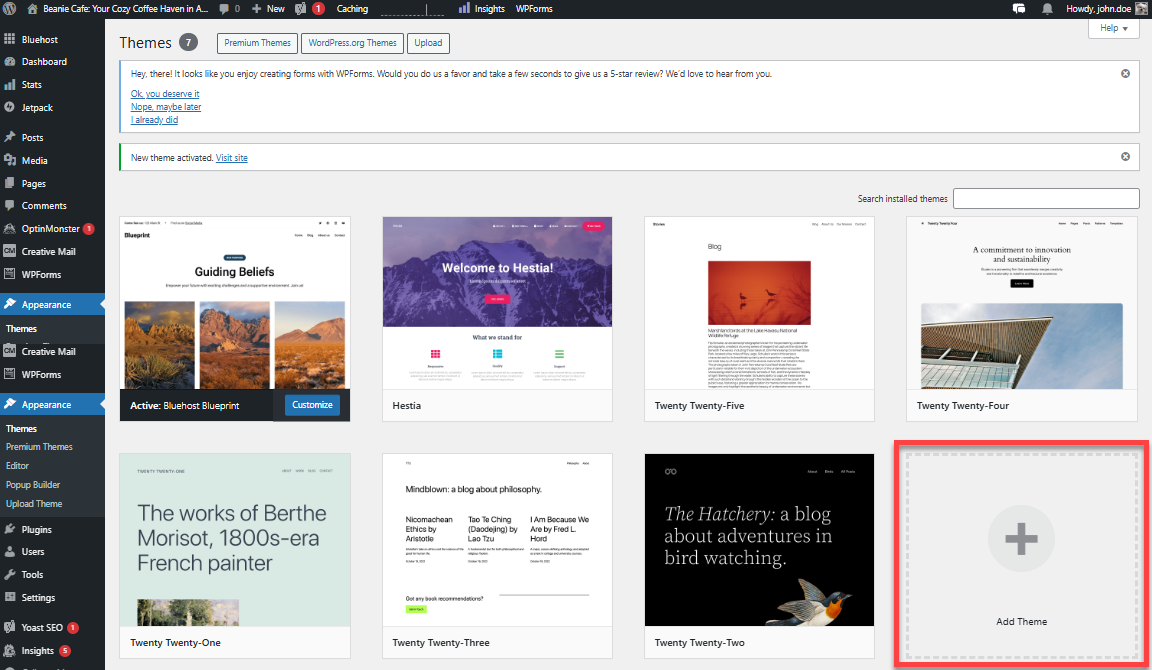
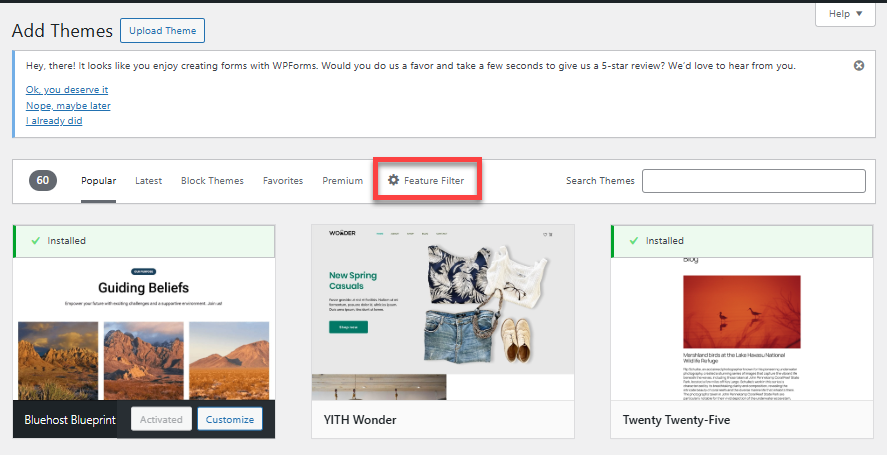
- On the Themes page, you can view all installed themes in your WordPress dashboard. To add a new theme, click Add Theme.
- Search and choose your new theme.
- (Optional) You can choose a theme from the Popular, Latest, Block Themes, or Favorites tabs.

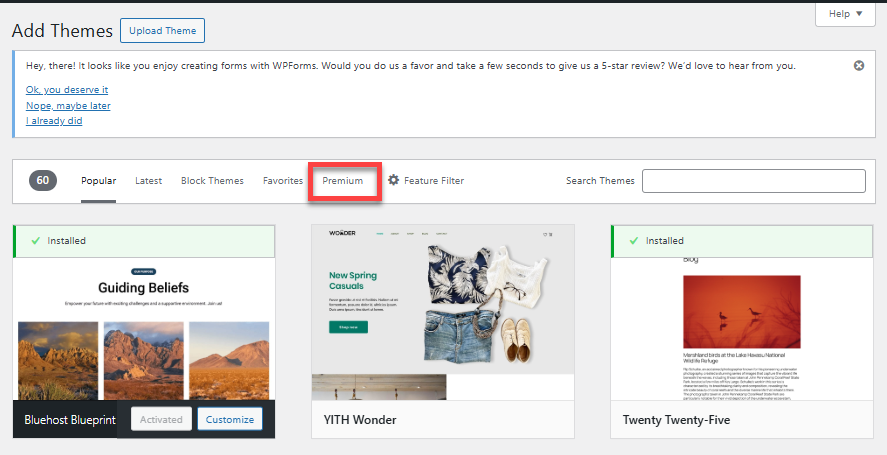
- (Optional) You have the option to add a Premium Theme. The Premium tab will take you to the WordPress Marketplace section, where you can purchase the Premium theme of your choice.
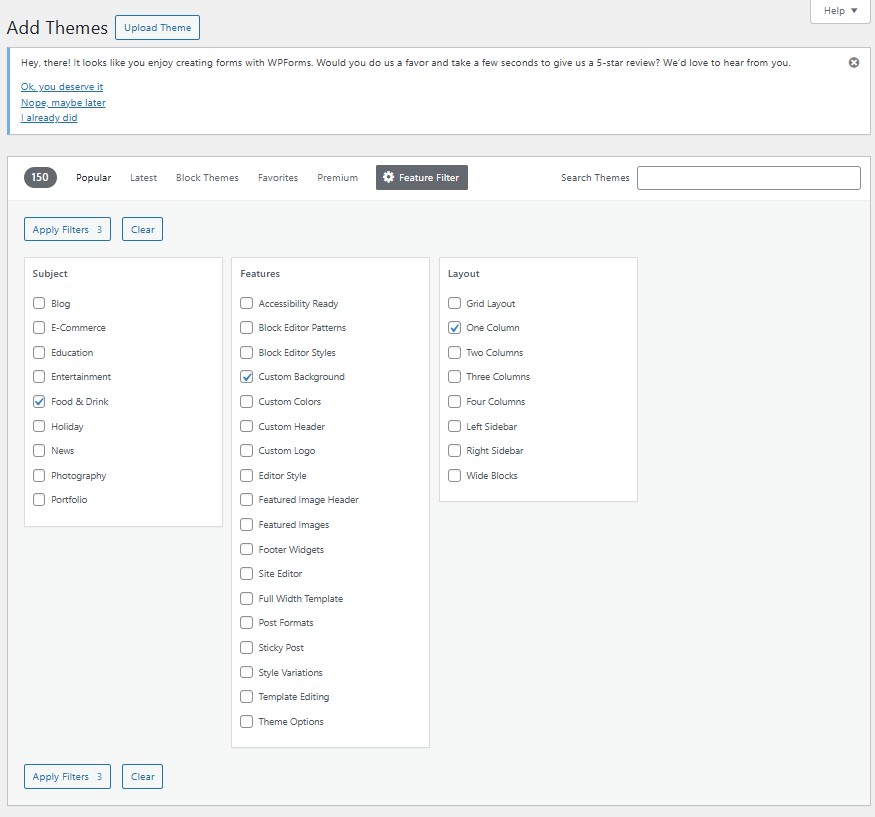
- (Optional) Click Feature Filter to browse themes based on specific features.
Select the Subject, Features, and Layout, then click on Apply Filter to view themes based on your selection.
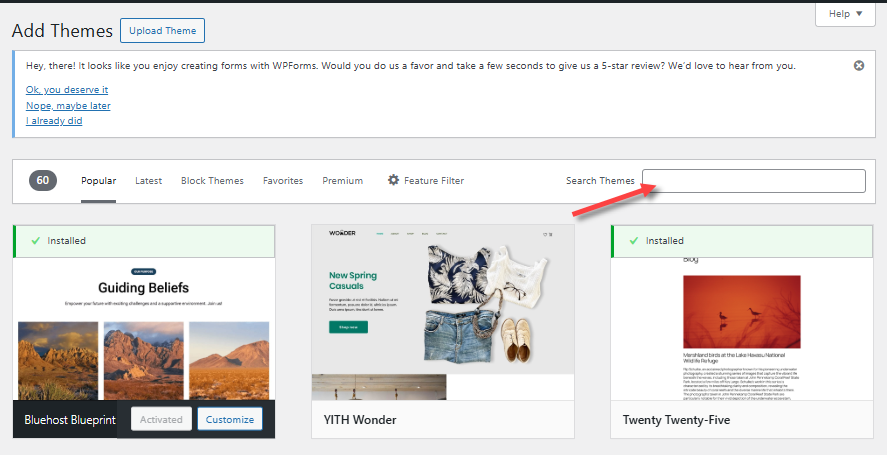
- (Optional) You can find a theme using the search function.
- (Optional) You can choose a theme from the Popular, Latest, Block Themes, or Favorites tabs.
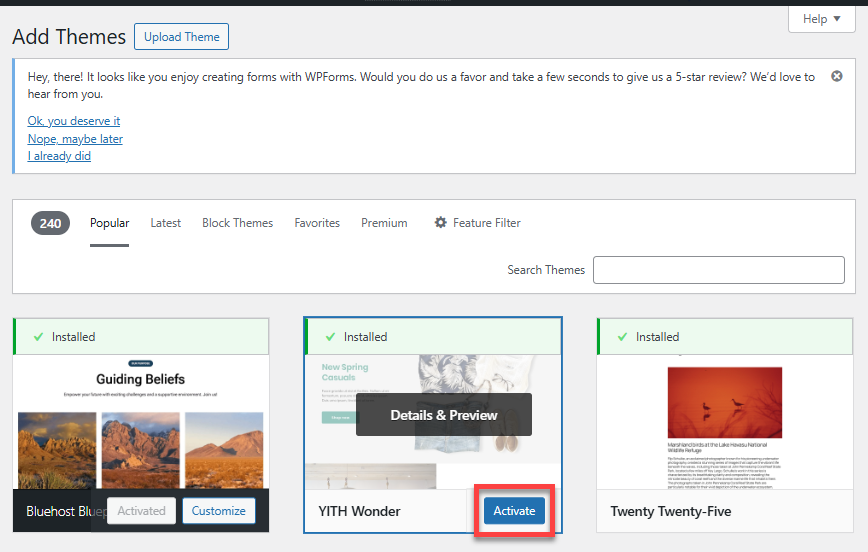
- Once you find your preferred theme, you can install it right away. Hover your mouse over the theme and click Install.
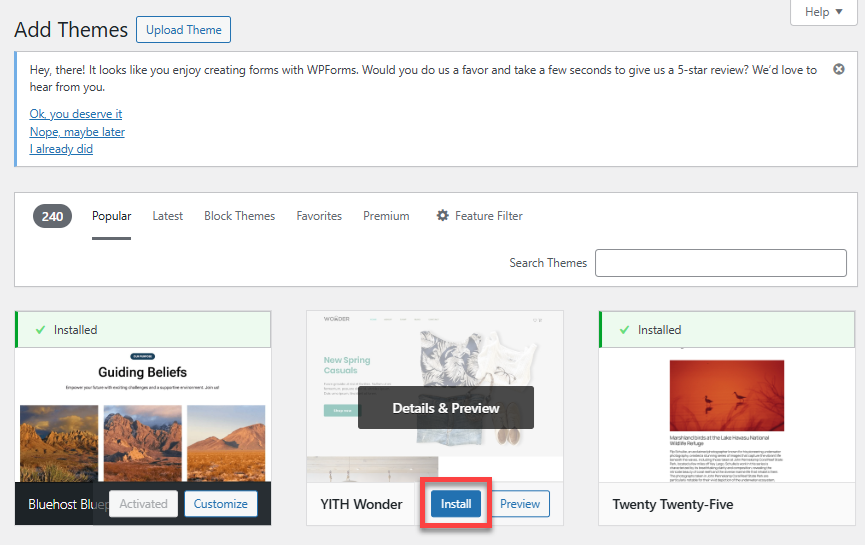
- You can also learn more about the theme by clicking on Details & Preview.
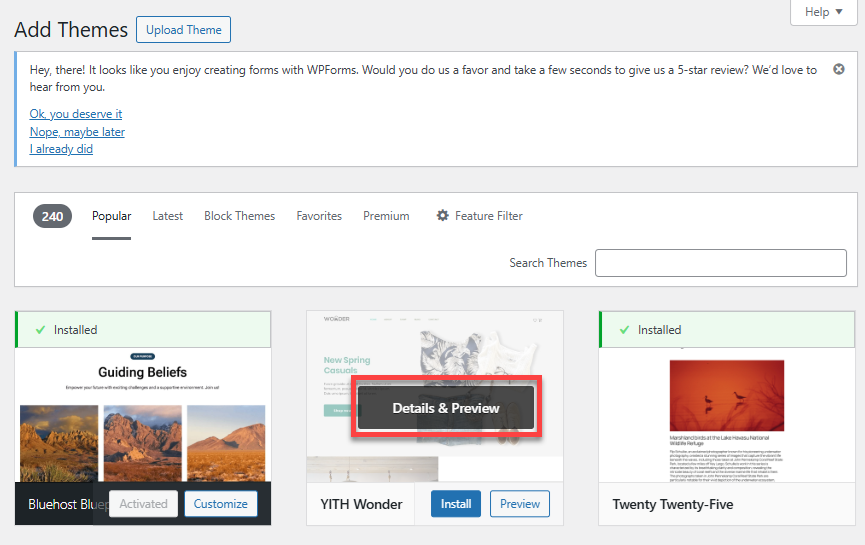
- After installation, click Activate to immediately use this theme on your website.
- Visit your website to check out your new theme.
Method 2: Install a Theme Using the Upload Method in the WordPress Dashboard
If you purchased a new theme from a third-party company or wish to install a custom theme, you'll need to use the Upload method. This involves uploading the theme's .zip file through the WordPress dashboard, and then activating it.
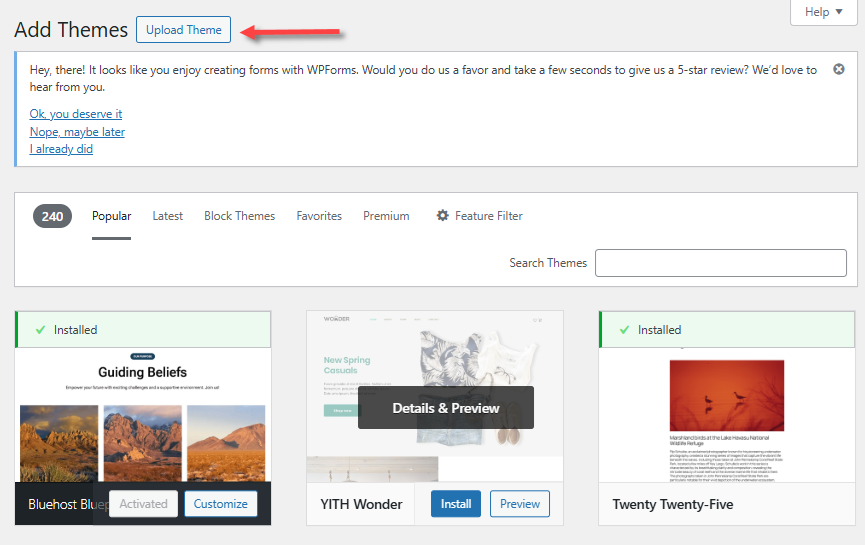
- In your WordPress dashboard, click Appearance, then select Themes.
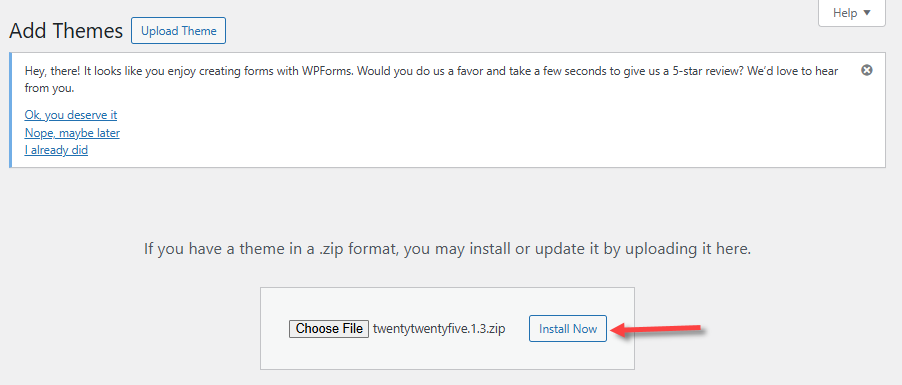
- Click Upload Theme in the top menu.
- Click Choose File and upload the theme's .zip file.
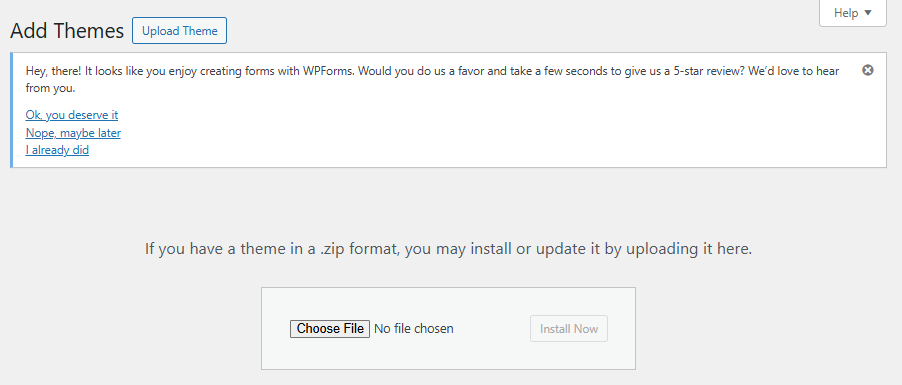
- Click Install Now.
- After installation is complete, click Activate.
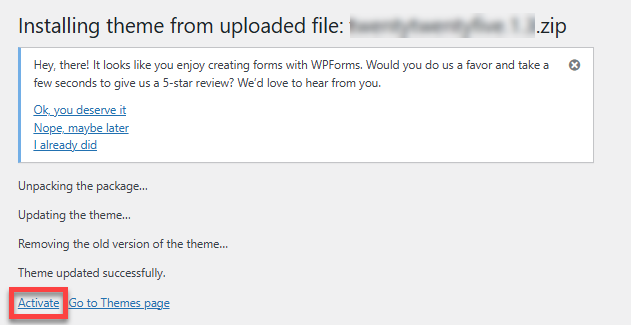
- Visit your website to check out your new theme. You'll find your uploaded theme marked as "Active" under the Themes section.
Method 3: Install a Theme Manually
If you have issues with the automatic updates or cannot access the WordPress dashboard, you can manually update your site's theme. This method involves two steps:
Step 1: Upload Your Theme .zip File
- Find your site's document root.
- Under the Files & Access tab, click Manage in the File Manager card.
- In the File Manager, navigate to your website's document root folder or directory, and click on the wp-content folder.
- Click the themes folder.
- Click the Upload button in the top menu and select your theme's .zip file.
- After the upload, right-click on the .zip file and select Extract.
- Click Reload and then take note of your new theme's folder name. You will need this information later when we update your theme in the database.
You can also connect to your hosting account using FTP to upload the theme folder directly to the /wp-content/themes directory. Remember, this needs to be in a .zip file format.
Step 2: Update the Theme in the Database
- Find your website database name in your wp-config.php file.
- Go back to your Bluehost Bluehost Portal and navigate to the Overview tab.
- Click the PHPMyAdmin button.
- You'll be redirected to your phpMyAdmin in a new tab.
- Using the database name you found in your wp-config.php file, you'll find your database in the left pane.
- Click the "_options" table. (The prefix may differ depending on your hosting settings.)
- Use the search feature in your table to locate the "template" row.
- Double-click the value under the option_value column and replace it with your theme's folder name, which you noted earlier.
- Use the search feature again to find the "stylesheet" row. Change the option_value to match your theme's folder name.
- Your site is now using your new theme. Please refresh to see its new look!
For the detailed instructions, check out the How to Change WordPress Theme in the Database via phpMyAdmin article.
Summary
A WordPress theme makes it easy to build a professional-looking and mobile-friendly website without needing to code. This article discusses the different methods of installing a new theme in the WordPress dashboard, uploading the theme's .zip file, and through manual installation. This guide also includes a quick checklist to help you safeguard your website as you switch themes, ensuring that your website continues running smoothly.
If you need further assistance, Bluehost Chat Support is available 24 hours a day, 7days a week while Bluehost Phone Support is available 7 days a week from 7 am-12 midnight EST.
- Chat Support - While on our website, you should see a CHAT bubble in the bottom right-hand corner of the page. Click anywhere on the bubble to begin a chat session.
- Phone Support -
- US: 888-401-4678
- International: +1 801-765-9400
You may also refer to our Knowledge Base articles to help answer common questions and guide you through various setup, configuration, and troubleshooting steps.