How to Set Up Email on Android Kitkat (4.4)
Setting up email can take time and effort if you're using an Android device running KitKat (4.4) or an earlier version. But don't worry. With this simple guide, you can easily complete the process in just a few steps. This tutorial was created to simplify the setup process so you can quickly access your email on your Android device. Whether you're setting up a new device or updating your settings on an older one, this guide provides you with all the necessary information on how to set up email on Android KitKat (4.4) or earlier to get your email up and running.
Once you've created an email account in your Bluehost account, you can access, manage, and set up a new email account on Android devices for your convenience.
If you have a newer Android device that uses the Gmail app, follow this article: How to Set Up Gmail: Connecting a New Email Address. It provides more detailed instructions for setting up a new email address.
Set Up Email on Android Kitkat (4.4) or Earlier
Create a New Email Account
- Open the Email application.
- On the Account Setup screen, enter your full email address and password, then tap Next.
- What type of account is this? Select POP3, IMAP, or Exchange. We recommend IMAP.
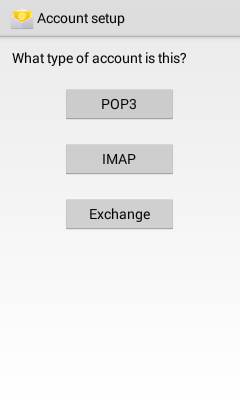
- POP3 downloads emails from the server and saves them on your phone.
- IMAP stores emails on the server and shows a cached copy on your phone.
- Exchange is not supported as it requires a Microsoft Exchange server.
Incoming Server Settings
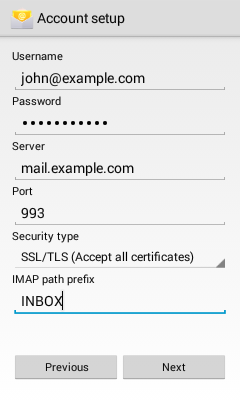
Enter the following settings for an IMAP with SSL* configuration:
- Username: Your full email address.
- Password: The password for your email account.
- Server: mail.example.com, replacing example.com with your domain name.
- Port: 993
- Security Type: SSL/TLS (Accept all certificates)
- IMAP path prefix: INBOX. This will allow you to store your Sent, Drafts, and Deleted emails on the server.
- Tap Next.
*For POP3 or non-secured IMAP configurations, check out Email Account Setup.
Outgoing Server Settings
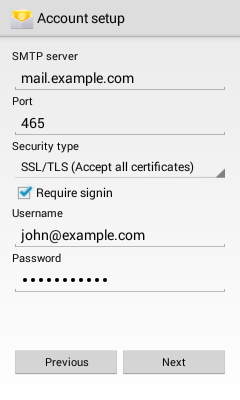
Enter the following settings for an IMAP with SSL* configuration:
- SMTP server: This is your domain name preceded by "mail." like mail.example.com.
- Port: 465
- Security type: SSL/TLS (Accept all certificates)
- Check Require Sign-In.
- Username: Your full email address
- Password: The password for your email account.
- Tap Next.
*For POP3 or non-secured IMAP configurations, check out Email Account Setup.
Account Options
- Inbox Checking Frequency: Set how often you would like your device to check for new emails.
- Optionally, check the following boxes with your preferences:
- Send an email from this account by default.
- Notify me when the email arrives.
- Sync email from this account.
- Automatically download attachments when connected to Wi-Fi.
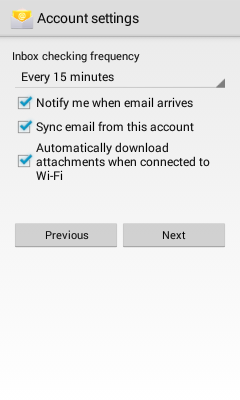
- Tap Next.
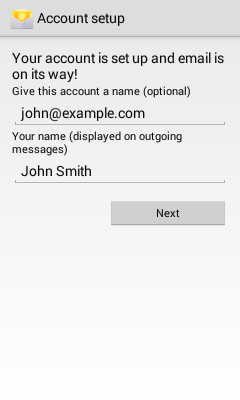
Name the Account
- You can name the email account; this can be helpful if you have multiple accounts on one device.
- Enter the name you want to be shown on all outgoing emails you send from the device.
- Tap Next.
- And you're done!
Summary
When managing emails, learning how to set up email on Android KitKat (4.4) or earlier versions is beneficial. It emphasizes the importance of choosing the right type of account (recommending IMAP for its server-side email storage capabilities). It provides detailed instructions for configuring incoming and outgoing server settings with an SSL configuration for enhanced security. Additionally, it covers account options such as email checking frequency and notification settings, culminating in the naming of the account for easier identification. The guide also mentions the availability of professional email and productivity plans through Google Workspace for a domain-matching email address and robust tools. It redirects users with newer Android devices to a separate guide for setting up Gmail.
Setting up an email account on older Android devices can be efficiently accomplished by following the steps outlined in the guide. Users can ensure secure and convenient access to their emails by configuring the correct server settings and account options. For those seeking enhanced features and integration, exploring Google Workspace could provide significant benefits. Additionally, individuals with newer devices or specific needs (like setting up Gmail) can refer to other detailed guides tailored to their requirements.
If you need further assistance, Bluehost Chat Support is available 24 hours a day, 7days a week while Bluehost Phone Support is available 7 days a week from 7 am-12 midnight EST.
- Chat Support - While on our website, you should see a CHAT bubble in the bottom right-hand corner of the page. Click anywhere on the bubble to begin a chat session.
- Phone Support -
- US: 888-401-4678
- International: +1 801-765-9400
You may also refer to our Knowledge Base articles to help answer common questions and guide you through various setup, configuration, and troubleshooting steps.