How to Back Up a MySQL Database
Backups are an important aspect of website maintenance. Backing up your files and databases weekly or monthly, or before making any significant changes, ensures that your files are secure and recoverable in the event of data loss.
A backup MYSQL database will save all the data in a specific database. A MySQL database can be handy for backing up valuable data from several scripts; unfortunately, it only provides a partial backup. It will not include DNS, home directory files, or other system files and configurations.
Using CodeGuard
CodeGuard is a website backup and monitoring service that helps you keep your website safe, secure, and running smoothly. It automatically backs up your website daily, so you can always restore it to a previous version if something goes wrong. It also monitors your website for any changes or errors and alerts you if any issues need your attention.
With CodeGuard, you can know that your website is always protected and backed up. Start backing up and restoring your data with Codeguard today.
Using Jetpack
Jetpack backup enables you to effortlessly restore or download a copy of your website at any time. It's like having a powerful undo button for WordPress. You can now quickly build your site without missing a word, image, page, or worrying about it. Jetpack Backup automatically creates backups and allows you to recover or transfer your site.
To learn more about Jetpack and how it works, please see Jetpack - Backup and Restore.
Using phpMyAdmin
With phpMyAdmin, you can easily create a MYSQL backup database without using the command line:
- Log in to your Bluehost Portal.
- In the left-hand menu, click Websites.
- Click the Manage button located next to the website you want to manage.

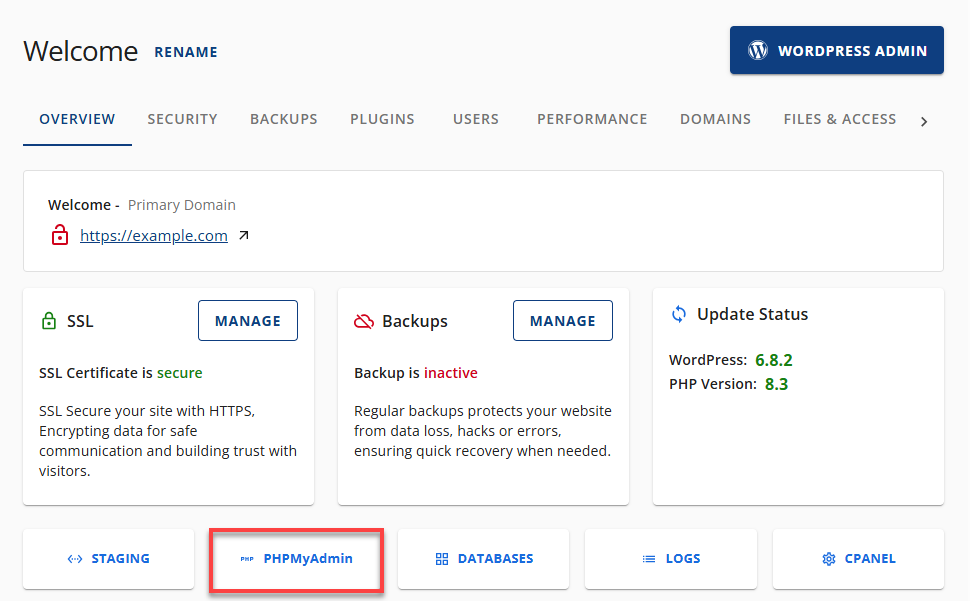
- In the OVERVIEW tab, click the PHPMyAdmin button.

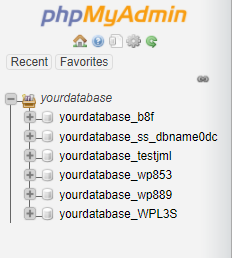
- From the phpMyAdmin, select the MySQL database you wish to back up in the list on the right.

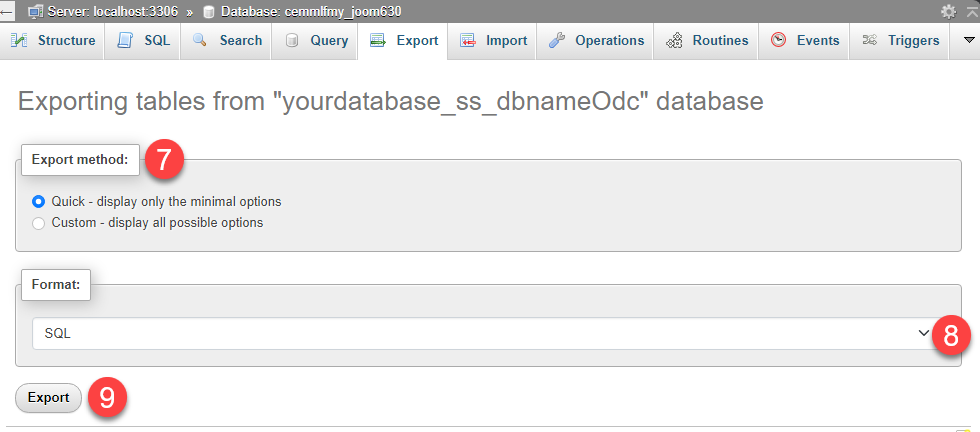
- When you select the MySQL database, click on the Export tab at the top.

- Choose your preferred Export method by clicking the radio button.
- Click this â–¼ icon to choose the database format (e.g., SQL, CSV, XML, PDF, etc.).
- Click the Export button.

This can take a significant period of time, depending on the size of the file being imported, the number of operations the .sql file must perform, and a number of other variables.
Using Command Line
Enter the following command to export your database:
mysqldump -u username -p database_name filenamehere.sql
After pressing Enter, you will be prompted for your MySQL password. Enter your password, and this will export a copy of the database into your specified filename.
Summary
Failing to back up a MySQL database risks irreversible data loss and can affect your business operations. This guide shows how to back up a MySQL database using tools like CodeGuard, Jetpack, phpMyAdmin, and the Command Line.
Regular backups help prevent data loss, ensure quick recovery, and keep your business running smoothly. It's a simple way to protect your data and avoid problems in the future.
If you need further assistance, feel free to contact us via Chat or Phone:
- Chat Support - While on our website, you should see a CHAT bubble in the bottom right-hand corner of the page. Click anywhere on the bubble to begin a chat session.
- Phone Support -
- US: 888-401-4678
- International: +1 801-765-9400
You may also refer to our Knowledge Base articles to help answer common questions and guide you through various setup, configuration, and troubleshooting steps.