Purchase a Self-Managed VPS with Dify Installation
Dify serves as the core platform that powers our custom AI solutions, giving you the flexibility to deploy everything from simple customer service chatbots to advanced automation workflows. Our self-managed VPS hosting gives you complete control over this setup, allowing you to configure software and scale resources exactly how your business needs them.
Why Use Dify?
Our platform uses Dify to connect your favorite AI models directly to your company's secure data and everyday tools. This setup ensures you get incredibly fast, accurate answers tailored specifically to your business needs without any technical hassle. By handling the heavy lifting behind the scenes, we give you a smooth, reliable AI experience that helps you work smarter every day.
Uses of Dify
We build and manage our AI assistants using Dify, an open-source platform that keeps your data secure, connects our tools seamlessly, and allows us to use the world's best AI models to serve you faster.
- Chatbots: Simple, conversational assistants designed for direct, back-and-forth Q&A.
- AI Agents: Autonomous systems that use reasoning to figure out a problem and deploy external tools (like searching the web, browsing Wikipedia, or executing code) to get the job done.
- Workflows: Multi-step background automations that handle repeatable business processes (e.g., automatically taking incoming data, rewriting it, and passing it along).
- Chatflows: Advanced chatbots embedded with branching logic, distinct user paths, and custom variables.
- Text Generators: Instant content creators where a user fills out a few fields to instantly output formatted reports, summaries, or emails.
How to Purchase a Self-Managed VPS with Dify Installation
To deploy and manage Dify efficiently, start by purchasing a Self-Managed VPS Hosting from Bluehost. Follow these steps:
 New to VPS or not sure where to start? No worries! At the top of the Self-Managed VPS purchase page, you’ll see the Pre-configured Setup section. This handy feature is perfect if you’re feeling a bit unsure—just pick the type of project you want, like WordPress Site, AI Agent/Claude Code, Dev/Staging, or eCommerce Store. We’ll take care of the rest by automatically filling in the best plan, operating system, and template for you.
- Super simple for beginners or anyone who just wants a quick setup
- Instantly get the recommended settings for your project
- Skip the guesswork and save time
- You can still customize things later if you want
- In your browser, go to https://www.bluehost.com/vps-hosting.
- Click the Choose Plan button under your preferred VPS hosting plan.
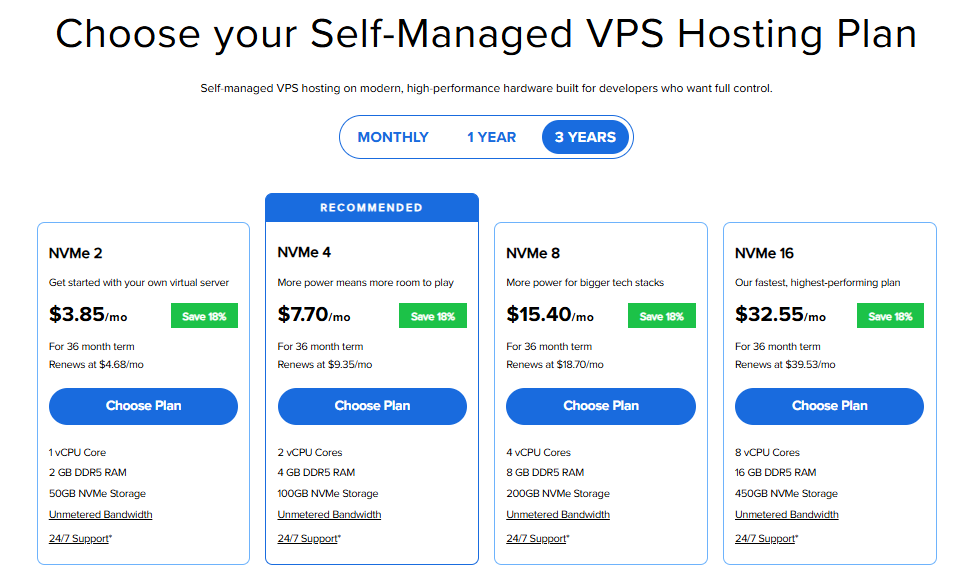
Important: Pricing is subject to change—please visit https://www.bluehost.com/vps-hosting for the current introductory/sign-up offer for Bluehost VPS Hosting. For the most up-to-date renewal pricing, visit your Bluehost Portal Renewal Center.
- Select your preferred Data Center location.

- On the Cart page, you can configure your server to fit your needs in the following section:
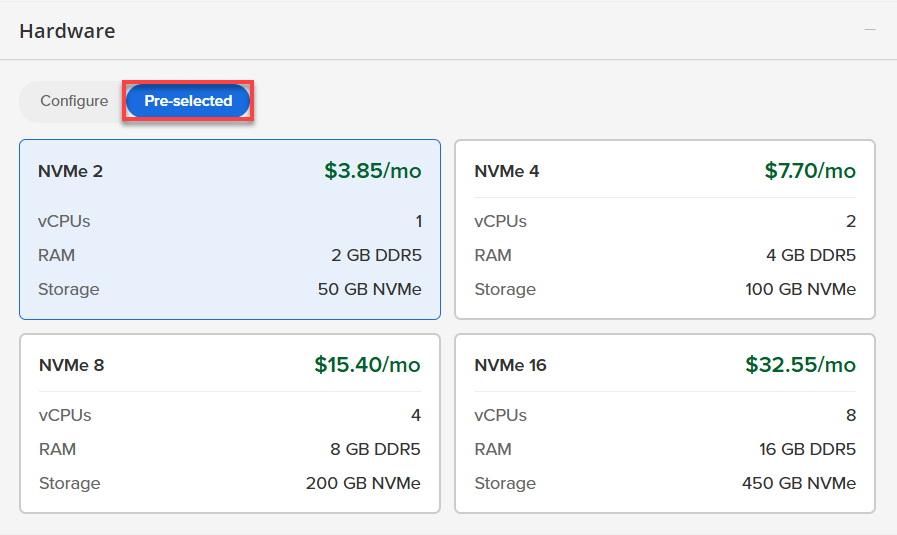
- Hardware:
- Pre-selected:
You can select a different Self-Managed VPS plan in this section.
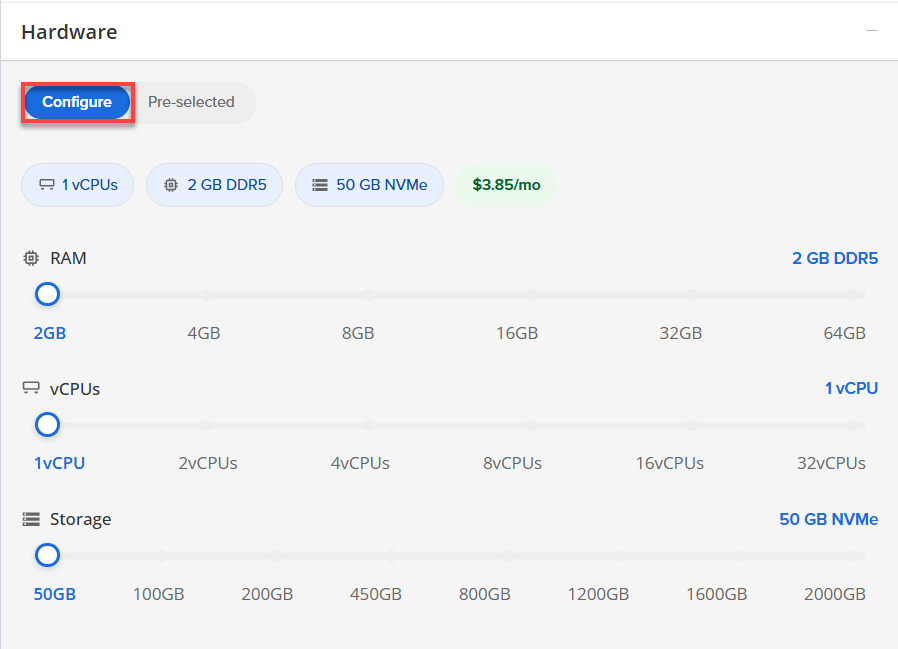
- Configure:
Click Configure to customize your package.
Note that your changes help customize your plan, and the overall cost will adjust accordingly to fit your needs.
- Pre-selected:
- Software:
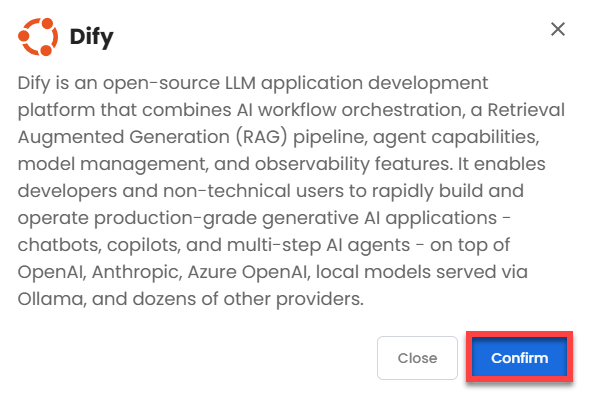
- Click on the Application tab.
- Choose Dify.
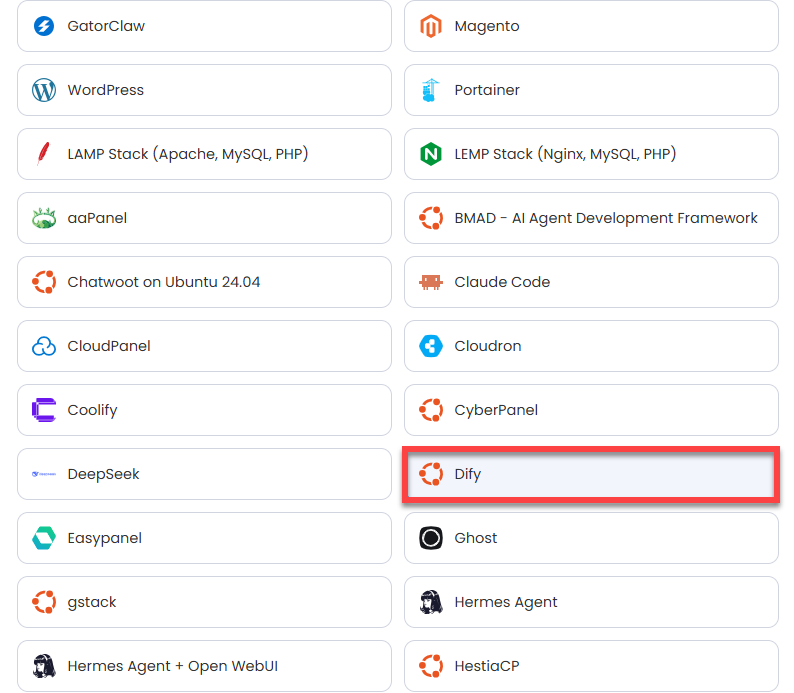
- Click Confirm to continue.
- Hardware:
- Add-Ons:
- Premium Support:
This service provides you with priority access to our expert team for faster responses and personalized assistance whenever you need it.

- Premium Support:
- In the Advanced options:
- Extra IP's: You can add extra IP addresses for an additional fee.
Pricing changes based on how many IPs you add. - Hostname: Assign a custom hostname to easily identify your server. This is optional.
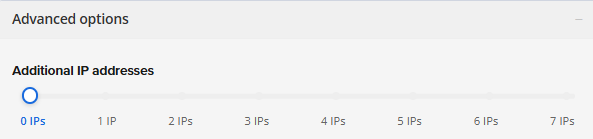
- Extra IP's: You can add extra IP addresses for an additional fee.
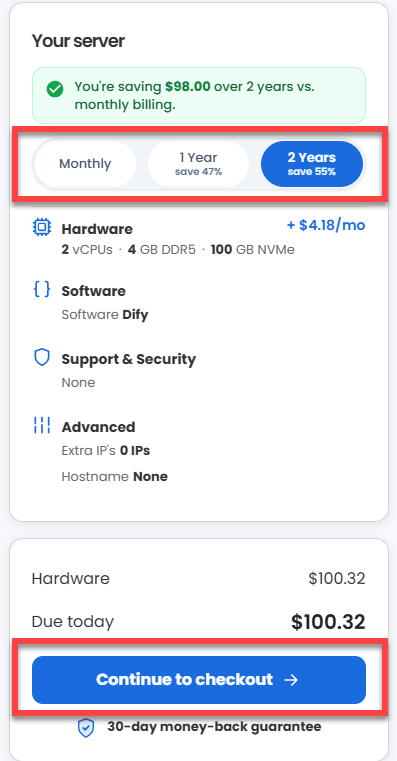
- Select your preferred billing term and view your Order Summary. Click the Continue to Checkout button to proceed.
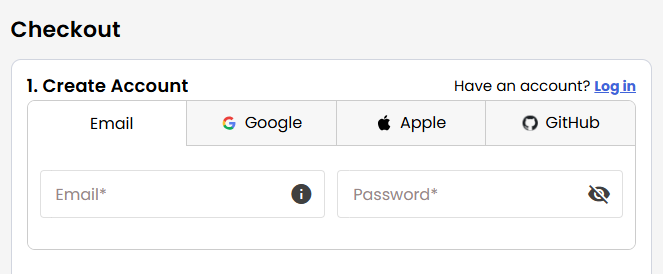
- Do the following on the Checkout page:
If you're new with Bluehost:
- Create your Bluehost account by using your email address or by connecting with your Google, Apple, or GitHub account — whichever you prefer!
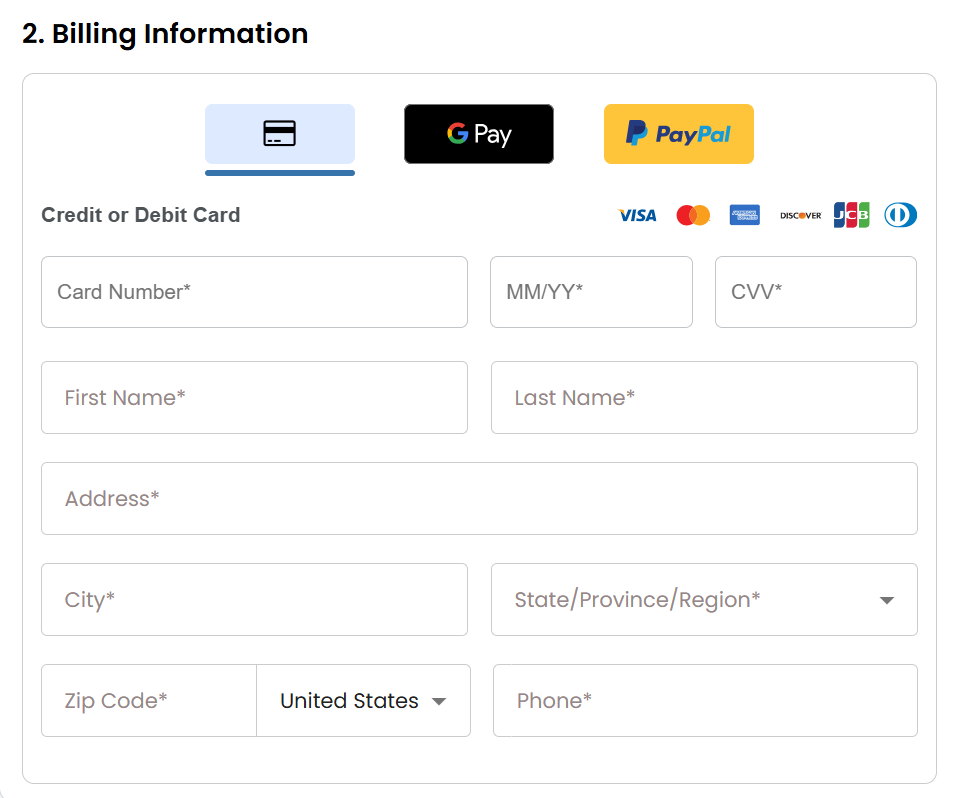
- Select your preferred payment method: credit card, Google Pay, or PayPal. Enter your billing information.
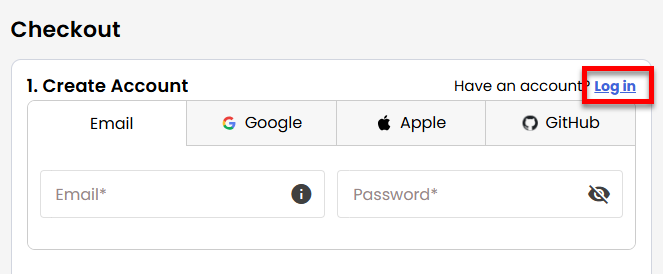
If you have an account with us, you will see your Bluehost login details when you are logged into your Bluehost Portal. If you are not logged in, please click the Log In link.
- Create your Bluehost account by using your email address or by connecting with your Google, Apple, or GitHub account — whichever you prefer!
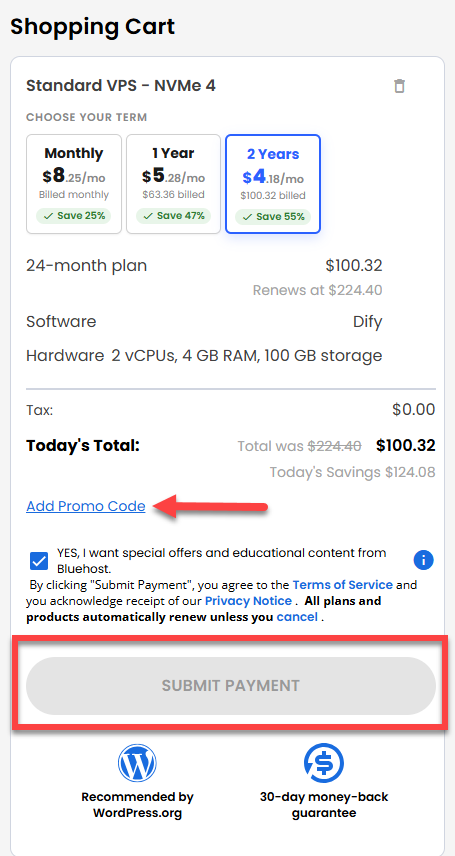
- In the Shopping Cart section, you can still adjust your billing term if needed.
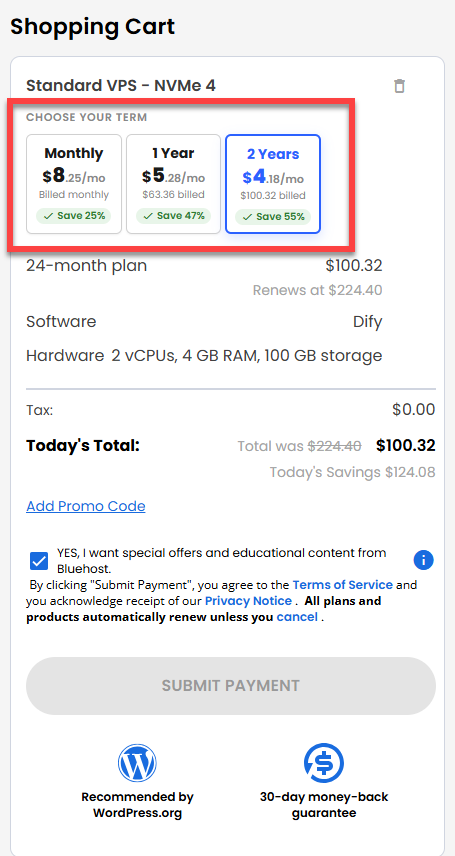
- Review the items in your cart, add a Promo Code if you have one, and then click Submit Payment to complete the purchase.
After checkout, your Self-Managed VPS will begin setting up. Once it’s ready, you can find it under the Hosting tab in your Bluehost Portal.
Summary
Purchasing a Self-Managed VPS gives you the underlying power and flexibility needed to run advanced platforms like Dify. By selecting your hardware, choosing your preferred application during the cart configuration, and completing the checkout process, Bluehost automatically provisions your server. Once the setup finishes, your new VPS instance will be fully accessible and ready to manage directly from the Hosting tab in your Bluehost Portal.