 ChatGPT,
  Claude,
  Gemini,
  Grok — all four for
 Purchase a Virtual Dedicated Server with DeepSeek Installation
Run high-performance AI directly on your own servers. DeepSeek gives you full control over your data and infrastructure while powering your applications, automating workflows, and processing complex information with top-tier reasoning and text generation.
This article explains how to purchase a Bluehost Virtual Dedicated Server (VDS) hosting plan and set up and manage your DeepSeek Assistant.
Why Choose DeepSeek?
Deploying DeepSeek on a Virtual Dedicated Server gives you dedicated CPU, RAM, and storage for fast, uninterrupted model performance. Your data stays completely private inside your own secure environment without risky third-party sharing. Plus, flat monthly pricing means you can process unlimited prompts without worrying about unpredictable per-token fees.
Uses of DeepSeek
Six ways DeepSeek solves complex problems, cuts costs, and protects your data
- Powering AI coding agents: Development teams plug DeepSeek into multi-step coding tools (like Claude Code or OpenClaw). It handles continuous loops of writing, testing, and fixing code without losing its train of thought.
- Repository-wide debugging: With its massive 1-million-token context window, developers feed entire codebases into the model to find bugs, refactor code, or map out system architecture.
- High-volume contract and log auditing: Thanks to its ultra-low API costs, businesses use DeepSeek to instantly scan, summarize, and extract unstructured data from thousands of legal documents or massive streams of server security logs simultaneously.
- Fully offline local assisting: Everyday users and field workers run smaller, optimized versions of the model directly on standard consumer laptops, giving them a powerful, fully capable AI without an internet connection.
- Complex data analysis: Financial analysts and data scientists use DeepSeek to build intricate probability models, solve optimization problems, and evaluate game theory scenarios.
Whatever the use case, DeepSeek delivers enterprise-grade performance while keeping your infrastructure and data firmly in your hands.
System Requirements
Review the hardware specifications below to ensure your infrastructure is properly sized before beginning installation.
- Do not purchase a server that only meets minimum survival specs: Running with only baseline specifications (4 GB RAM, 5 GB Disk, and No GPU / CPU-only) represents the software's bare survival threshold and does not account for operating system overhead (~500 MB idle usage) or Ollama runtime (~150 MB). This can cause severe performance slowdowns, system freezes, or crashes during traffic spikes.
- Bluehost VPS/VDS & GPU Offloading: Bluehost Self-Managed VPS and VDS lack dedicated GPUs (VRAM). While CPU-only mode is supported, running local LLMs without an NVIDIA (CUDA) or AMD (ROCm) GPU results in significantly slower response times. For low-latency production workloads, use a GPU-equipped server or connect your application via API to an external cloud AI provider (like OpenAI or Anthropic).
- Node Resource Baselines: For a stable deployment, we recommend at least 4 vCPUs, 8 GB RAM (for the default model), and 20 GB+ Disk space. Allocate extra storage if you plan to save recordings, logs, or additional application data.
- Model Storage & Memory Scaling: Recommended RAM requirements per model:
- deepseek-r1:1.5b: 8 GB Recommended RAM
- deepseek-r1:7b: 16 GB Recommended RAM
- deepseek-r1:14b: 24 GB Recommended RAM
- deepseek-r1:32b: 64 GB Recommended RAM
- deepseek-r1:70b: 72 GB Recommended RAM
- Memory Error Warning: The default model pre-loaded on first boot is
deepseek-r1:1.5b. Pulling a larger model on a node with insufficient RAM will cause Ollama to return a500 Internal Server Error.
Hosting Options for High-Resource Needs
If your application requires more performance, you can choose between a Self-Managed VPS or a Virtual Dedicated Server (VDS).
Main Benefits of a VDS Server:
- Guaranteed Resources: You get 100% of your CPU, RAM, and storage. Other users cannot slow down your server.
- Better Security: Your server is completely isolated from others, keeping your data safer.
The following node resources outline the baseline hardware needed to run the system smoothly.
Node Resources
Ensure your server meets or exceeds these baseline memory, storage, and processing specifications.
| Resource | Minimum | Recommended |
|---|---|---|
| RAM | 4 GB | 8 GB (default model); see model table below for larger models |
| Disk | 5 GB | 20 GB+ (if pulling multiple or larger models) |
| GPU | None (CPU-only supported) | NVIDIA (CUDA) or AMD (ROCm) GPU for faster inference |
Depending on which model you plan to deploy, system memory requirements will scale accordingly.
RAM Requirements by Model
Refer to the breakdown below to determine the exact RAM required for your selected model size.
RAM figures account for model weights (Q4_K_M quantization), KV cache at default context length, Ollama runtime (~150 MB), and Ubuntu OS idle usage (~500 MB).
| Model | Disk size | Min node RAM | Recommended RAM |
|---|---|---|---|
| deepseek-r1:1.5b | ~1.1 GB | 4 GB | 8 GB |
| deepseek-r1:7b | ~4.7 GB | 8 GB | 16 GB |
| deepseek-r1:14b | ~9.0 GB | 16 GB | 24 GB |
| deepseek-r1:32b | ~20 GB | 32 GB | 64GB |
| deepseek-r1:70b | ~43 GB | 64 GB | 72 GB |
The default model pre-loaded on first boot is deepseek-r1:1.5b. Pulling a larger model on a node with insufficient RAM will cause Ollama to return a 500 Internal Server Error.
How to Purchase a Virtual Dedicated Server with DeepSeek Installation
DeepSeek can be installed on a Bluehost Virtual Dedicated Server (VDS). You can choose to have DeepSeek installed during the initial VDS purchase or install it manually at a later time.
- In your browser, go to https://www.bluehost.com.
- Click Hosting in the top menu, then select Virtual Dedicated Server.

You can also go to this link directly: https://www.bluehost.com/vds-hosting.
- On the Virtual Dedicated Server Hosting page, click Explore Plans. You can also scroll down to the hosting plans section.

- Choose a plan from either tab — Standard or High Performance — by clicking Choose Plan.

Pricing is subject to change. Please visit https://www.bluehost.com/vds-hosting for the current introductory/sign-up offer for the Bluehost Virtual Dedicated Server hosting. For the most up-to-date renewal pricing, visit your Bluehost Portal's Renewal Center. - On the next page, configure your VDS hosting to meet your requirements. The configuration options are divided into the following sections:
- Location: Select your data center in this section.

- Hardware: This section shows your pre-selected plan. You can also switch to another Virtual Dedicated Server plan in this section

- Software:
If the selected plan does not meet the app's minimum requirements, the app will be grayed out.
- Under the Application tab, click on DeepSeek.
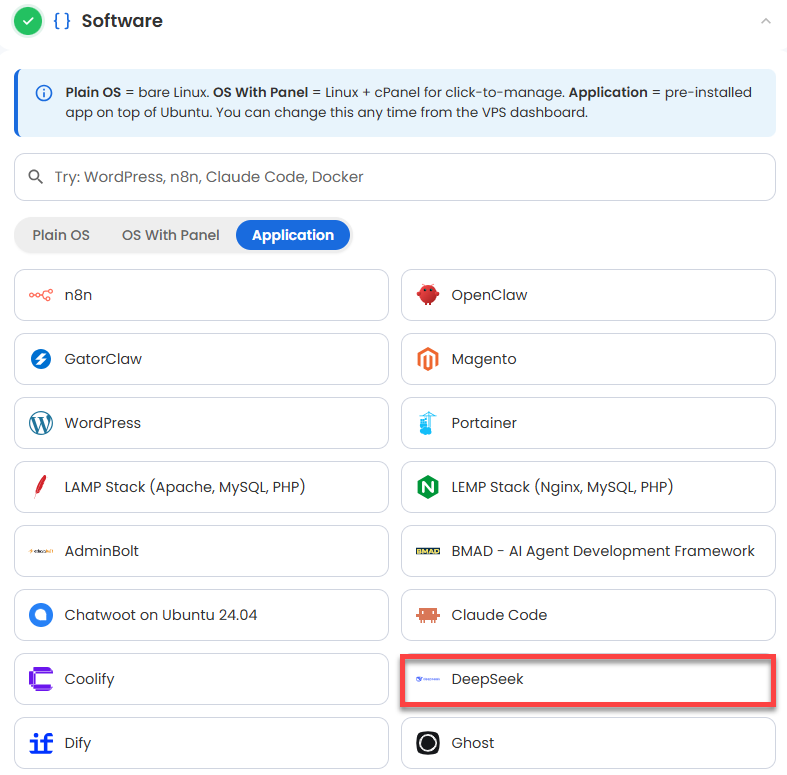 You can install only one application per purchase; the system will automatically select the best operating system for it.
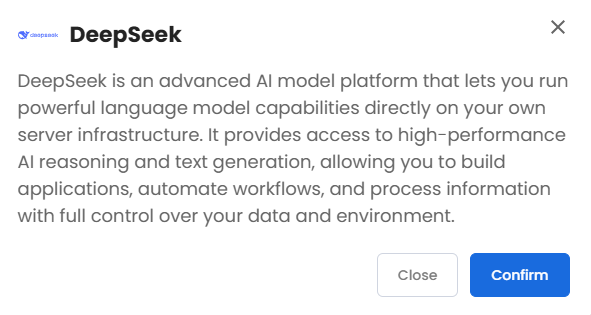
 - In the pop-up, click Confirm.
- Under the Application tab, click on DeepSeek.
- Support & Security: You can add Premium Support - Recurring, which provides priority access to expert assistance and faster response times.

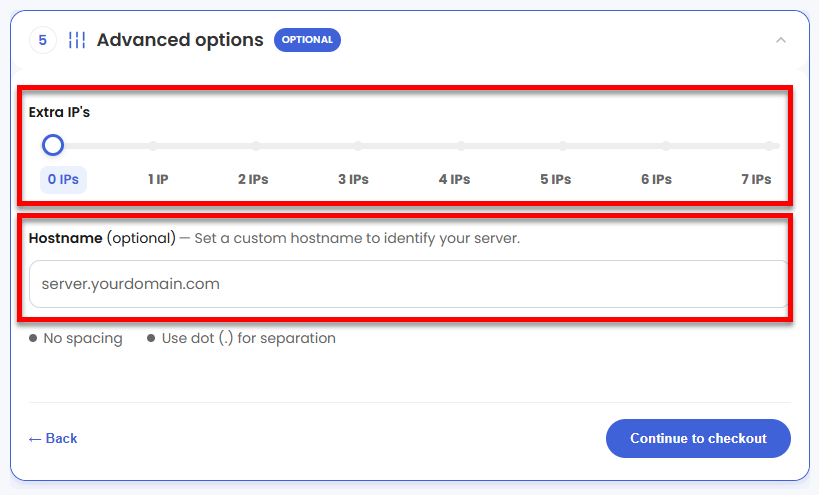
- Advanced Options:
- Extra IP's: You can add IP addresses for an additional fee. Pricing changes based on how many IPs you add.
- Hostname: Assign a custom hostname to identify your server. This is optional.
- Location: Select your data center in this section.
- Select your billing term and review your selected items on the right pane, along with the summarized total cost.
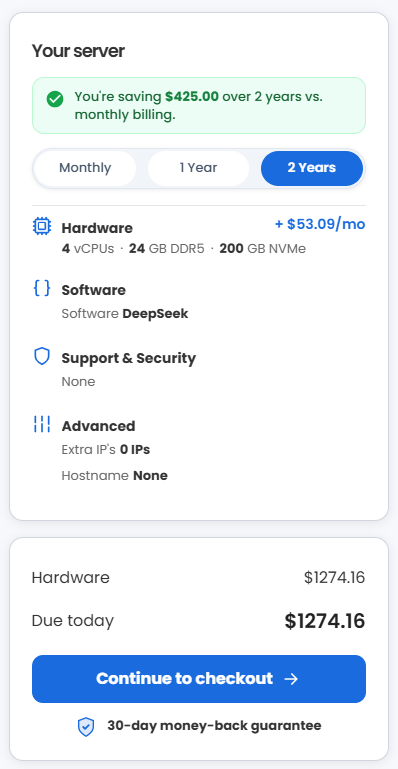
- Click Continue to checkout.
- Do the following on the Checkout page:
If you're new to Bluehost:- Create your Bluehost account by using your email address or by connecting with your Google, Apple, or GitHub account — whichever you prefer!

- Select your preferred payment method: credit card, Google Pay, or PayPal. Enter your billing information.

If you have an account with us, you will see your Bluehost login details when you are logged into your Bluehost Portal. If you are not logged in, please click the Log In link.

- Create your Bluehost account by using your email address or by connecting with your Google, Apple, or GitHub account — whichever you prefer!
- In the Shopping Cart, choose your billing term if you did not choose one on the previous page.
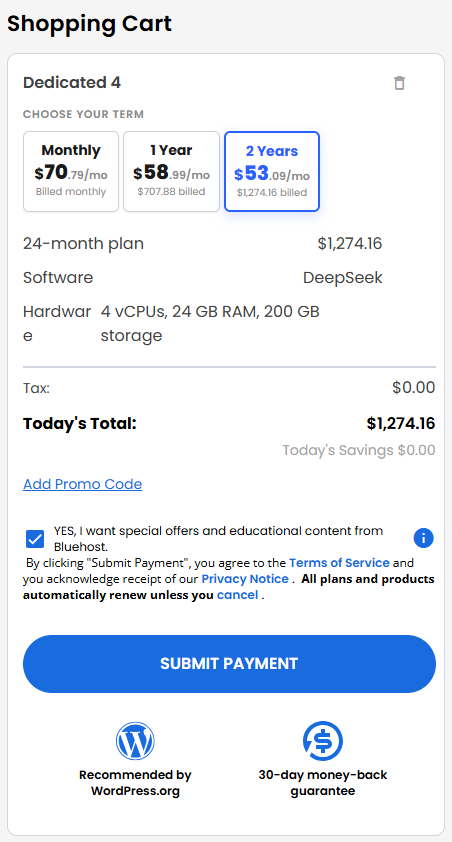
- Add a Promo code if you have one, and then click Submit Payment to complete your purchase.
After completing the purchase, your VDS hosting will begin provisioning. You can access and manage your new VDS hosting in the Hosting tab of your Bluehost Portal.
How to Test and Verify Your DeepSeek Setup
Here is how to quickly check your server, run DeepSeek commands, and make sure everything is working safely.
- Log in to your Bluehost Portal.
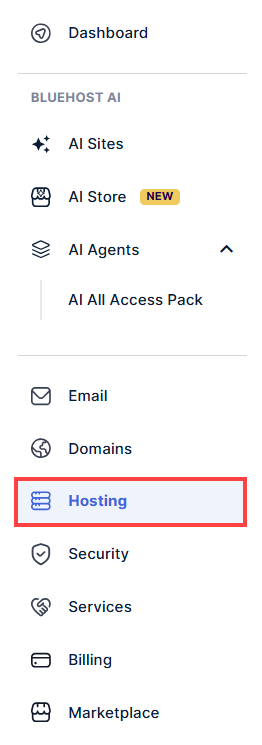
- In the left-hand menu, click Hosting, then select My Plans.
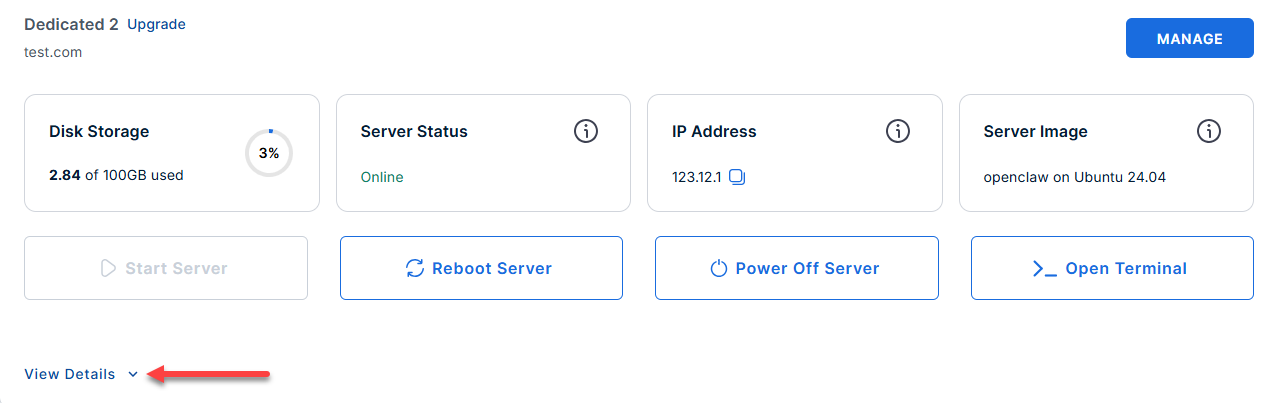
- Locate the server you want to manage, then click View Details in the bottom-left corner to expand the section and access additional server information.
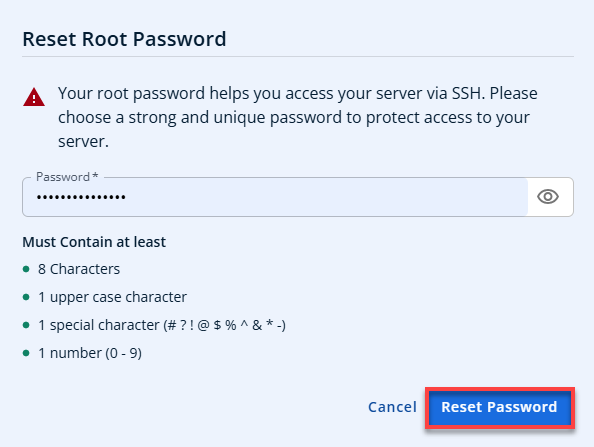
- Click the Reset Password.
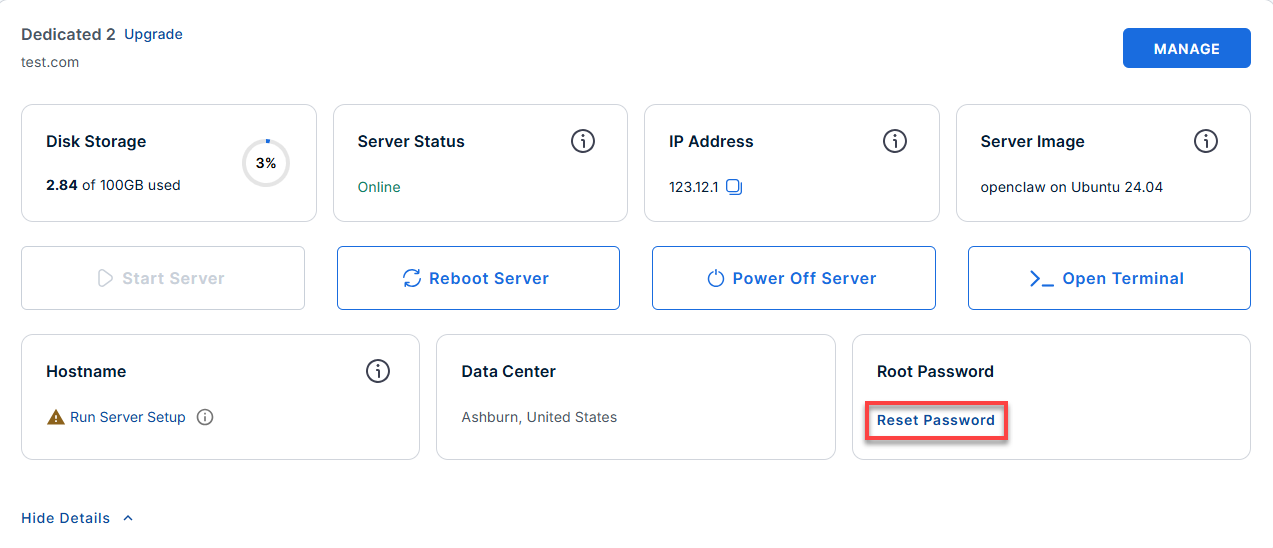
- In the pop-up window, type your new root password, then click Reset Password again to confirm and save the changes.
- Connect to your server via SSH.
When you log in to your server for the first time via SSH, you're greeted with a welcome message that includes all the essential commands and instructions for verifying DeepSeek. The content looks like this:Replaceyour_server_ipwith your actual server IP address.ssh root@your_server_ipExample Output
Welcome to Ubuntu 24.04.4 LTS (GNU/Linux 6.8.0-124-generic x86_64) ******************************************************************************** DeepSeek AI Server API : http://123.45.67.89:11434 (Ollama-compatible REST) SSH : port 22 | UFW enabled - all other ports blocked Default model : deepseek-r1:1.5b (~1.1 GB, auto-pulled on first boot) Requirements: RAM : 4 GB minimum for this image (default model: deepseek-r1:1.5b) Larger models need more - see table below Model RAM requirements (minimum node RAM / recommended): deepseek-r1:1.5b -> 4 GB min / 8 GB recommended (default) deepseek-r1:7b -> 8 GB min / 16 GB recommended deepseek-r1:14b -> 16 GB min / 24 GB recommended Quick start: ollama run deepseek-r1:1.5b # interactive chat (default, needs 4 GB RAM) ollama list # list loaded models ollama pull deepseek-r1:7b # larger model (~4.7 GB, needs 8 GB RAM) ollama pull deepseek-r1:14b # pull an even larger model (~9 GB, needs 16 GB RAM) REST API: curl http://123.45.67.89:11434/api/tags curl -X POST http://123.45.67.89:11434/api/generate \ -H 'Content-Type: application/json' \ -d '{"model":"deepseek-r1:1.5b","prompt":"Hello","stream":false}' Service : systemctl status ollama Logs : /var/log/deepseek/deepseek.log Docs : cat /root/README.md ******************************************************************************** To delete this message of the day: rm -rf /etc/update-motd.d/99-deepseek Last login: Tue Jun 9 18:08:22 2026 from 180.190.20.22 - Check the Health of the Ollama Service:
systemctl status ollama
Example Output
root@server-123456:~# systemctl status ollama ● ollama.service - Ollama Service Loaded: loaded (/etc/systemd/system/ollama.service; enabled; preset: enabled) Drop-In: /etc/systemd/system/ollama.service.d └─logging.conf, override.conf Active: active (running) since Tue 2026-06-09 17:22:47 UTC; 54min ago Main PID: 763 (ollama) Tasks: 39 (limit: 19161) Memory: 15.0G (peak: 15.0G) CPU: 7min 58.247s CGroup: /system.slice/ollama.service ├─ 763 /usr/local/bin/ollama serve └─6179 /usr/local/lib/ollama/llama-server --model /usr/share/ollama/.ollama/models/blobs/sha256-aabd4debf0> - Run and Manage DeepSeek Models via CLI:
ollama run deepseek-r1:1.5b
Example Output
root@server-123456:~# ollama run deepseek-r1:1.5b pulling manifest pulling aabd4debf0c8: 100% ▕██████████████████████████████████████████████████████████▏ 1.1 GB pulling c5ad996bda6e: 100% ▕██████████████████████████████████████████████████████████▏ 556 B pulling 6e4c38e1172f: 100% ▕██████████████████████████████████████████████████████████▏ 1.1 KB pulling f4d24e9138dd: 100% ▕██████████████████████████████████████████████████████████▏ 148 B pulling a85fe2a2e58e: 100% ▕██████████████████████████████████████████████████████████▏ 487 B verifying sha256 digest writing manifest success >>> good morning Good morning! 🌞 How can I assist you today? >>> Send a message (/? for help) - Run the Test Suite:
prove /root/app_test/main.t
Example Output
root@server-123456:~# prove /root/app_test/main.t             prove /root/app_test/main.t
/root/app_test/main.t .. ok
All tests successful.
Files=1, Tests=7,  0 wallclock secs ( 0.01 usr  0.01 sys +  0.04 cusr  0.03 csys = 0.09 CPU)
Result: PASS
Supporting Information and Sample Output
Run the following command to check the local documentation:
Example Output:
Docs    : cat /root/README.md
********************************************************************************
To delete this message of the day: rm -rf /etc/update-motd.d/99-deepseek
Last login: Tue Jun  9 21:26:30 2026 from 123.123.20.22
root@server-123456:~# cat /root/README.md
# DeepSeek

## Description

DeepSeek is an advanced AI model platform that lets you run powerful language model capabilities directly on your own server infrastructure.
It provides access to high-performance AI reasoning and text generation,
allowing you to build applications, automate workflows, and process information with full control over your data and environment.

## Minimum Requirements

### Node resources

| Resource | Minimum | Recommended |
|----------|---------|-------------|
| RAM      | 4 GB    | 8 GB (default model); see model table below for larger models |
| Disk     | 5 GB    | 20 GB+ (if pulling multiple or larger models) |
| GPU      | None (CPU-only supported) | NVIDIA (CUDA) or AMD (ROCm) GPU for faster inference |

> **GPU note:** Ollama automatically offloads model layers to any detected NVIDIA (CUDA)
> or AMD (ROCm) GPU. Without a GPU, inference runs on CPU only - functional but noticeably
> slower, especially for larger models. For production workloads or low-latency responses,
> a GPU-equipped node is strongly recommended.

### RAM requirements by model

RAM figures account for model weights (Q4_K_M quantization), KV cache at default context
length, Ollama runtime (~150 MB), and Ubuntu OS idle usage (~500 MB).

| Model              | Disk size | Min node RAM | Recommended RAM |
|--------------------|-----------|--------------|-----------------|
| deepseek-r1:1.5b   | ~1.1 GB   | 4 GB         | 8 GB            |
| deepseek-r1:7b     | ~4.7 GB   | 8 GB         | 16 GB           |
| deepseek-r1:14b    | ~9.0 GB   | 16 GB        | 24 GB           |
| deepseek-r1:32b    | ~20 GB    | 32 GB        | 32 GB           |
| deepseek-r1:70b    | ~43 GB    | 64 GB        | 64 GB           |

The default model pre-loaded on first boot is `deepseek-r1:1.5b`. Pulling a larger model
on a node with insufficient RAM will cause Ollama to return a `500 Internal Server Error`.

Following installation the virtual machine will have:
* DeepSeek REST API on port 11434 (Ollama-compatible, OpenAI-compatible)
* SSH on port 22

Ports are protected using ufw with default-deny incoming policy.

## Services

Service           | Port  | Protocol | Notes
------------------|-------|----------|------
SSH               | 22    | TCP      | UFW rate-limited
DeepSeek API      | 11434 | TCP      | Ollama runtime, OpenAI-compatible endpoint

## Links

* DeepSeek models on Ollama: https://ollama.com/library/deepseek-r1
* Ollama documentation: https://github.com/ollama/ollama
* Ollama REST API reference: https://github.com/ollama/ollama/blob/main/docs/api.md
* DeepSeek official site: https://www.deepseek.com

## How-to-use

### Interacting via CLI

SSH into the server and use the `ollama` command:

ollama list # list downloaded models
ollama run deepseek-r1:1.5b # interactive chat session (default, needs 4 GB RAM)
ollama pull deepseek-r1:7b # pull a larger model (~4.7 GB, needs 8 GB RAM)
ollama pull deepseek-r1:14b # pull an even larger model (~9 GB)
ollama rm deepseek-r1:1.5b # remove a model

### Interacting via REST API

The API is accessible from outside the server on port 11434:

# List available models
curl http://:11434/api/tags

# Generate a completion (non-streaming)
curl -X POST http://:11434/api/generate \
     -H 'Content-Type: application/json' \
     -d '{"model":"deepseek-r1:1.5b","prompt":"Explain quantum computing","stream":false}'

# Chat endpoint
curl -X POST http://:11434/api/chat \
     -H 'Content-Type: application/json' \
     -d '{"model":"deepseek-r1:1.5b","messages":[{"role":"user","content":"Hello"}]}'

# OpenAI-compatible endpoint
curl -X POST http://:11434/v1/chat/completions \
     -H 'Content-Type: application/json' \
     -d '{"model":"deepseek-r1:1.5b","messages":[{"role":"user","content":"Hello"}]}'

### Model storage

Models are stored in /usr/share/ollama/.ollama/models. Ensure sufficient disk space before pulling large models (7B models require ~4.7 GB, 14B ~9 GB, 32B ~20 GB).

### Service management

systemctl status  ollama       # check service status
systemctl restart ollama       # restart the service
journalctl -u ollama -f        # follow journal logs
tail -f /var/log/deepseek/deepseek.log   # follow file logs (rotated daily, 14 days)

### Running the test suite

prove /root/app_test/main.t

### Security note
The Ollama API on port 11434 is exposed to the network and does not provide authentication by default. Restrict access using cloud firewall/security groups, a reverse proxy with authentication, or deploy only on trusted private networks.
Summary
Learn how to purchase a Bluehost Virtual Dedicated Server (VDS) with DeepSeek pre-installed to power your private AI workflows. This article details why you should choose DeepSeek for total data privacy and dedicated resources, along with key business use cases like coding agents, log auditing, and data analysis. You will also discover how to pick the right RAM specs to prevent server under-provisioning, while keeping in mind that these CPU-only servers run inference slower than GPU hardware. Finally, the guide walks you through selecting your software and hardware during checkout, then accessing your new server directly from the Bluehost Portal.