How to Change Your Bluehost Nameservers
Are you looking to change your website's nameservers? Whether switching to a new hosting provider or updating your domain settings, changing your nameservers can seem daunting. However, the process can be straightforward to follow with the right guidance. In this article, we'll walk you through how to change your nameservers so you can ensure your website stays up and running smoothly.
How Nameservers Work
Nameservers are responsible for converting website names, such as 'example.com,' into IP addresses that computers can understand. Its job is to retrieve information about the website from a network of servers worldwide.
If you want to visit a website called "example.com," you start by searching for it in your browser. Once you enter the URL, your computer quickly loads the webpage, granting you access to the site. While this process seems straightforward, the technical steps happening behind the scenes are more complex than they appear.
When you enter "example.com" in your browser, it asks the nameservers for the website's IP address. The nameservers provide the IP, and your browser then requests the website's content from that address. The website loads quickly, so you usually don't notice these steps unless there's an error.
Where Are My Nameservers Located?
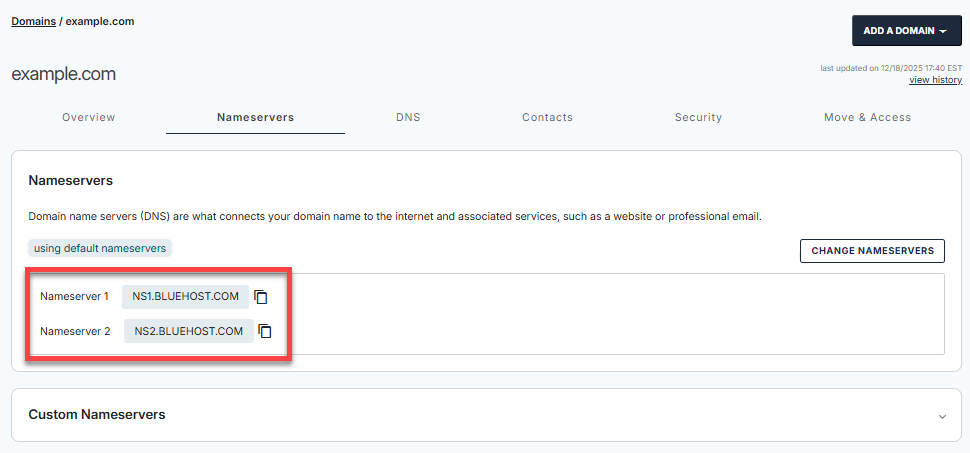
When you sign up for Bluehost, you'll receive an order confirmation email that includes your Bluehost nameservers. You can also find this information in your Bluehost Portal.
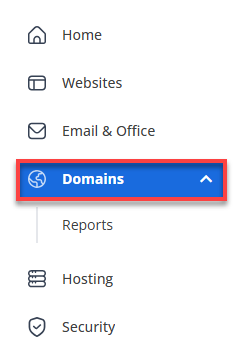
In the Domains tab, click on the Nameservers tab.
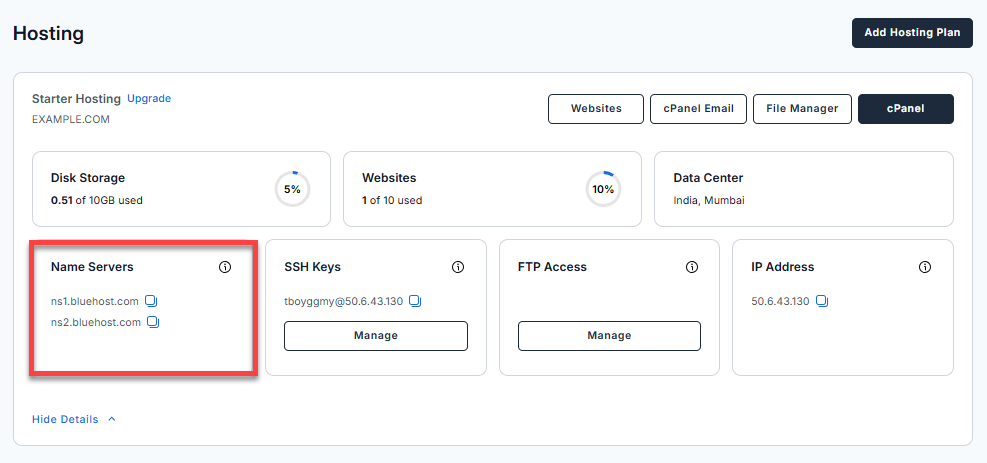
You can also go to the Hosting tab and click View Details.
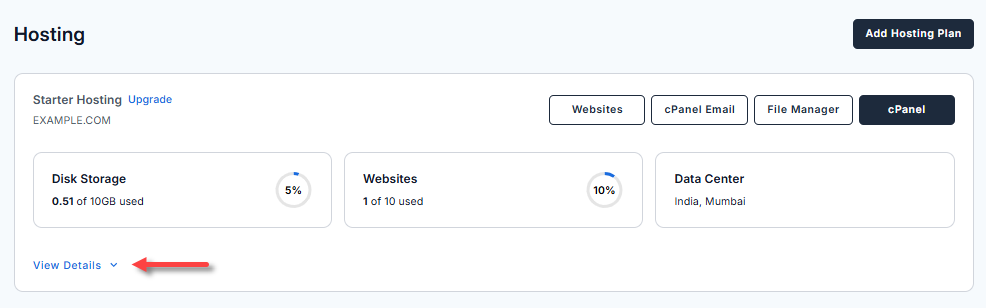
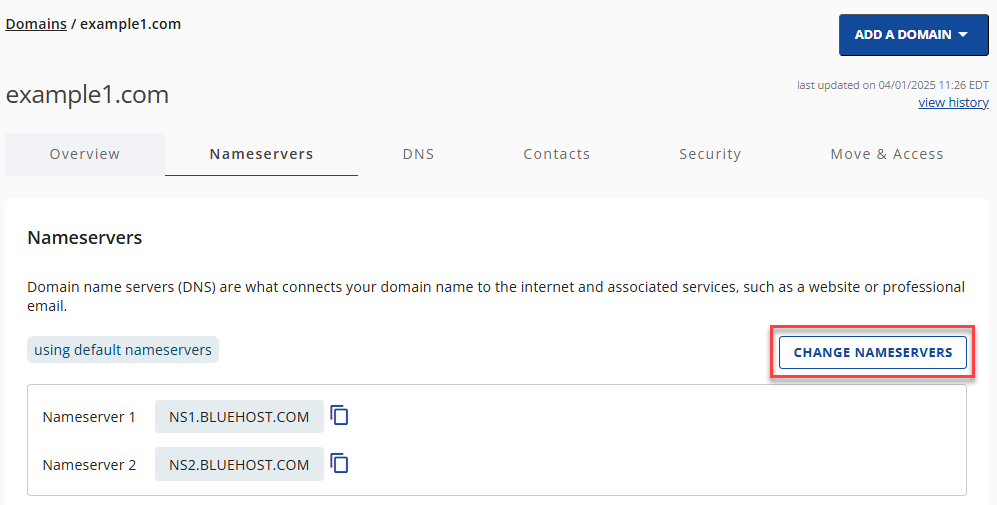
Your nameservers are displayed, along with other details of your Bluehost account.
- NS1.BLUEHOST.COM
- NS2.BLUEHOST.COM
Here is a video to guide you in changing your nameservers in your Bluehost Portal.
Changing Your Bluehost Nameservers
- Log in to your Bluehost Portal.
- In the left-hand menu, click Domains.
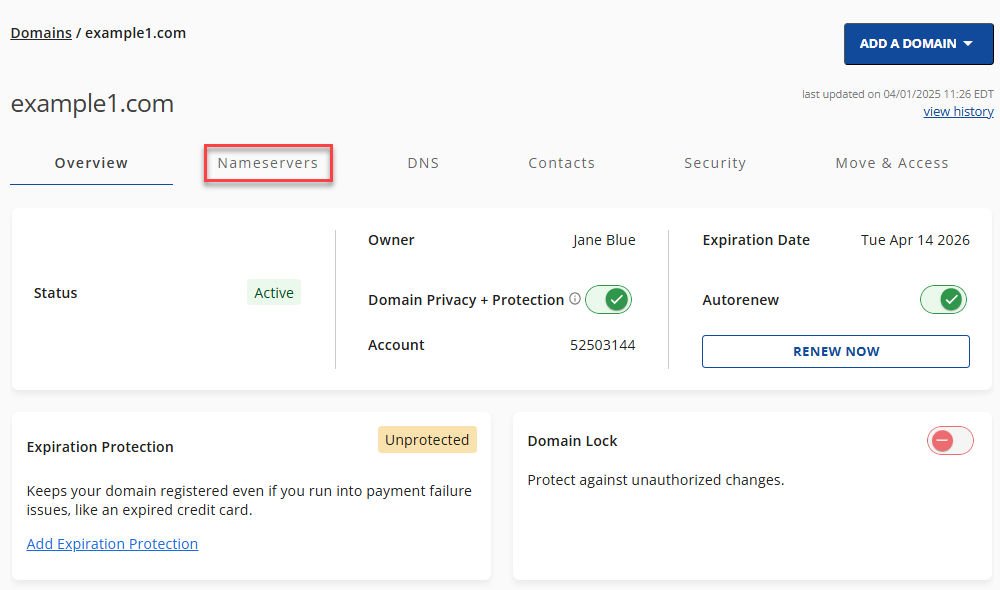
- If you have one domain in your account, you will be taken directly to the domain management panel.

- If you have multiple domains in your account, click the domain you wish to manage to access the domain management panel.
- If you have one domain in your account, you will be taken directly to the domain management panel.
- Select the Nameservers tab.
- Click the Change Nameservers button.
- Enter the new nameservers.
- Click the Save button to save your changes.
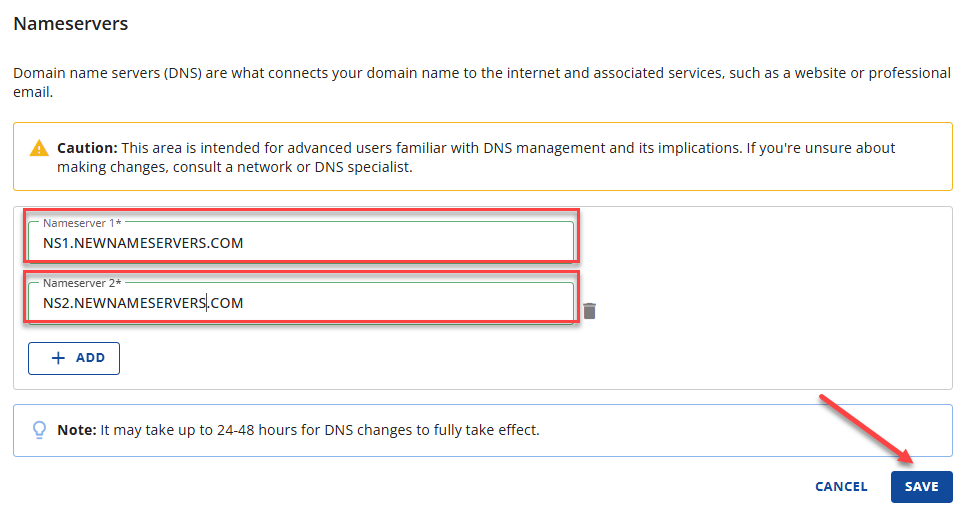
- Allow 24-48 hours for propagation time.
Changing Custom Nameservers
If you're on a VPS or Dedicated hosting plan, you can use custom nameservers.
Custom nameservers, also known as private nameservers, are DNS servers linked to a specific domain rather than the default nameservers provided by a hosting provider.
Before changing your nameservers to custom nameservers in the Bluehost Portal, there are important considerations to remember.
- Are you going to use us to host the website?
- Would A records and/or CNAME be more suitable?
For more information about the custom nameservers, please visit the VPS and Dedicated Hosting: Setting Up Private Nameservers article.
What to Do After Changing Nameservers
After you've changed your nameservers, it's essential to take several key steps to ensure everything functions smoothly and to leverage the benefits of the change.
- Verify the Change: Use online tools to check that your new nameservers are recognized globally. This can take up to 48 hours. Also, make sure all your DNS settings, like website and email directions, have been correctly moved to the new provider.
- Monitor Your Website: Keep an eye on your website to make sure it's always up and running. Check all its features to ensure everything works as expected.
- Update Your DNS Records if Needed: Review and adjust your DNS settings if anything didn't transfer correctly or needs changes. Add any new records that could improve security or performance.
- Test Email Services: If you manage emails through your domain, test to make sure you can send and receive emails without issues.
- Backup Your DNS Records: Save a backup of your DNS settings. It's useful in case you need to make changes in the future or fix problems.
- Communicate with Your Team or Clients: Let anyone affected by the website know about the nameserver change and any potential short-term impacts.
- Review Website Performance: After everything is stable, check how well your website performs. Look for any improvements or issues that need fixing.
- Keep an Eye on Security: Watch for any security threats and make sure all your defenses are working as they should.
Why Change Nameservers
People change nameservers for several reasons, each motivated by the desire to optimize, secure, or expand their online presence. Here’s why this move is often considered strategic and beneficial:
-
Switching Hosting Providers - People often look for better performance; if a website loads slowly or is often offline, switching to a more reliable web hosting provider can make it faster and more available. Some hosts have advanced features or better support, which can attract users looking for those benefits.
Also, cost matters a lot; choosing a provider that gives more for the same price can lead to a switch since everyone wants to get the most value for their money.
-
Accessing Advanced DNS Features - Some domain registrars or third-party DNS services offer custom DNS management, which allows for more control over DNS settings than what's available with current hosting providers.
Adding security features like DDoS protection and DNSSEC is crucial for keeping a website safe. Switching to a provider that offers these security options can greatly improve a site's protection.
-
Scaling and Reliability - Changing nameservers can also be due to the need for better website performance. Load Balancing spreads high traffic across several servers, making the website more reliable and faster.
Switching to nameservers from a Content Delivery Network (CDN) service can speed up how quickly users get website content. This is because the CDN stores content in various locations closer to users, improving the website's speed everywhere.
-
Consolidating Services - Managing domain names, hosting, and email services all in one place can simplify things. Having just one contact for any support issues makes solving problems easier and less complicated.
-
Overcoming Censorship or Geo-Restrictions - Changing nameservers can help avoid government or ISP restrictions and make content accessible. Geo-targeting lets businesses use nameservers that direct users to local versions of their website, making the experience better for them.
-
Personal Preference or Expert Recommendations - Trust and reliability are crucial; people may change to nameservers from a more trusted or highly recommended company. For unique project or application needs, a specialized DNS provider might be better, as they offer services that regular ones don't.
Summary
Changing your nameservers boosts your website's speed, safety, and control. After switching, check that it's working worldwide, keep an eye on your site, update settings if needed, and tell your team about the change. This simple step can make a big difference, making your website better and opening up new chances for growth.
If you need further assistance, Bluehost Chat Support is available 24 hours a day, 7days a week while Bluehost Phone Support is available 7 days a week from 7 am-12 midnight EST.
- Chat Support - While on our website, you should see a CHAT bubble in the bottom right-hand corner of the page. Click anywhere on the bubble to begin a chat session.
- Phone Support -
- US: 888-401-4678
- International: +1 801-765-9400
You may also refer to our Knowledge Base articles to help answer common questions and guide you through various setup, configuration, and troubleshooting steps.