How to Configure SiteLock SMART Database
SiteLock is a cloud-based security service that scans websites for malware and vulnerabilities. It protects against hackers and DDoS attacks, ensuring website safety and uptime. SiteLock also provides solutions for website acceleration and performance improvement, and learning how to configure the SiteLock SMART Database scanner is essential for maintaining the security of your website. SMART Database (Secure Malware Alert and Removal Tool Database) is a feature included in the Prevent and Prevent Plus plans. It scans your website's database on an on-demand basis. It cleans any malware automatically by connecting to your hosting account via FTP.
In this guide, we'll walk you through the steps to manually configure the SMART Database in the SiteLock dashboard since the feature is not set up automatically.
Configure SiteLock SMART Database
To do the SiteLock Dashboard setup for the SMART Database scanner, please follow the steps below:
- Launch SiteLock Dashboard.
- If you purchased the SiteLock services through us, you could launch the dashboard by signing into your Bluehost Portal; refer to How to Access SiteLock for further instructions.
- If you purchased the service directly from SiteLock, you can go to sitelock.com and click the Login button at the top right-hand corner.
- The username is your email address to sign up for the service.
- You may need to request a password reset if you cannot sign in.
- After logging in to your dashboard, click on Setup Wizard.
- In the Database Setting Wizard, verify your credentials to scan and back up your database.
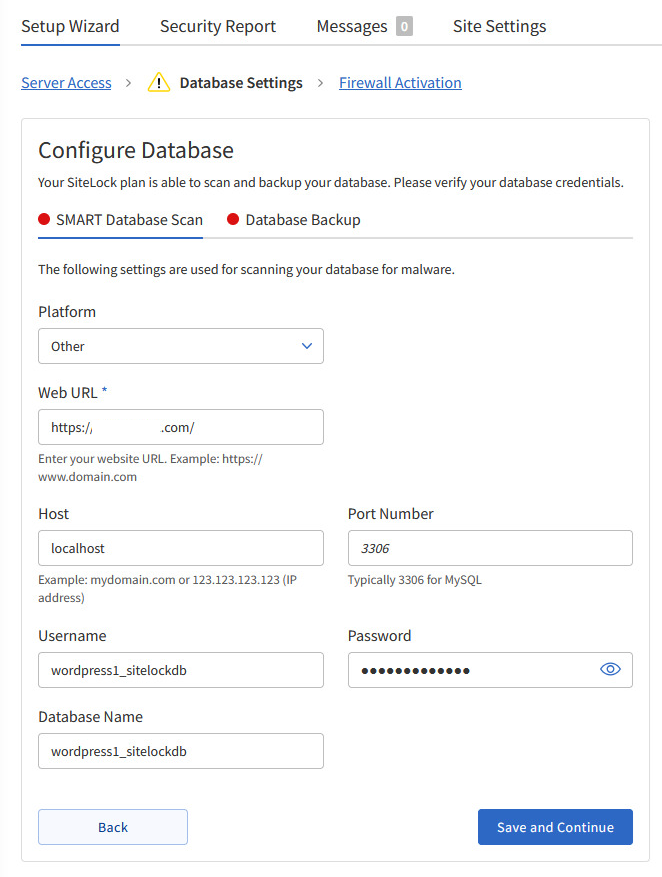
- Platform – Select the platform that the website uses:
- WordPress: Automatically detects database credentials.
- Joomla!: Automatically detects database credentials.
- Other: Please manually provide database credentials.
- Web URL – The URL of the website.
- Example: https://www.bluehost.com
- Host – The server address can be either a domain name or an IP address.
- Example: bluehost.com or [IP_address_1]
- Port Number – The port number used to connect to the MySQL database is typically 3306.
- Username – The username required to access the database.
- Password – The password needed for database access.
- Database Name – The name of the database that will be scanned.
- Functionality
- Status Indicators – Each tab features a status indicator.
- Green – Configured successfully.
- Red – Requires attention.
- Status Indicators – Each tab features a status indicator.
- Platform – Select the platform that the website uses:
- Click Save and Continue.
Configuration: Database Backup
After configuring the SiteLock SMART Database, you can set the database backup frequency.
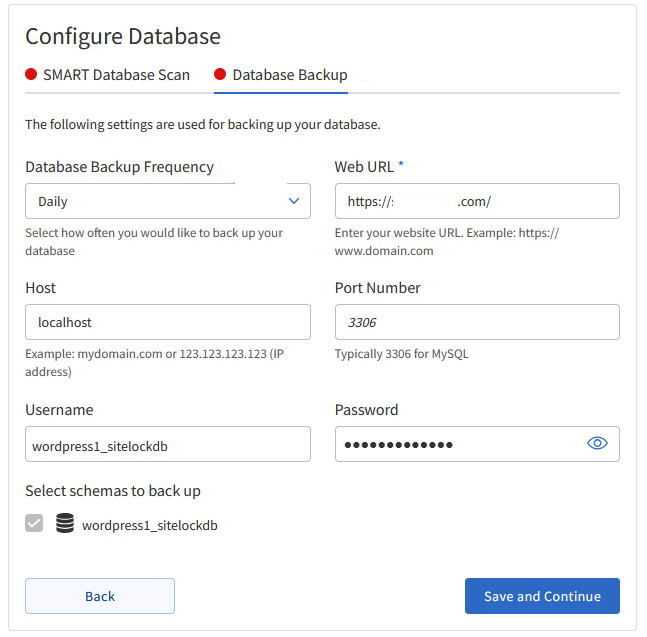
- Click on the Database Backup tab.
- Import the database connection strings from the previous section.
- Select the desired frequency for database backups.
- Daily
- Weekly
- Monthly
- Quarterly
- Never
- Click Save and continue.
Summary
You must know how to configure the SiteLock SMART Database scanner to keep your website malware-free. This way, you will know if the SMART DB scanner is set up correctly to ensure the safety of your database. We want to ensure the security of your website and provide you with the necessary tools to achieve this.
If you need further assistance, Bluehost Chat Support is available 24 hours a day, 7days a week while Bluehost Phone Support is available 7 days a week from 7 am-12 midnight EST.
- Chat Support - While on our website, you should see a CHAT bubble in the bottom right-hand corner of the page. Click anywhere on the bubble to begin a chat session.
- Phone Support -
- US: 888-401-4678
- International: +1 801-765-9400
You may also refer to our Knowledge Base articles to help answer common questions and guide you through various setup, configuration, and troubleshooting steps.