Bluehost Self-Managed VPS: Reimage Your Server for Odoo Installation
Get started with Odoo quickly and effortlessly using the Bluehost Portal. This guide will walk you through the simple steps to install Odoo on your VPS and access your dashboard, so you can begin managing your business applications without delay.
Install Odoo Using Bluehost Portal
To install Odoo:
Important:
- You can install only one application using the one-click installer.
- To change or delete your application, follow the guide: Bluehost Self-Managed VPS: How to Change and Delete an Application.
- If you want to keep your current template, install the new application manually using SSH.
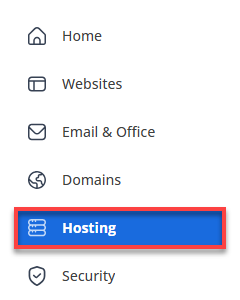
- Log in to your Bluehost Portal.
- Click Hosting in the left-hand menu.
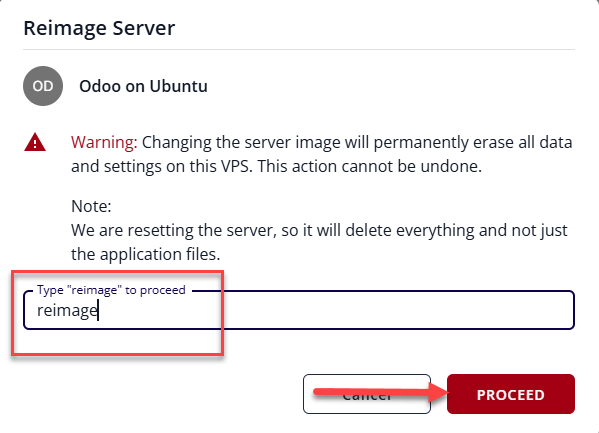
Changing the server image will permanently erase all data and settings on this VPS. This action cannot be undone.
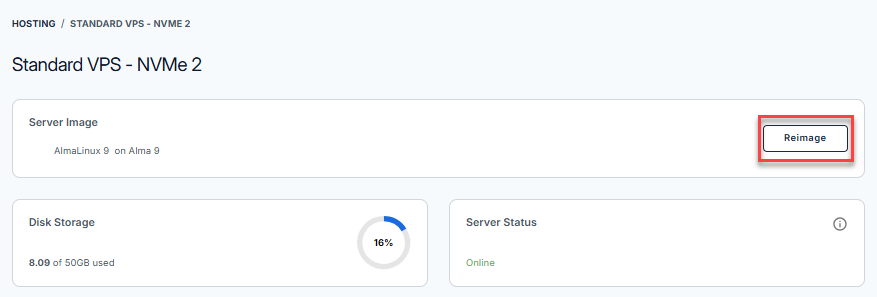
- Click the Manage button on the Self-Managed VPS package.

- Click the Reimage button.
- Select the Applications tab.
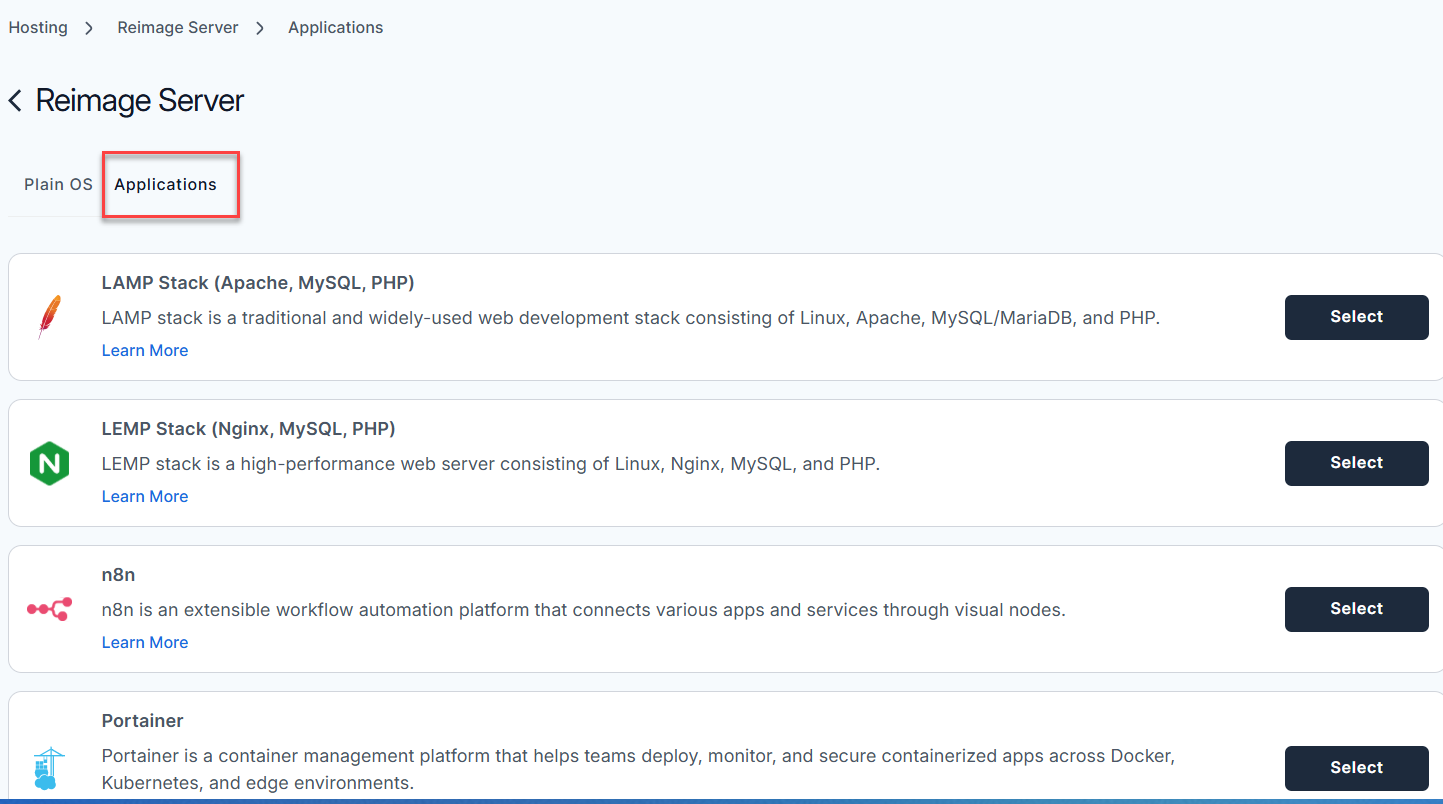
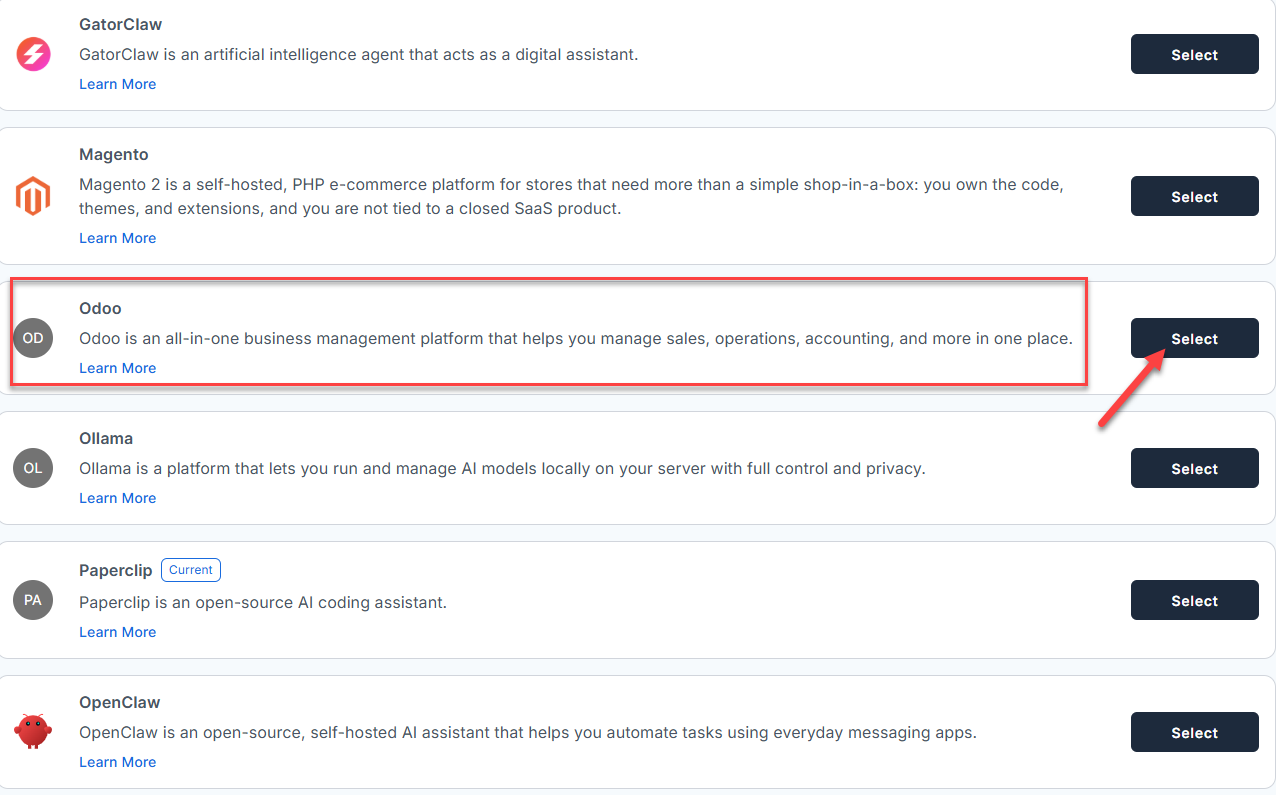
- From the list, find Odoo and click Select.
- To confirm, please type "reimage" and then click Proceed to start the process.
- Wait a few moments while the installation completes.

- Once completed, you will see Odoo listed in the Server Image section.
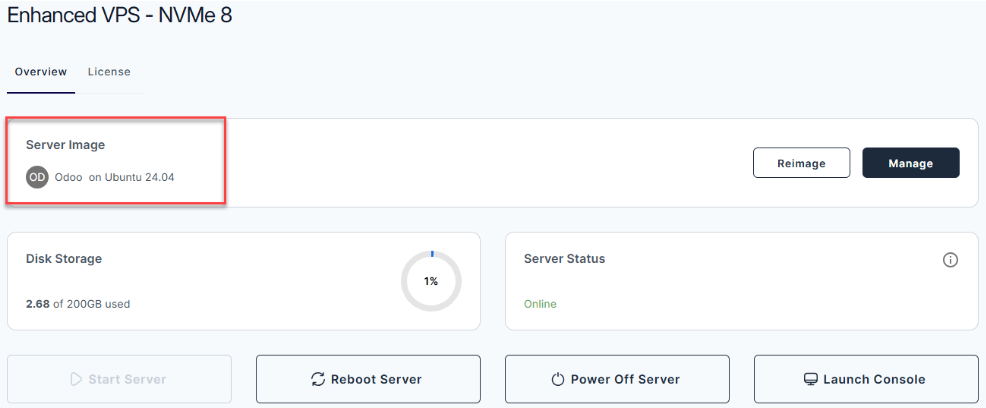
- Once completed, you will see Odoo listed in the Server Image section.
How to Set Up Odoo
- Log in to your server via SSH.
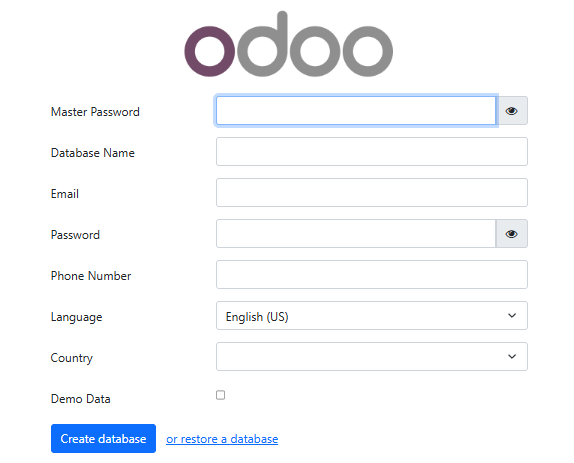
When you log in to your server for the first time via SSH, you're greeted with a welcome message that includes all the essential commands and instructions for setting up Odoo. The content looks like this:Welcome to Ubuntu 24.04.4 LTS (GNU/Linux 6.8.0-111-generic x86_64) ******************************************************************************** Odoo is running on this server. The UFW firewall is enabled. All ports are BLOCKED except 22 (SSH), 80 (HTTP), 443 (HTTPS), and 8069 (Odoo). In a web browser, you can access Odoo at: * Direct Odoo URL: http://50.6.6.130:8069 First-time setup notes: * Odoo will show a "Create Database" screen on first access * The Odoo Master Password is stored in: /root/.app_passwords Use the following guidance on the setup screen: * Master Password: Use the value shown above or retrieve it with: grep ODOO_MASTER_PASSWORD /root/.app_passwords * Database Name: Choose a name such as: odoo_prod * Email: This becomes the first Odoo administrator login * Password: This becomes the first Odoo administrator password * Load Demonstration Data: Leave UNCHECKED for production use Important locations on the server: * Odoo config: /etc/odoo/odoo.conf * Odoo log: /var/log/odoo/odoo.log * Passwords: /root/.app_passwords Helpful commands: systemctl status odoo # Check Odoo service status systemctl restart odoo # Restart Odoo service tail -100 /var/log/odoo/odoo.log # View recent Odoo logs For more details please refer /root/README.md To delete this message of the day: rm -f /etc/update-motd.d/99-odoo - See full server documentation (recommended):
Run the following to view all useful info about your Odoo server:
Example Output:cat /root/README.md# Odoo Server Image ## Image contents This template installs and configures: * Odoo 17 from the official GitHub repository (`branch 17.0`) * PostgreSQL local database service * Nginx web server * UFW firewall rules for SSH, HTTP, HTTPS, and Odoo * Python 3 virtual environment under `/opt/odoo/venv` * Odoo config at `/etc/odoo/odoo.conf` * Odoo logs at `/var/log/odoo/odoo.log` * First-boot injection script at `/var/lib/cloud/scripts/per-instance/001_onboot` * App password store at `/root/.app_passwords` ## Services Service | Ports | Purpose ----------- | --------- | ----------------------------------------------------------- Odoo | 8069 | Primary Odoo HTTP interface PostgreSQL | local | Database backend for Odoo Nginx | 80, 443 | Installed and enabled, but Odoo is exposed directly on 8069 OpenSSH | 22 | Remote access Ports are protected using UFW. ## Odoo configuration The default Odoo configuration file is `/etc/odoo/odoo.conf`. Key settings include: * `admin_passwd = CHANGE_ME_ON_FIRST_BOOT` - replaced at first boot by the per-instance cloud-init script * `db_host = False` and `db_port = False` - use local PostgreSQL * `db_user = odoo` * `addons_path = /opt/odoo/odoo-server/addons,/opt/odoo/custom-addons` * `logfile = /var/log/odoo/odoo.log` * `xmlrpc_port = 8069` * `proxy_mode = True` * `data_dir = /opt/odoo/.local/share/Odoo` - First-time browser access: create your Odoo instance and database.
- Open your browser and go to:
http://<server-ip>:8069 - On the "Create Database" screen, fill out:
- Master Password: Get the value with
Example Output:grep ODOO_MASTER_PASSWORD /root/.app_passwordsODOO_MASTER_PASSWORD="w92iq8f9d17b2ab40eaa979cdbe977d89d2285e0" - Database Name: Example:
odoo_prod - Email & Password: These become your Odoo admin login.
- Load Demonstration Data: Leave UNCHECKED for production.
- Click Create database
- Master Password: Get the value with
- Open your browser and go to:
- Check Odoo and related service status:
- Check Odoo:
systemctl status odoo● odoo.service - Odoo Open Source ERP and CRM Loaded: loaded (/etc/systemd/system/odoo.service; enabled; vendor preset: enabled) Active: active (running) - Check PostgreSQL:
systemctl status postgresql● postgresql.service - PostgreSQL RDBMS Loaded: loaded (/lib/systemd/system/postgresql.service; enabled) Active: active (exited) - Check Nginx:
systemctl status nginx● nginx.service - A high performance web server Loaded: loaded (/lib/systemd/system/nginx.service; enabled) Active: active (running)
- Check Odoo:
- To verify logs or troubleshoot:
tail -100 /var/log/odoo/odoo.log2024-06-05 11:53:21,340 340 INFO odoo_prod odoo.addons.base: Base setup ready. 2024-06-05 11:53:21,401 340 INFO odoo_prod odoo.service.server: Server running...journalctl -u odoo -n 100 --no-pager - Show or retrieve the master password:
grep ODOO_MASTER_PASSWORD /root/.app_passwordsODOO_MASTER_PASSWORD="w92iq8f9d17b2ab40eaa979cdbe977d89d2285e0" - Validation test (optional):
prove /root/app_test/main.t/root/app_test/main.t .. ok All tests successful. Files=1, Tests=8, 1 wallclock secs ( 0.04 usr 0.01 sys + 0.13 cusr 0.04 csys = 0.22 CPU) Result: PASS
Notes and Links:
- The Odoo master password is the database manager password (for creating/restoring databases), and is different from your Odoo admin login password.
- Odoo runs on port 8069. Nginx is enabled by default; to set up a secure reverse proxy, see Odoo HTTPS Deployment Docs.
- Odoo Documentation
Summary
Installing Odoo on your VPS is simple with the BH Portal’s one-click installer. Keep in mind that reimaging permanently erases all existing data and settings. After installation, you can open the Odoo dashboard directly from the Bluehost Portal to start using the application. Note that only one application can be installed via the one-click installer, and changing or deleting the application requires following additional steps or manual installation via SSH.
× ![]()
Did you find this article helpful?