 ChatGPT,
  Claude,
  Gemini,
  Grok — all four for
 Purchase a Self-Managed VPS with Odoo Installation
Odoo is an all-in-one business management software that provides a suite of open-source applications to help companies run various business functions seamlessly. From customer relationship management (CRM) to inventory management, accounting, human resources, and E-commerce, Odoo offers an integrated platform that allows businesses to manage everything in a single place. It is highly modular, allowing users to add features as their needs grow.
To get the most out of Odoo, consider a Self-Managed VPS hosting plan for better control and performance.
This article covers why Odoo is important, its common uses, and how to purchase and set up VPS hosting for it.
Why Use Odoo?
In the current world of cutthroat business competition, efficiency and automation are key factors that cannot be overlooked. With Odoo, it is possible for businesses to automate and streamline their processes by bringing all data and processes under one roof. By doing so, it makes processes efficient and minimizes the chances of error while ensuring proper coordination between departments.
Uses of Odoo
Odoo's uses span across multiple areas of business operations:
- CRM and Sales Management: Manage customer relationships, track leads, and automate sales workflows.
- Inventory and Warehouse: Monitor stock levels, streamline order fulfillment, and optimize supply chain management.
- Accounting and Finance: Automate invoicing, payments, and financial reporting.
- Human Resources: Employee information management, payroll, recruiting, and team member evaluations.
- E-commerce: Build online stores integrated with other business operations.
- Manufacturing: Plan production schedules, track work orders, and manage quality control.
The platform’s flexibility and comprehensive applications make it a go-to solution for companies wanting to unify and simplify their business processes.
How to Purchase a Self-Managed VPS with Odoo Installation
To get started with Odoo on Bluehost, you first need to purchase a Self-Managed VPS plan. Follow the steps below:

New to VPS or not sure where to start? No worries! At the top of the Self-Managed VPS purchase page, you’ll see the Pre-configured Setup section. This handy feature is perfect if you’re feeling a bit unsure—just pick the type of project you want, like WordPress Site, AI Agent/Claude Code, Dev/Staging, or eCommerce Store. We’ll take care of the rest by automatically filling in the best plan, operating system, and template for you.
- Super simple for beginners or anyone who just wants a quick setup
- Instantly get the recommended settings for your project
- Skip the guesswork and save time
- You can still customize things later if you want
- In your browser, go to https://www.bluehost.com/vps-hosting.
- Click the Choose Plan button for the Self-Managed VPS hosting plan you prefer.
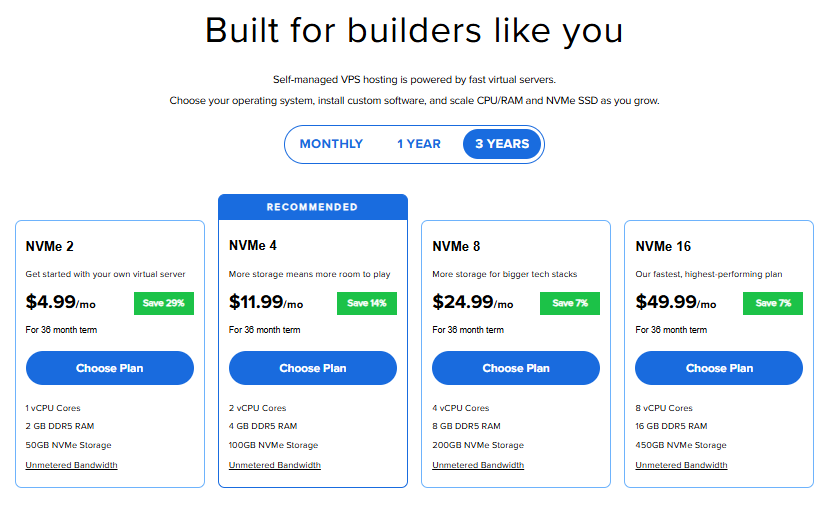 Pricing is subject to change. Please visit https://www.bluehost.com/vps-hosting for the current introductory/sign-up offer for Bluehost Self-Managed VPS Hosting. For the most up-to-date renewal pricing, visit your Bluehost Portal's Renewal Center.
 - Select your preferred Data Center location.

- On the Cart page, you can configure your server to fit your needs in the following section:
- Hardware:
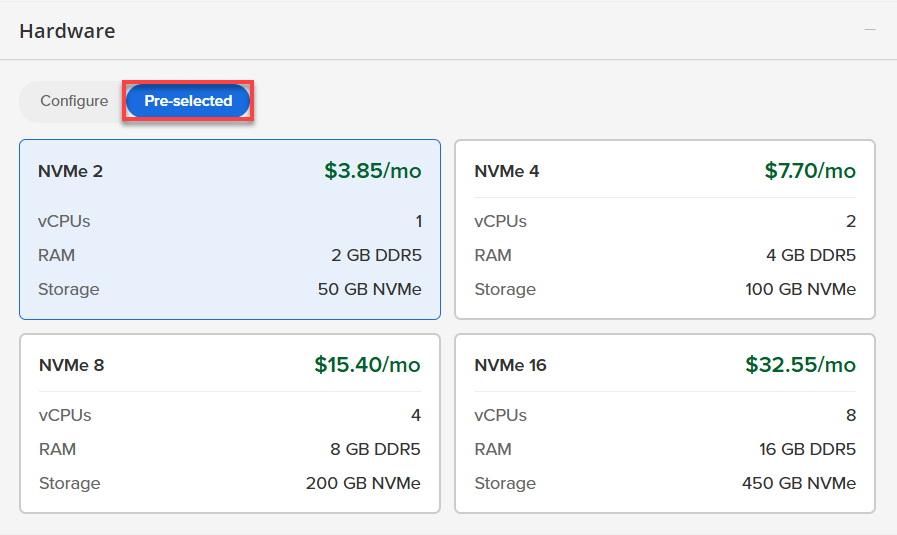
- Pre-selected:
You can select a different Self-Managed VPS plan in this section.
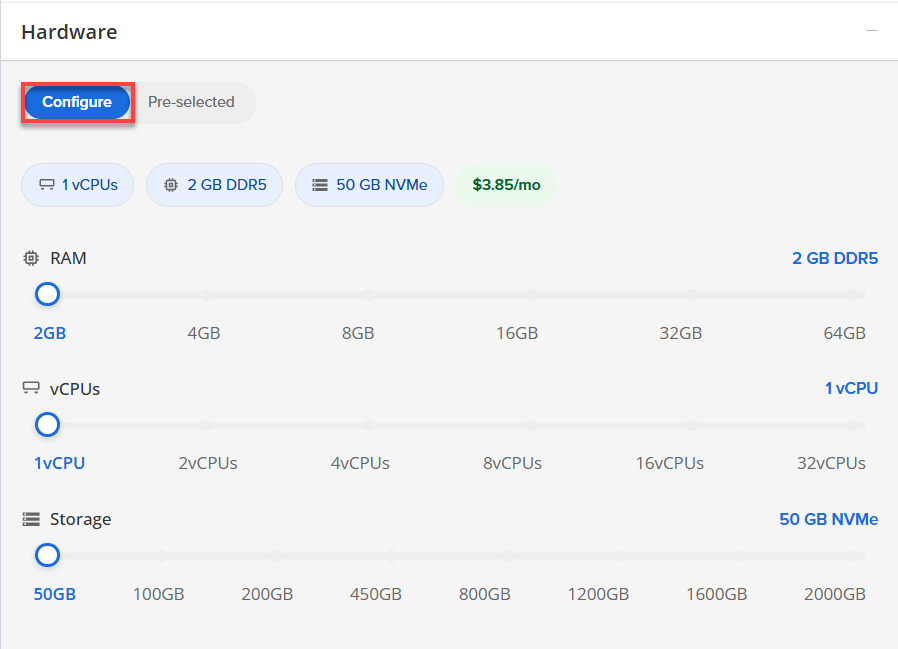
- Configure:
Click Configure to customize your package.
Note that your changes help customize your plan, and the overall cost will adjust accordingly to fit your needs.
- Pre-selected:
- Software:
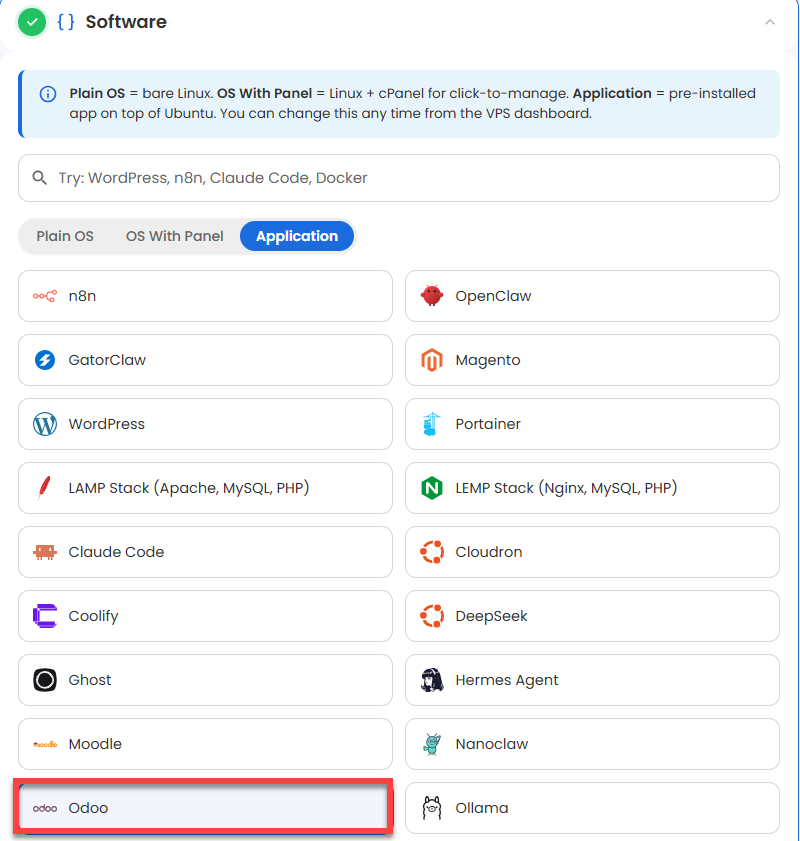
If the selected plan does not meet the app's minimum requirements, the app will be grayed out.
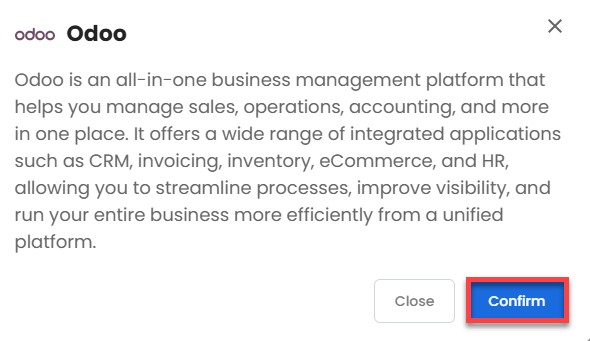
- Click on the Application tab.
- Choose Odoo.
- Click Confirm to continue.
- Hardware:
- Add-Ons:
- Premium Support:
This service provides you with priority access to our expert team for faster responses and personalized assistance whenever you need it.

- Premium Support:
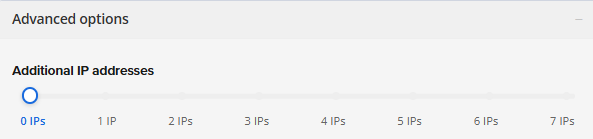
- In the Advanced options:
- Extra IP's: You can add extra IP addresses for an additional fee.
Pricing changes based on how many IPs you add. - Hostname: Assign a custom hostname to easily identify your server. This is optional.
- Extra IP's: You can add extra IP addresses for an additional fee.
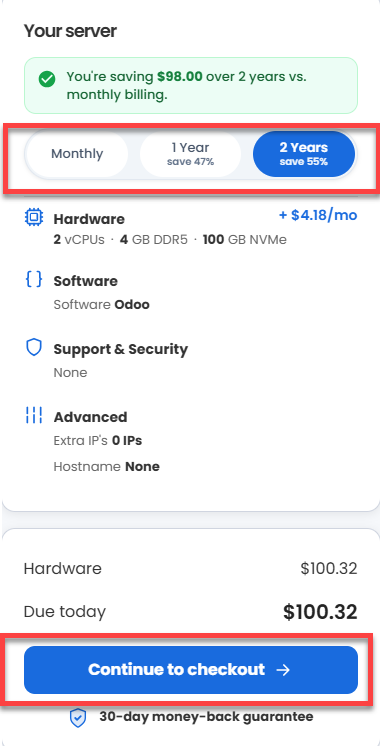
- Select your preferred billing term and view your Order Summary. Click the Continue to Checkout button to proceed.
- Do the following on the Checkout page:
If you're new with Bluehost:
- Create your Bluehost account by using your email address or by connecting with your Google, Apple, or GitHub account — whichever you prefer!

- Select your preferred payment method: credit card, Google Pay, or PayPal. Enter your billing information.

If you have an account with us, you will see your Bluehost login details when you are logged into your Bluehost Portal. If you are not logged in, please click the Log In link.

- Create your Bluehost account by using your email address or by connecting with your Google, Apple, or GitHub account — whichever you prefer!
- In the Shopping Cart section, you can still adjust your billing term if needed.
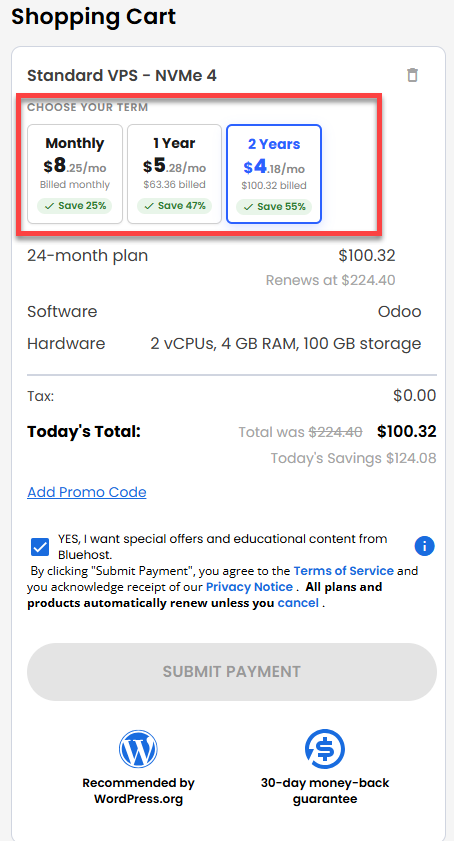
- Review the items in your cart, add a Promo Code if you have one, and then click Submit Payment to complete the purchase.
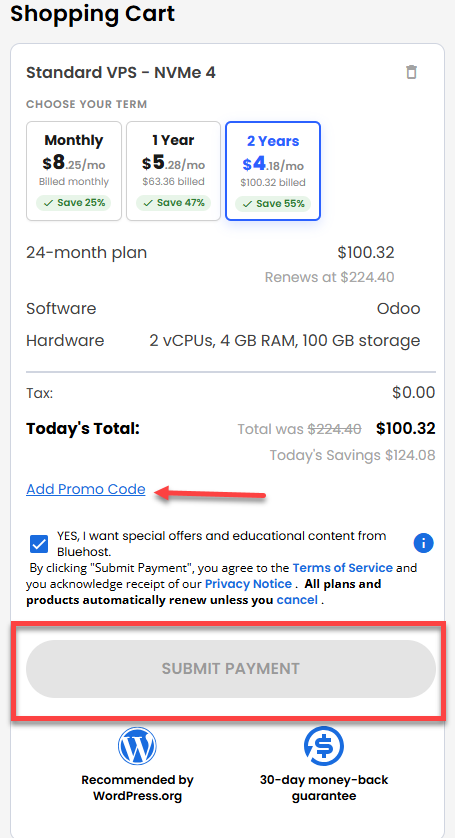
After completing the purchase, your VPS hosting will begin provisioning. You can access and manage your new VPS hosting in the Hosting tab of your Bluehost Portal.
How to Set Up Odoo
Once installation is complete, continue with the steps below to configure and start using the application.
- Log in to your Bluehost Portal.
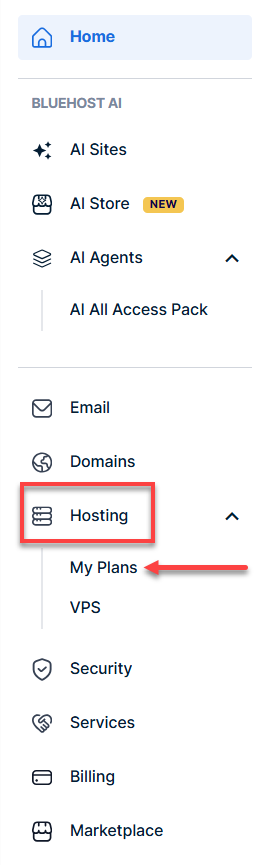
- In the left-hand menu, click Hosting, then select My Plans.
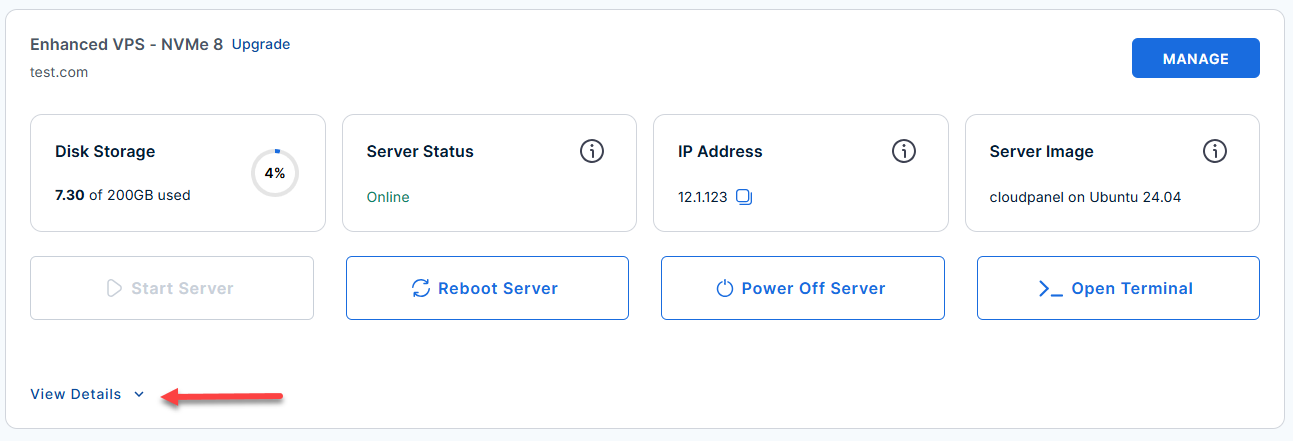
- Locate the server you want to manage, then click View Details in the bottom-left corner to expand the section and access additional server information.
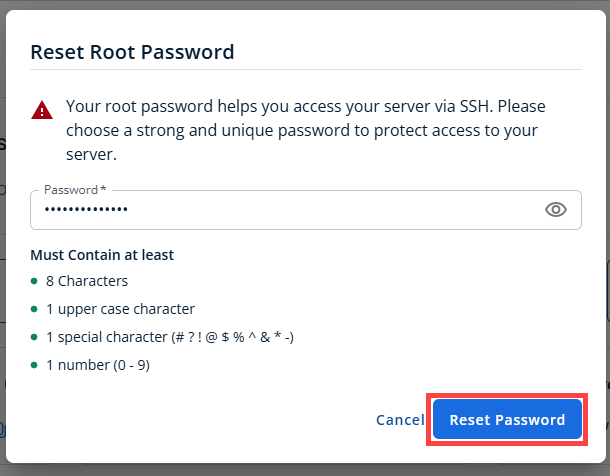
- Click the Reset Password.
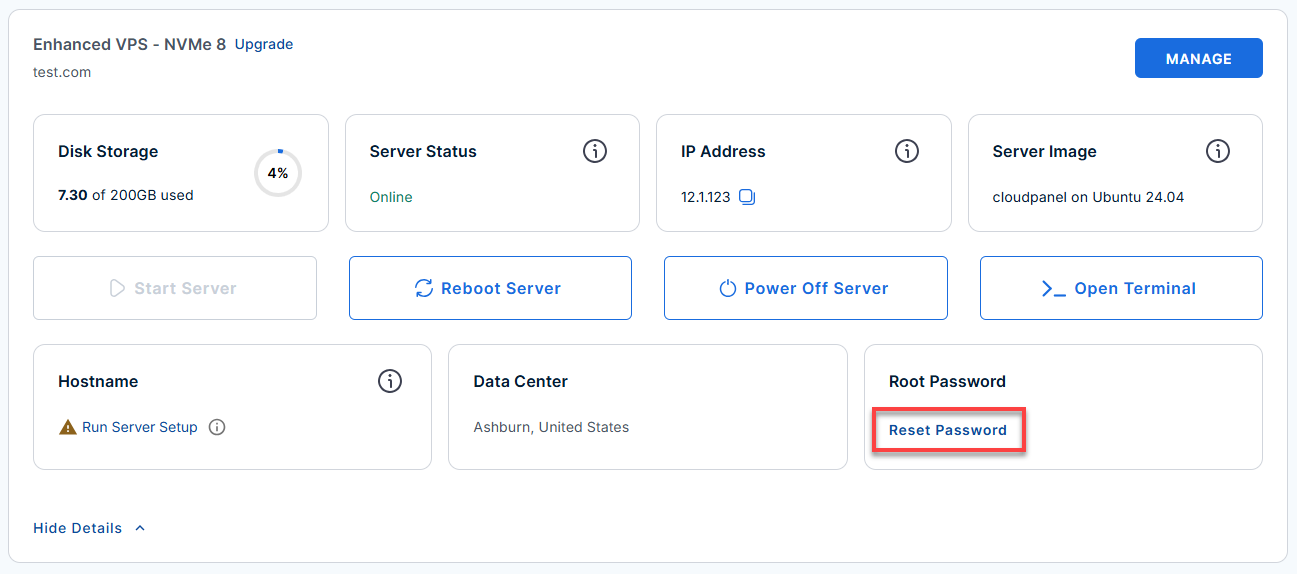
- In the pop-up window, type your new root password, then click Reset Password again to confirm and save the changes.
- Log in to your server via SSH.
When you log in to your server for the first time via SSH, you're greeted with a welcome message that includes all the essential commands and instructions for setting up Odoo.Replaceyour_server_ipwith your actual server IP address.ssh root@your_server_ipExample Output:
Welcome to Ubuntu 24.04.4 LTS (GNU/Linux 6.8.0-111-generic x86_64) ******************************************************************************** Odoo is running on this server. The UFW firewall is enabled. All ports are BLOCKED except 22 (SSH), 80 (HTTP), 443 (HTTPS), and 8069 (Odoo). In a web browser, you can access Odoo at: * Direct Odoo URL: http://50.6.6.130:8069 First-time setup notes: * Odoo will show a "Create Database" screen on first access * The Odoo Master Password is stored in: /root/.app_passwords Use the following guidance on the setup screen: * Master Password: Use the value shown above or retrieve it with: grep ODOO_MASTER_PASSWORD /root/.app_passwords * Database Name: Choose a name such as: odoo_prod * Email: This becomes the first Odoo administrator login * Password: This becomes the first Odoo administrator password * Load Demonstration Data: Leave UNCHECKED for production use Important locations on the server: * Odoo config: /etc/odoo/odoo.conf * Odoo log: /var/log/odoo/odoo.log * Passwords: /root/.app_passwords Helpful commands: systemctl status odoo # Check Odoo service status systemctl restart odoo # Restart Odoo service tail -100 /var/log/odoo/odoo.log # View recent Odoo logs For more details please refer /root/README.md To delete this message of the day: rm -f /etc/update-motd.d/99-odoo - See full server documentation (recommended):
Run the following to view all useful info about your Odoo server:cat /root/README.md - First-time browser access: create your Odoo instance and database.
- Open your browser and go to:
Replace
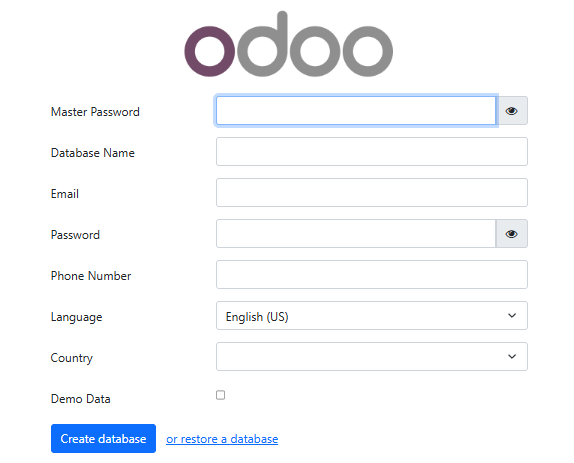
server_ipwith your actual server IP address.http://server_ip:8069 - On the "Create Database" screen, fill out:
- Master Password: Get the value with
Example Output:grep ODOO_MASTER_PASSWORD /root/.app_passwords
ODOO_MASTER_PASSWORD="abc123456aa979cdbe977d89d2285e0" - Database Name: Example:
odoo_prod - Email & Password: These become your Odoo admin login.
- Load Demonstration Data: Leave UNCHECKED for production.
- Click Create database
- Master Password: Get the value with
- Open your browser and go to:
- Check Odoo and related service status:
- Check Odoo:
Example Output:systemctl status odoo
● odoo.service - Odoo Open Source ERP and CRM Loaded: loaded (/etc/systemd/system/odoo.service; enabled; vendor preset: enabled) Active: active (running) - Check PostgreSQL:
Example Output:systemctl status postgresql
● postgresql.service - PostgreSQL RDBMS Loaded: loaded (/lib/systemd/system/postgresql.service; enabled) Active: active (exited) - Check Nginx:
Example Output:systemctl status nginx
● nginx.service - A high performance web server
   Loaded: loaded (/lib/systemd/system/nginx.service; enabled)
   Active: active (running)
- Check Odoo:
- To verify logs or troubleshoot:
Example Output:tail -100 /var/log/odoo/odoo.log
2024-06-05 11:53:21,340 340 INFO odoo_prod odoo.addons.base: Base setup ready.
2024-06-05 11:53:21,401 340 INFO odoo_prod odoo.service.server: Server running...
journalctl -u odoo -n 100 --no-pager - Show or retrieve the master password:
Example Output:grep ODOO_MASTER_PASSWORD /root/.app_passwords
ODOO_MASTER_PASSWORD="w92iq8f9d17b2ab40eaa979cdbe977d89d2285e0" - Validation test (optional):
Example Output:prove /root/app_test/main.t
/root/app_test/main.t .. ok
All tests successful.
Files=1, Tests=8,  1 wallclock secs ( 0.04 usr  0.01 sys +  0.13 cusr  0.04 csys =  0.22 CPU)
Result: PASS
Notes and Links:
- The Odoo master password is the database manager password (for creating/restoring databases), and is different from your Odoo admin login password.
- Odoo runs on port 8069. Nginx is enabled by default; to set up a secure reverse proxy, see Odoo HTTPS Deployment Docs.
- Odoo Documentation
Additional Information and Example Documentation Output
You can run cat /root/README.md to see more information and useful commands:
Example Output:
root@server-123456:~# cat /root/README.md
# Odoo

## Description

Odoo is an all-in-one business management platform that helps you
manage sales, operations, accounting, and more in one place. It offers
a wide range of integrated applications such as CRM, invoicing,
inventory, eCommerce, and HR, allowing you to streamline processes,
improve visibility, and run your entire business more efficiently from
a unified platform.

This install includes Odoo 17 and is configured to use a local
PostgreSQL backend and a Python virtual environment.

The image is built from Ubuntu cloud image sources, installs required
packages, clones the Odoo 17 source tree, creates an isolated virtualenv,
and configures systemd, UFW, and first-boot initialization.

## Image contents

This template installs and configures:

* Odoo 17 from the official GitHub repository (`branch 17.0`)
* PostgreSQL local database service
* Nginx web server
* UFW firewall rules for SSH, HTTP, HTTPS, and Odoo
* Python 3 virtual environment under `/opt/odoo/venv`
* Odoo config at `/etc/odoo/odoo.conf`
* Odoo logs at `/var/log/odoo/odoo.log`
* First-boot injection script at `/var/lib/cloud/scripts/per-instance/001_onboot`
* App password store at `/root/.app_passwords`

## Services

Service     | Ports     | Purpose
----------- | --------- | -----------------------------------------------------------
Odoo        | 8069      | Primary Odoo HTTP interface
PostgreSQL  | local     | Database backend for Odoo
Nginx       | 80, 443   | Installed and enabled, but Odoo is exposed directly on 8069
OpenSSH     | 22        | Remote access

Ports are protected using UFW.

## Odoo configuration

The default Odoo configuration file is `/etc/odoo/odoo.conf`.

Key settings include:

* `admin_passwd = CHANGE_ME_ON_FIRST_BOOT` - replaced at first boot by the
  per-instance cloud-init script
* `db_host = False` and `db_port = False` - use local PostgreSQL
* `db_user = odoo`
* `addons_path = /opt/odoo/odoo-server/addons,/opt/odoo/custom-addons`
* `logfile = /var/log/odoo/odoo.log`
* `xmlrpc_port = 8069`
* `proxy_mode = True`
* `data_dir = /opt/odoo/.local/share/Odoo`

The systemd service unit is `/etc/systemd/system/odoo.service` and starts Odoo
as the `odoo` user from the source tree.

## First boot behavior

On the first boot, the cloud-init per-instance script
`/var/lib/cloud/scripts/per-instance/001_onboot`:

* generates a random `ODOO_MASTER_PASSWORD`
* stores it securely in `/root/.app_passwords`
* updates `/etc/odoo/odoo.conf`
* ensures runtime directories exist and are owned by `odoo`
* waits for PostgreSQL readiness
* restarts Odoo

This guarantees that no master password is baked into the image.

## First-time access (How-to-use)

After the VM boots, access Odoo at:

* `http://:8069`

On the first screen, create the first database using:

* Master Password: value from `/root/.app_passwords`
* Database Name: any name you choose
* Email: Odoo administrator login email
* Password: Odoo administrator login password

## Useful commands

* Check Odoo service:
  `systemctl status odoo`
* Check PostgreSQL service:
  `systemctl status postgresql`
* Check Nginx service:
  `systemctl status nginx`
* View Odoo logs:
  `tail -100 /var/log/odoo/odoo.log`
* View systemd logs:
  `journalctl -u odoo -n 100 --no-pager`
* Show current master password:
  `grep ODOO_MASTER_PASSWORD /root/.app_passwords`

## Validation tests

The template includes a validation script at `/root/app_test/main.t` that checks:

* `postgresql`, `nginx`, and `odoo` are enabled
* `/etc/odoo/odoo.conf` exists
* `/etc/systemd/system/odoo.service` exists
* first-boot script exists and is executable
* Odoo is active and listening on port 8069

## Notes

* The Odoo master password is the database manager password.
* It is different from the Odoo administrator password you create in the UI.
* Nginx is installed and enabled, but this starter image exposes Odoo directly
  on port 8069.
* A reverse proxy can be added later if desired. See https://www.odoo.com/documentation/17.0/administration/on_premise/deploy.html#https for how to do this.

## Links

* Manage: [http://{server_ip}:8069](http://{server_ip}:8069)
* Documentation: [https://www.odoo.com/documentation/17.0/](https://www.odoo.com/documentation/17.0/)root@server-646875:~#
Summary
Odoo is a comprehensive, modular business management suite covering CRM, inventory, finance, HR, ecommerce, and more in one place. Set up your dedicated Odoo VPS on Bluehost to unlock the full power and flexibility of open-source business automation with complete control and high performance. This guide gave you step-by-step VPS purchase and Odoo setup instructions so you can get started quickly on your path to an all-in-one ERP solution.