 ChatGPT,
  Claude,
  Gemini,
  Grok — all four for
 Purchase a Virtual Dedicated Server with Claude Code Installation
Claude Code runs in your terminal and lets you delegate real engineering work, like debugging, refactoring, and git workflows, using plain language instead of manual commands. You describe what you need, and it reads your codebase, edits across multiple files, and runs tests to get the job done. Use it directly in your terminal, inside VS Code or JetBrains, or remotely through the Claude mobile app.
This article explains how to purchase a Bluehost Virtual Dedicated Server (VDS) hosting plan and set up and manage your Claude Code Assistant.
Why Choose Claude Code?
Running Claude Code on your VDS gives it full access to a real development environment instead of a limited local machine. You get the CPU, RAM, and storage to run builds, tests, and multiple projects without slowdowns. Root access means you can install any dependencies or tools Claude Code needs, exactly the way your workflow requires.
Uses of Claude Code
Claude Code helps you manage your project from start to finish:
- Explore Your Project: Navigate unfamiliar codebases, understand project structure, and get answers about how your code works.
- Fix Bugs Faster: When you hit an error, Claude can investigate the cause, suggest a fix, and even run the code to make sure it actually works.
- Automate Big Changes: Update your entire codebase at once, like renaming variables or restructuring folders, while keeping everything consistent.
- Write and Run Tests: Automatically create tests for your new features and run them in the terminal to catch mistakes early.
- Handle Git Tasks: Claude can help you stage your changes, write clear commit messages, and prep your work for a pull request.
- Manage Your System: Run scripts, install libraries, or organize files with just simple commands.
The platform's deep integration with the developer's local environment makes it an indispensable tool for engineers looking to maximize their output and maintain a flow state during complex builds.
How to Purchase a Virtual Dedicated Server with Claude Code Installation
Claude Code can be installed on a Bluehost Virtual Dedicated Server (VDS). You can choose to have Claude Code installed during the initial VDS purchase or install it manually at a later time.
- In your browser, go to https://www.bluehost.com.
- Click Hosting in the top menu, then select Virtual Dedicated Server.

You can also go to this link directly: https://www.bluehost.com/vds-hosting.
- On the Virtual Dedicated Server Hosting page, click Explore Plans. You can also scroll down to the hosting plans section.

- Choose a plan from either tab — Standard or High Performance — by clicking Choose Plan.

Pricing is subject to change. Please visit https://www.bluehost.com/vds-hosting for the current introductory/sign-up offer for the Bluehost Virtual Dedicated Server hosting. For the most up-to-date renewal pricing, visit your Bluehost Portal's Renewal Center. - On the next page, configure your VDS hosting to meet your requirements. The configuration options are divided into the following sections:
- Location: Select your data center in this section.

- Hardware: This section shows your pre-selected plan. You can also switch to another Virtual Dedicated Server plan in this section

- Software:
If the selected plan does not meet the app's minimum requirements, the app will be grayed out.
- Under the Application tab, click on Claude Code.
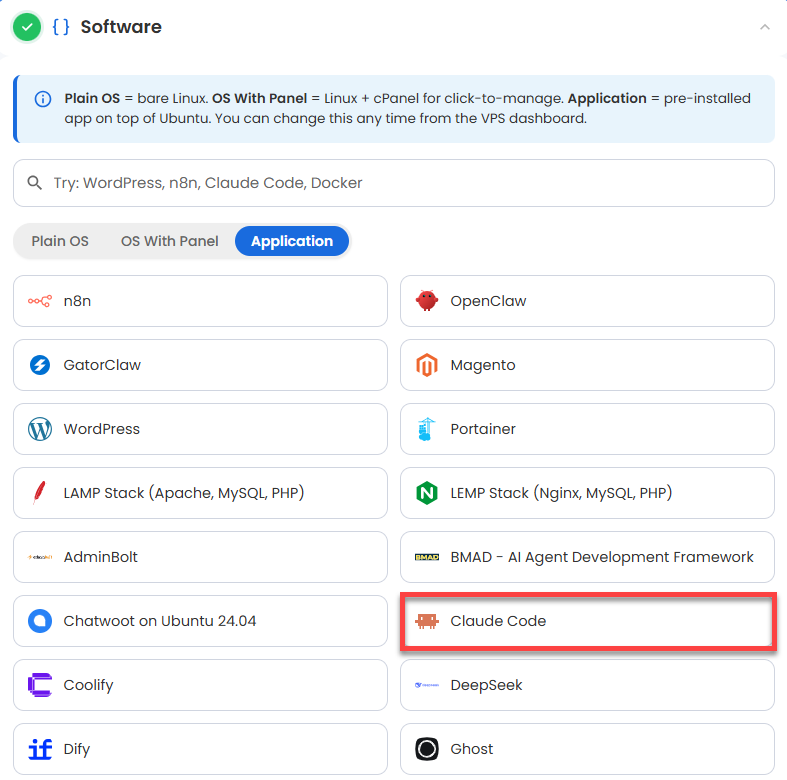
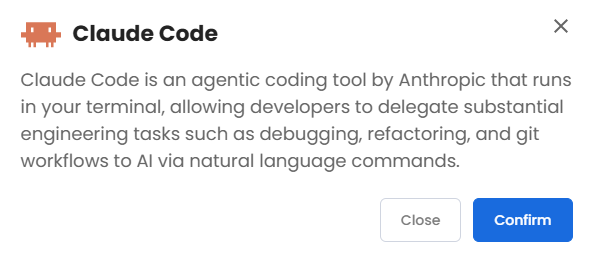
You can install only one application per purchase; the system will automatically select the best operating system for it. - In the pop-up, click Confirm.
- Under the Application tab, click on Claude Code.
- Support & Security: You can add Premium Support - Recurring, which provides priority access to expert assistance and faster response times.

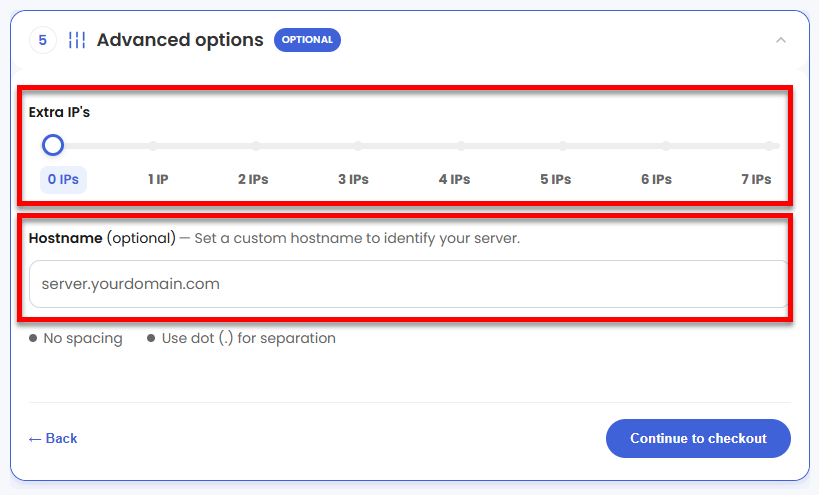
- Advanced Options:
- Extra IP's: You can add IP addresses for an additional fee. Pricing changes based on how many IPs you add.
- Hostname: Assign a custom hostname to identify your server. This is optional.
- Location: Select your data center in this section.
- Select your billing term and review your selected items on the right pane, along with the summarized total cost.
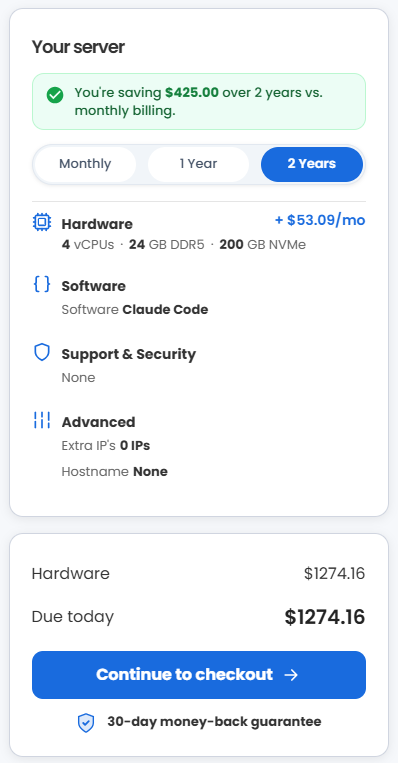
- Click Continue to checkout.
- Do the following on the Checkout page:
If you're new to Bluehost:- Create your Bluehost account by using your email address or by connecting with your Google, Apple, or GitHub account — whichever you prefer!

- Select your preferred payment method: credit card, Google Pay, or PayPal. Enter your billing information.

If you have an account with us, you will see your Bluehost login details when you are logged into your Bluehost Portal. If you are not logged in, please click the Log In link.

- Create your Bluehost account by using your email address or by connecting with your Google, Apple, or GitHub account — whichever you prefer!
- In the Shopping Cart, choose your billing term if you did not choose one on the previous page.
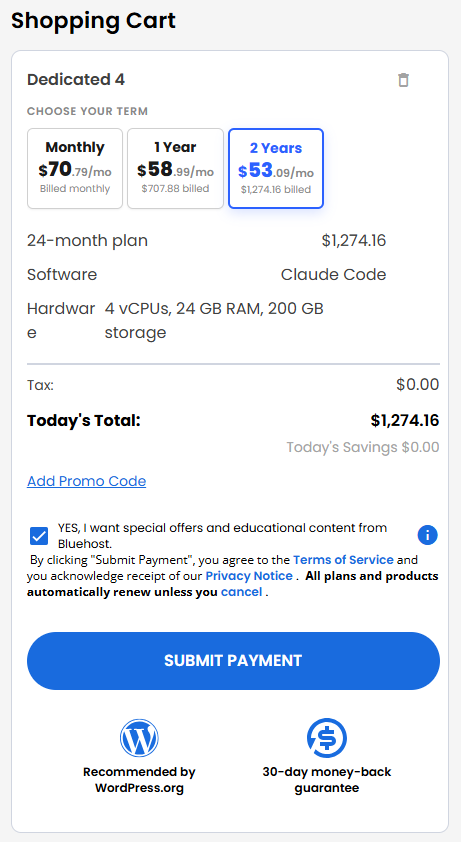
- Add a Promo code if you have one, and then click Submit Payment to complete your purchase.
After completing the purchase, your VDS hosting will begin provisioning. You can access and manage your new VDS hosting in the Hosting tab of your Bluehost Portal.
How to Get and Set Up Your Anthropic API Key
To use Claude Code on your Bluehost Self-Managed VPS and Virtual Dedicated Server (VDS), you'll need to supply an Anthropic API Key (ANTHROPIC_API_KEY). This key allows your server to securely connect to the Claude API.
After installation completes:
- Log in to your Bluehost Portal.
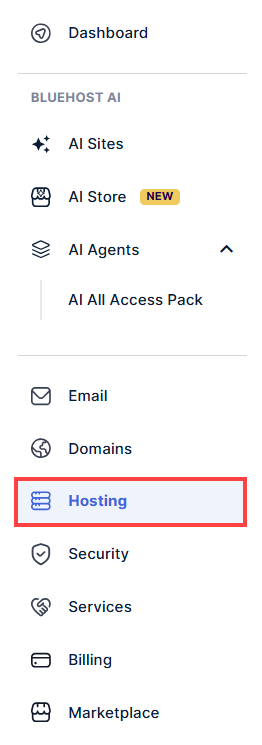
- In the left-hand menu, click Hosting, then select My Plans.
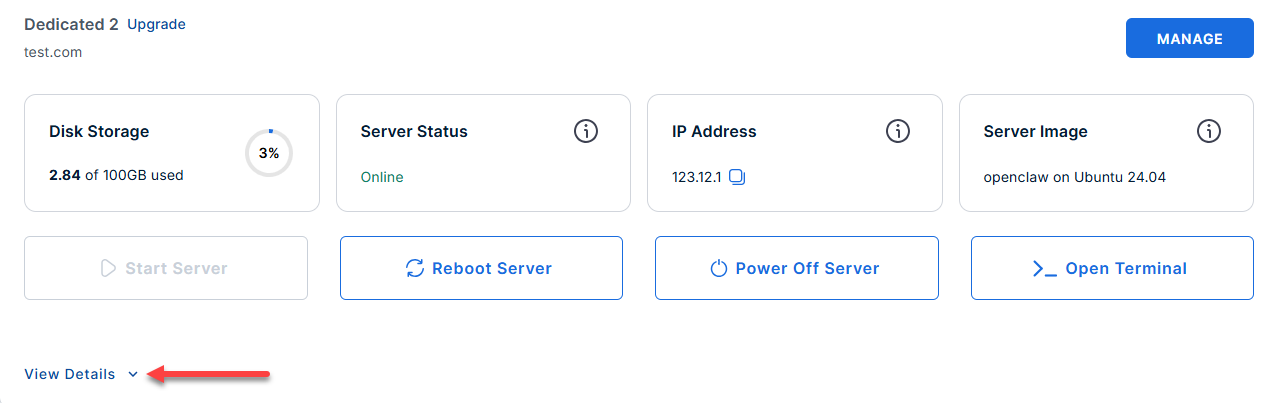
- Locate the server you want to manage, then click View Details in the bottom-left corner to expand the section and access additional server information.
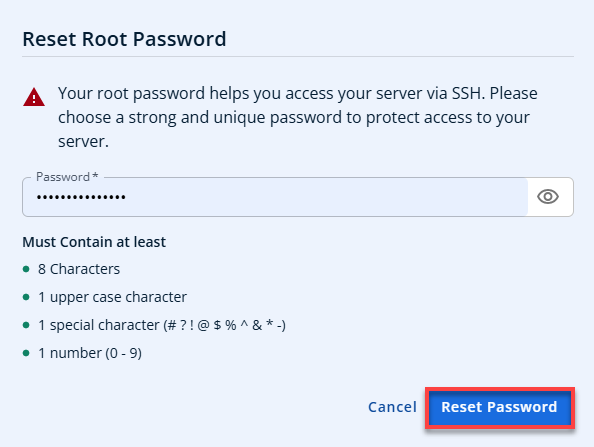
- Click the Reset Password.
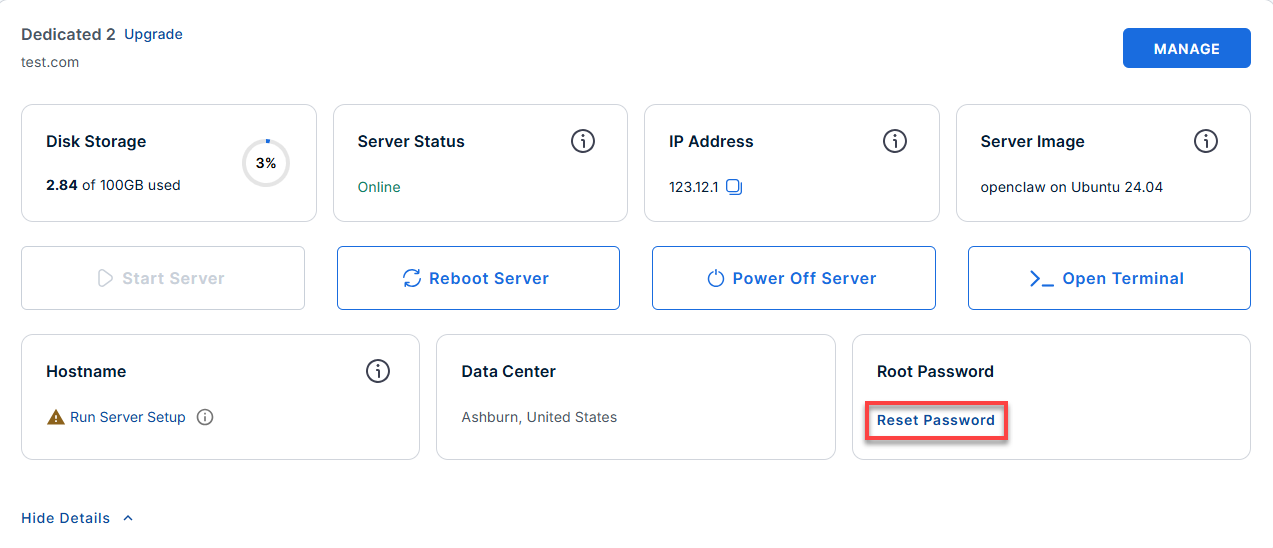
- In the pop-up window, type your new root password, then click Reset Password again to confirm and save the changes.
- Connect to your server via SSH.
Use your VDS IP and credentials with an SSH client, follow the prompts, and enter your root password when asked:Replaceyour_server_ipwith your actual server IP address.ssh root@your_server_ipExample Output:
Welcome to Ubuntu 24.04.4 LTS (GNU/Linux 6.8.0-111-generic x86_64)
********************************************************************************

Claude Code Ubuntu 24.04 image is installed and ready.

ANTHROPIC_API_KEY is not configured yet.

Set it for current shell:
  export ANTHROPIC_API_KEY="sk-ant-..."

Persist it for root:
  echo 'export ANTHROPIC_API_KEY="sk-ant-..."' >> /root/.profile
  source /root/.profile

Verify installation:
  claude --version

Start Claude Code:
  claude

Documentation:
  /root/README.md

********************************************************************************
Where to get your API key:
- Go to the Anthropic Console and sign up for an account.
- Navigate to the API Keys or Account Settings section and create a new API key.
(Your API key will look similar to:sk-ant-xxxxxxxxxxxxxxxx) - Copy this key. Keep it safe — do not share your real API key with others.
Creating an Anthropic account is free. However, generating an API key and accessing Claude typically requires entering billing information and may incur charges. Please refer to Anthropic's pricing page for current details.
How to set your API key
Once you have your key, add it to your server environment using the commands displayed in your welcome message, or use the following:
- For the current terminal session (temporary):
export ANTHROPIC_API_KEY="sk-ant-xxxxxxxxxxxxxxxx"
- To persist the key (recommended):
echo 'export ANTHROPIC_API_KEY="sk-ant-xxxxxxxxxxxxxxxx"' >> /root/.profile source /root/.profile
- Verify Claude Code is installed:
Expected output:claude --version
Claude Code CLI version 1.2.3 - Start Claude Code:
Expected prompt:claude
claude>
Error: ANTHROPIC_API_KEY not set. Please export your API key and try again.Supporting Information and Sample Output
For advanced usage or troubleshooting, see the local documentation on your server:
Sample output:
Last login: Wed Jun  3 14:08:04 2026 from 203.0.113.5
root@server-123456:~# cat /root/README.md
# Claude Code

## Description

Claude Code is an agentic coding tool by Anthropic that runs in your terminal, allowing developers to delegate substantial engineering tasks such as debugging, refactoring, and git workflows to AI via natural language commands.

## Services

- SSH on port 22 (protected by UFW)
- Claude Code CLI available in terminal sessions

## Links

- Claude Code Installation: https://claude.ai/install.sh
- Anthropic Claude: https://www.anthropic.com/claude
- Node.js: https://nodejs.org/

## What's Included

- Ubuntu 24.04 minimal base image
- Node.js 22.x from NodeSource repository
- Claude Code CLI installed globally
- UFW firewall configured (SSH only)
- Automated first-boot configuration check
- MOTD support via /etc/update-motd.d/99-claude-code
- Test suite for validation

## Installation Process

The build process performs the following steps:

1. Prerequisites: Installs required packages (curl, ca-certificates, gnupg, xz-utils)
2. Node.js Setup: Removes any distro-provided Node.js/npm to avoid vulnerabilities, installs Node.js 22.x from NodeSource
3. Claude Code Installation: Attempts native installer first (curl -fsSL https://claude.ai/install.sh | bash), falls back to npm (npm install -g @anthropic-ai/claude-code) if needed
4. Configuration: Sets up PATH, permissions on copied files, and writes installation notes
5. Validation: Verifies Node.js, npm, and Claude Code are working
6. Firewall: Configures UFW with SSH access only
7. Cleanup: Removes package caches and temporary files

## Configuration

### PATH Setup

The image configures the shell PATH to include common Claude Code installation locations via /etc/profile.d/claude-code.sh:

- /usr/local/bin
- ~/.local/bin
- ~/.claude/bin
- ~/.npm-global/bin

### First Boot

On first boot, the system (/var/lib/cloud/scripts/per-instance/001_onboot) checks for an Anthropic API key in:

- Environment variable ANTHROPIC_API_KEY
- /etc/environment
- /root/.profile

If found, it writes a ready-to-use message to /root/.app_passwords/claude-code-firstboot.txt. If not, it provides setup instructions in the same file.

## Usage

### Setting API Key

Before using Claude Code, you need an Anthropic API key from https://console.anthropic.com/.

For current shell only:
export ANTHROPIC_API_KEY="sk-ant-..."

Persist for root user sessions:
echo 'export ANTHROPIC_API_KEY="your_api_key_here"' >> /root/.profile
source /root/.profile

### Running Claude Code

Verify installation:
claude --version

Start Claude Code:
claude

If claude is not found after logging in, reload your shell environment:
source /etc/profile
source ~/.bashrc
claude

## Security

- UFW firewall enabled with default deny incoming
- Only SSH (port 22/tcp) allowed inbound
- All outbound traffic allowed
- Root login via SSH with key authentication only

## Testing

The image includes a test suite (/root/app_test/main.t) that validates:

- Claude Code binary is executable in expected locations
- claude --version works in shell environment with PATH loaded

Run tests:
cd /root/app_test
perl main.t
Summary
Setting up Claude Code on your Bluehost Virtual Dedicated Server (VDS) turns your terminal into a full development powerhouse. You purchase your plan, add Claude Code during setup, then connect your Anthropic API key to get going. From there, Claude handles the heavy lifting, like debugging, testing, and git tasks, so you can focus on building instead of juggling tools.