 ChatGPT,
  Claude,
  Gemini,
  Grok — all four for
Purchase a Virtual Dedicated Server with gstack Installation
gstack is an open-source collection of workflow skills designed to enhance software development productivity. It enables AI-assisted workflows for tasks, such as planning, code reviews, deployments, browser automation and quality assurance testing, helping streamline the software development lifecycle
This article explains how to purchase a Bluehost Virtual Dedicated Server (VDS) hosting plan with gstack installed.
Why Choose gstack?
To help teams build and manage projects mroe efficiently from a single platform, gstack simplifies software development with AI-powered workflows for planning, code reviews, deployments, testing, and automation.
Uses of gstack
Here are some of the specific uses or skills of gstack.
- Product Planning and Review - Refines your ideas, remove unnecessary features,and establishes a clear, technical plan before development begins, with dedicated review modes for product strategy and system architecture.
- Code Review - Searches hidden bugs and security holes that normal tests miss before they cause issues.
- Browser Automation and QA Testing - Automates browser-based testing and quality assurance tasks using a persistent browser environment. Features include visual testing, change detection, health monitoring, and automated workflows to identify, fix, and verify issues across web applications.
- Parallel Development - Runs en Claude Code sessions simultaneously with isolated workspaces.
- Shipping/Deployment - One-command shipping that handles sync, testing, pushing, and PR creation.
System Requirements
Before deploying, ensure your server meets the following minimum hardware requirements. For a stable production deployment, we recommend using higher specifications than the minimum requirements.
- Do not purchase a server that only meets the minimum requirements. The minimum specifications represent the software's bare survival threshold and do not account for operating system overhead or production workloads. Running with only 2 vCPUs, 4 GB RAM, and 20 GB disk space can result in severe performance slowdowns, system freezes, or unexpected crashes during traffic spikes.
- Bluehost Self-Managed VPS and VDS lack dedicated GPUs (VRAM). Running local LLMs entirely on their CPUs will cause extremely slow response times. For optimal performance, host your application on Bluehost but connect it to an external AI cloud provider (like OpenAI or Anthropic) via API.
- For a stable deployment, we recommend using at least 4 vCPUs, 8 GB RAM, and 30 GB disk space. While lower specs might be sufficient for basic installation, consider allocating additional disk space if you plan to store recordings, logs, or other application data.
| Resource | Minimum | Recommended |
|---|---|---|
| RAM | 4 GB | 8 GB |
| Disk | 20 GB | 30 GB |
| CPU | 2 vCPUs | 4 vCPUs |
How to Purchase a Virtual Dedicated Server with gstack Installation
gstack can be installed on a Bluehost Virtual Dedicated Server (VDS). You can choose to have gstack installed during the initial VDS purchase or install it manually at a later time.
- In your browser, go to https://www.bluehost.com.
- Click Hosting in the top menu, then select Virtual Dedicated Server.

You can also go to this link directly: https://www.bluehost.com/vds-hosting.
- On the Virtual Dedicated Server Hosting page, click Explore Plans. You can also scroll down to the hosting plans section.

- Choose a plan from either tab — Standard or High Performance — by clicking Choose Plan.
 Pricing is subject to change. Please visit https://www.bluehost.com/vds-hosting for the current introductory/sign-up offer for the Bluehost Virtual Dedicated Server hosting. For the most up-to-date renewal pricing, visit your Bluehost Portal's Renewal Center.
 - On the next page, configure your VDS hosting to meet your requirements. The configuration options are divided into the following sections:
- Location: Select your data center in this section.

- Hardware: This section shows your pre-selected plan. You can also switch to another Virtual Dedicated Server plan in this section

- Software:
If the selected plan does not meet the app's minimum requirements, the app will be grayed out.
- Under the Application tab, click on gstack.
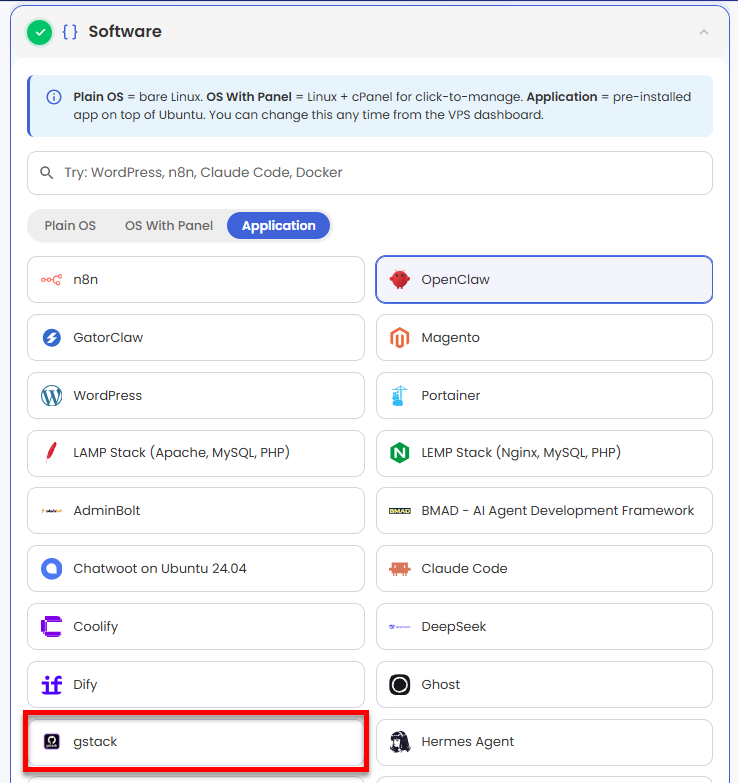 You can install only one application per purchase; the system will automatically select the best operating system for it.
 - In the pop-up, click Confirm.
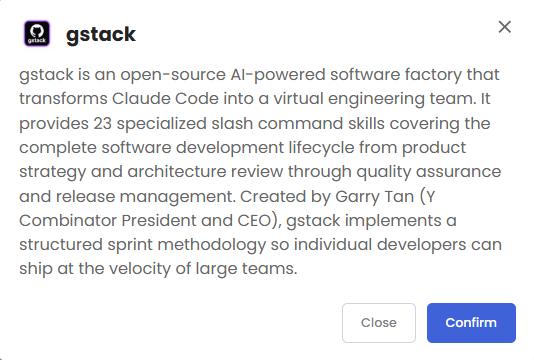
- Under the Application tab, click on gstack.
- Support & Security: You can add Premium Support - Recurring, which provides priority access to expert assistance and faster response times.

- Advanced Options:
- Extra IP's: You can add IP addresses for an additional fee. Pricing changes based on how many IPs you add.
- Hostname: Assign a custom hostname to identify your server. This is optional.
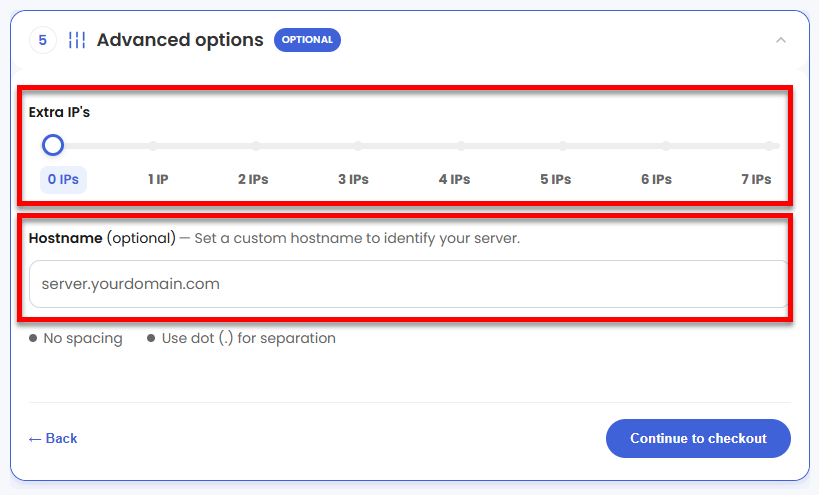
- Location: Select your data center in this section.
- Select your billing term and review your selected items on the right pane, along with the summarized total cost.
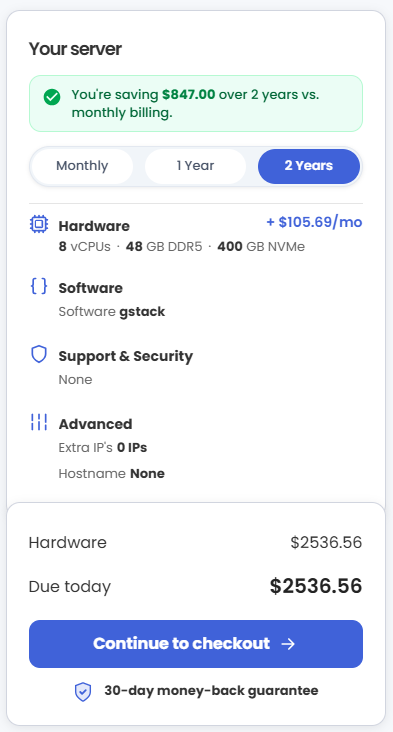
- Click Continue to checkout.
- Do the following on the Checkout page:
If you're new to Bluehost:- Create your Bluehost account by using your email address or by connecting with your Google, Apple, or GitHub account — whichever you prefer!

- Select your preferred payment method: credit card, Google Pay, or PayPal. Enter your billing information.

If you have an account with us, you will see your Bluehost login details when you are logged into your Bluehost Portal. If you are not logged in, please click the Log In link.

- Create your Bluehost account by using your email address or by connecting with your Google, Apple, or GitHub account — whichever you prefer!
- In the Shopping Cart, choose your billing term if you did not choose one on the previous page.
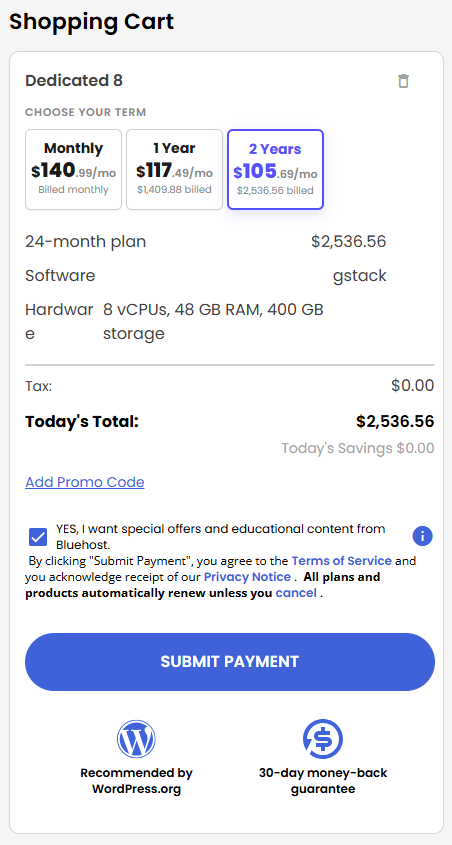
- Add a Promo code if you have one and then click Submit Payment to complete your purchase.
After completing the purchase, your VDS hosting will begin provisioning. You can access and manage your new VDS hosting in the Hosting tab of your Bluehost Portal.
How to Get Started with gstack
gstack transforms Claude Code into a virtual engineering team, helping you manage the entire development process, from product planning and strategy to deployment and release, with 23 specialized commands.
Follow these steps to set up your environment and start your first sprint.
Step 1: Access your gstack Dashboard
After installation completes:
- Log in to your Bluehost Portal.
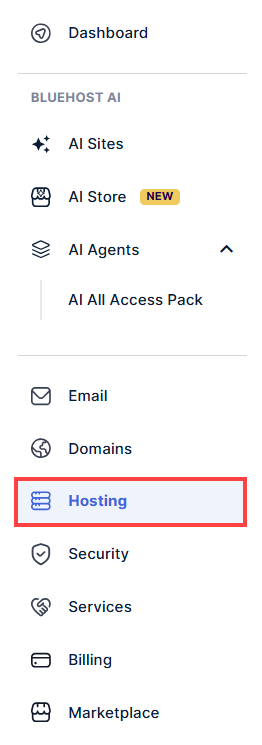
- In the left-hand menu, click Hosting, then select My Plans.
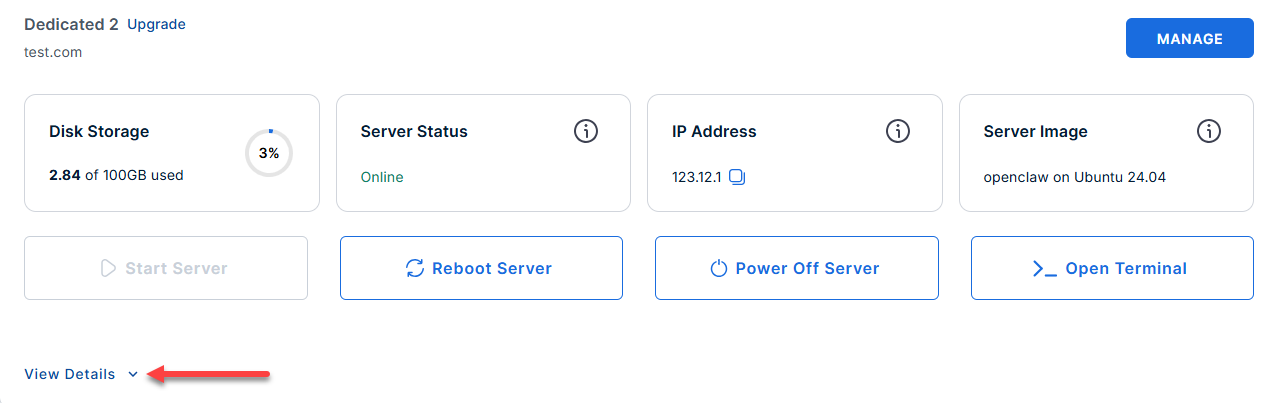
- Locate the server you want to manage, then click View Details in the bottom-left corner to expand the section and access additional server information.
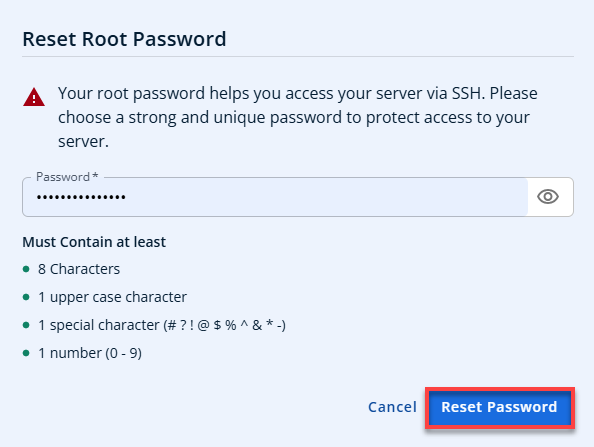
- Click the Reset Password.
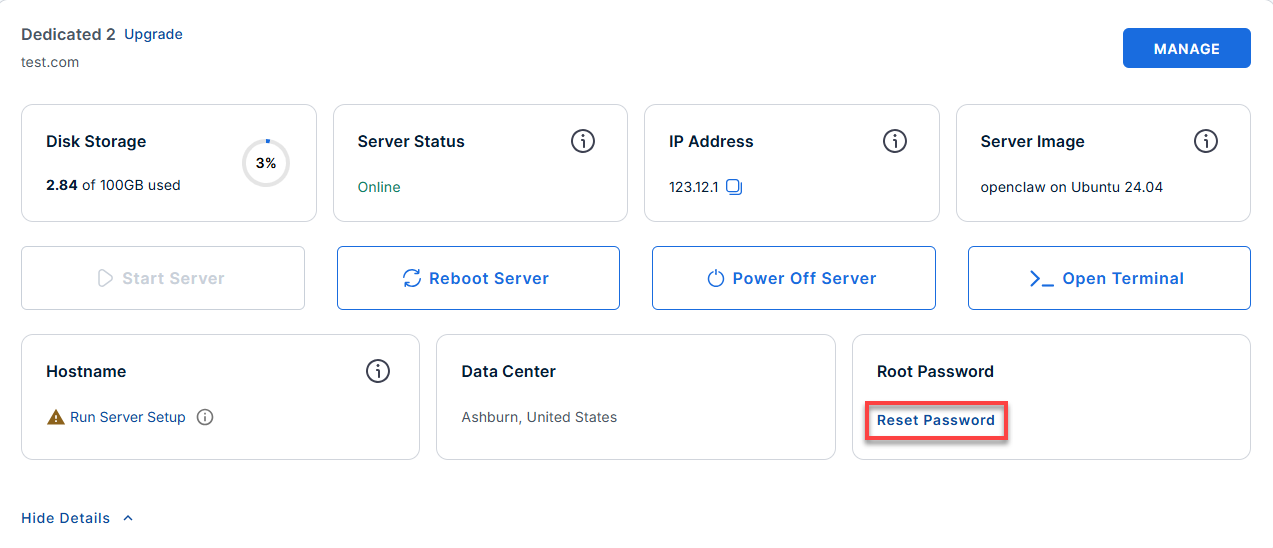
- In the pop-up window, type your new root password, then click Reset Password again to confirm and save the changes.
- Connect to your VPS via SSH.
Use your VPS IP and credentials with an SSH client, follow the prompts, and enter your root password when asked:ssh root@your_server_ipReplaceyour_server_ipwith your actual server IP address.Example Output:
Welcome to Ubuntu 24.04.4 LTS (GNU/Linux 6.8.0-124-generic x86_64)
********************************************************************************

gstack is installed and ready. Claude Code with gstack skills awaits your use.

gstack gives you 23 specialized slash commands covering the full development
lifecycle: strategy, architecture, code review, QA, security, and release.

IMPORTANT: machinectl is required to enter the gstack user session.
  Without it, user-scoped environment settings will not be loaded correctly.

First-time setup:
  machinectl shell gstack@
  claude auth
  cd ~/my-project && claude

Then inside Claude Code, type /gstack to see all available skills.

Sprint workflow:
  /office-hours       - define the feature
  /plan-eng-review    - validate the technical approach
  /qa                 - generate tests before building
  /ship               - release when done

Updating gstack (inside a claude session):
  /gstack-upgrade

Or manually:
  machinectl shell gstack@
  cd ~/.claude/skills/gstack && git pull && ./setup --quiet

Files:
  Skills   : /home/gstack/.claude/skills/
  Source   : /home/gstack/.claude/skills/gstack
  Config   : /home/gstack/.gstack/
  README   : /root/README.md (root) | /home/gstack/README.md (gstack user)

Installed:
  Node.js    : v22.23.0
  Bun        : 1.3.14
  Claude Code  : 2.1.186 (Claude Code)
  Server IP    : 12.1.1.123

********************************************************************************
To delete this message of the day: rm -rf /etc/update-motd.d/99-gstack
Step 2: Switch to the gstack User
gstack runs under its own user account for security. Switch to this session by running:
Example Output:
root@server-12345:~# machinectl shell gstack@
Connected to the local host. Press ^] three times within 1s to exit session.
gstack@server-12345:~$
Step 3: Authorize Claude Code
Before you start coding, you need to connect Claude Code to your Anthropic account. You have two options:
- Option A (Interactive): Run
claude authand follow the prompts on your screen.claude authExample Output:
gstack@server-12345:~$ claude auth Usage: claude auth [options] [command] Manage authentication Options: -h, --help Display help for command Commands: help [command] display help for command login [options] Sign in to your Anthropic account logout Log out from your Anthropic account status [options] Show authentication status - Option B (Environment Variable): Alternatively, you can set your key directly in your current session:
export ANTHROPIC_API_KEY=your_key_here
Step 4: Start Your First Sprint
If you haven't created the project folder yet:
You can create it and then enter it:
- Choose the text style that looks best with your terminal and then click Enter.
mkdir ~/my-project
cd ~/my-project
claudeExample Output:
gstack@server-12345:~$ mkdir ~/my-project cd ~/my-project claude mkdir: cannot create directory ‘/home/gstack/my-project’: File exists Welcome to Claude Code v2.1.186 .......................................................... * █████▓▓░ * ███▓░ ░░ ░░░░░░ ███▓░ ░░░ ░░░░░░░░░░ ███▓░ ░░░░░░░░░░░░░░░░░░░ * ██▓░░ ▓ ░▓▓███▓▓░ * ░░░░ ░░░░░░░░ ░░░░░░░░░░░░░░░░ █████████ * ██▄█████▄██ * █████████ * .......█ █ █ █.......................................... Let's get started. Choose the text style that looks best with your terminal To change this later, run /theme 1. Auto (match terminal) ❯ 2. Dark mode ✔ 3. Light mode 4. Dark mode (colorblind-friendly) 5. Light mode (colorblind-friendly) 6. Dark mode (ANSI colors only) 7. Light mode (ANSI colors only) ╌╌╌╌╌╌╌╌╌╌╌╌╌╌╌╌╌╌╌╌╌╌╌╌╌╌╌╌╌╌╌╌╌╌╌╌╌╌╌╌╌╌╌╌╌╌╌╌╌╌╌╌╌╌╌╌╌╌╌╌╌╌╌╌╌╌╌╌╌╌╌╌╌╌╌╌╌╌╌╌╌╌╌╌╌╌╌╌╌╌╌╌╌╌╌╌╌╌╌╌╌╌╌╌╌╌╌╌╌╌╌╌╌╌╌╌╌╌ 1 function greet() { 2 - console.log("Hello, World!"); 2 + console.log("Hello, Claude!"); 3 } ╌╌╌╌╌╌╌╌╌╌╌╌╌╌╌╌╌╌╌╌╌╌╌╌╌╌╌╌╌╌╌╌╌╌╌╌╌╌╌╌╌╌╌╌╌╌╌╌╌╌╌╌╌╌╌╌╌╌╌╌╌╌╌╌╌╌╌╌╌╌╌╌╌╌╌╌╌╌╌╌╌╌╌╌╌╌╌╌╌╌╌╌╌╌╌╌╌╌╌╌╌╌╌╌╌╌╌╌╌╌╌╌╌╌╌╌╌╌ Syntax theme: Monokai Extended (ctrl+t to disable) - To finalize your setup in the Claude Code CLI, please select the billing method that applies to your situation:
- Option 1: Select this if you have an active Claude Pro, Max, Team, or Enterprise subscription and wish to apply your existing plan benefits.
- Option 2: Select this if you prefer to be billed based on API usage via your Anthropic Console account.
- Option 3: Select this if you are connecting through a specific cloud provider platform (e.g., AWS, Azure, or Google Cloud).
After highlighting your choice, press Enter to proceed with the authentication flow.
Example Output:
Welcome to Claude Code v2.1.186 .......................................................... * █████▓▓░ * ███▓░ ░░ ░░░░░░ ███▓░ ░░░ ░░░░░░░░░░ ███▓░ ░░░░░░░░░░░░░░░░░░░ * ██▓░░ ▓ Welcome to Claude Code v2.1.186 .......................................................... * █████▓▓░ * ███▓░ ░░ ░░░░░░ ███▓░ ░░░ ░░░░░░░░░░ ███▓░ ░░░░░░░░░░░░░░░░░░░ * ██▓░░ ▓ ░▓▓███▓▓░ * ░░░░ ░░░░░░░░ ░░░░░░░░░░░░░░░░ █████████ * ██▄█████▄██ * █████████ * .......█ █ █ █.......................................... Claude Code can be used with your Claude subscription or billed based on API usage through your Console account. Select login method: ❯ 1. Claude account with subscription · Pro, Max, Team, or Enterprise 2. Anthropic Console account · API usage billing 3. 3rd-party platform · Amazon Bedrock, Microsoft Foundry, or Vertex AI - If your browser fails to launch automatically, copy the URL below and paste it into your browser to complete the sign-in process.
- Retrieve Code: Follow the prompts in the browser; once authorized, you will be provided with a verification code.
- Finalize: Copy that verification code, return to your terminal, paste it when prompted, and press Enter.
Example Output:
     *                                    █████▓▓░
                                    *          ███▓░       ░░
          ░░░░░░                      ███▓░
    ░░░   ░░░░░░░░░░                  ███▓░
   ░░░░░░░░░░░░░░░░░░░    *           ██▓░░      ▓
                                       ░▓▓███▓▓░
 *                                  ░░░░
                                  ░░░░░░░░
                                 ░░░░░░░░░░░░░░░░
      █████████                                        *
      ██▄█████▄██                  *
       █████████     *
.......█ █   █ █..........................................

 Browser didn't open? Use the url below to sign in (c to copy)
https://claude.com/cai/oauth/authorize?code=true&client_id=9d1c250a-e61b-44d9-88ed-5944d1962f5e&response_type=code&redirect_uri=https%3A%2F%2Fplatform.claude.com%2Foauth%2Fcode%2Fcallback&scope=org%3Acreate_api_key+user%3Aprofile+user%3Ainference+user%3Asessions%3Aclaude_code+user%3Amcp_servers+user%3Afile_upload&code_challenge=ebpyfZlp5uPT8pvo1gezIRJ0P4vgW7tHLztDSKNYc44&code_challenge_method=S256&state=qhPFuP_QmdQL82Nf79jGaHZ8QY3mnF1dUacvmNiUkgI
 Paste code here if prompted >
If the project is in a different location:
If your project is already located elsewhere, use the ls command to look around and find the correct path:
- List files in your home directory:
ls -F(The-Fflag will helpfully add a/after folder names). - Navigate to the correct folder: Once you identify the folder, use
cd path/to/your/project. - Run Claude: After you are inside the correct directory, run
claudeagain.
Step 5: Open Your Project
Now that your environment is ready, you can start managing your projects using the gstack-powered Claude CLI.
Example Output:
gstack@server-12345:~$ cd ~/my-project
gstack@server-12345:~/my-project$
Example Output:
Authentication successful!

Welcome to Claude Code (v2.1.186).
You are now in: /home/gstack/my-project

How can I help you with your code today?
(Type /help to see available commands)

gstack@server-12345:~/my-project $ claude>
- Navigate to your code: Move into the directory containing your project:
- Start the session: Simply type:
- Verify available tools: Once the CLI is active, type
/gstackto see the full menu of 23 specialized skills.
Keeping gstack Up to Date
To make sure you always have the latest features and improvements, run this command inside your Claude Code session:
gstack Skills Reference
Below is the comprehensive list of available skills to help you manage your software development lifecycle.
| Skill | Purpose |
|---|---|
/office-hours |
Product strategy and vision |
/plan-eng-review |
Architecture and technical planning |
/plan-design-review |
Design review and iteration |
/qa |
Quality assurance and test generation |
/qa-only |
Run QA without a broader context |
/review |
Code review |
/cso |
Security audit using OWASP and STRIDE |
/ship |
Release management |
/land-and-deploy |
Deploy to production |
/design-html |
HTML/CSS design iteration |
/document-generate |
Generate documentation |
/browse |
Web browsing and research |
/pair-agent |
Multi-agent browser collaboration |
/gstack-upgrade |
Update gstack to the latest version |
Supporting Information and Sample Output
You can run cat /root/README.md to see more information and useful commands:
root@server-123456:~# cat /root/README.md
# gstack
## Description

gstack is an open-source AI-powered software factory that transforms Claude Code into a virtual engineering team. It provides 23 specialized slash command skills covering the complete software development lifecycle from product strategy and architecture review through quality assurance and release management. Created by Garry Tan (Y Combinator President and CEO), gstack implements a structured sprint methodology so individual developers can ship at the velocity of large teams.

The sprint cycle follows: Think, Plan, Build, Review, Test, Ship, and Reflect. Each skill feeds into the next, creating a continuous pipeline where design docs from office-hours automatically inform downstream planning phases and test matrices from engineering reviews guide QA workflows.

## Services

Service | Port | Purpose
--------|------|--------
OpenSSH | 22   | SSH access

Ports are protected using ufw.


## What Gets Installed

- Claude Code latest (global CLI: `@anthropic-ai/claude-code`)
- Bun runtime latest (JavaScript/TypeScript runtime required by gstack)
- gstack skills (23 specialized slash commands, source at `/home/gstack/.claude/skills/gstack`)
- Playwright Chromium (headless browser for the `/browse` and `/design-html` skills)
- Installed to: `/home/gstack/.claude/skills/gstack`
- Runs as user: `gstack`


## First Boot Behavior

- Cloud-init completes OS initialization
- All gstack skills and the browse binary are ready to use
- Claude Code requires authentication with an Anthropic API key before first use
- gstack is NOT auto-started; it runs interactively when you invoke `claude`


## First-Time Setup

1. SSH to the server as root
2. Switch to the gstack user session:
   ```
   machinectl shell gstack@
   ```
3. Authenticate Claude Code with your Anthropic API key:
   ```
   claude auth
   ```
   Alternatively, export your key directly:
   ```
   export ANTHROPIC_API_KEY=sk-ant-...
   ```
4. Navigate to your project directory and start a Claude Code session:
   ```
   cd ~/my-project
   claude
   ```
5. Type `/gstack` inside Claude Code to see all available skills


## Key Skills

Skill | Purpose
------|--------
`/office-hours` | Product strategy and vision
`/plan-eng-review` | Architecture and technical planning
`/plan-design-review` | Design review and iteration
`/qa` | Quality assurance and test generation
`/qa-only` | Run QA without broader context
`/review` | Code review
`/cso` | Security audit using OWASP and STRIDE
`/ship` | Release management
`/land-and-deploy` | Deploy to production
`/design-html` | HTML/CSS design iteration
`/document-generate` | Generate documentation
`/browse` | Web browsing and research
`/pair-agent` | Multi-agent browser collaboration
`/gstack-upgrade` | Update gstack to the latest version


## Updating gstack

Run the built-in upgrade skill from inside a Claude Code session:
```
/gstack-upgrade
```

Or update manually:
```
cd ~/.claude/skills/gstack && git pull && ./setup --quiet
```


## Firewall

UFW is enabled and allows:
- Port 22 (SSH, rate-limited)

All other inbound ports are blocked by default.


## File Locations

Location | Purpose
---------|--------
`/home/gstack/.claude/skills/gstack` | gstack source repository and compiled browse binary
`/home/gstack/.claude/skills/` | Registered Claude Code skills directory
`/home/gstack/.gstack/` | gstack global state and configuration
`/root/README.md` | This documentation (root user)
`/home/gstack/README.md` | This documentation (gstack user)
`/etc/motd.d/99-gstack` | Login message of the day


## Minimum Resources

Resource | Minimum | Recommended
---------|---------|------------
RAM      | 4 GB    | 8 GB
Disk     | 20 GB   | 30 GB
CPU      | 2       | 4


## Next Steps

After launching your image and connecting via SSH:

1. Switch to the gstack user: `machinectl shell gstack@`
2. Authenticate Claude Code: run `claude auth` and follow the prompts, or set `ANTHROPIC_API_KEY` in your shell
3. Navigate to your project: `cd ~/my-project`
4. Start a Claude Code session: `claude`
5. Explore available skills: type `/gstack` to see all 23 skills
6. Begin a sprint: start with `/office-hours` for product strategy or `/plan-eng-review` for technical architecture
7. Keep gstack current: run `/gstack-upgrade` periodically to pull the latest skills

A complete sprint workflow looks like:
```
/office-hours       -> define the feature
/plan-eng-review    -> validate the technical approach
/qa                 -> generate tests before building
/ship               -> release when done
```


## Links

Documentation: [https://github.com/garrytan/gstack](https://github.com/garrytan/gstack)

Community: [https://github.com/garrytan/gstack/discussions](https://github.com/garrytan/gstack/discussions)

Issues: [https://github.com/garrytan/gstack/issues](https://github.com/garrytan/gstack/issues)
root@server-646875:~# client_loop: send disconnect: Connection reset
Summary
Learn how to purchase a Bluehost Virtual Dedicated Server (VDS) with gstack installed and start using AI-assisted tools to streamline software development. This article walks you through choosing a VDS plan, setting up and accessing gstack, and connecting Claude Code to your development environment. You'll also learn how to use gstack's specialized workflows to support planning, coding, testing, reviews, and deployments.