How to Troubleshoot PHP 400 Errors
A PHP error occurs when something goes wrong while executing a PHP script on a web server. PHP is a popular server-side scripting language used to create dynamic web pages, and errors can happen for various reasons. This guide will walk you through solutions to troubleshoot PHP 400 errors to identify and resolve common PHP 400 errors, such as 400, 403, 404, and 429, helping you get your website back up and running smoothly.
Understanding PHP 400 Errors
What is a 400 Error?
A 400 Bad Request occurs when the server has not read the browser's request because it appears malformed or is an invalid data item. Such cases often happen with a request where the data fails to adhere to the proper requirements and structure and becomes unreadable to the server.
Common Causes of PHP 400 Errors
Here are a few common causes of PHP 400 errors:
- 400 Bad Request: The server could not understand the request due to malformed syntax.
- 403 Forbidden: You do not have permission to view the requested resource.
- 404 Not Found: The page you are looking for could not be found.
- 429 Too Many Requests: You have hit the rate limit for making requests to the server.
Troubleshooting PHP 400 Errors
Here are the steps to fix the PHP 400 Error on Bluehost:
Check Core Files
- Log in to your Bluehost Portal.
- In the left-hand menu, click Websites.
- Click the Manage Site button located next to the website you want to manage.

- In the top horizontal menu, click on Security.

- Scroll to the Check Core WordPress Files section and click the Scan Core Files button to initiate the scan.

Need Help Fixing WordPress Core Files?
For step-by-step instructions on WordPress core files and warnings in WordPress, check out this How to Troubleshoot and Repair WordPress Core Files guide. - After the scan, open your website in a private or incognito browser window.
- If the error persists, check your Permalink Settings for further troubleshooting.
Check Permalinks
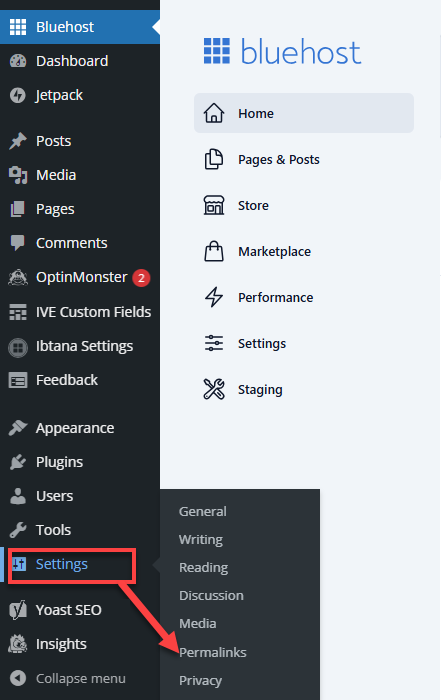
- Log in to your WordPress Admin Dashboard.
- From the left-hand side menu, click on Settings, then select Permalinks from the dropdown.
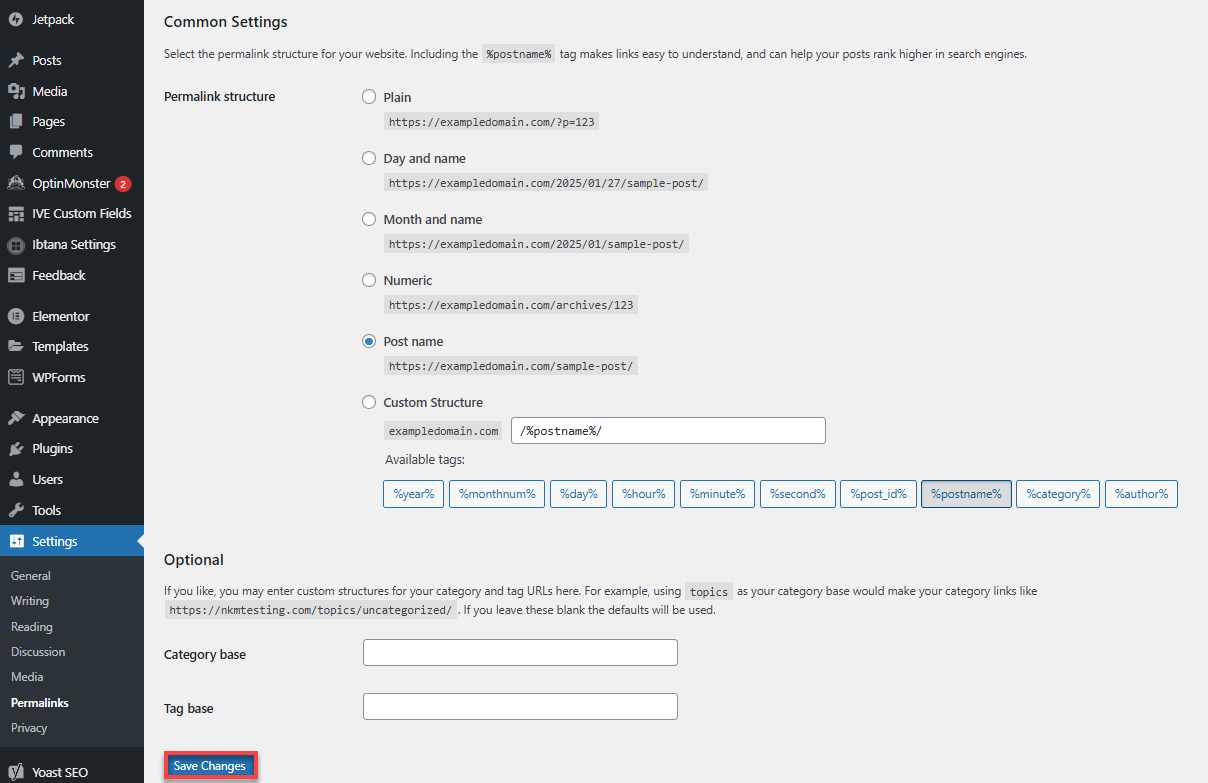
- Leave the current settings as they are, and click Save Changes to refresh the permalink structure.
- Open your website in a private or incognito browser window.
- If the error persists, proceed to the next step to disable the .htaccess file temporarily.
Temporarily Disable the .htaccess File
- Log in to your Bluehost Portal.
- In the left-hand menu, click Websites.
- Click the Manage Site button located next to the website you want to manage.
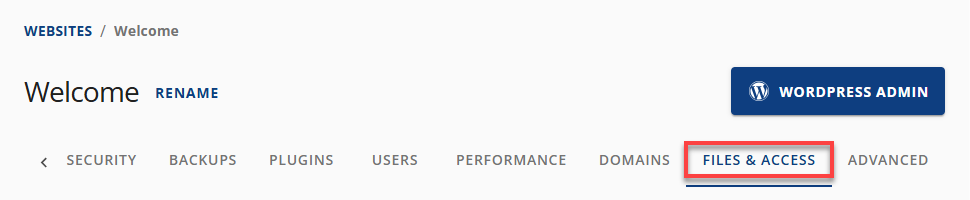
- Click on the Files & Access tab in the horizontal menu.
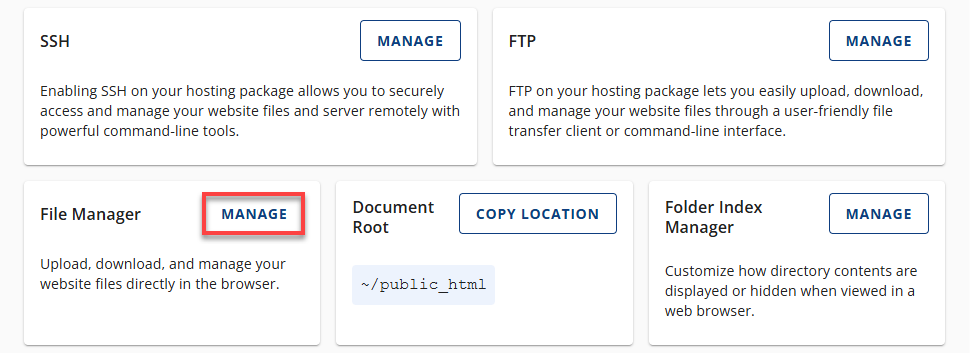
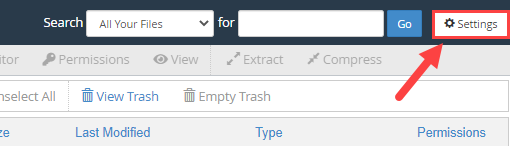
- Under the File Manager section, click Manage. This will open the folder where your website's content is stored.
- In the top-right corner, click Settings.
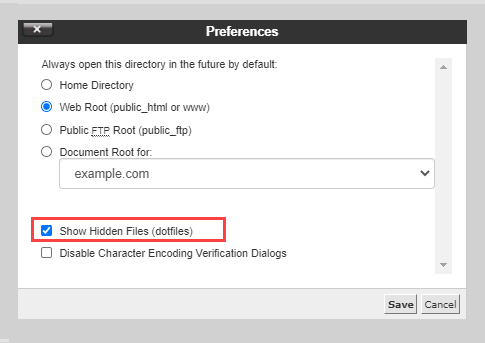
- Check the box for Show Hidden Files (dotfiles) and click Save.
- In the File Manager, locate the purple file icon named .htaccess.
- Right-click on it and select Rename from the pop-up menu.
Renaming the file (e.g., ".htaccess-old") instead of deleting it is important, as it may contain critical code for your website's functionality. Renaming temporarily disables the file.
- In the File Manager, create a new .htaccess file:
- Click the + File option in the top left corner.
- In the pop-up box, enter .htaccess as the new file name, ensuring it's created in the correct directory, then click Create New File.
- Once created, edit the .htaccess file:
- Locate the new .htaccess file.
- Click Edit to copy and paste the following code:
                  # BEGIN WordPress

                  RewriteEngine On
                  RewriteRule .* - [E=HTTP_AUTHORIZATION:%{HTTP:Authorization}]
                  RewriteBase /
                  RewriteRule ^index\.php$ - [L]
                  RewriteCond %{REQUEST_FILENAME} !-f
                  RewriteCond %{REQUEST_FILENAME} !-d
                  RewriteRule . /index.php [L]

                  # END WordPress
- Once done, click Save Changes.
- Open your website in a private or incognito browser window to check if the error has been resolved.
- If the issue persists, you may need advanced troubleshooting for further assistance.
Advanced Troubleshooting
Check Server Logs: Examine your server's error logs for more specific information about the 400 error, such as the exact error message and the time of occurrence.
Preventing Future 400 Errors
To minimize future errors:
- Regularly update WordPress Settings and Plugins to avoid compatibility issues.
- Back up your website to prevent data loss in case of unexpected issues.
- Monitor server resources to ensure there are no bottlenecks affecting performance.
Summary
PHP 400 errors can be troubleshooted relatively quickly with the right approach. You can deal with the most common problems, such as the 400 Bad Request, 403 Forbidden, 404 Not Found, and 429 Too Many Requests, by checking core files, refreshing permalinks, and disabling the .htaccess file. Advanced troubleshooting methods, like server log review, might be required for issues that are not resolved. With regular updates and continuous monitoring, you do not have to worry about these errors recurring, thus ensuring a smooth and seamless user experience.
If you need further assistance, Bluehost Chat Support is available 24 hours a day, 7days a week while Bluehost Phone Support is available 7 days a week from 7 am-12 midnight EST.
- Chat Support - While on our website, you should see a CHAT bubble in the bottom right-hand corner of the page. Click anywhere on the bubble to begin a chat session.
- Phone Support -
- US: 888-401-4678
- International: +1 801-765-9400
You may also refer to our Knowledge Base articles to help answer common questions and guide you through various setup, configuration, and troubleshooting steps.