Loading...

Knowledge Base
 Up to 70% off  on  WordPress  hosting for WordPress Websites and Stores!

How to Troubleshoot and Repair WordPress Core Files

This guide will help you with WordPress core files and warnings, as well as how to troubleshoot and repair core files in WordPress.

A WordPress core file error message is most likely caused by a plugin, theme, script, or code malfunctioning, which prevents WordPress from functioning properly and makes it unable to load files properly.

WordPress is capable of a wide range of tasks. You can extend and supercharge your WordPress website using themes, plugins, WordPress native action, and filter hooks.

However, there is one thing you should never do: modify WordPress core files.

A WordPress installation will always include its core PHP files and directory structure. You may be aware of the WordPress configuration file, wp-config.php, which connects the WordPress installation to the desired database, and the wp-content directory, which contains plugin and theme files. The only files you may need to change are wp-config.php and .htaccess. However, as is customary, these files don't need to be edited immediately.


What Are WordPress Core Files

Core files, also known as core dumps or core dump files, are generated by operating systems when a program terminates abnormally due to a segmentation fault, illegal instruction, or other critical error. These files contain a snapshot of the program's memory at the time of the crash, which can be invaluable for developers in diagnosing and debugging the issue that caused the program to crash.

In the context of WordPress, core files refer to the PHP and related source files that contain WordPress's main functionality. These core files are created by WordPress developers and are required for WordPress to run. This does not include Themes or Plugins, which may be added to your site.

WordPress core file errors typically refer to issues within the WordPress software itself, rather than issues with operating system-generated core dumps. This is an example of a WordPress core file error. For some errors, WordPress will provide a link to click for more information about the error and tips on how to fix the core file error.

wordpress critical error core file notification wordpress message

Where Can You Find the WordPress Core Files?

WordPress core files are typically installed in the root directory of your WordPress installation. This directory contains various folders and files, including the core PHP files, configuration files, and directories for plugins, themes, uploads, and more.

Specifically, the core files are typically found in the following directories:

  • /wp-admin/: Contains the files and resources required for the WordPress admin dashboard.

  • /wp-includes/: Contains core WordPress files such as libraries, functions, and classes.

  • /wp-content/: While not strictly part of the core WordPress files, this directory contains user-generated content such as themes, plugins, and uploaded media. It's an essential directory for WordPress functionality but doesn't include core WordPress code.

You can also access the WordPress core files directly from the official WordPress repository on wordpress.org. This is particularly useful for downloading the latest version of WordPress or specific releases for installation or development purposes.

Why Shouldn't You Modify Core Files

Warning: Core files are not intended to be modified in ANY way. Modifying the core files of WordPress, which are the PHP and related source files containing the main functionality of the platform, is strongly discouraged for several reasons:
  • Data Integrity: Data Integrity: WordPress core files, like any other software's core files, contain critical data that is essential for the proper functioning of the platform. Altering these files can jeopardize the integrity of the data within them, potentially leading to incorrect behavior and hindering the troubleshooting process.

  • Legal and Ethical Concerns: WordPress is open-source software, and its core files are subject to licensing agreements and ethical guidelines. Modifying these files without proper authorization may violate these agreements. Additionally, unauthorized changes might be viewed as tampering with computer systems, which could raise ethical concerns.

  • Loss of Evidence: WordPress core files serve as crucial evidence when diagnosing the cause of errors or crashes within the platform. Modifying these files could erase or alter vital information needed to understand the root cause of the issue, making it more challenging to troubleshoot effectively.

  • Debugging Tools Exist: WordPress developers have access to various debugging tools and techniques, such as logging plugins and error reporting features, which provide a safer and more controlled environment for diagnosing issues within the platform. Relying on these tools instead of directly modifying core files mitigates the risks associated with data corruption and legal implications.

  • Risk of Further Damage: Making arbitrary changes to WordPress core files without a deep understanding of the platform's internals can introduce further instability or errors into the system. Without proper analysis and understanding of the underlying problem, modifying core files may exacerbate the issue or create new problems altogether.

If you believe you need to modify WordPress core files, a possible alternative method to accomplishing major previsions, check out this BRAND blog for alternative options that may suit your needs: What is WP-Content Uploads and How to Upload Files in WordPress.


How To Troubleshoot Core File Errors

The steps below will assist you in determining whether an error is related to WordPress core files.

Before You Start:

Pro Tip Make A Backup: In addition to making sure all your website components are up to date, such as any scripts, WordPress theme, and plugins you use.

Keep your website data and files protected in the event of accidents, data loss, or injections and hackers, make sure you have a daily full backup of your website files and databases, or create a full backup of your website files and databases for easy restoration.

To know more about how to make a backup, check out these guides to show you how:

Prepare Your WordPress Website For Troubleshooting:

  1. Before troubleshooting, you should always create a backup of your website. Ensure you have a daily backup of your site for easy restoration. To know more information about this process, please follow either of these guides for making a backup of your website: Getting CodeGuard Set Up for Backups or How To Backup My WordPress Website?
  2. Make sure your website and plugins are up to date, which you can view and perform updates inside the WordPress Dashboard.
  3. It is important to check the "Compatibility" of your site against new versions of PHP before upgrading. Sites built with WordPress can use the PHP Compatibility Checker plugin.
    The minimum PHP version on our Shared hosting servers is 8.1. You can also check PHP Manual for reviewing the new and deprecated features of PHP.
  4. Disable any caching plugins. You can disable plugins in the database or via File Manager or FTP if you do not have access to your WordPress dashboard.
  5. If your site makes use of WP Super Cache, disable it.

Look For Core File-Related Errors:

  1. Enable the WordPress debug mode.
  2. Open the website again to generate the error, then check the results.
  3. Examine your website to see if there is a PHP error. If there is a PHP error, see if the file path contains a reference to a WordPress core file or folder.

    Note: These errors frequently refer to files in the wp-admin or wp-includes folders.

    Below is an example:
    Fatal error: require(): Failed opening required '/home/user/public_html/wp-includes/class-wp.php'
    • If the error's file path contains a reference to a core file or folder, you can proceed to resolve the problem.
    • If the error is not visible on your website, view the error logs
      • If you see a PHP error related to a core file in the logs or detailed errors, you can start fixing it.
  4. Disable the WP DEBUG from true to false in the wp-config.php file to disable WordPress debug mode.

After you've determined that the issue is related to your WordPress core files, you can proceed to correct WordPress core file errors.


Repair Core File Errors

WordPress website administrators can check the status of their WP installation and see if there are any pending version updates for the application core or any associated add-ons by going to /wp-admin/update-core.php.

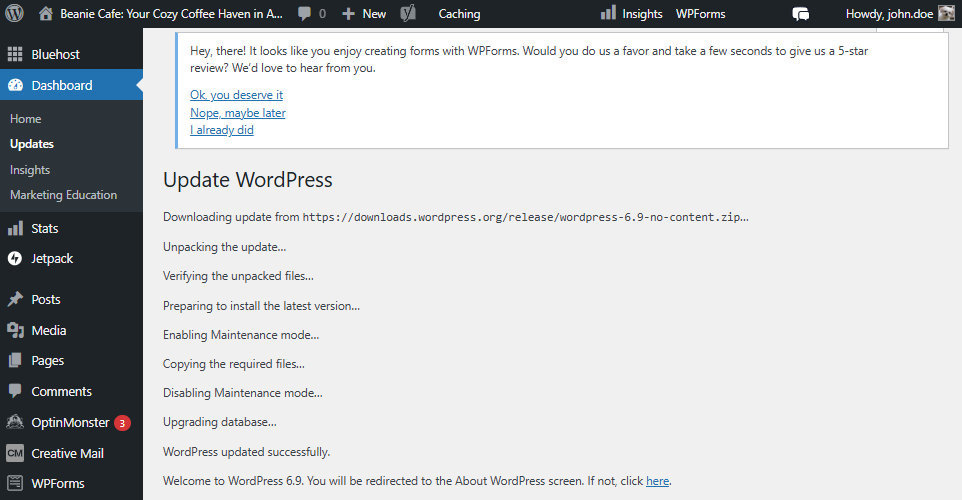
Most users can use WordPress's built-in auto-update capabilities to install the most recent stable version with a single click. In such cases, WP will enter maintenance mode automatically, download and apply the core updates in the background, and then confirm the process's success. However, if WordPress is misconfigured or transferred with incorrect file permissions, the auto-update functionality may fail, and the website may become stuck in Maintenance Mode.

There are several methods for repairing core files. We recommend creating a backup of your site before attempting to solve a modified core issue in case you need to roll back your changes.

Scan and Repair Using the My Sites Tool

To begin, you must be logged in to your Account Login Links. And then access the WordPress tool:

  1. Click on the My Sites tab from the side navigation menu to the left.
  2. Locate the site you want to back up or restore, and click the Manage Site button.
    my-sites-bluehost
  3. Click the Security tab.
    You can manage Free SSL settings and additional security settings through SiteLock. You will also see options to toggle your free SSL on or off, access your SiteLock dashboard, upgrade your SiteLock plan, and scan your core files.
    • Security Certificate: Here, you can toggle the free SSL on/off for your website.
    • Malware Security: Here, you can click Upgrade to add features/functionality or View Dashboard to access your SiteLock dashboard.
    • File Integrity Check: Here, you can check file integrity.
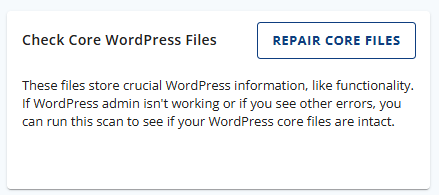
  4. Click Scan Now to scan your core WordPress files in the Check core WordPress files tiles. You will receive a notification depending on the scan result.
    • File Issue: Your core files have been modified.
    • All Good: Your core files are excellent and intact.
  5. If you received the File Issue confirmation, click the Repair files to resolve the problem.
  6. You will receive a confirmation once the repair is complete.

Update WordPress and Reinstall to the Latest Version via WP-Admin

The simplest option for anyone with any experience level is to go to the update screen in your WordPress Admin Dashboard. To update WordPress, you must be an Administrator of the website. For more information on logging into a website created with WordPress, please refer to this article: How To Login To WordPress Sites - WP Admin Access.

  1. Log in to your WordPress site's wp-admin dashboard.
  2. Navigate to the Dashboard.
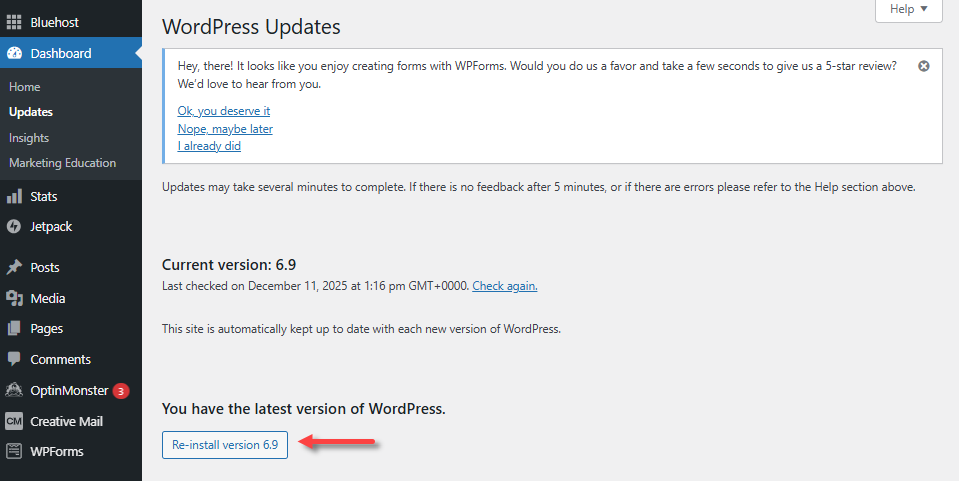
  3. Select Updates.

    Note: You can also go to your domain and append the following path:
    /wp-admin/update-core.php

    wordpress dashboard on the left click update
  4. Click Check Again to force WordPress to look for an update if no update is available.
  5. Click the Re-install Now button to install a fresh, unmodified version of your WordPress core files.

Manually Update Core Files

  1. Make a backup of all WordPress files and database - It is critical to backup your files and database before beginning the upgrade in case you need to revert to the 'old' version of WordPress for any reason.
  2. Check the backups - Check that the backups you created are still present and usable. This is the most crucial step in the upgrade procedure! Please verify that you can see the backup files on your local computer (or wherever you've saved them) and can navigate any sub-folders. If the files are zip files, ensure you can open them. Consider opening a .sql file in an editor to verify that the tables and data are present.
  3. Disable all plugins - Deactivate any Plugins in your Administration Screen's Plugins section. Because of the changes to WordPress, some Plugins may conflict with the upgrade process. If you can't get into the administrative menus, you can disable all plugins by resetting the plugins folder.
  4. Ensure that the first 3 steps are completed - STOP and complete the first 3 procedures if you haven't already! Do not attempt the upgrade unless the first 3 steps have been completed.
  5. Download and unzip the WordPress installation package - Download the WordPress package from https://wordpress.org/download/ and unzip it. The WordPress package will be extracted into a folder called WordPress.
  6. Delete the previous WordPress files - Why should you delete them? It is generally a good idea to delete anything possible because the uploading (or upgrading via cPanel) process may not correctly overwrite an existing file, causing problems later. For more information on deleting files using File Manager, please refer to this article File Manager - How to Create, Remove, and Edit Files.

    Warning: Do not remove the following files and folder:

    • wp-config.php file;
    • wp-content folder;
    • wp-includes/languages/ folder – If you are using a language file that is not in wp-content/languages/, do not delete this folder (you may want to move your language files to wp-content/languages/ in the future for easier upgrading);.
    • .htaccess file – Do not delete your .htaccess file if you have added custom rules to it;
    • Custom Content and/or Plugins – If you have any images, custom content, or plugins in the wp-content folder, do not delete

    Note: Delete these files and folders:

    • wp-* - (except for those above), readme.html, wp.php, xmlrpc.php, and license.txt files; Typically files in your root or WordPress folder. Again, don't delete the wp-config.php file. Note: some files may not exist in later versions.
    • wp-admin folder;
    • wp-includes folder;
    • wp-content/plugins/widgets folder; You only see this folder if you previously installed the Sidebar Widgets plugin. The Sidebar Widgets code conflicts with the built-in widget ability.
  7. Upload the new files - Upload the new files to your site server using File Manager and the new upgrade on your local computer, just as you did when you first installed WordPress. For more information on using an FTP client to upload, see Using FileZilla and Uploading WordPress to a Remote Host. For more detailed instructions on uploading files, please refer to this article File Manager - How to Upload Files.

    Note: If you did not delete the wp-content folder before uploading, you would need to overwrite some files.

  8. Run the WordPress upgrade program - Navigate to the WordPress admin pages using a web browser to the standard /wp-admin location. WordPress will notify you if a database upgrade is required and provide you with a new link to follow. This link will take you to wp-admin/upgrade.php to run the WordPress upgrade script. Follow the instructions presented on your screen.
    If you want to run the upgrade script manually, do the following:
    • If you have WordPress installed in the root directory, navigate to: http://example.com/wp-admin/upgrade.php.
    • If WordPress is installed in its own subdirectory, say, blog, navigate to: http://example.com/blog/wp-admin/upgrade.php.
  9. Update Permalinks and .htaccess - Update your Permalink Structure in your Administration Screen > Settings > Permalinks screen and, if necessary, place the rules in your .htaccess file.
  10. Install updated Plugins and Themes - Please look for compatibility information with your new WordPress version on individual plugin and theme pages. If necessary, update the versions of your plugins and themes.
  11. Reactivate Plugins - Activate your plugins from the Administration Screen, Plugins. If you are unsure whether they will work properly with the new version, activate each plugin one at a time and ensure that there are no issues before proceeding.

You have successfully updated your core files. Please check the website and see if any other changes need to be made.


FAQs — Frequently Asked Questions

Why do I see the 'Your core files have been modified.' error message?

The message will appear when the core files for your WordPress site differ in any way from the core files that normally come with WordPress. Even slight changes like an extra blank line will cause this error. It doesn't matter if the functionality of the file changes. The core files in WordPress can be modified for many reasons.

You may see this message because:

  • You or a developer have customized the core files of WordPress so that they differ from the default core files.
  • A plugin or theme has changed the core files of WordPress.
  • Malware has infected your site and changed the core files.

The site may be infected with malware if you haven't installed any plugins or themes recently and haven't modified the core files. Keep in mind seeing this message is not proof of malware on your site.

I think my WordPress site is infected. How do I repair WordPress website-infected files?

When you see this message, you will be given the option to click the update button. If you click the update button, it will replace the core files with the latest version of the files from WordPress.

Warning This will undo any changes made by malware on the core files. Don't do this if you have customized the file, as this will also undo those changes.

Summary

To ensure you can repair or fix WordPress errors, review the error message to help determine the possible cause. To repair WordPress core file warnings, this guide shows you how to troubleshoot and repair core files and warnings in WordPress.

As a reminder, you should never modify core files. Modification of core files is recommended for advanced WordPress users, in addition to those who are familiar with PHP.

When implemented with other measures, it results in fixed WordPress errors, and your WordPress website is working once again.

Tip: You can also view debug mode ,whichcis highly useful in troubleshooting a WordPress site that is showing errors or not working correctly.

If you're looking to boost your WordPress site, check out BRAND's WordPress Hosting plans. Get a web hosting that's perfectly fit WordPress and boost yor site's success.

ContactSupport

Did you find this article helpful?

 
* Your feedback is too short

Loading...