Key highlights
- Understand what is a nameservers and how they connect domain names to IP addresses, so your website loads correctly.
- Learn the key differences between nameservers, DNS, DNS zones and resolvers to manage your domain effectively.
- Explore how proper nameserver setup improves website speed, uptime, email delivery and overall security.
- Know the benefits of using private nameservers for branding, flexibility, privacy and advanced DNS control.
- Uncover practical steps to check, update and configure your domain’s nameservers with tools and hosting providers.
Ever typed a website name into your browser’s address bar and wondered how it magically takes you to the right page in seconds? It feels effortless, but behind the scenes, a powerful system is at work. That system is powered by nameservers.
Think of nameservers as the internet’s traffic directors. They guide your request to the correct web server, making sure you land on the site you’re looking for instead of getting lost online. Without them, visiting a website would mean memorizing long strings of numbers called IP addresses, not exactly user-friendly.
Since nameservers play such an important role in speed, security and accessibility, let’s break it down. First, let’s answer the big question: What is a nameserver?
What is a nameserver?
A nameserver is a critical server component of the Domain Name System (DNS). It stores DNS records and translates human-readable domain names (like www.example.com) into the numerical IP addresses that computers use to identify and connect with each other across the world. When you type a website address into your browser’s address bar, your device sends a DNS query to the domain name server. The nameserver checks its configuration files and cached data, then provides the correct IP address. This process ensures the browser connects to the right web server, loads the main domain and keeps all the domain name’s various services, such as websites, subdomains and email, working properly.
Nameservers vs DNS records
There is often confusion between nameservers and the Domain Name System (DNS). To put it simply: nameservers are not separate from DNS, they are a crucial part of it. While DNS is the entire system that manages how domain names are translated into IP addresses, nameservers are the specific server components that store and deliver those DNS records.
What does a nameserver do in DNS?
Think of DNS as the internet’s phone book and nameservers as the operators who look up the exact number you need. Instead of phone numbers, DNS connects domain names to numerical IP addresses, making websites easy to access.
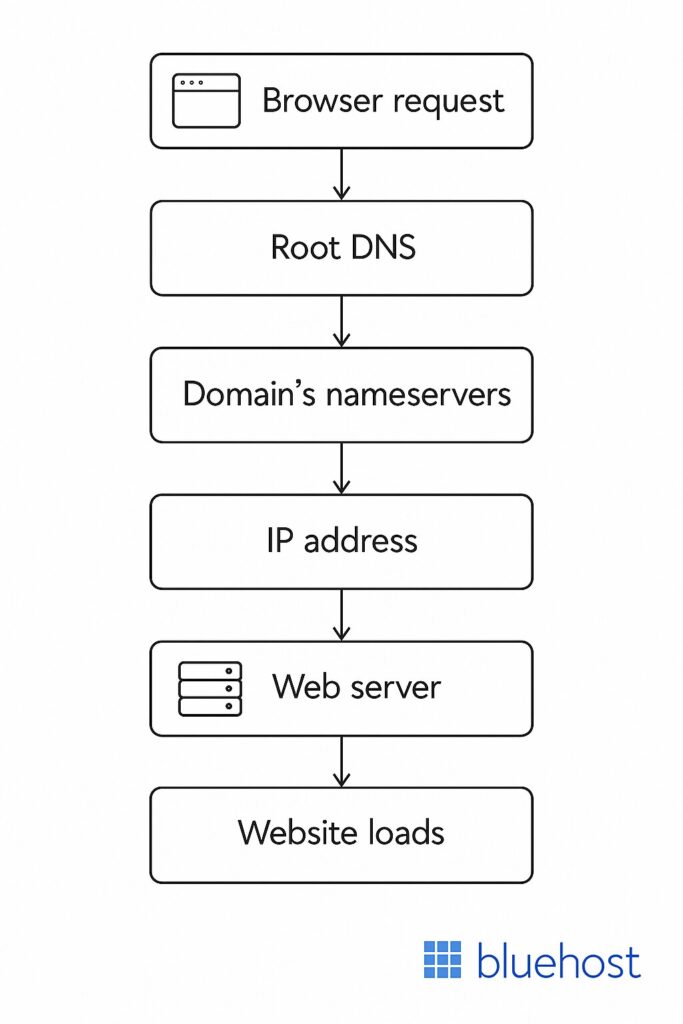
Here’s a step-by-step example of how it works when you type example.com into your browser’s address bar:
- URL parsing: The browser breaks down the domain name into parts (example + .com).
- Top-level domain (TLD) query: The .com part directs the request to a TLD nameserver.
- Second-level domain (SLD) query: The TLD server points to the domain’s nameservers responsible for “example.com,” often managed by a domain registrar or hosting provider.
- Resolution: The nameserver points to the correct IP address stored in its DNS records (such as the A record).
- Browser connects: With the IP address, your browser connects to the correct web server and loads the site.
This entire process, called a DNS query, takes just milliseconds, ensuring users land on the right page without needing to remember long numbers. To learn more about DNS, you can watch our “What is DNS” video or read the full guide.
Also read: What is DNS (Domain Name System) and How Does it Work?
Why are nameservers important? Key benefits for your website
Nameservers connect your main domain to the right IP address, ensuring DNS records work for websites, email and subdomains. With nameservers provided by your host or registrar, administrators manage services, use cache and keep domains online, fast and reliable worldwide.
1. They keep your website online
2. They help your website load faster
3. They give you control over your domain name
4. They help your emails get delivered
Let’s discuss in detail how nameservers work and keep your domain, DNS records and services reliable, fast and accessible worldwide.
1. They keep your website online
If nameservers aren’t set up correctly or stop working, people won’t be able to reach your website. This can lead to:
- Frustrated visitors
- Lost business opportunities
- A damaged brand reputation
For businesses, website downtime can be costly. Imagine an online store going offline during a big sale or a company’s site crashing during an important launch. These issues can hurt sales and the company’s image.
2. They help your website load faster
People expect websites to load quickly and slow sites drive visitors away. Nameservers affect your site’s speed and reliability by:
- Helping pages load faster when using a good DNS provider
- Reducing delays by using servers in multiple locations
- Keeping your site online with a reliable provider
A fast website improves user experience, helps with search rankings and can increase sales or sign-ups.
3. They give you control over your domain name
When you buy a domain, it usually comes with default nameserver records from the company you bought it from. But you can change these anytime to:
- Switch to a new hosting provider
- Manage your own DNS settings
This flexibility makes it easier to move your website or customize settings as needed.
4. They help your emails get delivered
Nameservers also control email delivery by managing MX (Mail Exchange) records, which directs emails to the right servers. If these records aren’t set up correctly, you might face:
- Undelivered or lost emails
- Communication issues with customers
- Business disruptions
Nameservers, including DNS NS records, may not always be top of your mind, but they are essential for keeping your website running. They help people find your site, improve speed, give you control over your domain and ensure emails are delivered. Choosing the right nameservers helps keep your website fast, reliable and always online.
Where are your domain’s nameservers located?
Log in to your Bluehost account and go to the Manage button on your sidebar. In that menu, click DNS and then go to the Name Servers section.
There, if you set up your WordPress website with Bluehost, you’ll see Bluehost’s nameservers.
ns1.bluehost.com
ns2.bluehost.com
Typically, there are at least two nameservers in place for backup and redundancy. This setup ensures that if one server fails, customers can still reach the correct destination, maintaining seamless access to your website.
You can also modify your DNS records in the DNS Manager, within your Bluehost account. This allows you to modify records such as A records, CNAME, MX records and TXT records, which control how your domain connects to different services.
Also read: How to Add a CNAME Record: A Complete Tutorial
Nameserver lookup
If you didn’t set up your website with Bluehost or are uncertain about your nameservers’ location, several online tools can help you track them down, including a DNS Checker search bar:
- Bluehost WHOIS Lookup: Bluehost offering WHOIS services (e.g., [domaintools].com) displays registration details, including your domain’s nameservers.
- ICANN DNS Lookup Tool: Managed by the Internet Corporation for Assigned Names and Numbers (ICANN), this tool (available at lookup.icann.org) provides detailed DNS information, including your nameservers.
Why use these tools?
Beyond locating your nameservers, these resources are valuable for:
Verification: Confirming that your nameservers are correctly configured and pointing to the intended hosting provider or server.
Troubleshooting: Ensuring your domain resolves properly to avoid access issues.
By using these tools, you can quickly clarify where your domain’s nameservers are directed, making it easier to manage or update your DNS settings as needed.
How to set up a custom nameserver
When you register your main domain with a domain registrar and use hosting from a provider like Bluehost, the default nameservers provided come from that host. But setting up a custom nameserver gives you more control, branding, and flexibility over how your DNS records work across the world.
With custom nameservers, you (as the administrator) can:
- Manage subdomains and special domain name’s various services directly.
- Edit configuration files to set advanced protocols.
- Use cache for faster performance.
- Easily identify and register your own domain name servers instead of relying only on your hosting provider.
Quick steps to set up a custom nameserver
- Log in to your hosting/registrar account: Go to the DNS/Nameserver settings.
- Identify your domain: Select the main domain you want to assign custom nameservers to.
- Create new nameservers: Example: ns1.yourdomain.com, ns2.yourdomain.com.
- Enter the server IP address: This links your custom nameserver to the correct web server.
- Save and update DNS records: Ensure A records, MX records, and CNAME records are pointing correctly.
- Register nameservers: Some registrars require you to formally register custom nameservers before they work.
- Wait for propagation: Changes may take up to 24–48 hours to update across the internet.
Benefits of using private nameservers
Private nameservers give website owners and businesses more control, branding, and flexibility compared to default nameservers provided by a hosting provider.
1. Custom branding
2. Easier for clients to see
3. Greater flexibility when changing hosting providers
4. More control over DNS, privacy and security
Let’s discuss these benefits in detail and see how they impact your website’s performance and reliability.
1. Custom branding
Instead of using nameservers from your hosting provider (like ns1.bluehost.com), you can create custom nameservers that show your own domain (like ns1.yourdomain.com). This helps strengthen your brand and makes it look more professional.
2. Easier for clients to see
If you run several websites or offer hosting services, a private nameserver makes it easier for clients to connect their domain to your brand.
3. Greater flexibility when changing hosting providers
If you change web hosting providers, a private nameserver lets you move domains without changing nameserver settings for several websites. You only need to update the IP addresses of your nameservers, not the nameservers for each domain.
4. More control over DNS, privacy and security
A private nameserver lets you manage your DNS records directly. This allows for special settings that might not be available with regular hosting nameservers. It also gives more privacy, since your domains won’t link directly to your hosting provider’s public nameservers. It can improve security by lowering the need for third-party DNS services.
Updating a custom nameserver in Bluehost
To update custom nameservers in your Bluehost account, follow these steps:
- Log in to your Bluehost Account Manager: Access your account using your credentials.
- Navigate to the domains section: Click on the “Domains” tab located on the left side of your Account Manager homepage.
- Access custom nameservers: Within the Domains section, select the “Custom Nameservers” tab.

- Manage name servers: To create or edit a custom nameserver, enter your desired custom nameserver in the first input box and click “Go.”

- To replace an existing custom nameserver, input the current custom nameserver in the second input box.
- Enter the server IP address: If you’re creating a new custom nameserver, you’ll be prompted to enter the associated server IP address. After entering the IP address, click “Go.”

- Save changes: Review the information for accuracy and click “Save Changes” to apply the updates.
Modifying nameservers with other registrars
Each registrar has its own whole process of updating nameservers. Bluehost provides instructions for correctly pointing your domain name to Bluehost’s servers.
Typically, you’ll need to navigate to the DNS settings section of your hosting provider’s dashboard. From there, you can modify your website’s records to point to Bluehost’s nameservers.
You can also transfer your domain to Bluehost, letting you control your website all in one location. To ensure a smooth and disruption-free transfer, make sure your nameservers are pointed to Bluehost first.
Also read: Change Nameservers with Other Registrars
How long does it take for nameservers to update?
When you change DNS records, it takes time for the updates to propagate across the internet. This process, known as DNS propagation, can take up to 48 hours
Changes can be seen soon after you update, but it could still be updated in other regions. So, allow up to 48 hours for your nameservers to propagate fully.
You can check the status of your update on tools like DNSchecker.org.
How to check which nameservers your website is using
Ensuring your website’s nameservers are correctly configured is essential for its smooth operation. Let’s explore various methods and tools to help you determine the nameservers your website is currently using.
How to check nameservers using WHOIS lookup tools
You can find your web host’s nameservers using WHOIS lookup tools or by checking your hosting provider’s control panel. Here’s how you can do it:
- You can find your web host’s nameservers by accessing your hosting control panel to find the provider’s nameserver details.
- There are various lookup tools available online where you can enter your domain name and retrieve your domain details.
- You can compare the nameservers from your hosting provider with the ones you found using the WHOIS lookup tool. If they match, your domain is set up correctly. If not, contact your hosting company for assistance.
Also read: How to use Whois lookup
How to check nameservers on different operating systems
You can check your domain’s nameservers using built-in command-line tools on Windows, Linux and macOS. Follow the steps below based on your operating system.
Windows:
- Press Windows + R, type cmd and click OK to open the Command Prompt.
- In the Command Prompt, enter the following command: nslookup -type=ns [yourdomain].tld
- This will display the nameservers associated with your domain.
Linux:
- Open the terminal by pressing CTRL + ALT + T or searching for “Terminal.”
- Enter the following command: dig +short ns [yourdomain].tld
- The output will list the nameservers assigned to your domain.
macOS:
- Open Spotlight Search by pressing Command + Spacebar and type Terminal, then press Enter to launch it.
- Run the following command: dig +short ns [yourdomain].tld
- This will return the nameservers configured for your domain.
These methods allow you to verify whether your domain is pointing to the correct hosting provider. If you recently changed your nameservers, remember that DNS updates may take 24 to 48 hours to fully propagate.
Website security & Nameservers: Protecting your domain
Your website and domain name are like your home on the internet. Just as you lock your doors at night, you need to protect your online space. Hackers and cybercriminals may try to attack your website or steal sensitive information. Let’s go over how to keep your site secure and running smoothly.
DNSSEC: Extra protection for your website
DNSSEC (Domain Name System Security Extensions) acts like a special lock for your website’s address book. Here’s why it’s important:
- What it does: DNSSEC adds a digital signature to your DNS records, making it much harder for hackers to trick visitors into going to a fake website.
- Why you need it: Without DNSSEC, cybercriminals could redirect your visitors to a fraudulent site to steal passwords or spread malware.
- How to use it: Most domain registrars offer DNSSEC and many provide easy tools to enable it.
If you use Bluehost WordPress hosting, you’re already protected. We automatically enable DNSSEC for all hosted websites, adding an extra layer of security.
DDoS protection: Preventing large-scale attacks
DDoS (Distributed Denial of Service) attacks are one of the biggest threats to websites. Here’s what you need to know:
- What it is: In a DDoS attack, hackers flood your website with fake traffic, slowing it down or crashing it completely.
- Why it’s bad: If your site goes offline, you could lose business, frustrate visitors and damage your reputation.
- How to stop it: Choose a hosting provider with built-in DDoS protection that detects and blocks these attacks.
With Bluehost WordPress hosting, you get strong DDoS protection. Our system uses smart firewalls and other tools to keep your website online, even if someone tries to overwhelm it with fake traffic.
By using DNSSEC and DDoS protection, you can significantly reduce security risks and keep your website safe for visitors. Taking these steps now can save you from major problems in the future.
Final thoughts
Nameservers are a key part of how the internet works, helping you access websites without needing to remember complex numbers. They make browsing easier and if you understand how they work, they can also help you manage your website. Whether you’re connecting your domain to your web host’s nameservers or setting up your own, knowing how to manage nameservers is important.
With Bluehost’s DNS Manager or your registrar’s tools, you can easily find and update your nameservers. If you set up custom nameservers on Bluehost, you can use a simple nameserver checker to ensure everything is set up correctly.
Need a dependable web host? Explore Bluehost WordPress hosting plans to get started today.
FAQs
A nameserver, also known as a “DNS name server,” translates human-friendly domain names into IP addresses. It acts as a directory, guiding computers, tablets and other devices to the correct location within the Domain Name System (DNS). By responding to queries, nameservers ensure that users can easily access websites using familiar domain names instead of complex numerical addresses.
A domain name server receives a DNS query and responds with the correct IP address. This lets the browser connect to the right web server, ensuring DNS records work properly for websites, emails and online services like subdomains.
DNS is the global protocol that manages how domains map to IP addresses, while nameservers are the specific servers that store and return DNS records. Together, they identify, register and resolve domain name servers so the main domain loads correctly.
A DNS Zone is like a configuration file storing all DNS server for a domain, while a nameserver is the administrator’s server that answers queries. The zone defines and the nameserver delivers, a domain name’s various services worldwide.
TTL (Time to Live) is the cache setting in DNS records that controls how long data is stored before refreshing. Lower TTL updates faster, while higher TTL reduces server queries, improving performance across the world for main domains.
Nameservers are server components of the Domain Name System (DNS). They store and deliver DNS files like A, CNAME and MX records. With nameservers provided by a registrar or host, administrators manage a domain name’s various services across the world.

Write A Comment