
Draft pages in WordPress keep your valuable content hidden, reducing engagement. Unpublished drafts mean visitors miss out on new insights or updates, leading to missed opportunities for interaction and growth. Wondering, ‘How Do Publish My Draft Pages in WordPress?’ Taking this step keeps your site active, relevant, and appealing to readers.
By learning the simple steps to publish drafts, you’ll streamline your content management. This process covers locating drafts, reviewing them for accuracy, and making them live for users. With WordPress’s flexible publishing options, you can control when your content appears, whether immediately or at a scheduled time.
Drafts don’t have to sit in limbo, waiting for the perfect moment. By publishing them strategically, you enhance user experience and improve your site’s performance in search engines.
Publishing drafts doesn’t just update your site; it signals to search engines that your website is active, which can positively impact your SEO. With this guide, you’ll be ready to convert your drafts into engaging live content that keeps your audience coming back for more.
Steps to publish a draft page in WordPress
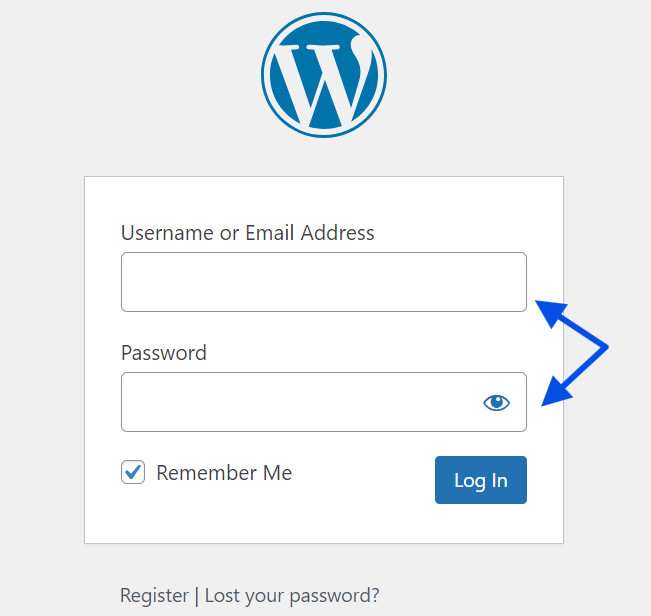
Log in to WordPress
Access the WordPress dashboard. The dashboard is where you’ll manage your pages, blog posts and site content. To begin publishing draft pages, you’ll first need to log in to WordPress. Start by entering your login credentials—your username and password—to access the WordPress dashboard.
Navigate to the pages section
Once logged into your WordPress dashboard, navigate to the Pages section. This is where all your website’s pages are stored, including those in draft status.
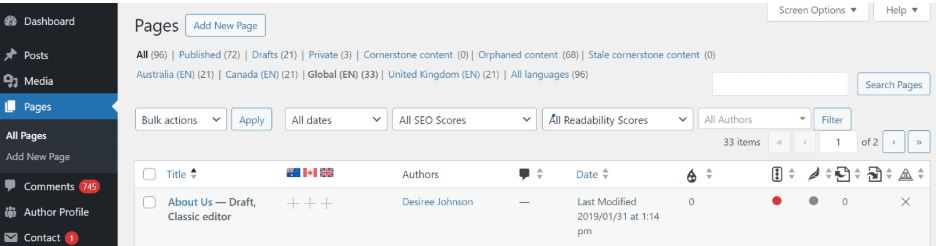
Locate the draft page
In the sidebar menu, select Pages > All Pages. Here, you’ll see a list of published pages, draft pages, and pages pending review. Draft pages are usually labeled as “Draft” next to the title, making them easy to identify.
Locating your draft page in this section is crucial to ensure you’re working on the correct content.

Review and edit the draft
Before publishing, it’s crucial to review the draft. Open the draft in the WordPress editor to check for any necessary edits. Here, you can add images, links, or new content. Make sure the formatting aligns with the rest of your website.
Take advantage of the “Preview” feature to see how the page will look when it is live. It allows you to view the page without publishing it, helping catch any errors before finalizing.
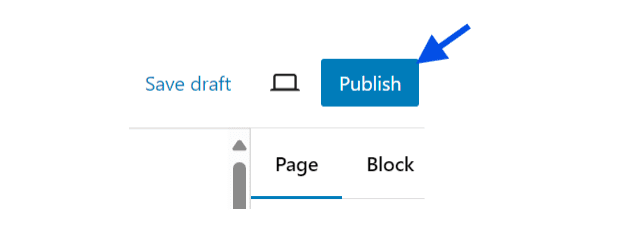
Publish the draft Page
To publish the draft status page, navigate to the “Publish” section in the editor. You can publish the draft immediately, schedule it for a future date, or make it password protected. Choose the “Publish” button. Your content will be published immediately and will be live for users to access.
If you want the page to go live at a specific time, use the “Schedule” feature to set the publication date.
Quick checklist before publishing
Review this checklist before publishing your draft page to ensure it’s fully optimized and ready for visitors:
- Proofread content for grammar and vocabulary to maintain professionalism.
- Ensure all links work correctly and direct users to relevant content.
- Add images and a featured image if needed to make the page visually engaging.
- Verify SEO settings are complete, including a well-written meta description, focus keywords, and appropriate headings.
- Set visibility options (Public, Private, or Password-Protected) based on who should be able to access the content.
- Adjust the publish date if you wish to schedule the page for a future release. Set the desired date and time under the “Publish” section.
- Assign categories and tags if applicable, to organize your content and improve site navigation for a more user-friendly experience, helping visitors easily find relevant topics and information on your site.
- Customize the URL (slug) for a clean, descriptive link that aligns with the page’s content.
- Preview the page to check formatting, layout, and mobile responsiveness before it goes live.
Following this checklist ensures your page is error-free, well-optimized, and ready for publication, making it more effective for both users and search engines.
How do I publish a draft WordPress post?
The process of publishing a draft WordPress post is similar to a page. Follow the steps below to publish draft posts easily.
1. Locate your draft post: Go to Posts > All Posts in your WordPress dashboard. Here, you’ll see posts in different statuses, including draft posts.
2. Edit and review content: Open the draft post in the editor. Edit as needed, ensuring the title, images and content are ready for readers.
3. Add categories and tags: Organize the post by adding appropriate categories and tags. This helps readers navigate your blog post and search engines can better understand your content.
4. Publish or schedule: Click “Publish” for immediate publication, or schedule a date and time. Scheduled posts will automatically publish at your set time.
Using this process ensures your blog posts are ready for readers while maintaining consistency in your website content.
Final thoughts
Publishing drafts in WordPress keeps your website updated and engaging. This guide on “How Do Publish My Draft Pages in WordPress” will help you move draft status content to live content ensuring your site stays fresh, bringing in regular traffic. A reliable hosting provider, like Bluehost, simplifies content management and enhances site performance. With Bluehost, publishing draft posts, scheduling posts and managing WordPress is easy and streamlined.
FAQs
Go to the page editor, change the Status from “Published” to “Draft,” and click Save. This removes the page from public view.
Yes. You can enhance your draft’s SEO by optimizing the title, adding meta descriptions, and incorporating keywords naturally into the content. Many plugins, like Yoast SEO, offer guidance on improving SEO aspects directly from your WordPress dashboard, making it easy to boost visibility even before publishing.
Yes. A missing meta description may impact search engine visibility. Add an optimized meta description for better SEO results.
Clear your browser cache or website cache if using a caching plugin. This action helps show the latest updates on your site.


Write A Comment