
Key highlights
- Optimising images improves website speed, user experience and SEO by reducing file sizes without sacrificing quality.
- Photoshop and GIMP provide powerful tools for resizing, compressing and optimising images for the web.
- Choosing the right file format—JPEG, PNG or WebP—helps achieve the best balance between quality and loading speed.
- Using smart resampling techniques and proper compression settings ensures minimal quality loss while reducing file size.
- Resized and compressed images improve website performance by lowering page load times and reducing bandwidth usage.
Did you know that images make up nearly half of what your browser loads on most websites? Most of these are raster images, which can be optimised for faster loading.
Heavy, unoptimised images slow down your site, frustrate visitors and harm your search rankings. You need simple image optimisation to solve this problem. The good news?
GIMP resize image tools can dramatically improve your site’s loading speed – and they’re completely free.
This guide walks you through how to resize and compress images using both Photoshop and GIMP. First, you’ll learn professional techniques using Adobe’s powerful subscription-based tool.
We’ll then show you how to utilise the free GIMP resize image capabilities in this open-source alternative to optimise your images for the web without compromising quality.
How to resize an image in Photoshop
Resizing images correctly in Photoshop helps you optimise your website performance while maintaining visual quality. You need properly sized images to improve page load times and create a better user experience.
Here’s a step-by-step guide to resizing your images in Photoshop:
- Open the image in Photoshop
- Access the Image Size dialog
- Set the correct resolution
- Adjust dimensions with smart resampling
- Save with web optimisation
There’s no magic shortcut to resize images without some quality loss. However, Photoshop’s powerful tools help minimise degradation when used correctly.
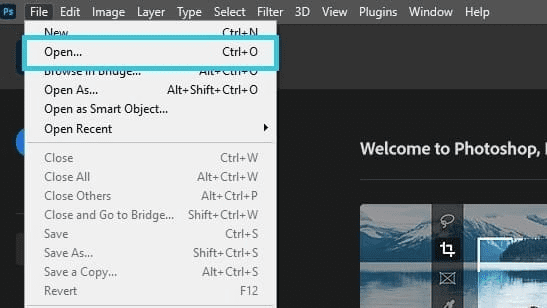
Step 1: Open the image in Photoshop
Open your image by navigating to ‘File’ > ‘Open’ in the top menu bar. You can also use the keyboard shortcut ‘Ctrl+O’ (Windows) or ‘Command+O’ (Mac).
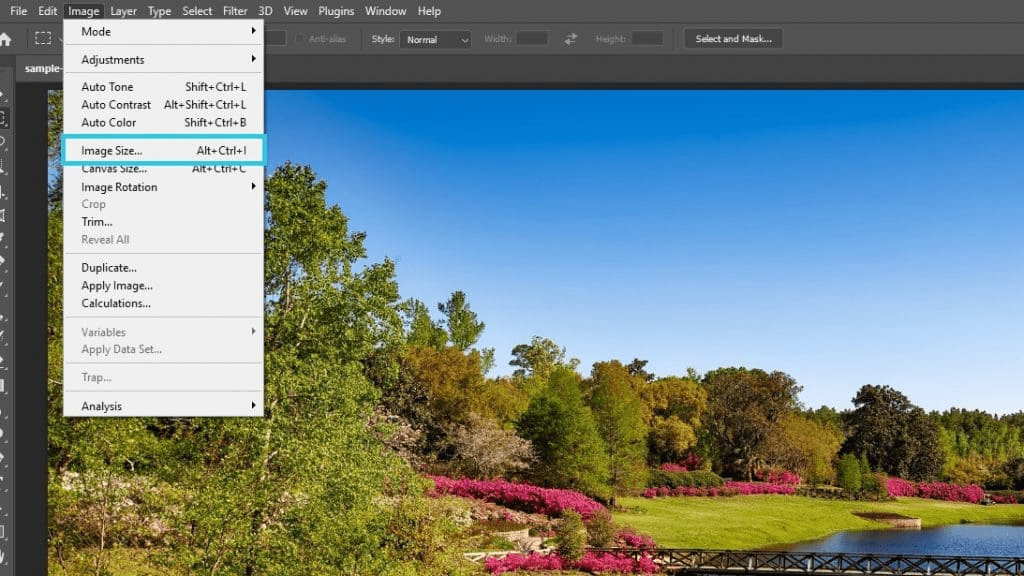
Step 2: Access the image size dialog
Go to ‘Image’ > ‘Image Size’ from the top menu. This launches the Image Size dialog box where you’ll make all your adjustments. The keyboard shortcut ‘Ctrl + Alt + I’ (Windows) or ‘Option+Command+I‘ (Mac) works too.
Step 3: Set the resolution
For web images, set the resolution to 72 pixels per inch (ppi). This standard web resolution balances quality and file size perfectly. Higher resolutions like 300 ppi are only necessary for printing.
Keep in mind that lower resolution means faster loading times for your website visitors. This directly impacts your SEO performance since page speed is a key ranking factor.
Also read: 5 Ways To Fix Your Website Speed
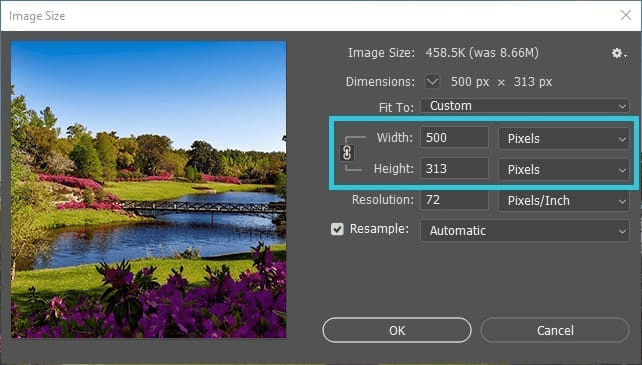
Step 4: Adjust dimensions with smart resampling
Select ‘Pixels’ as your unit of measurement from the dropdown menu. This helps you manually adjust pixel dimensions to suit your website layout. Setting the new image size properly ensures optimised performance without distortion.
The chain icon between width and height values represents the ‘Constrain Proportions’ option. When activated, changing one dimension automatically adjusts the other proportionally to prevent distortion.
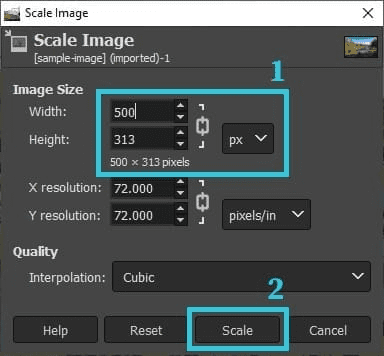
For example, if your original image is 2200px × 1376px and you set the width to 500px, the height automatically adjusts to 313px to maintain the correct aspect ratio.
To maintain the highest possible quality when resizing, use Photoshop’s smart resampling options:
- Select ‘Automatic’ from the Resample dropdown for most images
- Choose ‘Preserve Details 2.0’ for photos being significantly downsized
- Use ‘Bicubic Sharper’ when reducing image size for extra crispness
These intelligent algorithms analyse your image data to preserve details and clarity during the resizing process.
When finished with your adjustments, click ‘OK’ to apply the changes.
Also read: Best Image Size for Websites + How To Optimize Them
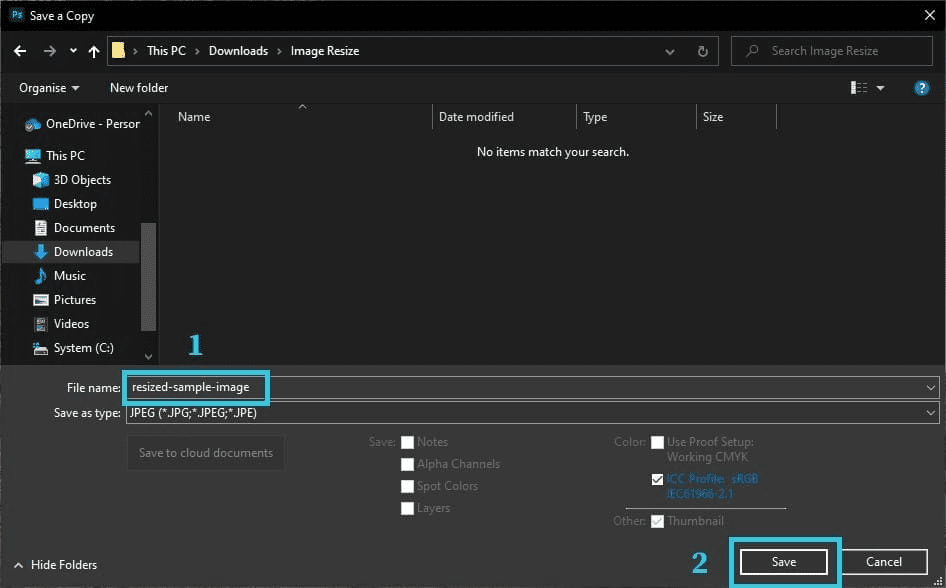
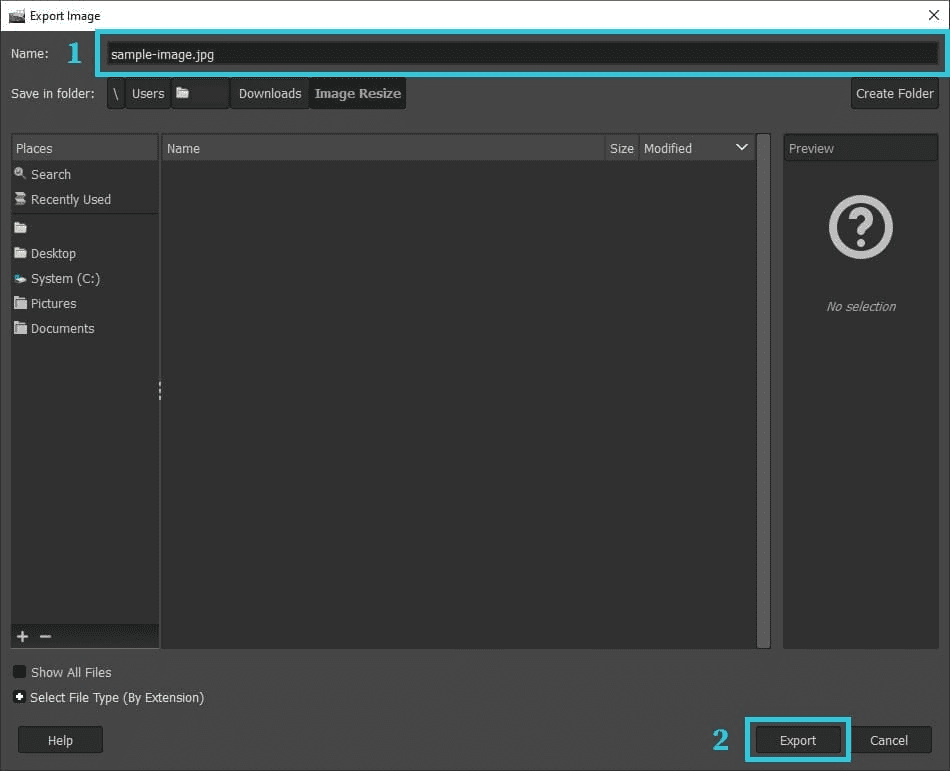
Step 5: Save with web optimisation
To optimise your resized image for web use:
- Go to ‘File’ > ‘Export’ > ‘Save for Web (Legacy)’ or use the shortcut ‘Alt+Shift+Ctrl+S’ (Windows)/‘Option+Shift+Command+S’ (Mac)
- Select the ‘JPEG’ format for photographs or ‘PNG-8’ for graphics with transparency
- Adjust the quality setting to find the sweet spot between file size and visual quality
- For JPEG, a setting between 60-80% usually offers the best balance
- Preview the optimisation in the 2-Up view to compare quality differences
- Check the final file size in the bottom left corner
- Click ‘Save’ and choose a descriptive filename that helps with SEO
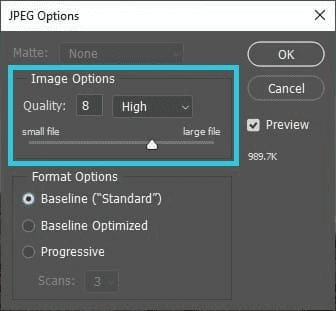
When saving JPEGs through the standard ‘File’ > ‘Save As’ method, you’ll see the JPEG Options dialog. Here you can also adjust quality settings with the slider.
For the fastest website performance, aim for image file sizes under 200KB whenever possible. Your Bluehost hosting includes performance tools that work best with properly optimised images.
Remember to save your original file separately before exporting the web-optimised version. This lets you edit the full-quality version later if needed.
How to compress an image in Photoshop
Compressing images properly is essential for website speed and performance. You can significantly reduce file sizes while maintaining visual quality with Photoshop’s compression tools. Let’s explore how to optimise your images effectively.
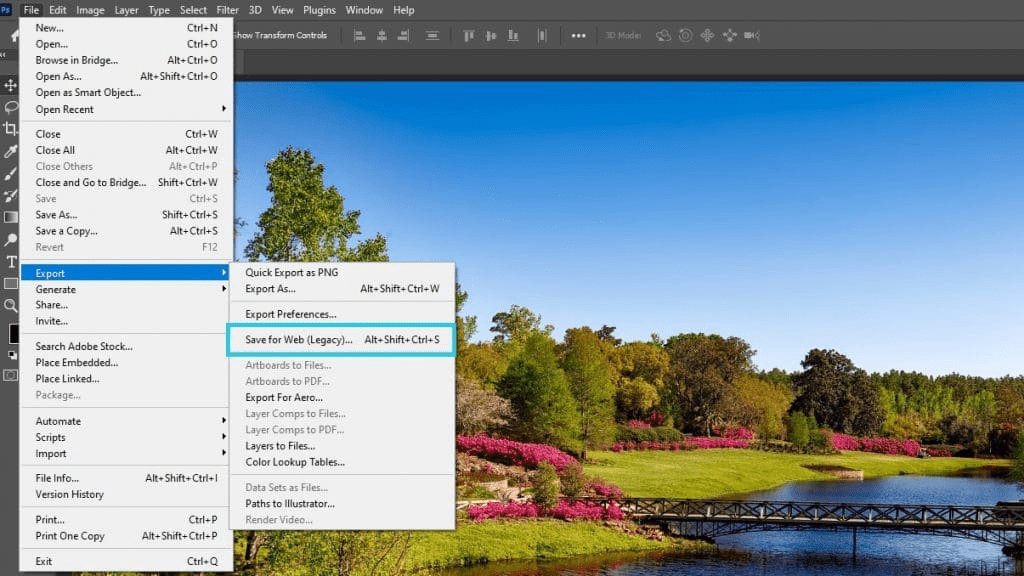
Using ‘save for web’ for optimised compression
Photoshop provides powerful compression options through its Export features. Here’s the step-by-step process:
- Open your image in Photoshop by navigating to ‘File’ > ‘Open’ in the top menu bar.

- Access the compression tool by going to ‘File’ > ‘Export’ > ‘Save for Web (Legacy)’. You can also use the keyboard shortcut ‘Alt+Shift+Ctrl+S’ (Windows) or ‘Option+Shift+Command+S’ (Mac).
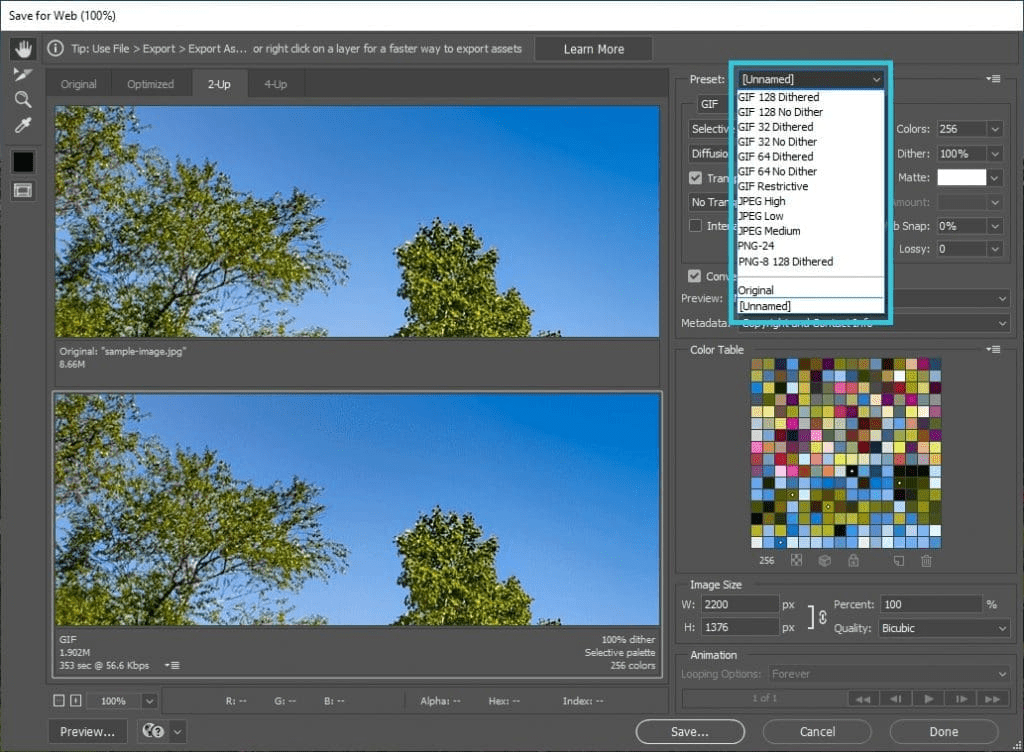
- The Save for Web dialog offers multiple preview options. Select the ‘2-Up’ or ‘4-Up’ view at the top of the dialog box to compare your original image with different compression settings side-by-side. This visual comparison helps you find the perfect balance between quality and file size.
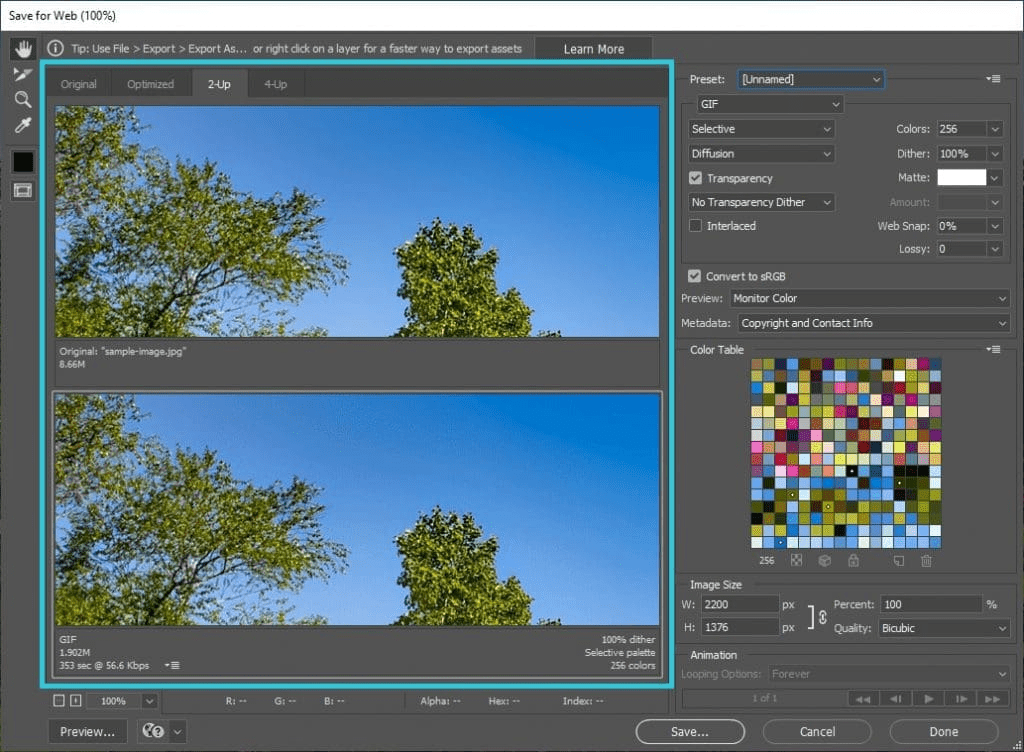
- Adjust compression settings using the preset options or manual controls in the right panel. The Quality slider provides precise control over the compression level.
Choosing the right format (JPEG vs PNG vs WebP)
Different image formats serve different purposes. Selecting the right one dramatically impacts your file size:
JPEG
- Best for photographs and complex images with many colours
- Supports variable compression levels (Low, Medium, High)
- Doesn’t support transparency
- Use when file size is your primary concern
PNG
- Ideal for graphics, logos and images with transparency
- PNG-8: Limited to 256 colours, great for simple graphics
- PNG-24: Supports millions of colours but creates larger files
- Use when you need transparency or precise colour reproduction
WebP
- Modern format with superior compression
- Supports both lossy and lossless compression
- Offers transparency with smaller file sizes than PNG
- Increasingly supported across all major browsers
- Export via ‘File’ > ‘Export’ > ‘Export As’ and select ‘WebP’
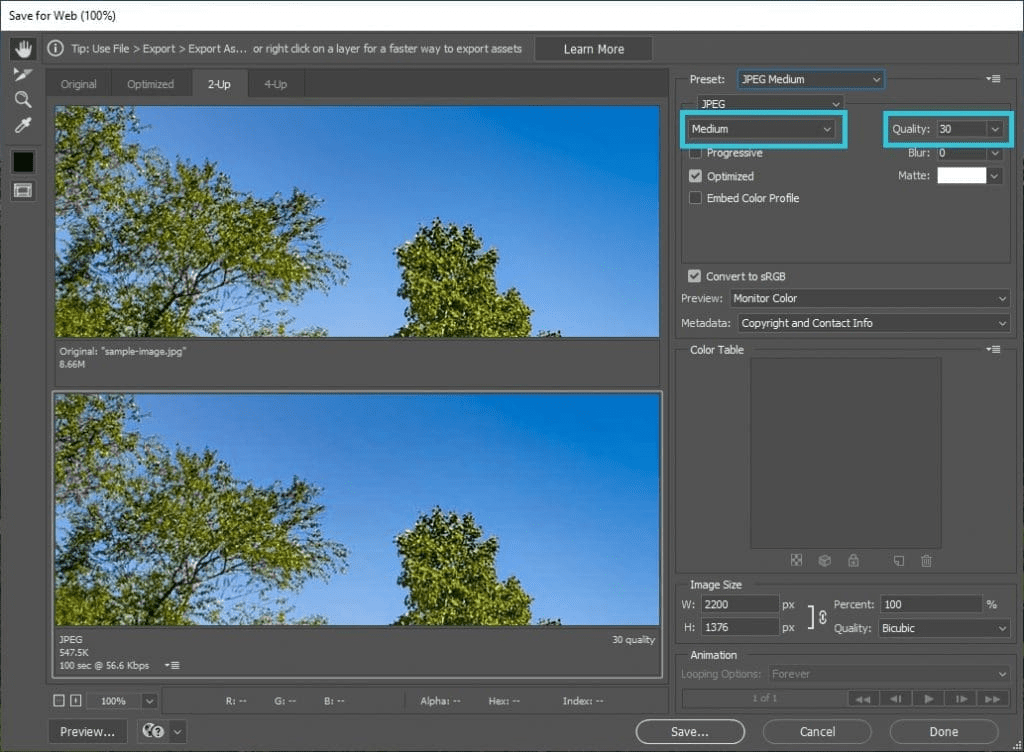
When using the Save for Web dialog, select your desired format from the preset dropdown menu. For JPEG, you can choose between Low, Medium and High quality presets or create your custom settings.
Balancing image quality & file size for faster loading
Finding the optimal balance between visual quality and file size requires some experimentation:
- For JPEGs, start with a quality setting of around 60-70%. This often provides the best compromise between file size and visual appearance.
- Watch the file size indicator at the bottom of the Save for Web dialog. For optimal website performance, aim for:
- Hero images: Under 200KB
- Standard content images: Under 100KB
- Thumbnails: Under 30KB
- Enable the ‘Optimise’ checkbox to further reduce file size without additional quality loss.
- Consider using ‘Progressive’ for JPEGs. This allows the image to load gradually, improving perceived loading speed for your visitors.
- Remove unnecessary metadata by unchecking ‘Include XMP’ and other metadata options unless specifically needed.
- For text-heavy images or graphics with sharp edges, try the “Sharpen” option (between 15-25%) to maintain clarity at lower quality settings.
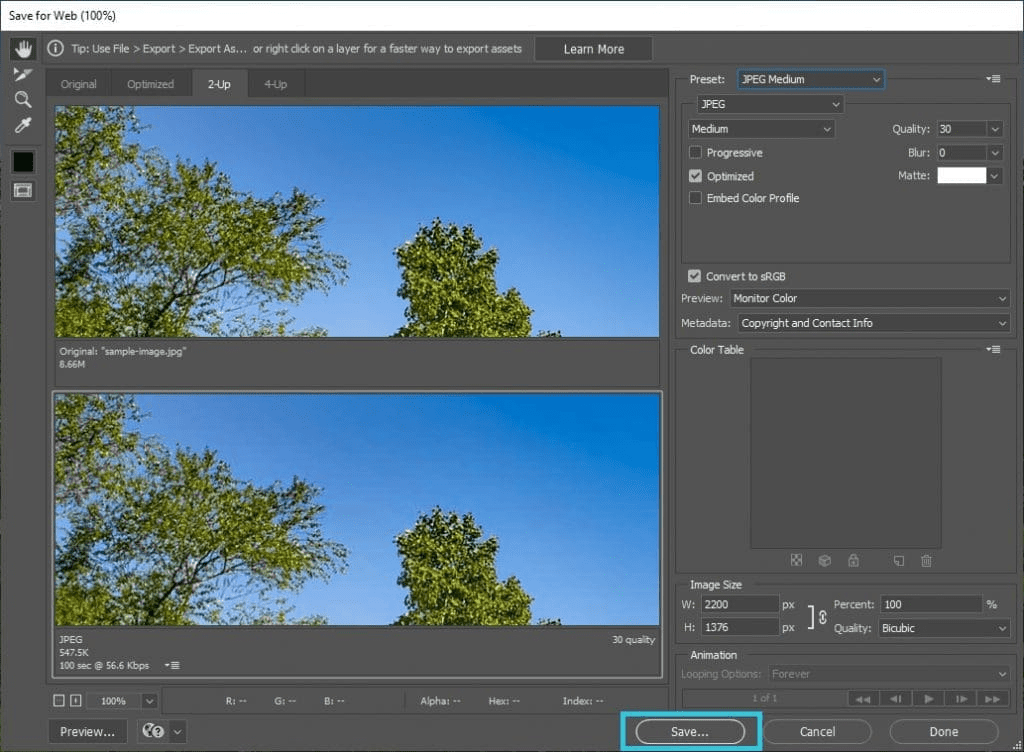
After finding your optimal settings, click ‘Save’ and choose an appropriate location on your computer. You should pick a descriptive file name that includes relevant keywords, so search engines understand your image. This drives more traffic and helps people discover your image faster.
Website hosting and image optimisation go hand in hand for peak performance. When your optimised images are uploaded to a quality hosting platform, you’ll see even better results.
For additional performance benefits, Bluehost provides server-level caching and built-in CDN support, which improves loading speeds without compromising quality.
WordPress users can also install Smush or Imagify, two popular image optimisation plugins that work seamlessly with Bluehost WordPress hosting plans. These tools reduce file sizes and enhance website performance without manual adjustments.
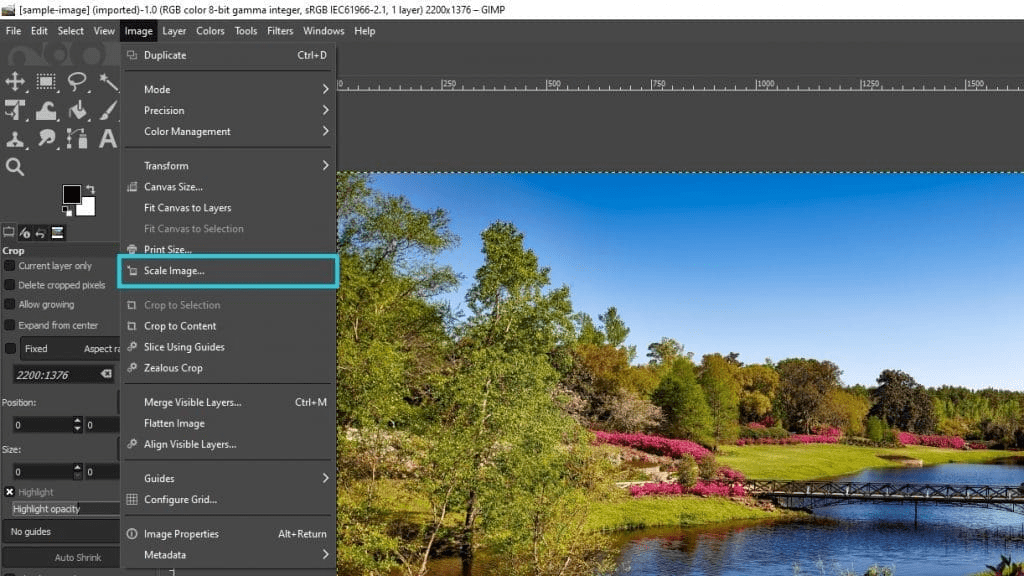
How to GIMP resize image for optimal results
GIMP (GNU Image Manipulation Program) offers you powerful image editing capabilities completely free. This open-source alternative to Photoshop provides excellent GIMP resize image tools that deliver professional results without subscription costs.
Using the GIMP scale image tool
Ensure you’re working on the active layer before applying the scale tool to avoid unintentional changes. Resizing your images in GIMP is straightforward, thanks to its dedicated scaling tool.
Here’s how you can use it effectively:
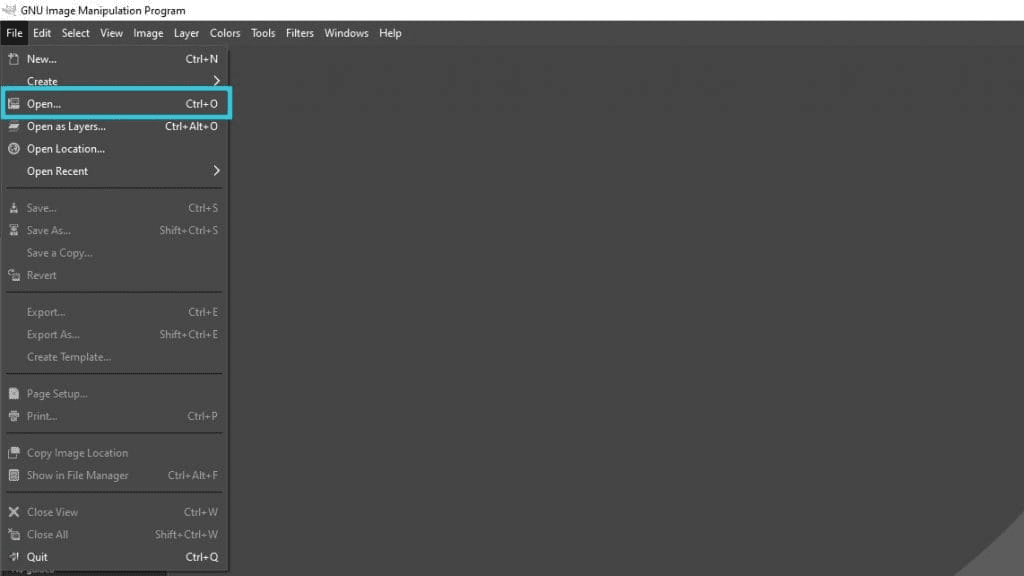
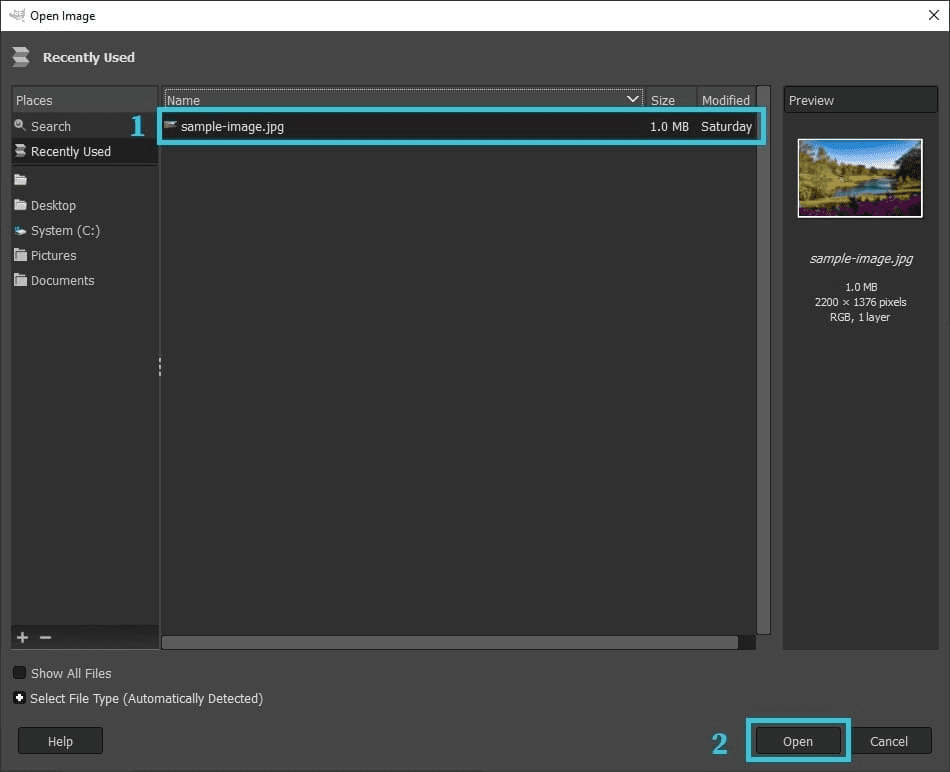
- Start by opening your image in GIMP. Navigate to ‘File’ > ‘Open’ from the top menu, then select your image and click ‘Open’. You can also simply drag and drop any image directly into the GIMP workspace. This places the image on the image canvas, ready for editing or scaling.
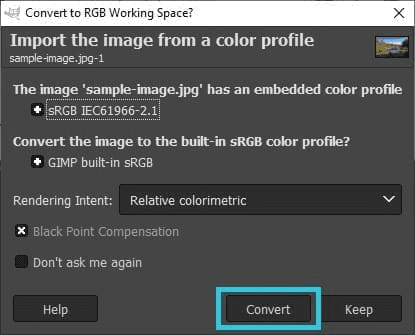
- When working with files that have embedded colour profiles, GIMP will prompt you with options for the profiles. Select ‘Convert’ to use GIMP’s built-in sRGB profile for web compatibility, or choose ‘Keep’ to maintain the original profile if you’re working on print projects.

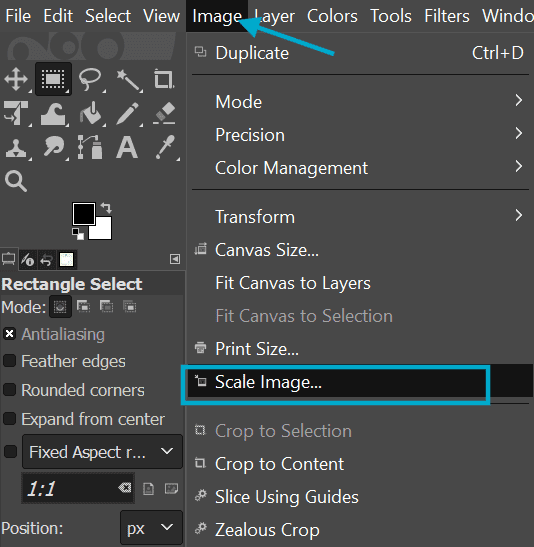
- Access the GIMP scale image tool by going to ‘Image’ > ‘Scale Image’ in the top menu bar. GIMP’s scale tool provides a comprehensive resizing dialog where you’ll make all your adjustments. The scale tool is essential when you need to resize images without losing clarity.
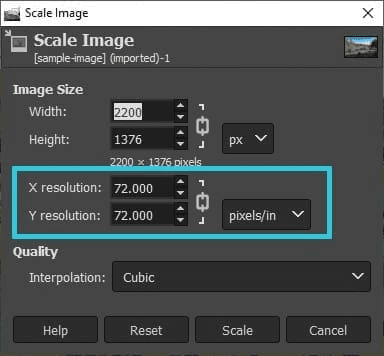
- The Scale Image dialog displays your current dimensions, including exact pixel dimensions for width and height. It provides options for precise resizing. You’ll see fields for Width, Height, X resolution and Y resolution that you can modify to achieve your desired results. Once you’ve entered your new dimensions, click ‘Scale’ to apply the changes.
If resizing multiple images, consider automating the scale tool through batch scripts. Furthermore, always preview your new image size in the dialog box to assess the impact.
Adjusting DPI and resolution for print & web
Setting pixel dimensions correctly ensures the image fits well on screen and loads quickly. Resolution settings in GIMP help you control both screen display and print quality:
- For your web images, set the X and Y resolution values to ’72 pixels/inch’. This standard web resolution optimises your file size while maintaining sufficient quality for digital displays.
- For your print materials, use higher resolution settings:
- Standard print: 150-300 pixels/inch
- High-quality print: 300-600 pixels/inch
- Professional photography: 600+ pixels/inch
- Make sure you set the resolution unit properly in the dropdown menu beside the resolution fields. Select ‘pixels/in’ for standard DPI measurements.
- GIMP resize image quality depends on the interpolation methods you choose in the Quality section. For most of your resizing operations:
- Choose Cubic for general-purpose resizing
- Use NoHalo for sharper results when reducing image size
- Select LoHalo for smoother results when enlarging images
- The chain icon between the Width and Height values controls the Constrain Proportions feature. Keep this linked to maintain your image’s original aspect ratio and prevent distortion. If you need to deliberately change proportions, click the chain to break the link.
Exporting your resized images in the best format
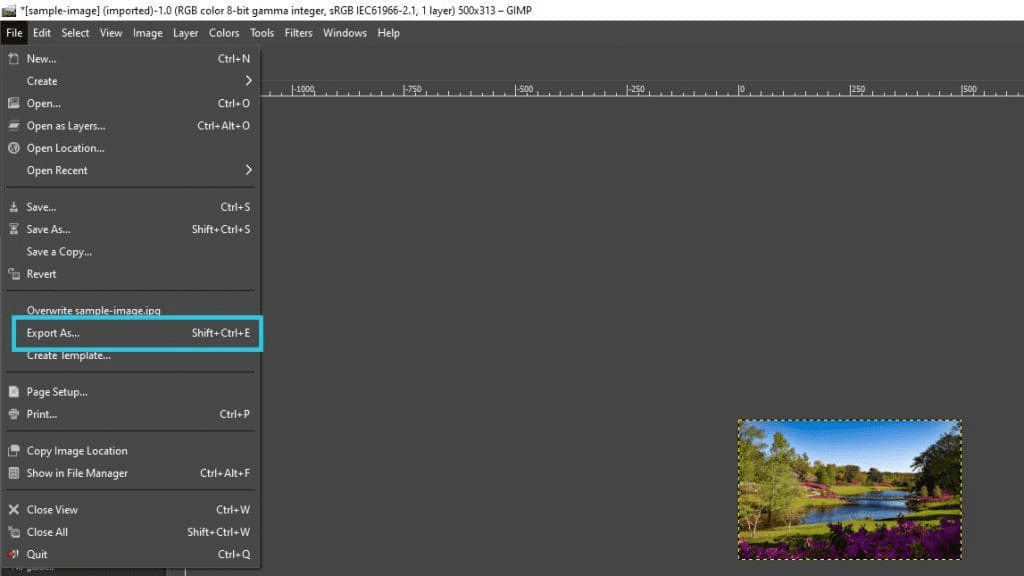
GIMP saves your projects in its native XCF format, which preserves layers and editing capabilities. To create web-ready images after you GIMP resize image dimensions, you’ll need to export your work:
- After resizing, go to ‘File’ > ‘Export As’ to save your image in a web-compatible format.
- Choose the appropriate format based on your image content:
- JPEG (.jpg): Best for your photographs and complex images with many colours
- PNG (.png): Ideal for your graphics with transparency, logos or illustrations
- WebP (.webp): Modern format with excellent compression and quality for your web images
- GIF (.gif): For your simple animations or images with very few colours
- Add a descriptive filename that helps with your SEO and click ‘Export’.
- Format-specific options will appear:
- For JPEG: Adjust the Quality slider between 75-90% for your web images (lower values create smaller files but reduce quality)
- For PNG: Choose your compression level and colour depth
- For WebP: Set your quality level or lossless compression
- Consider enabling the ‘Show preview in image window’ checkbox to see how compression affects your image quality in real-time.
- Click ‘Export’ to finalise and save your optimised image.
For batch processing multiple images at once, you can use GIMP’s script-fu capabilities through the ‘File’ > ‘Batch Process’ feature, allowing you to GIMP resize image entire folders with consistent settings.
Remember that proper image sizing directly impacts your website’s performance.
Also read: How to Optimize Images: Bitmapped Graphics and Resizing
How to compress an image in GIMP
Compressing your images properly is essential for maintaining a fast-loading website. GIMP offers powerful compression capabilities that help you reduce file sizes while preserving visual quality. Let’s explore how you can optimise your images for the web.
Reduce file size without losing image clarity
Image compression doesn’t have to mean sacrificing quality. Use the scale tool first to ensure dimensions are appropriate before compressing. Before compressing, you can also crop unnecessary areas using the rectangle select tool to further reduce file size
Moreover, you can effectively reduce your file sizes while maintaining visual clarity with GIMP scale image and compression techniques:
- First, open your image in GIMP by going to ‘File’ > ‘Open’. Locate the image you want to compress from your computer and click ‘Open’.
- If your image contains an embedded colour profile, GIMP will prompt you to convert it to the program’s built-in sRGB profile. Choose ‘Keep’ to maintain the original profile’s colour accuracy or select ‘Convert’ if you’re specifically optimising for web display.
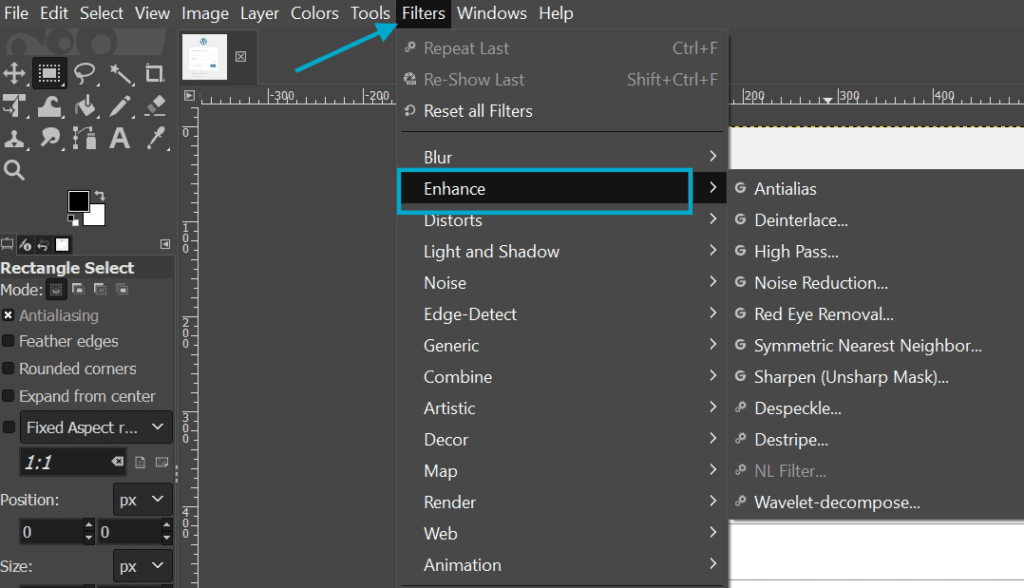
- Before compression, consider making any necessary adjustments to your image. You can enhance sharpness using ‘Filters’ > ‘Enhance’ > ‘Unsharp Mask’ to compensate for potential detail loss during compression.
- For the best compression results, use GIMP resize image functionality first if your dimensions are larger than needed. Access this via Image > Scale Image before applying compression.
Adjust compression levels for web optimisation
The key to effective compression is finding the perfect balance between file size and visual quality after using GIMP scale image dimensions:
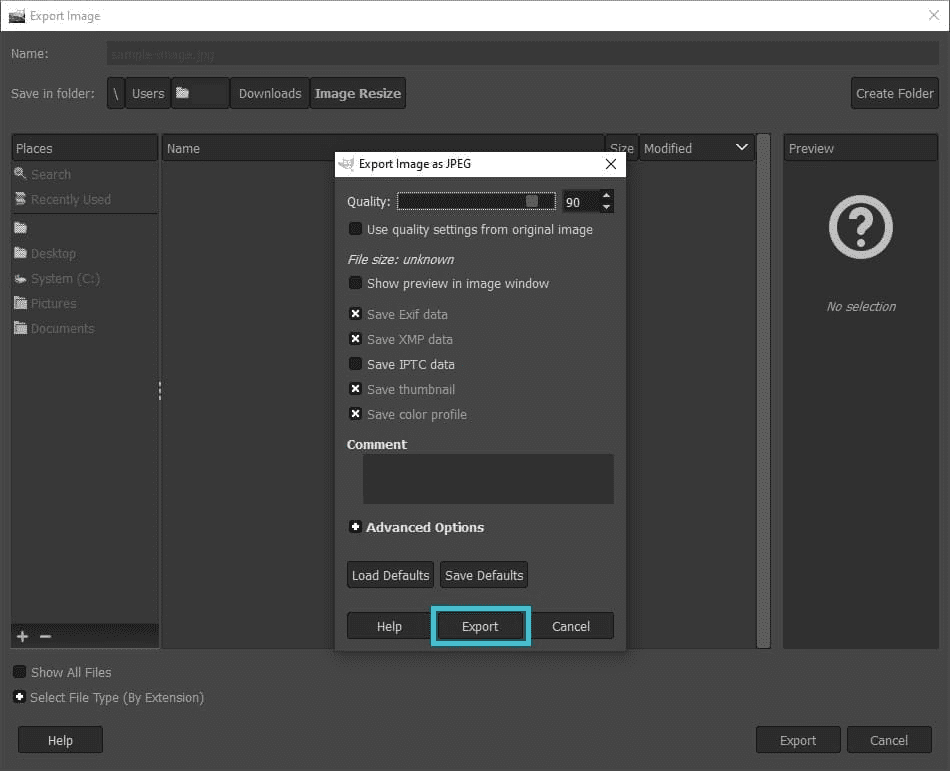
- When you’re ready to compress your image, go to ‘File’ > ‘Export As’ in the top menu bar.
- In the Export Image dialog, choose your save location, give your file a descriptive name that helps with SEO and click ‘Export’.

- For maximum compression control with JPEG files, check the ‘Show preview in image window’ checkbox in the JPEG export dialog. This feature lets you see quality changes in real time.
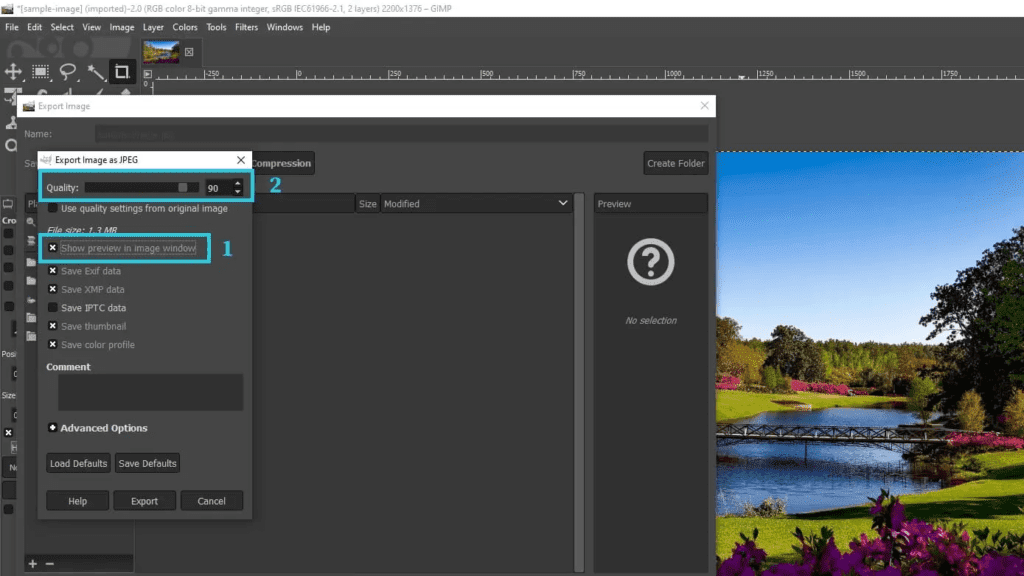
- Adjust the Quality slider to find your optimal setting:
- Quality 85-100: Use for professional photography where detail is crucial
- Quality 70-85: Ideal for most web images with a good balance of quality and size
- Quality 50-70: Suitable for thumbnails or background images where some quality loss is acceptable
- As you adjust the quality, pay close attention to both the image preview and the file size indicator. The goal is to find the lowest quality setting that still maintains an acceptable visual appearance.
- For images with text or sharp edges, maintain a higher quality setting to preserve readability and definition.
Save in WebP format for faster load speeds
WebP is a modern image format developed by Google that offers superior compression:
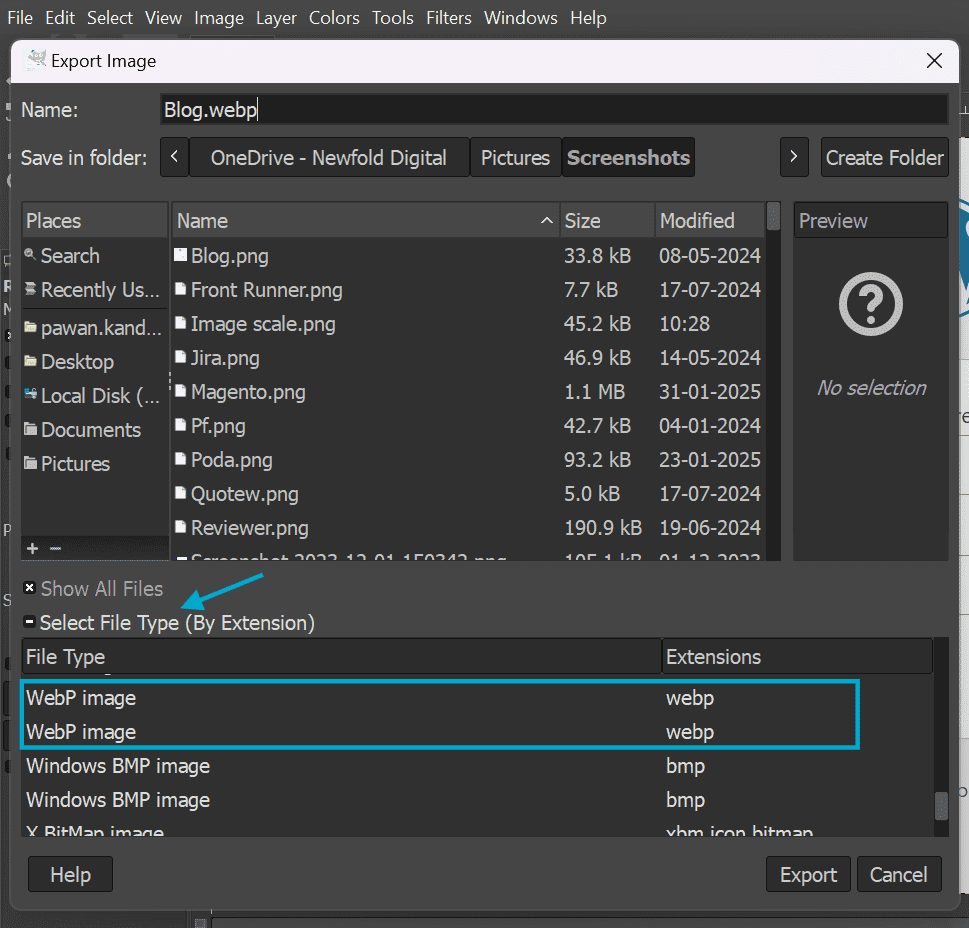
- To save your image in WebP format, go to ‘File’ > ‘Export As’ and change the file extension to .webp in the name field.
- Alternatively, you can click on ‘Select File Type’ at the bottom of the export dialog and choose ‘WebP image’ from the list of formats.
- When exporting as WebP, you’ll have access to additional options:
- Choose between Lossless compression (higher quality but larger files) or Lossy compression (smaller files with some quality reduction)
- For lossy compression, adjust the quality slider similar to JPEG
- Enable Save transparent pixels if your image contains transparency
- WebP typically achieves 25-35% smaller file sizes compared to JPEG at equivalent visual quality, making it an excellent choice for optimising your website speed.
- Before committing to WebP, check your analytics to ensure your audience uses browsers that support this format. Most modern browsers support WebP, but some older versions may not.
Manually optimising images in GIMP, combined with Bluehost’s caching and CDN features, ensures the best possible website performance. This approach reduces load times, improves user experience and enhances SEO.
Also read: WordPress Caching: How to Setup and Clear Your WordPress Cache
Key benefits of resizing images for the web
- Faster page loads: Smaller images reduce bandwidth usage and improve loading speed across devices
- Better SEO performance: Optimised images improve Core Web Vitals, boosting search engine rankings
- Improved mobile experience: Resized images display properly on smaller screens without layout shifts
- Reduced server load: Lower file sizes decrease server strain, especially on shared hosting plans
- Maintained visual quality: Smart compression preserves sharpness and color even at smaller dimensions
- Cross-platform compatibility: Properly sized and formatted images work across all major browsers and CMS platforms
- More storage efficiency: Smaller files save hosting space and speed up backups
- Enhanced user retention: Fast-loading, visually consistent pages reduce bounce rates and improve engagement
Final thoughts
Properly resizing and compressing your images is essential for maintaining a fast, user-friendly website. Both Photoshop and GIMP’s image resizing tools offer powerful options to optimise your images while preserving quality. Remember to consider your audience’s devices when determining dimensions and resolution.
Use 72 ppi resolution for web images and aim for 640–750 px widths on mobile. Keep file sizes under 200KB when possible. In addition, use the right format for each image type – JPEG for photos, PNG for graphics with transparency and WebP for the best overall compression.
The techniques covered in this guide will help you find the perfect balance between image quality and loading speed, directly improving your website’s performance and SEO rankings.
Ready to put your optimised images to work on a lightning-fast website? Choose Bluehost for reliable WordPress hosting with built-in performance tools that complement your image optimisation efforts.
FAQs
To resize an image in GIMP, go to ‘Image’ > ‘Scale Image’. Enter your new dimensions in pixels and set the resolution to 72 pixels per inch for web use. Make sure to choose Cubic or NoHalo as your interpolation method to retain image clarity during the resizing process.
To compress an image in GIMP, use ‘File’ > ‘Export As’, then choose JPEG or WebP. Adjust the quality slider to between 70–85 for a good balance of size and clarity. This is the most efficient GIMP compress image method for websites.
In GIMP’s Scale Image dialog, make sure the chain icon between Width and Height is linked. This ensures proportions are locked, so your enlarged image or reduced one won’t be distorted. Scaling maintains both original size integrity and layout consistency on the canvas.
In GIMP, both terms often refer to changing image dimensions. However, scaling focuses on pixel dimensions and image quality, while resizing can also apply to canvas changes. The resize image in GIMP process often includes adjusting DPI and selecting the right file format for output.
Setting resolution to 72 pixels per inch (ppi) is ideal for screen displays. This setting keeps file sizes low without compromising quality. For print, higher DPI like 300 ppi is recommended. Always choose based on where your image will appear—screen or print.
After resizing via Scale Image, go to ‘File’ > ‘Export As’ and save your file as .webp. Choose ‘lossless’ or ‘lossy compression’ based on your needs. This GIMP compress image technique delivers smaller file sizes with good quality, making it perfect for modern websites.
Yes. Use ‘Image’ > ‘Canvas Size’ to change the canvas dimensions independently of the image. This is helpful when you want to add margins, padding or frame elements around your design without scaling the original size of the image content.
Use the Scale Image feature to reduce dimensions in pixels, then compress using ‘Export As’ > ‘JPEG’ or ‘WebP’. Lower the quality slider while using the real-time preview. Keeping hero images under 200KB improves site load speed and SEO.
Use Cubic for general resizing, NoHalo for downsizing sharp graphics and LoHalo when enlarging images. These options during scale image operations help preserve detail and clarity.
Yes. GIMP is an excellent free tool to resize image in GIMP, compress images using advanced export settings and even batch process folders. It’s ideal for users who want quality web-optimised images without paying for Photoshop.
The scale image dialog in GIMP (found under ‘Image’ > ‘Scale Image’) allows you to adjust pixel dimensions, set image resolution and select interpolation methods. This is your main tool for resizing while preserving visual quality.
Yes. Increasing image resolution during image enlargement can lead to blurriness if there isn’t enough original data. Use GIMP’s scale tool with NoHalo or LoHalo methods for the best results when increasing image scale for print or large displays.
To resize using the scale tool, go to ‘Image’ > ‘Scale Image’. In the scale image dialog, input your desired width and height in pixels, then select the proper interpolation (e.g., Cubic). Adjust the image resolution to 72 ppi for web or 300 ppi for print. This keeps your resized image sharp and optimised.
The image scale directly impacts clarity—especially when enlarging images. In GIMP, use the scale image dialog to adjust size and image resolution accurately. For best results, apply the scale tool with high-quality interpolation like LoHalo to minimise quality loss during enlargement.

Write A Comment