Microsoft Outlook 2007 Email Application for Windows
This guide will show step-by-step instructions for setting up email on Outlook 2007 for Windows. While it can be used for other versions of Outlook, some screens and steps might vary.
Add a New Account
- On your computer, open Microsoft Outlook 2007.
- Go to Tools > Account Settings...
- Click the New... button in the upper left-hand corner of the Email tab.
- Choose Manually configure server settings or additional server types, and click Next.
- Select Internet Email, and click the Next button.

Account Settings
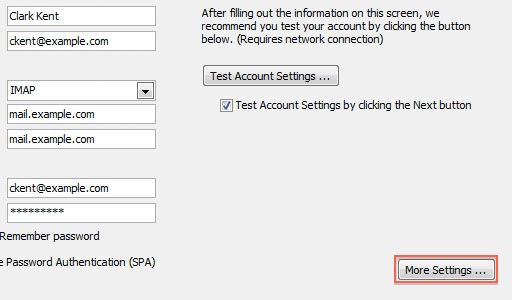
Enter the details in each field on the screen:
- Your Name: Enter your name as you want it to appear on your outbound email messages.
- Email Address: Your email address.
- Account Type: IMAP or POP3. We recommend IMAP.
- Incoming Mail Server: mail.example.com, replacing example.com with your domain name.
- Outgoing Mail Server: mail.example.com, replacing example.com with your domain name.
- User Name: Your email address.
- Password: Your email account password.
More Settings
- Click More Settings.
- Go to the Outgoing Server tab.
- Check the "My outgoing server (SMTP) requires authentication" checkbox.
- Ensure that you're using the same settings as your incoming mail server.
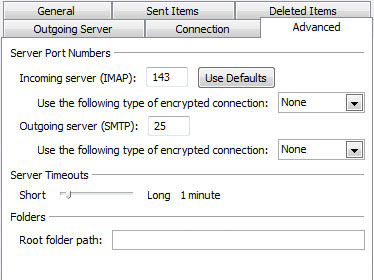
- Go to the Advanced tab.
- For IMAP with SSL*, change the following settings:
- Incoming Port: 993
- Outgoing Port: 465
- SSL: SSL/TLS
- Authentication: Normal password
- Click the OK button.
- Click the Next button and then click Finish to complete the email account setup.
For other configuration settings, check Email Device Setup in your Email Manager, or refer to our How To Setup Email Account - Client Setup SSL/TLS Settings - POP & IMAP article.
You're done! Outlook 2007 is now correctly configured to send and receive emails.
Related Articles
If you need further assistance, Bluehost Chat Support is available 24 hours a day, 7days a week while Bluehost Phone Support is available 7 days a week from 7 am-12 midnight EST.
- Chat Support - While on our website, you should see a CHAT bubble in the bottom right-hand corner of the page. Click anywhere on the bubble to begin a chat session.
- Phone Support -
- US: 888-401-4678
- International: +1 801-765-9400
You may also refer to our Knowledge Base articles to help answer common questions and guide you through various setup, configuration, and troubleshooting steps.
Did you find this article helpful?