How to Upload an SSL Certificate in SiteLock
Configuring SSL alongside SiteLock is an effective way to boost your website’s security and overall performance. Bluehost provides both SSL Certificates and SiteLock services, which work together to protect your site and keep data encrypted. Still, it’s important to set them up correctly, as misconfigured SSL settings can sometimes interfere with the SiteLock CDN or firewall.
In this guide, we’ll walk you through the steps for configuring SSL with SiteLock so you can keep your website secure while ensuring everything runs efficiently.
To configure SSL with SiteLock CDN, you will need to do the following:
How to Find Your SSL Information and Format It Properly for SiteLock
To configure your SSL Certificate for use with the SiteLock CDN, start by downloading your .crt and .rsa keys from cPanel. After obtaining these files, convert them into a format that SiteLock supports. These converted files are required when setting up your SSL Certificate within the SiteLock CDN environment.
Step 1: Get your SSL Info from cPanel
To get your SSL Certificate info:
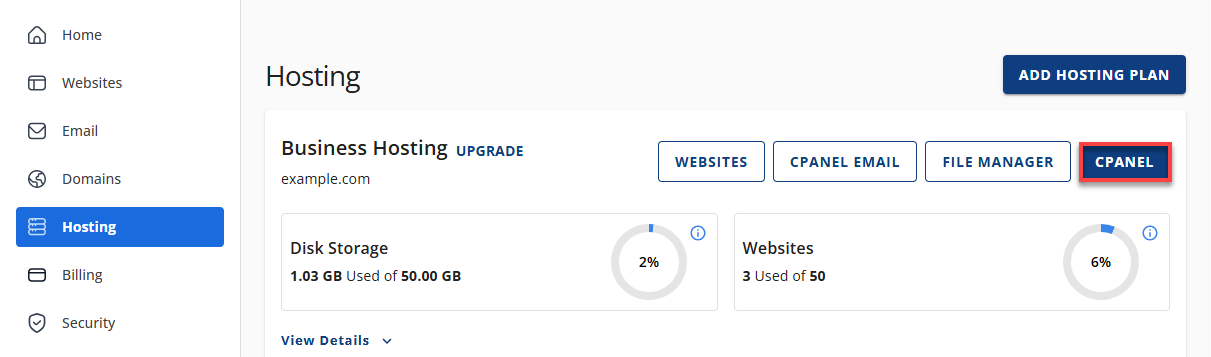
- Log in to your Bluehost Portal.
- Click Hosting in the left-hand menu.
- In the hosting details page, click the cPanel button.
- Your cPanel will open in a new tab.
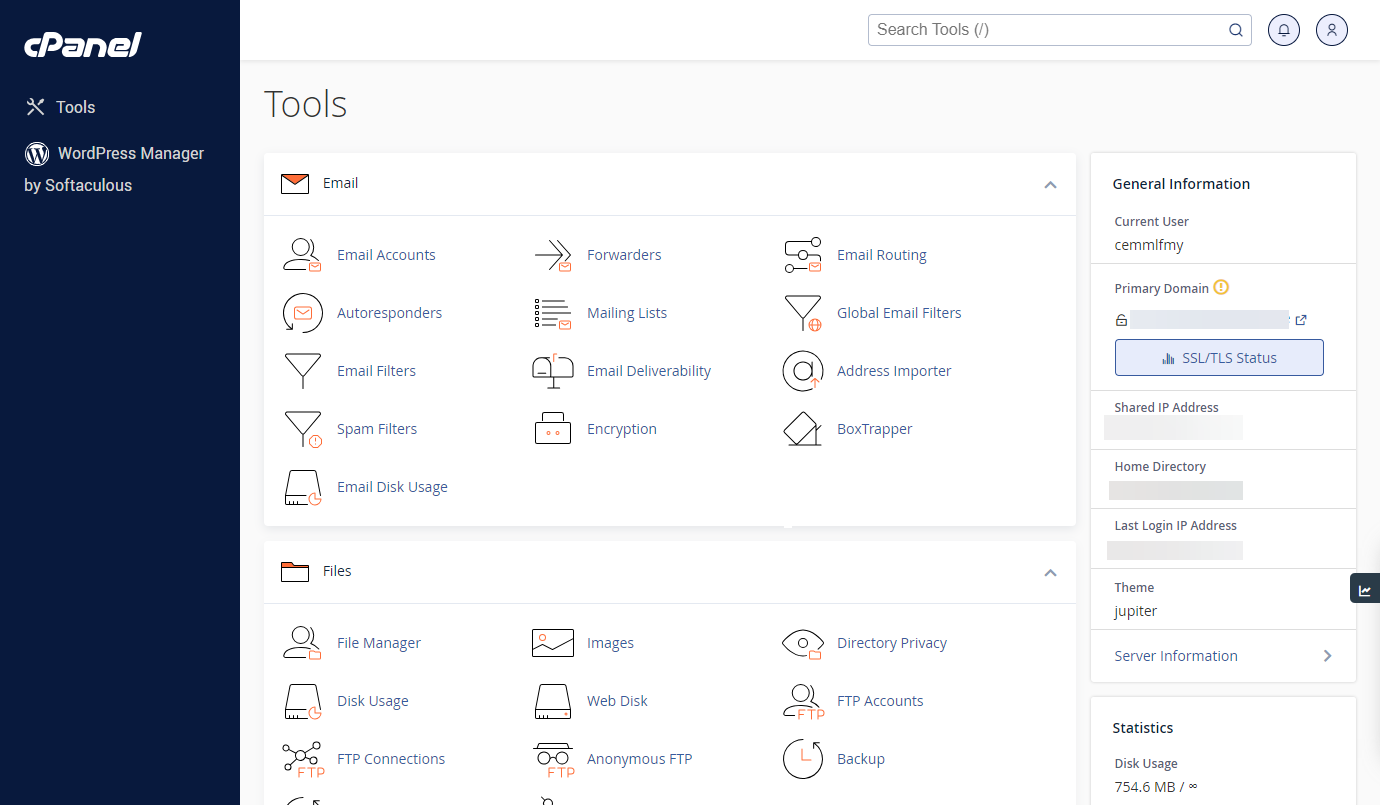
- In cPanel, navigate to the Security section and select SSL/TLS.

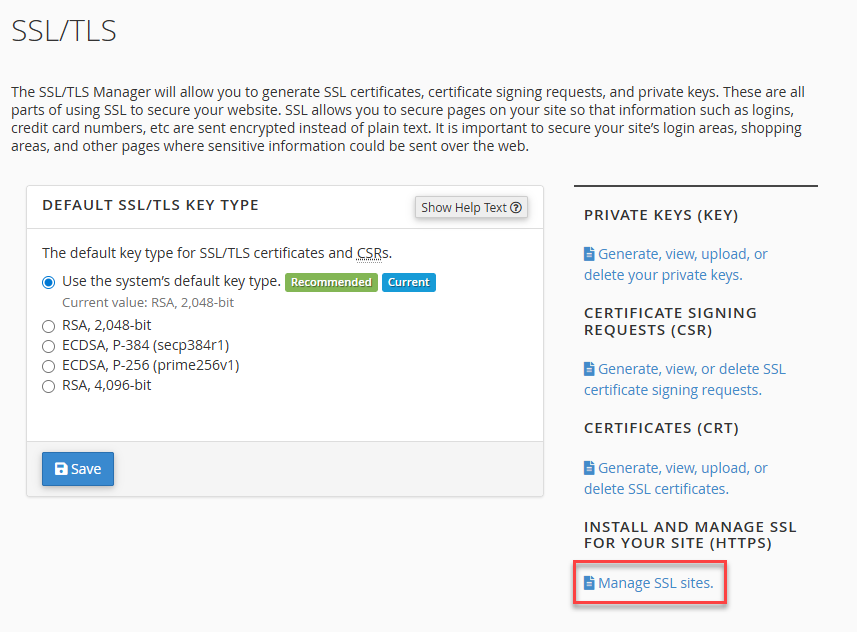
- Click Manage SSL Sites under the Install and Manage SSL for Your Site (HTTPS) section.
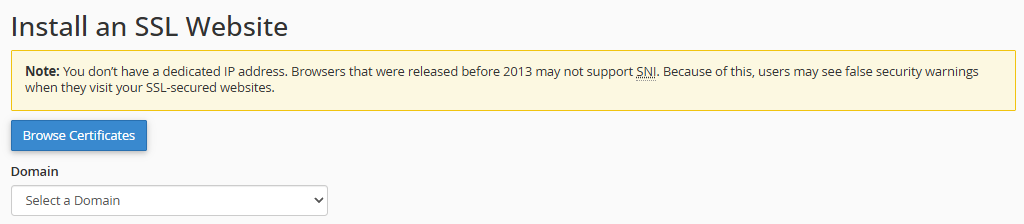
- Find the certificate that covers both your root domain (for example, exampledomain.com) and the www version of the domain (such as www.exampledomain.com).
If you see multiple certificates listed in the SSL/TLS section, review the associated domains carefully to make sure you select the correct one. The right certificate will cover the domains you intend to secure and will show an expiration date that is still valid.
- After identifying the correct certificate, click Use Certificate for New Site in the Actions column.

- Choose your domain from the dropdown menu.
- Open Notepad, then copy and paste each of the following values into separate files:
- Certificate (CRT)
- Private Key (KEY)
- Certificate Authority Bundle (CABUNDLE)
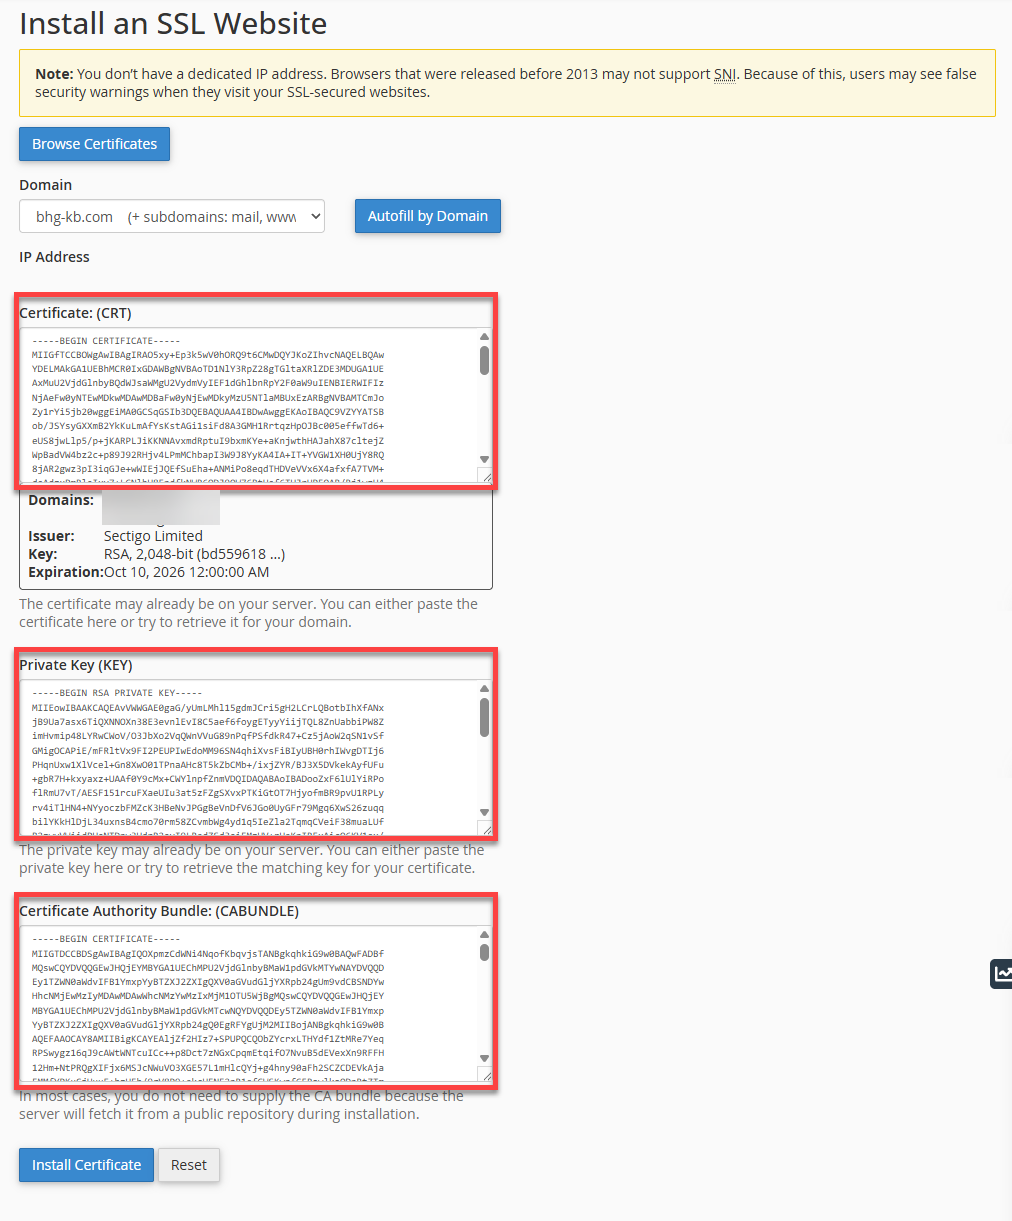
- Be sure to copy the full content of each section without adding any extra spaces before or after the text. Every file should start with the line -----BEGIN CERTIFICATE----- and end with -----END CERTIFICATE-----.
Step 2: Convert your SSL Files
In this step, you’ll need to convert your SSL files into a format that SiteLock can use. The SSL certificates stored on our servers are in .PEM format, but SiteLock requires them to be converted to .PFX before they can be uploaded.
To convert your SSL files:
- Once all three files are prepared, open your browser and go to an SSL conversion tool—such as SSL Shopper’s SSL Converter.
- Upload your Certificate (CRT) file to the converter.
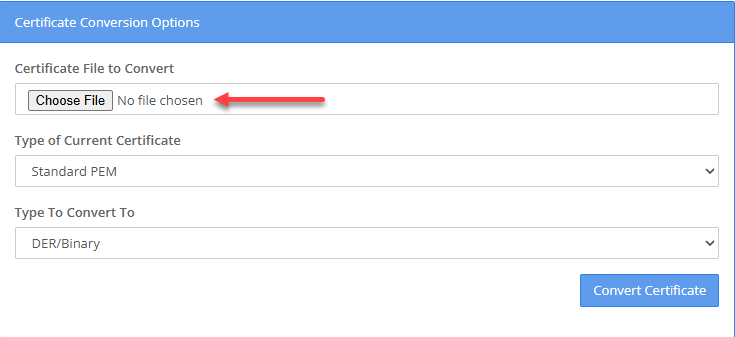
- Set the input format to PEM, then change the output format to PFX instead of DER.
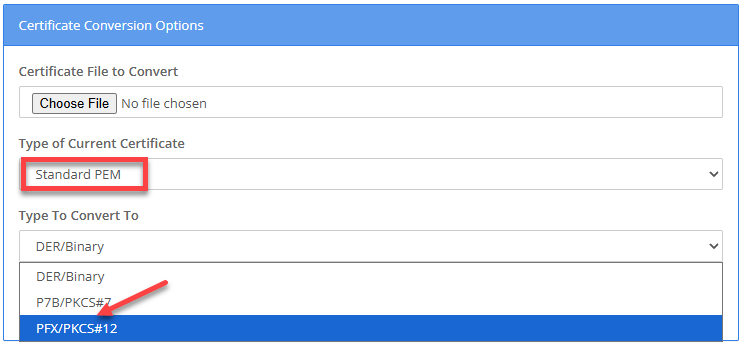
- Upload the Private Key (RSA) file and the Certificate Authority Bundle (CA) file into their respective fields.
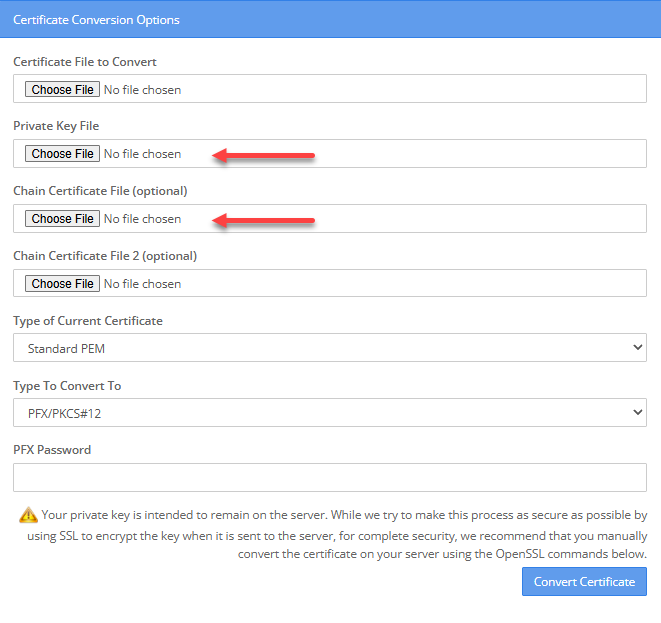
- Enter your password in the PFX Password field.
- Click Convert Certificate.
- After the PFX file has been generated and saved to your computer, you can upload it directly through your SiteLock Dashboard. Follow the steps outlined below to complete the process.

How to Configure the Firewall and CDN within your SiteLock Dashboard
Once you’ve obtained the .crt and .rsa keys, the next step is to upload these SSL files to your SiteLock Dashboard.
Step 1: Manage SSL
To upload your SSL files to SiteLock:
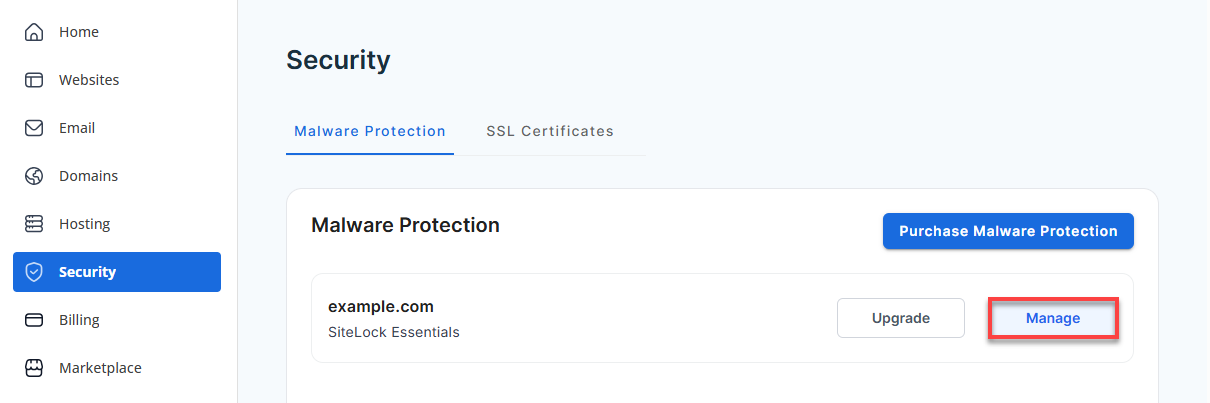
- Log in to your Bluehost Portal.
- Click Security on the left-side menu.
- Under the Malware Protection tab, locate the SiteLock plan you want to manage, and then click the Manage button next to it.
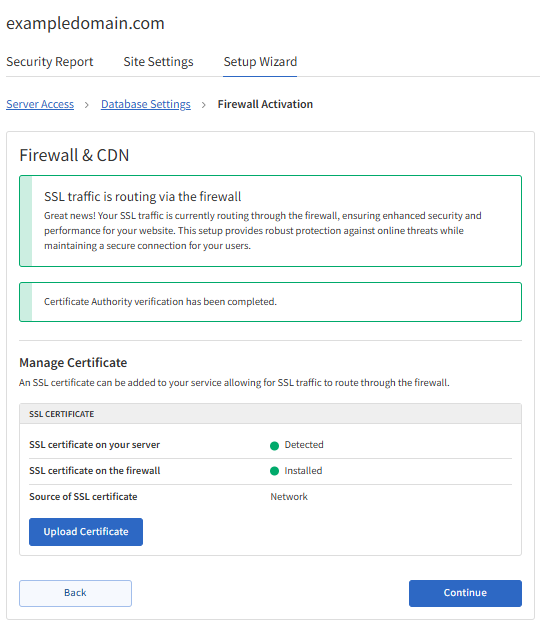
- Go to the Set Up Wizard section for the domain you want to manage.

- Click the Firewall Activation tab.

- Click the Upload Certificate button.
- In the pop‑up window, click Choose File to locate your Certificate (.crt) and Private Key (.rsa) files, then click Submit to upload them.
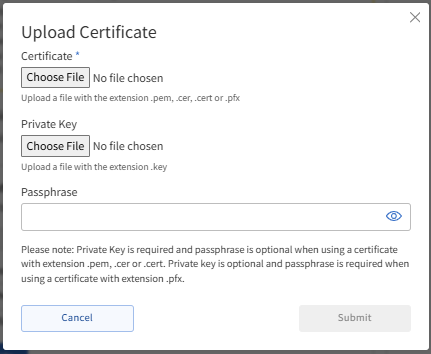
- When the pop-up window closes, click Continue to move forward and finish this step.
- Once the verification is completed, the Firewall Activation tab should display like this:
Step 2: Manage Routing
The next step is to update your DNS records so that your traffic is routed through the SiteLock Firewall and CDN. Keep in mind that DNS updates can take 24 to 48 hours to fully propagate and appear within your SiteLock dashboard.
For instructions on how to manage your domain's DNS records, please refer to the following article.
To update your DNS records:
- In the Setup Wizard, the Remove DNS records table will show the DNS records you need to delete for your domain.
- Add the DNS records shown in the Add DNS records table.
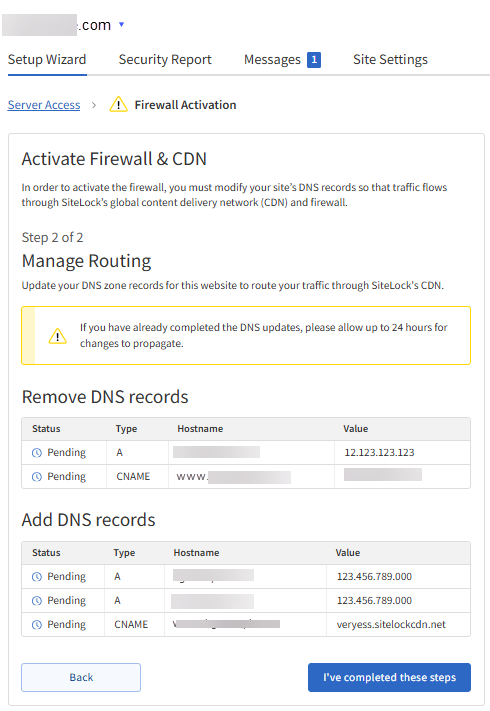
Please note that the DNS values shown in the tables above are only examples. Your SiteLock Dashboard will display the exact DNS records you need to remove and the correct values to add to your domain.
- Click the I've completed these steps button once done. Allow your DNS records to fully propagate.
Summary
Uploading your SSL certificate to SiteLock ensures that your website is secured with HTTPS encryption, which helps protect your users' sensitive information. You'll need your private key, SSL certificate, and CA Bundle to upload your SSL certificate successfully. After preparing the files, follow the steps in this guide to upload an SSL Certificate to SiteLock. Once your SSL certificate is uploaded, your website will be secure and protected against online threats.
If you need further assistance, Bluehost Chat Support is available 24 hours a day, 7days a week while Bluehost Phone Support is available 7 days a week from 7 am-12 midnight EST.
- Chat Support - While on our website, you should see a CHAT bubble in the bottom right-hand corner of the page. Click anywhere on the bubble to begin a chat session.
- Phone Support -
- US: 888-401-4678
- International: +1 801-765-9400
You may also refer to our Knowledge Base articles to help answer common questions and guide you through various setup, configuration, and troubleshooting steps.