How to Manually Change Your Domain Name in WordPress
There may come a time when you need to duplicate your WordPress site's content and use it on a different domain name. Instead of designing a new site for each domain, you may choose to use the existing content in one of your current domains. The following article will guide you through duplicating a WordPress site.
Please be aware that the steps below may not be enough to change your domain successfully due to WordPress's communication with the server. It is strongly advised that you make a full backup (website files and databases) of your website using the Backups button in cPanel before proceeding with the remaining steps in this article.
- How to Prepare for a Domain Name Change
- Step 1: Access File Manager and Copy Files to the New Domain
- Step 2: Create a New MySQL Database
- Step 3: Edit the WordPress .config File for Your New Site
- Step 4: Export the Database
- Step 5: Update the Database
- Step 6: Update the Database Tables
- Step 7: Update WordPress
- Summary
How to Prepare for a Domain Name Change
To ensure a smooth transition with minimal downtime and no data loss, thorough preparation is crucial. Get ready for a domain name change with our guide:
- Back up your current site. Before making any changes, it's important to create a complete backup of your WordPress website. This includes all files, databases, and any other content. Backing up ensures that you can restore your site to its original state if needed. You can use WordPress plugins like UpdraftPlus or BackupBuddy to automate this process, or you can manually export your site's content through your WordPress dashboard.
- Ensure access to a hosting dashboard or an FTP client. To implement the domain name change, you'll need to access your web hosting environment. This could be through your current hosting dashboard provided by Bluehost or via an FTP client such as FileZilla. Access to these is necessary to upload files, make changes to your WordPress configuration, and manage your new domain settings.
- Select and register a new domain name. The domain name you choose is critical—it should reflect your brand, be easy to remember, and be relevant to your audience. Once you've decided on a new domain name, you'll need to register it with a reliable web host.
Step 1: Access File Manager and Copy Files to the New Domain
To add a new domain, follow our guide on how to register a domain. Then, complete the following steps to copy files to your new domain.
- Log in to your Bluehost Portal.
- In the left-hand menu, click Websites.
- Click the Manage button located next to the website you want to manage.

- In the top navigation menu, click the FILES & ACCESS tab.

- Click the MANAGE button located under the File Manager section.
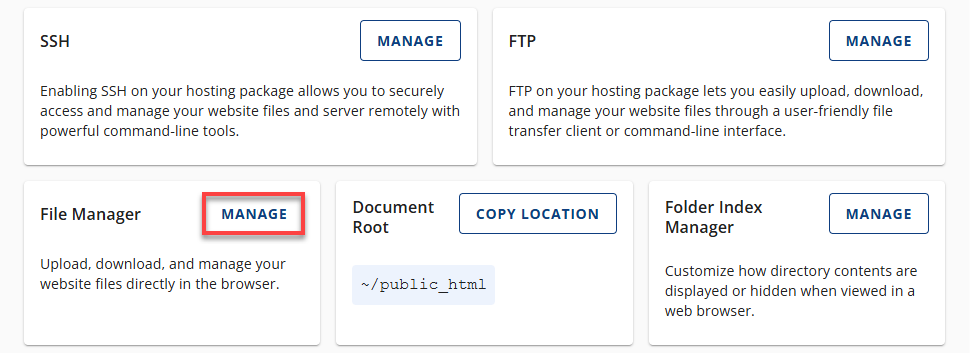
- Open the public_html folder.
- Along the top of the screen, click Select All.
- Press and hold the Ctrl key while clicking (un-selecting) the following folders in your public_html folder:
- .qidb
- cgi-bin
- addon domain folder
- With the files still highlighted, click Copy in the top menu of the File Manager. A pop-up will open showing the following path: /public_html
- Type the name of the addon domain folder to which you are copying the files. This box should now look similar to /public_html/addondomainname.com. (Replace addondomainname.com with the actual domain.)
- Click Copy File(s).
Step 2: Create a New MySQL Database
- Once the files have been copied over to your addon domain folder, open the MySQL Database Wizard on another screen in cPanel.
- Next, you will follow these steps to create a new MySQL database.
Step 3: Edit the WordPress .config File for Your New Site
- Log in to your Bluehost Portal.
- In the left-hand menu, click Websites.
- Click the Manage button located next to the website you want to manage.

- In the top navigation menu, click the FILES & ACCESS tab.

- Click the MANAGE button located under the File Manager section.

- Open the public_html folder and locate your addon domain folder.
- Right-click on the wp-config.php file and click the Code Edit or Edit button.
- When this page opens, edit the following information to reflect the values assigned to the new database created in the previous step.
- DB_NAME
- DB_USER
- DB_PASSWORD
- Click the Save Changes button.
Your wp-config.php file should reflect the correct database name, database user, and database password. This is essential for WordPress to know which database to obtain the information from.
Step 4: Export the Database
Export the database from the primary domain and import it into the newly created database. For help with this process, please refer to the following articles:
Step 5: Update the Database
You can update your database, but first, the database settings must be updated to reflect the new domain name information.
- Log in to your Bluehost Portal.
- In the left-hand menu, click Websites.
- Click the Manage button located next to the website you want to manage.

- In the OVERVIEW tab, click the PHPMyAdmin button.
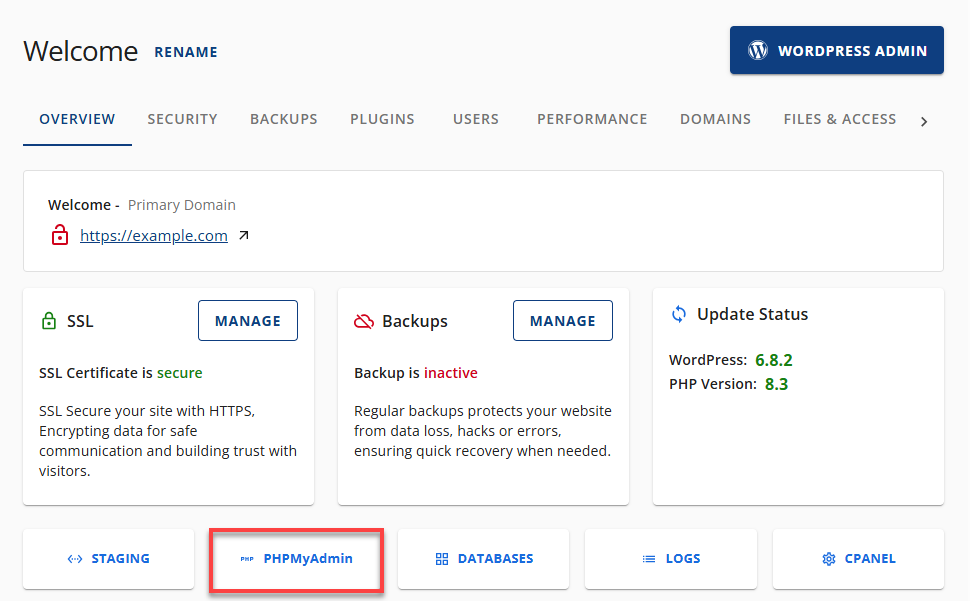
- In the left navigation panel, click on the newly created database name.
- In the left navigation panel, click wp_options.

- Click Edit on the siteurl line.

- Change the primary domain name to the addon domain name, then click Go.

- Click Edit on the homeurl line.

- Change the blog name to reflect your new blog, and click Go.

- Click Edit on the blog description line.

- Change the blog description to reflect your new blog, and click Go.

- In the left navigation panel, click wp_users.
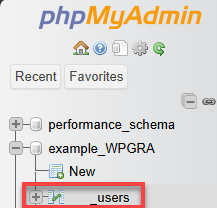
- Click Edit on the user_login line and change the user name to reflect your choice's new login username.
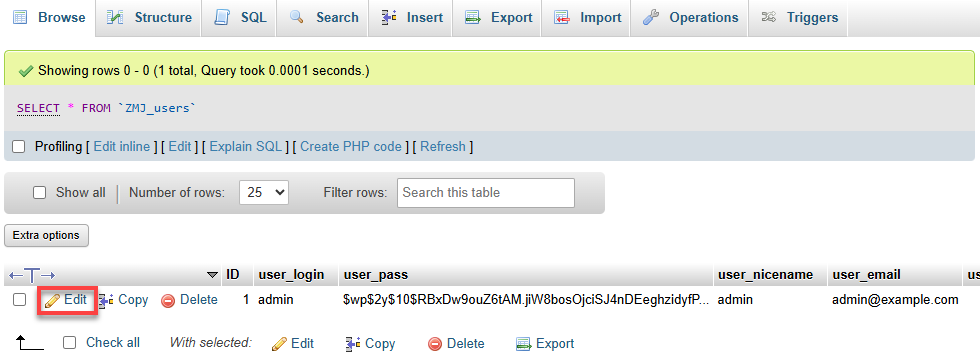
- Change it on the user_nicename line as well. For security purposes, do not use Admin as either username.
- On the user_pass line, highlight and delete the characters already in that box.
- Create a new password of your choice.
- To the left is the varchar(64) box; click the down arrow and select MD5.

- Click Go.
You should now be able to log in to your newly imported WordPress site.
Step 6: Update the Database Tables
Once the domain is working, you can log in to the WordPress Dashboard of the new site and install the Search and Replace plugin. It will allow you to search all of the tables in the database, search for your old domain, and replace each instance with your new domain. You can uninstall the plugin after the tables have been updated. In addition to the database, you should check your site for any links hard-coded into widgets, etc. Please edit the links manually to reference your new site address. For additional information on using this plugin, please review the following article:
Step 7: Update WordPress
- Log in to your Bluehost Portal.
- In the left-hand menu, click Websites.
- Click the WordPress Admin button located next to the website you want to manage.

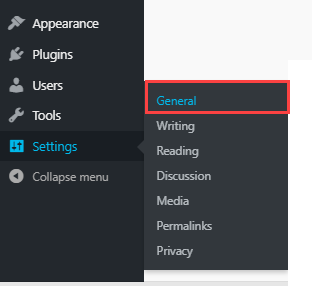
- In the left navigation menu, go to Settings.
- Click General.
- <↑> WordPress Address (URL)
- <↑> Site Address (URL)
See our helpful guide on how to change your WordPress URL. We also have a separate blog on how to create redirects in WordPress to retain all your traffic and SEO value.
Summary
To ensure a successful manual domain name change on your WordPress website, you must download a backup of two essential parts of your website: your WordPress website files and the related WordPress website database. With the steps implemented above, make sure the new domain you are using is registered and activated for a smoother transition from the old domain to the new domain name.
If you need further assistance, feel free to contact us via Chat or Phone:
- Chat Support - While on our website, you should see a CHAT bubble in the bottom right-hand corner of the page. Click anywhere on the bubble to begin a chat session.
- Phone Support -
- US: 888-401-4678
- International: +1 801-765-9400
You may also refer to our Knowledge Base articles to help answer common questions and guide you through various setup, configuration, and troubleshooting steps.