
Key highlights
- Understand what a VPS is and why it’s ideal for users who need more control than shared hosting but at a lower cost.
- Learn exactly what to prepare before setting up a virtual private server, including the OS, SSH tools and basic Linux commands.
- Follow this guide on how to set up a VPS, from choosing a provider to configuring a firewall, installing software and testing your setup.
- Explore post-setup tasks like enabling backups, installing SSL certificates, monitoring resource usage and choosing between managed and self-managed hosting.
- Explore how Bluehost’s VPS hosting offers enhanced performance, reliability and scalability for growing websites, with 24/7 support to guide you through the setup process.
Need more power than shared hosting but don’t want the cost of a dedicated server? That’s exactly why VPS hosting exists.
A virtual private server gives you full control, better speed and stronger security—without breaking your budget.
It’s no wonder VPS is the go-to choice for developers, site owners and growing businesses ready to level up.
But here’s the catch: learning how to set up a VPS can feel intimidating if you’ve never touched a command line.
Don’t stress. Don’t stress. This VPS installation guide will walk you through everything you need, from first steps to final testing.
By the end, you’ll have a fast, secure and fully working server that’s all yours.
What is a VPS and why use one?
A Virtual Private Server (VPS) is a powerful hosting option that gives you more control than shared hosting without the high cost of a dedicated server.
It works by dividing a physical server into isolated virtual machines—each with its own operating system, storage and resource allocation.
This setup gives you a secure environment with better performance, making it ideal for websites, apps or businesses that need flexibility.
If you’re looking for a balance between cost and control, a VPS is often the perfect middle ground for growing businesses.
Also read: What Is VPS Hosting? Everything You Need to Know!
What do you need before setting up a VPS?

Setting up a virtual private server is smoother when you’re fully prepared. Here’s a clear checklist of everything you need to get started.
- A reliable VPS hosting provider
- Decide which operating system your server will run:
- Linux distributions like Ubuntu, CentOS or Debian
- Windows VPS if you prefer a graphical interface or Windows-specific applications
- Install an SSH client to access your VPS securely.
- Know some basic linux commands.
Once you’ve gathered these essentials, you’re ready to begin the setup process.
In the next section, we’ll walk you through the steps for setting up a virtual server from scratch.
How to set up a VPS Hosting?
Learning how to set up a VPS might sound overwhelming at first, especially if you’re new to server management or command line tools.
But don’t worry—this guide breaks everything down into simple, manageable steps that even beginners can follow with confidence. Here are the steps to setup a VPS hosting server:
- Choose a VPS hosting provider
- Create a virtual machine or instance
- Connect to your VPS via SSH
- Create a new admin user and restrict root access
- Configure a firewall for VPS protection
- Secure your VPS access
- Install a web server (Apache or nginx)
- Add a database and configure PHP
- Connect your domain to your VPS via DNS settings
- Test your VPS
Let’s walk through each step in detail and get your VPS up and running the right way.
Step 1: Choose a VPS hosting provider
The first step in setting up your VPS is choosing a hosting provider that meets your technical and support requirements.
Having a reliable hosting provider that gives you root access, dedicated resources, fast storage and responsive support when things get technical. Choosing a VPS provider that is officially recommended by WordPress also gives you added confidence in quality and compatibility.
This is where Bluehost fits in perfectly. We’re proud to be officially recommended by WordPress and offer VPS hosting that balances power, speed and simplicity for users at every level.
All our VPS plans include full root access, ultrafast NVMe SSD storage, AMD EPYC processors and unmetered bandwidth for consistent performance.
Here’s a quick comparison of our VPS hosting plans to help you decide:
| Plan name | vCPU Cores | RAM | Storage | Starting price (36-month term) |
| Standard NVMe 4 | 2 Cores | 4 GB DDR5 | 100 GB NVMe Storage | $46.99/month |
| Enhanced NVMe 8 | 4 Cores | 8 GB DDR5 | 200 GB NVMe Storage | $70.99/month |
| Ultimate NVMe 16 | 8 Cores | 16 GB DDR5 | 450 GB NVMe Storage | $101.99/month |
Once you’ve selected a VPS hosting plan, your provider will send the IP address, login credentials and access instructions to get started.
Trusted by WordPress, optimized for performance and backed by 24/7 expert support—Bluehost makes VPS hosting seamless even for first timers.
Step 2: Create a virtual machine or instance
Every VPS runs as a virtual machine—a private slice of a physical server, isolated from others but fully customizable for your needs.
Creating this instance is where your hosting resources come to life. This is the environment you’ll configure, secure and manage going forward.
Most hosting providers make this step easy with an automated setup process that handles the technical deployment in the background.
Think of this step as the foundation for setting up a virtual server tailored to your specific needs.
You’ll usually select options like:
- Operating system (Linux distribution or Windows Server)
- Server region or location (for latency and compliance)
- Admin username and authentication method (password or SSH key)
Pro tip: With Bluehost, your virtual server is provisioned instantly after plan activation. You don’t have to worry about manual deployment or delays.
Once your virtual server is created, you’ll receive the following:
- Your VPS IP address
- The default SSH port (typically 22)
- Root login credentials or the ability to set up SSH key authentication
Step 3: Connect to your VPS via SSH
Accessing your VPS for the first time happens through a secure remote connection, usually made using a tool called SSH (Secure Shell).
SSH lets you interact with your server through a command line interface, giving you complete control over configuration and system commands.
To connect, you’ll need these tools:
3.1 SSH client:
- macOS/Linux users: Use the built-in Terminal
- Windows users: Use PuTTY or Windows Terminal
3.2 Your VPS details:
- IP address
- Port number
- Login credentials (root password or SSH private key)
3.3 How to connect using a password:
- Open your Terminal (macOS/Linux) or PuTTY (Windows).
- Type the following command and press Enter:
ssh root@your_vps_ip
- When prompted, enter the root password shared by your VPS provider.
3.4 How to connect using SSH key (recommended for security):
- Generate an SSH key pair on your local machine: ssh-keygen -t rsa -b 4096
- Upload your public key to your VPS dashboard or insert it during server creation.
- Connect using:
ssh -i /path/to/private_key_file root@your_vps_ip
Bluehost VPS hosting supports both password and key-based authentication. You can upload your public key securely through your dashboard for key-based login.
While setting up process, keep SSH on port 22 temporarily. We’ll show you how to change this later for better security.
Step 4: Create a new admin user and restrict root access
Before creating a new user or modifying system files, it’s important to update your server packages and security patches. Most VPS environments use a fresh Linux distribution, which may not be fully up to date at first login.
One of the most important parts of how to set up a VPS securely is replacing root access with a dedicated admin user.
4.1 Update your VPS system and packages
System updates ensure you have the latest security patches, bug fixes and stable software versions before performing any critical configurations.
For Ubuntu or Debian-based distributions, run:
sudo apt update && sudo apt upgrade -y
For CentOS or RHEL-based distributions, use:
sudo yum update -y
This may take a few minutes depending on the size of available updates and your server’s resources.
After updates complete, it’s a good idea to reboot the server:
sudo reboot
Once the reboot finishes, reconnect using SSH to proceed with user setup.
4.2 Create a new admin user account
Using the root account for all tasks isn’t recommended. You should create a new admin-level user to manage your server safely.
To create a user, enter:
adduser yourusername
Set a password and fill out the optional user details when prompted.
4.3 Grant sudo (admin) privileges
Give your new user permission to run admin-level commands by adding them to the sudo group:
usermod -aG sudo yourusername
You can test this by switching to the new user and running:
su – yourusername
sudo ls
If successful, the command will list files using elevated privileges.
4.4 Set up SSH public key authentication
Using SSH keys instead of passwords makes your VPS login more secure. First, generate an SSH key on your local system:
ssh-keygen -t rsa -b 4096
Copy the public key:
cat ~/.ssh/id_rsa.pub
Now switch to your new user and create the .ssh directory:
su – yourusername
mkdir ~/.ssh
chmod 700 ~/.ssh
Paste the public key into a file named authorized_keys:
nano ~/.ssh/authorized_keys
Paste, save, then run:
chmod 600 ~/.ssh/authorized_keys
4.5 Disable root login through the SSH configuration file
To improve security, disable root login entirely by editing the SSH configuration file.
Open the SSH config file:
sudo nano /etc/ssh/sshd_config
Find the line:
PermitRootLogin yes
Change it to:
PermitRootLogin no
Then restart the SSH service:
sudo systemctl restart ssh
This blocks direct root access, allowing only secure logins through your new admin user.
Step 5: Configure a firewall for VPS protection

Every virtual private server (VPS) connected to the internet is a potential target for unauthorized access or malicious activity. A firewall monitors and controls your server’s network traffic based on security rules. It helps:
- Block unwanted access attempts
- Allow only trusted ports and services (like SSH, HTTP, HTTPS)
- Protect applications running on your VPS
- Reduce vulnerabilities from exposed ports
Option 1: Use UFW (Uncomplicated Firewall) – for Ubuntu/Debian
UFW is a beginner-friendly tool to manage iptables, the default firewall in most Linux distributions.
Step-by-step: Set up UFW on Ubuntu
- Install UFW (if not already installed):
sudo apt install ufw
- Allow SSH access (to avoid locking yourself out):
sudo ufw allow OpenSSH
- Allow web traffic:
sudo ufw allow http sudo ufw allow https
- Enable the firewall:
sudo ufw enable
- Check status and rules:
sudo ufw status
Option 2: Use firewalld – for CentOS/RHEL
If you’re using a CentOS-based Linux distribution, firewalld is the recommended firewall management tool.
Step-by-step: Set up firewalld
- Start and enable firewalld:
sudo systemctl start firewalldsudo
systemctl enable firewalld
- Allow SSH access:
sudo firewall-cmd --permanent --add-service=ssh
- Allow web traffic:
sudo firewall-cmd --permanent --add-service=http
sudo firewall-cmd --permanent --add-service=https
- Reload firewall to apply changes:
sudo firewall-cmd --reload
- Verify rules:
sudo firewall-cmd --list-all
It’s a critical part of setting up a virtual server securely and preventing unwanted access from the start.
Step 6: Secure your VPS access
After completing the initial how to set up a VPS step, the next phase is strengthening your SSH connection and server configuration. These improvements help prevent unauthorized access and improve overall VPS performance and security.
By default, your SSH connection runs on port 22. Changing it helps reduce exposure to automated bots scanning for open ports.
6.1 Change the SSH port in your configuration
Follow these steps to modify the port used for SSH connections:
- Open the SSH configuration file:
sudo nano /etc/ssh/sshd_config
- Locate this line:
Uncomment it (remove the #) and change the value to a custom number (for example, 2222):
Port 2222
- Save and exit the file.
6.2 Update firewall rules for your custom port
Allow the new port so your connection doesn’t get blocked.
- UFW (Ubuntu/Debian):
sudo ufw allow 2222/tcp
- FirewallD (CentOS/RHEL):
sudo firewall-cmd --permanent --add-port=2222/tcpsudo
firewall-cmd --reload
- Then restart SSH:
sudo systemctl restart ssh
- Reconnect with:
ssh -p 2222 yourusername@your_vps_ip
Always test this in a new terminal before closing your current session.
6.3 Disable password login
If you’ve already enabled public key authentication, you can disable password-based logins to secure the SSH connection completely.
- Reopen the SSH configuration file:
sudo nano /etc/ssh/sshd_config
- Set the following values:
PasswordAuthentication no
ChallengeResponseAuthentication no
UsePAM no
- Restart the SSH service:
sudo systemctl restart ssh
Now only devices with the correct SSH private key can connect—greatly improving your server’s secure setup.
Including Fail2Ban and disabling password logins are essential VPS configuration steps that help protect against brute-force attacks.
6.4 Add Fail2Ban to block repeated login attempts
Fail2Ban scans your server logs for malicious login behavior and automatically bans offending IPs by modifying firewall rules.
- To install it on most Linux operating systems:
sudo apt install fail2ban # Ubuntu/Debian
sudo dnf install fail2ban # AlmaLinux/CentOS 8
- Start and enable the service:
sudo systemctl enable --now fail2ban
Default settings already protect your SSH connection. You can tune jail settings later for tighter control.
Also read: VPS Security Tips and Best Practices to Secure your Server
Step 7: Install a web server (Apache or nginx)
Now that your VPS is secured, it’s time to make it serve content. A web server lets you deliver your website files to users through a browser. Two of the most widely used options are Apache and Nginx—both are open-source, reliable and supported by most Linux distributions.
Most users prefer:
- Apache for flexibility and compatibility
- Nginx for better performance under high traffic
For Apache (on Ubuntu/Debian):
sudo apt update sudo apt install apache2 -y For Nginx (on Ubuntu/Debian):
sudo apt update sudo apt install nginx -y On CentOS/RHEL/Fedora, replace apt with dnf or yum.
7.1 Configure web traffic access
Open the necessary firewall rules to allow incoming traffic on ports 80 (HTTP) and 443 (HTTPS):
For UFW:
sudo ufw allow 80 sudo ufw allow 443 For FirewallD:
sudo firewall-cmd --permanent --add-service=http sudo firewall-cmd --permanent --add-service=https sudo firewall-cmd --reload Upload your website files to the server’s default root directory:
- Apache: /var/www/html/
- Nginx: /usr/share/nginx/html/
Open your browser and enter your VPS IP address. If everything’s working, you’ll see the default Apache or Nginx welcome page.
Also read: Apache vs Nginx: Which Web Server is Better?
Step 8: Add a database and configure PHP
Most dynamic websites need both a database and PHP to function properly. This step sets up the backend needed to run CMS platforms like WordPress or Joomla.
8.1 Install MySQL or MariaDB
These are the most commonly used relational database systems for Linux VPS hosting.
To install MySQL:
sudo apt update sudo apt install mysql-server -y To install MariaDB (a drop-in replacement for MySQL):
sudo apt update sudo apt install mariadb-server -y Once installed, run the secure installation tool to properly configure the database:
sudo mysql_secure_installation 8.2 Install PHP and Required Extensions
PHP is a server-side scripting language used by most CMS platforms. Install it along with common extensions to ensure compatibility.
- For Apache (Ubuntu/Debian):
sudo apt install php libapache2-mod-php php-mysql -y - For Nginx (PHP runs via php-fpm):
sudo apt install php-fpm php-mysql -y You can check your installed PHP version using:
php -v - Verify PHP Processing
Create a PHP info file to confirm PHP is running correctly:
sudo nano /var/www/html/info.php - Add this content:
<?php phpinfo(); ?> Save and visit [http://your_vps_ip/info].[php] in your browser. You should see PHP’s configuration page.
- Don’t forget to delete the file after testing:
sudo rm /var/www/html/info.php Step 9: Connect your domain to your VPS via DNS settings
Now that your web server and backend are ready, it’s time to point your domain name to your VPS. This allows visitors to reach your website using a friendly URL instead of an IP address.
9.1 Get your VPS IP address
First, log in to your VPS hosting dashboard (like the Bluehost control panel). You’ll find your public IPv4 address listed under your VPS details.
You’ll use this IP address in your DNS settings to direct traffic to your VPS.
9.2 Access your domain’s DNS settings
If your domain is registered with Bluehost, managing DNS is simple and intuitive. Just log in to your Bluehost dashboard, click the Domains tab, select your domain, then click Manage DNS.

We make it easy to add, edit or delete DNS records with a clean, beginner-friendly interface. Whether you’re updating an A record or connecting to a subdomain, every tool is accessible in just a few clicks.
During your VPS setup, you’ll have the option to choose a domain or connect to an existing one, streamlining the entire process. If you haven’t purchased a domain yet, you can easily register one directly through the Bluehost domain solution page.
9.3 Edit the A Record
To connect your domain:
- Find the A Record under your domain’s DNS settings.
- Set the host to @ (this stands for the root domain).
- Point the value to your VPS IP address.
- Set TTL (Time to Live) to 30 minutes or leave it at default.
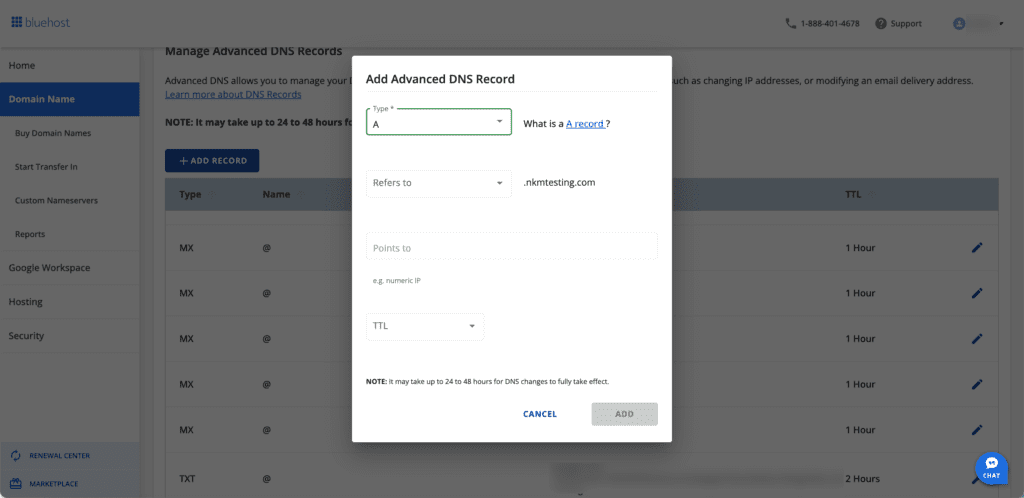
Want to also point www to your VPS? Add another A record:
- Host: www
- Value: your VPS IP
9.4 Wait for DNS propagation
It can take up to 24–48 hours for DNS changes to fully propagate across the internet.
Once DNS has updated, typing your domain in a browser should take you to your VPS-hosted website.
Also read: DNS Propagation: Timeframes, Tools and Troubleshooting
Step 10: Test your VPS
Once you’ve completed all the setup steps, it’s important to verify that your virtual private server is functioning correctly. This ensures everything is properly configured before you go live.
10.1 Check your SSH connection
Ensure your SSH connection is stable and responsive. Try logging in again using your SSH client. You should see the correct hostname and be able to execute commands without delay.
10. 2 Ping your server’s IP address
Use the following command from your local machine to verify network connectivity:
ping your-vps-ip You should receive responses if the VPS is reachable. If not, check your firewall rules or server’s network configuration.
10.3 Visit your website in a browser
Type your VPS IP address into a browser’s address bar. If you installed a web server like Apache or Nginx, you should see the default landing page. This confirms that your server is delivering website files correctly.
10.4 Test your firewall rules
Use online tools like YouGetSignal to check if ports like 22 (SSH), 80 (HTTP) and 443 (HTTPS) are open. This helps confirm incoming traffic is handled correctly by your firewall configuration.
10.5 Review resource usage
Run basic Linux commands to check CPU, RAM and disk usage:
topdf -hfree -m These help you monitor VPS performance and ensure your hosting environment isn’t under unnecessary load after setup. With this VPS installation guide, you’ll be confident that your server is secure, responsive and production-ready.
What are post-setup VPS tasks?
Setting up your VPS is just the beginning. To ensure stability, performance and security in the long term, there are a few important post-setup tasks to complete. These VPS configuration steps help you properly configure your environment and maintain a secure, high-performing VPS.
| Task | Tools | Where to access or run It |
| Enable backups | Bluehost Snapshots, rsnapshot, Borg | Bluehost Dashboard → VPS Settings or Linux CLI |
| Install SSL certificate | AutoSSL (Bluehost), Certbot | Bluehost Control Panel or Terminal (certbot) |
| Enable monitoring | top, htop, glances, Netdata, UptimeRobot, Pingdom | Terminal or Netdata UI; External dashboards (UptimeRobot, Pingdom) |
| Use control panel | cPanel/WHM, Webmin, CyberPanel, Plesk | Bluehost add-on or Manual Installation |
1. Set up automatic backups
Unexpected issues can occur at any time. That’s why enabling automatic backups is essential. Backups allow you to restore your VPS to a previous state in case of data loss, corruption or misconfiguration.
If you’re hosting with Bluehost, our VPS plans support snapshot backups. You can set these to run automatically via your control panel or create manual snapshots before making major changes.
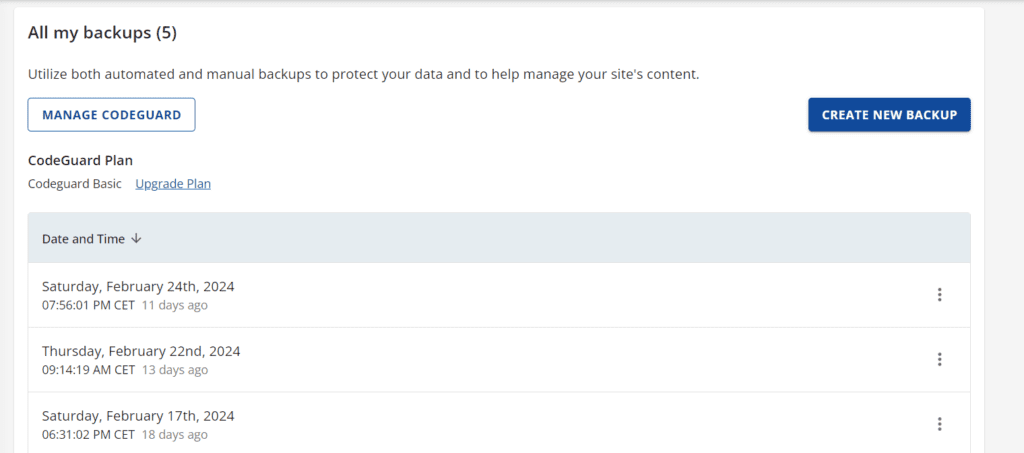
For Linux servers, consider tools like rsnapshot or borg for more advanced backup strategies.
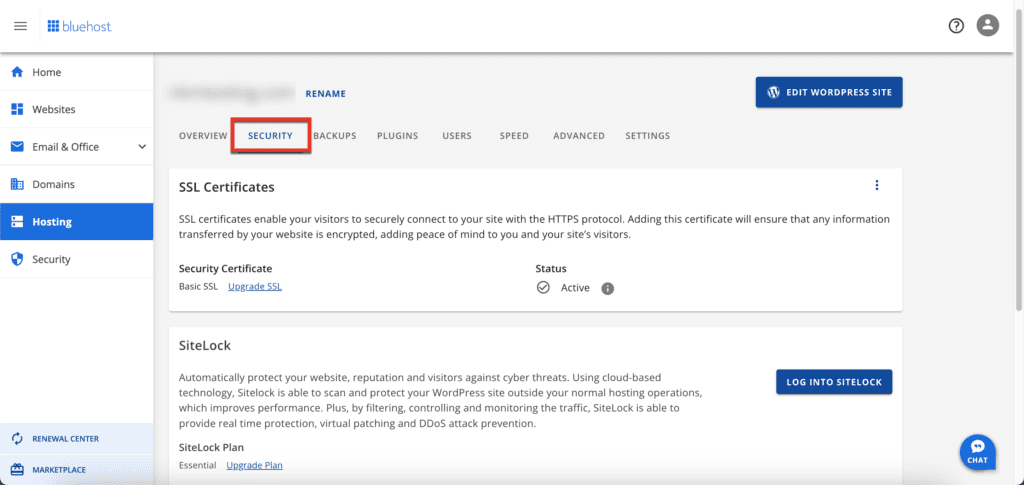
2. Add SSL certificates
An SSL certificate encrypts the connection between your VPS and your visitors, protecting login details, form entries and other sensitive information. It’s also required for HTTPS and can improve your site’s trust and SEO performance.
If you’re hosting your VPS with Bluehost, you’re covered—we include a free SSL certificate with every VPS hosting plan. You can activate it directly from your Bluehost Control Panel, making it simple to secure your site without extra setup.
3. Enable monitoring tools
Regular monitoring helps track resource usage, server performance and detect issues early. You’ll know if CPU or RAM is spiking or if there’s excessive incoming or outgoing traffic.
Popular tools include:
- top, htop or glances for real-time system info
- Netdata for visual insights
- UptimeRobot or Pingdom for uptime and response monitoring
If you’re using Bluehost, we offer a dashboard where you can monitor basic VPS performance and usage metrics easily.
4. Use a control panel
A control panel simplifies server management. Instead of relying only on terminal commands, you get a graphical user interface to manage your website files, domains, databases and more.
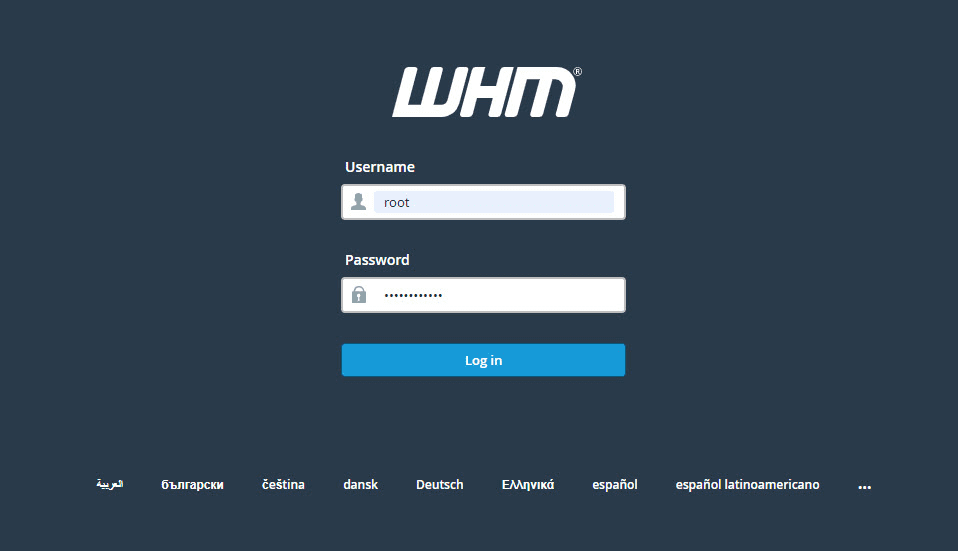
Options include:
- cPanel/WHM (available with Bluehost as an optional add-on)
- Webmin or CyberPanel (free, open-source choices)
- Plesk for Windows VPS users
Using a control panel is especially helpful for beginners managing multiple websites or who prefer a visual workflow over using only the command line.
Should you choose a managed or self-managed VPS?

When setting up a VPS, one of the biggest decisions is whether to go with a managed or self-managed hosting plan.
Understanding the difference will help you select the right hosting setup for your project or business.
| Feature | Self-Managed VPS | Managed VPS Hosting |
| Control | Full, hands-on | Full (with optional support) |
| Server updates | Manual installation and monitoring | Assisted or automatic |
| Security patches | User-applied | Provider-assisted |
| Resource monitoring | Manual setup required | Often built-in or pre-configured |
| Technical skills needed | High | Low to moderate |
| Ideal for | Developers, sysadmins, power users | Entrepreneurs, teams, SMBs |
With a self-managed VPS, you get complete freedom—but you also take full responsibility for system maintenance, uptime and problem resolution.
A managed VPS is great for small business owners, entrepreneurs or developers who want speed and power without worrying about system-level admin work.
VPS hosting with Bluehost
Looking for performance, control and support all in one place? Our VPS hosting at Bluehost is designed to fit your workflow—whether you’re just starting or scaling fast.
Here’s what you get with every plan:
- Full root access to install software, apply security updates and execute commands directly through SSH or our dashboard.
- Easy-to-use control panel to manage domains, monitor VPS performance and upload website files without needing deep command-line knowledge.
- Free SSL certificate for secure setup, plus two dedicated IP addresses and optional cPanel for a graphical user interface.
- Optimized infrastructure using AMD EPYC processors, DDR5 RAM and NVMe SSDs for faster load times and smoother performance.
- 24/7 expert support from real humans—no scripts, no guessing, just help when you need it.
Start strong and scale confidently—with VPS hosting built for creators and developers like you.
What are the most common VPS mistakes beginners make while setting up?
Even with the right setup, beginners often overlook critical details that can affect performance, security and usability. Avoid these frequent mistakes:
1. Running everything as root
Using the server’s root user for daily tasks increases the risk of accidental damage or security breaches.
Instead, create a new user account with sudo privileges to maintain control while limiting vulnerabilities.
This also helps you manage ssh users more securely and keeps your virtual private server properly configured.
2. Forgetting to configure a firewall
Many new users skip setting up firewall rules, leaving their server exposed to threats.
Use a firewall like iptables or UFW to control incoming and outgoing traffic and block unauthorized access.
It’s one of the easiest ways to prevent network protocol attacks and improve your server’s secure setup.
3. Using default SSH port without hardening
Keeping the default SSH port (22) makes it easier for attackers to attempt brute force logins.
Change the port and disable root login to reduce security vulnerabilities.
Make sure your ssh client settings and private key file are correctly configured for continued access.
4. Skipping regular updates and patches
Delaying updates puts your server at risk of known exploits.
Always install security updates for your operating system and install software as part of routine maintenance.
These updates fix bugs, close loopholes and keep your hosting account secure.
5. Ignoring VPS monitoring tools
Monitoring helps you track performance metrics and detect abnormal behavior early.
Neglecting VPS monitoring can lead to missed signs of attacks or resource overuse.
Bluehost includes a built-in control panel that supports basic performance tracking and resource monitoring.
6. Not backing up website files
One error or attack can wipe everything if you don’t maintain backups.
Set up automatic backups of your website files, databases and server configuration to protect against unexpected loss.
Whether you’re hosting multiple websites or a single application, backups ensure faster recovery on the same server or a new instance.
Final thoughts
That’s it—you’ve made it through the full VPS setup without melting your brain or frying your server. Nicely done.
By now, you’ve learned how to create a secure, high-performance hosting environment that’s fully under your control.
No more limits from shared hosting. No more guessing what’s slowing your site down. Just speed, security and flexibility.
And if you want that same freedom—without doing all the heavy lifting—we’ve got you covered. We at Bluehost give you full root access, blazing-fast NVMe SSDs and a control panel that works for you, not against you.
Ready to take your website to the next level? Get started with Bluehost VPS hosting today.
FAQs
Choose a VPS host, connect via SSH, update system packages, create a new user, secure access, configure a firewall, install Apache/Nginx, PHP, MySQL and connect your domain. Test setup and enable monitoring, backups and SSL.
VPS and VPN serve different purposes. A VPS (Virtual Private Server) is used for hosting websites, apps or databases, giving you full control over the server. A VPN (Virtual Private Network) is designed to encrypt your internet traffic and hide your IP address for privacy.
If you need control over your hosting environment, go for a VPS. If you’re more focused on online privacy, a VPN is a better choice.
To configure a VPS, start by connecting via SSH. Then update the system, create a new user, secure SSH access, configure a firewall and install server software like a web server (Apache or Nginx), database and PHP. Don’t forget to enable backups and monitoring tools for long-term stability.
Managed VPS hosting includes help with setup, default configuration and updates. It’s ideal for users without technical knowledge of the command line interface.
Unmanaged VPS hosting gives full control over your virtual server but requires more expertise.
If you prefer to customize your own Linux VPS, go unmanaged.
For simplicity and support, choose a managed VPS provider.
To set up a VPS, choose a hosting provider, select your operating system, connect via SSH, update system packages, create a new user, configure a firewall and install necessary software like a web server and database.
Basic knowledge of command-line interfaces and server management is helpful. You’ll need to work with the operating system, users and firewall rules. However, many providers offer managed VPS plans that handle technical tasks, making it accessible for beginners.
Begin by updating the server’s operating system using your command line interface. Create a non-root user account with sudo access to limit risk. Use a firewall called iptables or UFW to restrict access to important ports and disable root login. Switch from port 22 to a custom port.
Enable SSH key authentication using a private key for login security.
Yes. After setting up Apache/Nginx, PHP and MySQL, you can manually install WordPress or use Bluehost’s 1-click installer with root access.
Ubuntu is beginner-friendly and widely supported. CentOS is great for stability. Debian works well for minimal resource servers.


Write A Comment