Key highlights
- Know how to set up and manage cron jobs across Linux, Ubuntu, Unix, Windows and cPanel with clear, practical steps.
- Learn the correct cron syntax, commands and configurations to schedule and automate repetitive tasks efficiently without manual intervention.
- Understand how the cron daemon, crontab files and environment variables work together to execute scheduled scripts accurately.
- Explore common cron job errors, their causes and reliable troubleshooting methods to ensure smooth and error-free automation.
- Uncover how Bluehost simplifies cron automation with secure, built-in tools that help you schedule and manage tasks effortlessly.
Setting up automated tasks saves hours of manual work and cron jobs are at the heart of that efficiency. Roughly 60% of companies currently use automation solutions and tools in their workflows, a figure backed by multiple sources, including a major Duke University study.
In this guide, you’ll learn how to set up a cron job across Linux, Ubuntu, Unix, Windows and cPanel environments. We’ll cover real command-line examples, best practices and troubleshooting tips so you can confidently schedule and control repetitive tasks without errors. Whether you’re managing servers or running scripts for web applications, this walkthrough helps you automate with precision and reliability.
TL;DR
- Learn how to set up and manage cron jobs on Linux, Ubuntu, Unix, Windows and cPanel using clear steps and verified commands.
- Understand how the cron daemon, crontab file and environment variables work together to run tasks automatically and reliably.
- Follow step-by-step instructions to create, edit, verify and troubleshoot cron jobs, including 5-minute intervals, system-wide entries and PHP automation.
- Avoid common errors like permissions issues, missing paths, malformed syntax and overlapping jobs with practical fixes and diagnostic commands.
- See how Bluehost’s cPanel simplifies automation with secure cron environments, easy scheduling, built-in PHP paths and automatic handling of missed tasks.
What is a cron job?
A cron job is a scheduled task that runs commands or scripts automatically at set intervals on Unix-like systems. It’s managed by the cron daemon, which reads the crontab file containing job entries, time schedules and commands.
System administrators use cron jobs to automate repetitive tasks like clearing temporary files, monitoring system health or running backups. Each job follows a defined cron syntax that specifies the exact minute, hour, day and month for execution.
Because cron is a built-in Linux utility, it eliminates the need for manual triggers and ensures scripts run reliably, even when you’re not logged in. The result is a predictable, low-overhead way to schedule tasks and maintain system performance.
How does a cron job work?
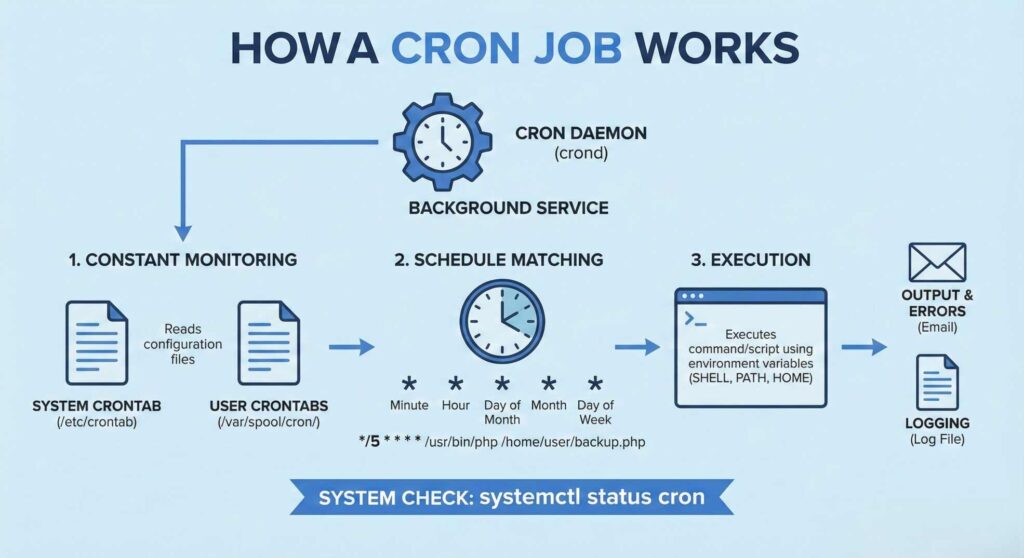
Every cron job runs under the supervision of the cron daemon (crond), a background service that constantly checks for scheduled tasks. Once started, the daemon reads from the system crontab file and user crontab entries stored in /var/spool/cron/, matching each command to its scheduled time.
When the defined time interval arrives, the daemon executes the command or script listed in the job line. The crontab configuration file follows a standard cron syntax, five time-and-date fields followed by the command to run. For example:
*/5 * * * * /usr/bin/php /home/user/backup.phpThis line triggers the PHP script every five minutes.
The cron service also uses environment variables such as SHELL, PATH and HOME to ensure the script runs in the correct context. Output and errors are typically sent to the user’s email or stored in a log file, allowing admins to verify execution or diagnose missed jobs.
In most Linux distributions, you can check whether the cron daemon is active using:
systemctl status cron If the service is running, cron continuously monitors the cron tables and executes each task precisely on schedule without further user input. Now that you know how cron works, let’s look at how to set up a cron job in Linux step by step.
How to set up a cron job in Linux?
Cron is a built-in Linux scheduler that runs commands or scripts automatically at defined intervals. Setting up a cron job involves enabling the cron service, configuring the crontab file and adding the required command entry.
Here’s a step-by-step process to set up a cron job in Linux seamlessly:
Step 1: Verify that cron is installed and active
Most Linux distributions include cron by default. To ensure it’s installed, run:
sudo apt install cron After installation, confirm that the cron daemon is active using:
systemctl status cronIf inactive, enable and start it:
sudo systemctl enable cron
sudo systemctl start cron
Also read: Linux Hosting: Introducing a Reliable, Cost-Effective Hosting Solution
Step 2: Open the user’s crontab file
Each user, including the root account, has a separate crontab configuration file. To open your own crontab and start editing scheduled tasks, use the following command:
crontab -e This command launches the default text editor, usually nano or vim, to modify the current user’s cron table.
Step 3: Add a new cron job entry
Each line in the crontab file represents one scheduled task and follows this syntax:
minute hour day_of_month month day_of_week command_to_execute Example:
0 2 * * * /usr/bin/python3 /home/user/scripts/cleanup.py This cleanup script runs every day at 2:00 AM.
Step 4: Save and verify the crontab
After saving the file, list all existing cron jobs using:
crontab -l To remove all scheduled tasks for the current user:
crontab -r Step 5: Check cron job output and logs
Cron redirects script output and errors to the user’s email by default. You can also log output manually:
0 2 * * * /path/to/script.sh >> /var/log/cron.log 2>&1 This stores both standard and error outputs in a custom log file.
Step 6: Manage permissions and file paths
Ensure your script has execute permissions:
chmod +x /path/to/script.sh Always use absolute paths (e.g., /usr/bin/, /home/user/) to avoid environmental mismatches between manual and automated runs. A well-configured cron job automates routine tasks, boosts efficiency and keeps your Linux system running smoothly with minimal effort.
Now that you understand how cron works in Linux, let’s look at how to set up a cron job in Ubuntu.
Also read: Essential Linux Commands – A Complete Guide for All Skill Levels
How to set up a cron job in Ubuntu?
Ubuntu includes the cron utility by default, allowing you to schedule tasks and automate repetitive commands using the crontab command. The process is similar to Linux, but with a few Ubuntu-specific configurations and paths.
Step 1: Install and enable the cron service
If cron isn’t active on your Ubuntu system, install it using the APT package manager:
sudo apt install cron -y Enable and start the service:
sudo systemctl enable cron
sudo systemctl start cron
Verify that it’s running:
systemctl status cron Step 2: Edit the user’s crontab file
Open your user crontab with the following command:
crontab -e When prompted, select your default editor (e.g., nano). This opens the existing crontab file for the current user.
Step 3: Add your cron job line
A cron job entry in Ubuntu follows the same format:
minute hour day month day_of_week command Example:
30 1 * * * /usr/bin/bash /home/user/scripts/disk_cleanup.sh This runs the cleanup script every day at 1:30 AM.
To run a command every 5 minutes:
*/5 * * * * /usr/bin/python3 /home/user/scripts/status_check.py Step 4: Manage system-wide cron jobs
To schedule tasks that run for all users, edit the system crontab file:
sudo nano /etc/crontab This file includes an extra user field:
minute hour day month day_of_week user command Example:
0 3 * * * root /usr/bin/rsync -av /data /backup Here, the job runs daily at 3:00 AM under the root user.
Step 5: Check logs and troubleshoot missed jobs
Cron logs can be found at:
/var/log/syslog To filter only cron-related entries:
grep CRON /var/log/syslog If a task fails, verify the file path, execute permissions and ensure your script includes absolute paths to avoid environmental mismatches. Using cron in Ubuntu allows system administrators and developers to automate routine processes. It helps optimize system performance and ensures consistent execution of scripts from backups to application updates without any manual input.
While Ubuntu uses cron in a similar way, let’s explore how you can set up a cron job in Unix systems next.
Also read: Step-by-Step Guide to Dedicated Server Setup for Beginners
How to set up a cron job in Unix?
Unix systems also use cron to schedule repetitive tasks such as running scripts, monitoring logs or managing backups. While the fundamentals are similar to Linux, Unix often uses different cron implementations and configuration file paths that require root privileges for certain edits.
Step 1: Confirm that the cron service is running
Cron typically runs automatically in the background. You can check the status using:
ps -ef | grep cronIf it’s not running, start it with:
sudo /usr/sbin/cron or, on some systems:
/etc/init.d/cron start Step 2: Edit the system crontab file
In Unix, system-wide jobs are defined in the system crontab configuration file, located at:
/etc/crontab Open it with a text editor such as vi or nano:
sudo vi /etc/crontab Each cron job line in this file specifies an execution time, user and command:
minute hour day month day_of_week user command Example:
0 4 * * * root /usr/bin/sh /usr/local/bin/daily_backup.sh This job runs a shell script every day at 4:00 AM as the root user.
Step 3: Use user-specific crontab entries
To create or modify a user’s crontab, run:
crontab -e This opens the user crontab file stored in /var/spool/cron/username. Each entry here omits the user field since it’s already tied to that specific account.
List existing jobs with:
crontab -lStep 4: Apply correct permissions
Ensure that your script file has execute permissions:
chmod +x /path/to/script.sh Only the root user or users with superuser privileges can modify /etc/crontab or add jobs in /etc/cron.d/.
Step 5: Verify cron job execution
Cron logs in Unix are usually stored at:
/var/adm/cron/log or
/var/log/cron Check the log to confirm successful execution or diagnose missed jobs.
Cron on Unix is highly reliable for automating system-level tasks and provides granular control over scheduling and execution environments. By correctly setting up user crontabs and system crontab files, administrators can manage and monitor tasks across multiple users securely and efficiently.
While Unix handles automation natively through cron, Windows uses a different approach with its built-in Task Scheduler to achieve similar results.
Also read: Generate SSH Keys: Windows & macOS/Unix (PowerShell, PuTTY)
How to set up a cron job in Windows?
Windows doesn’t include cron by default, but you can achieve the same automation using Task Scheduler, a built-in utility that lets you schedule repetitive tasks and scripts at specific times or events. It’s the Windows equivalent of the cron service used in Linux and Unix systems.
Step 1: Open task scheduler
Press Windows + R, type:
taskschd.msc and hit Enter. This opens the Task Scheduler console, where you can create, manage and monitor scheduled jobs.
Step 2: Create a new basic task
- Click Action → Create Basic Task.
- Enter a task name and description (e.g., “Database Backup Script”).
- Click Next to choose a trigger, the event or time that starts the task.
Step 3: Define the trigger (schedule)
Choose when you want the task to run:
- Daily at a fixed time every day.
- Weekly on specific days.
- One-time single execution.
- Repeat every 5 minutes for frequent jobs.
Example: To run every 5 minutes, select “Daily” and then enable “Repeat task every 5 minutes for a duration of 1 day.”
Step 4: Add the action (command or script)
Select Start a Program, then specify the full path to your script or command:
C:\Python39\python.exe "C:\Users\Admin\Scripts\cleanup.py" You can also execute batch files (.bat) or PowerShell scripts (.ps1):
powershell.exe -File "C:\Scripts\check-disk.ps1" Step 5: Review settings and save
Click Finish to create the task. You can view it in Task Scheduler Library, where it will execute automatically according to your defined schedule.
Step 6: Verify and manage the scheduled task
- To run it manually, right-click the task and select Run.
- To edit or disable, choose Properties → Triggers → Edit/Disable.
- For logs and output, open Event Viewer → Windows Logs → Application to review task execution results.
Windows Task Scheduler provides fine-grained control for automating scripts, running system commands or launching applications at precise intervals. It’s the most efficient way to replicate cron job functionality on Windows systems, without requiring additional tools or manual scheduling.
Once you understand how scheduling works across platforms, you can fine-tune task frequency, such as setting up a cron job to run every 5 minutes.
How to set up a cron job to run every 5 minutes?
Running a cron job every 5 minutes is one of the most common automation schedules for system monitoring, cache clearing and data syncing. To achieve this, you use the cron syntax that defines minute-based intervals.
Step 1: Open the crontab configuration
To edit your user’s cron table, run:
crontab -e This opens the user crontab file in the default text editor.
Step 2: Add the 5-minute cron job entry
Use the following syntax:
*/5 * * * * /path/to/command Explanation of each field:
- */5 — every 5 minutes
- * — every hour
- * — every day
- * — every month
- * — every day of the week
Example:
*/5 * * * * /usr/bin/python3 /home/user/scripts/status_monitor.py This continuously executes the Python script every 5 minutes.
Step 3: Log output for verification
To check execution results and debug issues, redirect output and errors to a log file:
*/5 * * * * /usr/bin/bash /home/user/healthcheck.sh >> /var/log/cron_health.log 2>&1 This ensures every run logs both success and error outputs.
Step 4: Verify the job is running
Use the following command to confirm your cron job entry exists:
crontab -l You can also check active logs to verify execution:
grep CRON /var/log/syslog Step 5: Avoid overloading the system
Running tasks, every 5 minutes can increase CPU and disk usage, especially if the job involves large scripts or database queries. To optimize performance:
- Use lightweight scripts.
- Avoid overlapping jobs (ensure each run completes before the next starts).
- Log outputs selectively to prevent disk space issues.
Alternative: Using system crontab for global tasks
If the task needs to run for all users, add it to the system crontab file:
sudo nano /etc/crontab Example entry:
*/5 * * * * root /usr/bin/sh /scripts/uptime_check.sh This executes the script every 5 minutes system-wide as the root user.
Scheduling cron jobs at 5-minute intervals helps automate repetitive checks and maintain consistent uptime monitoring. With proper logging and optimization, you can run high-frequency tasks efficiently across your Linux or Ubuntu systems.
If you manage websites or PHP apps, easily automate scripts via your hosting dashboard by setting up cron jobs in cPanel.
Also read: How to Run a Cron At a Specific Date and Time
How to set up a cron job in cPanel to run a PHP script?
If you’re using a web hosting control panel like cPanel, setting up cron jobs becomes much simpler, no command-line access required. You can configure a PHP script to run automatically at specific intervals directly through your hosting dashboard.
Step 1: Log in access cPanel account
Access your hosting account and open the cPanel dashboard. Scroll down to the Advanced section and click on Cron Jobs.
Step 2: Set the email for cron job notifications
Before creating a cron job, enter an email address under Cron Email. This ensures you receive cron job output or error messages directly in your inbox.
Step 3: Choose the schedule
In the Add New Cron Job section, select how often you want the PHP script to run. You can either choose from the Common Settings dropdown (like “Once per day” or “Every 5 minutes”) or manually set the time values.
For example, to run every 5 minutes:
- Minute: */5
- Hour: *
- Day: *
- Month: *
- Weekday: *
Also read: How to Troubleshoot PHP Script Throws Server 500 Error
Step 4: Add the command to execute your PHP script
In the Command field, specify the absolute path to your PHP binary followed by your script’s location.
Example:
php -q /home/username/public_html/scripts/backup.php If your hosting provider requires the full PHP path, you can check it with:
which phpor find it under Server Information in cPanel.
Step 5: Save and test your cron job
Click Add New Cron Job to save it. Once configured, cPanel’s cron service will automatically execute the command based on your schedule. You can check the last run time or output logs via the email you set or by verifying the script’s results in your application.
Step 6: Manage or edit existing cron jobs
All scheduled tasks appear in the Current Cron Jobs section. Here, you can edit, delete or temporarily disable a job without removing it. If your PHP script doesn’t execute, ensure it has execute permissions and that the file path in the command is accurate.
Using cPanel’s built-in cron interface eliminates the need for terminal commands and is ideal for automating repetitive web tasks such as database cleanups, report generation or sending scheduled emails. It’s especially useful for shared hosting users who want precise task scheduling without managing the cron daemon manually.
How does Bluehost help you automate cron jobs easily?
At Bluehost, we make managing cron jobs effortless through our built-in cPanel interface. You can schedule, monitor and adjust automated tasks directly from your hosting dashboard without touching the command line. Whether you’re a developer or a beginner, our tools help you automate repetitive tasks safely and efficiently.
1. Our cPanel makes cron setup simple
Every Bluehost account includes access to cPanel, where you can easily create and manage cron jobs from the Advanced section. Instead of manually configuring the cron daemon or system crontab files, you can set up scripts, backups or database updates with just a few clicks.
Also read: Exploring cPanel: Key Topics for Optimizing Web Hosting Management
2. We make scheduling PHP scripts and backups easier
You can schedule PHP scripts for cleanups, database syncs or report generation by entering a simple command like:
php -q /home/username/public_html/scripts/cleanup.php With our intuitive timing controls, you can set tasks to run every 5 minutes, hourly or daily, whatever fits your workflow.
Why users trust us for cron automation
- No complex setup required, our interface handles everything for you.
- Automatic email notifications keep you informed of job output and errors.
- Secure environments ensure scripts run under the correct permissions.
- Optimized uptime and server performance for consistent task execution.
- Pre-configured PHP paths simplify script automation and reduce setup time.
3. How we ensure secure and reliable cron execution
We use hardened cron environments across our servers to protect your data and prevent unauthorized access. Each cron job runs under your user’s environment, ensuring isolation and safety.
If your server restarts, our systems automatically resume missed cron jobs, so your scheduled tasks always stay on track, no manual recovery needed.
By hosting with us, you get a streamlined, secure and reliable way to schedule and automate cron jobs. Our goal is to remove the complexity, giving you more time to focus on growing your website while we handle the automation behind the scenes.
What are common cron job errors and how can you fix them?
Even with correct syntax, cron jobs can sometimes fail due to configuration mistakes or permission issues. Here are some of the most common errors and how to resolve them:
| Error | Cause | Fix |
|---|---|---|
| 1. Permission denied / script not executable | Script missing execute bit or wrong user runs the job | Add execute permission: chmod +x script.sh. Use correct user or root crontab. |
| 2. Wrong or relative paths (command not found) | Cron uses a minimal PATH and ignores relative paths | Use absolute paths or define PATH at top of crontab. |
| 3. Missing environment variables | Cron lacks interactive shell variables | Define needed env vars in script or at top of crontab. |
| 4. Incorrect cron syntax | Wrong field count or invalid tokens | Use valid min hour day month weekday command structure. Validate entry. |
| 5. Cron daemon not running | cron/crond service stopped or disabled | Start/enable service: systemctl start cron. |
| 6. Overlapping jobs | Job runs again before previous one finishes | Use flock, lockfiles or safety checks in script. |
| 7. Silent failures (no logs) | Output sent to local mail or discarded | Redirect output: >> logfile 2>&1 or set MAILTO. |
| 8. Disk full issues | No space for logs or temp files | Free disk space, rotate logs, clear journal. |
| 9. SELinux/AppArmor blocks | Security policies prevent script execution | Check audit logs and update policy or script location. |
| 10. User vs system crontab confusion | /etc/crontab requires user field; user crontab doesn’t | Add user field only in system crontab. |
| 11. Missed jobs after reboot | System was down at scheduled time | Use Anacron or make scripts idempotent. |
| 12. cPanel-specific cron issues | Wrong PHP binary or incorrect ownership | Use correct PHP path and set Cron Email for logs. |
| 13. Windows Task Scheduler equivalents | Wrong Start-in directory or PowerShell restrictions | Set correct working directory and adjust ExecutionPolicy. |
1. Permission denied / missing execute permission
Cause: Script file lacks the execute bit or the crontab entry runs as the wrong user.
Fix: Set execute permissions and confirm user context.
chmod +x /path/to/script.sh
# If it must run as root
sudo crontab -e         # edit root's crontab
2. Wrong or relative paths (command not found)
Cause: cron uses minimal PATH; relative paths fail.
Fix: Use absolute paths to binaries and files or define PATH at the top of the crontab.
# in crontab
PATH=/usr/local/sbin:/usr/local/bin:/usr/sbin:/usr/bin:/sbin:/bin
*/5 * * * * /usr/bin/python3 /home/user/scripts/check.py
3. Environment differences (missing env vars)
Cause: Scripts rely on environment variables present in interactive shells.
Fix: Export required env vars inside script or in crontab before entries.
# crontab header
SHELL=/bin/bash
HOME=/home/user
MY_VAR=production
4. Incorrect cron syntax / malformed entry
Cause: Wrong number of fields or bad tokens.
Fix: Validate format min hour day month weekday command. Use online validator or test simple entry.
# every day at 02:00
0 2 * * * /usr/bin/bash /home/user/backup.sh
5. Cron daemon not running
Cause: Cron/crond service stopped.
Fix: Start/enable service and verify.
sudo systemctl start cron
sudo systemctl enable cron
systemctl status cron
6. Overlapping jobs / race conditions
Cause: Long-running job starts again before previous finishes.
Fix: Use lockfile/flock or add a guard in the script.
# use flock to prevent overlap
*/5 * * * * /usr/bin/flock -n /tmp/uptime.lock /usr/bin/bash /scripts/uptime.sh
7. No output / silent failures (hard to debug)
Cause: Cron output goes to local mail or discarded.
Fix: Redirect stdout/stderr to log file and set MAILTO if needed.
[email protected]
*/15 * * * * /path/script.sh >> /var/log/mycron.log 2>&1
8. Disk full / log or temp write failures
Cause: No space for logs or temporary files.
Fix: Free disk space, rotate logs, limit logging verbosity.
df -h
sudo journalctl --vacuum-size=200M
9. Permission / SELinux / AppArmor blocks
Cause: Security policies preventing execution.
Fix: Check audit logs and adjust policies or move script to allowed path.
# audit logs (example)
ausearch -m avc -ts recent
10. User vs system crontab confusion
Cause: Editing /etc/crontab vs crontab -e leads to wrong user field.
Fix: Remember /etc/crontab requires the user field; user crontabs do not.
# /etc/crontab format:
m h dom mon dow user command
11. Missed jobs after reboot or downtime
Cause: The Machine was down at the scheduled time.
Fix: Design idempotent scripts, log last run time or use anacron for infrequent jobs.
# anacron for daily jobs (system-level)
sudo apt install anacron
12. cPanel-specific failures
Cause: Incorrect PHP path or wrong file ownership on shared hosting.
Fix: Use the PHP binary path shown in Server Info, set Cron Email in cPanel to capture output and verify file ownership (public_html user).
Example command for cPanel cron:
/usr/bin/php -q /home/username/public_html/cron/task.php 13. Windows task scheduler equivalents
Cause: Wrong “Start in” directory or missing execution policy for PowerShell.
Fix: Set “Start in” to script folder, use full executable path, adjust -ExecutionPolicy Bypass for PowerShell. Check Event Viewer for task history.
Also read: How to View, Set up and Control WordPress Cron Jobs
Quick diagnostic checklist (commands)
If your cron job isn’t running as expected, use the following quick commands to identify configuration issues, permission errors or service problems:
- List user cron entries: crontab -l
- Check syslog for cron lines: grep CRON /var/log/syslog or grep CRON /var/log/cron
- Confirm service: systemctl status cron
- Test command as cron user: sudo -u username /bin/bash -c ‘/path/to/command’
- Check permissions: ls -l /path/to/script.sh
Preventive best practices
To ensure your cron jobs run reliably and efficiently, it’s essential to follow a few preventive measures that minimize errors and make maintenance easier:
- Always use absolute paths for binaries and files.
- Set SHELL and PATH at the top of the crontab.
- Redirect output to dated logs and rotate them.
- Use flock or pidfiles to avoid overlaps.
- Make scripts idempotent and exit with meaningful codes.
- Monitor cron with alerts (MAILTO or external monitoring).
- Test commands manually under the same user context before adding to crontab.
By following these best practices, you can maintain a clean, predictable and error-free automation environment for your system tasks.
Final thoughts
Mastering how to set up a cron job is key to keeping your system efficient and self-sustaining. Whether you’re automating backups, syncing databases or running maintenance scripts, cron gives you precision control over your workflow with minimal effort. By now, you know how to configure, test and troubleshoot scheduled tasks across Linux, Unix, Ubuntu, Windows and cPanel environments.
Bluehost cPanel makes automation simple, fast and secure. Our intuitive cPanel and optimized hosting environment help you run cron jobs confidently, without touching the command line.
Start automating with Bluehost today and experience truly effortless task scheduling.
FAQs
To set up a cron job, edit your crontab (crontab -e) or create a new file in /etc/cron.d. Add the following line with time fields and the actual command, specify a user for /etc/cron.d, save, cron daemon runs on startup.
The string 30 4 1 15 5 is invalid for standard five-field cron. In /etc/cron.d (Vixie cron) format, fields are minute hour day month day-of-week user. Here 5 looks like a user, likely a mistake or invalid month.
Use ‘*/5 * * * * actual_command’ in crontab (crontab -e). This tells cron daemon to run every five minutes. You can use possible values, multiple values or ranges. For /etc/cron.d include the user field before command; save file and exit now.
2>&1 redirects file descriptor 2 (stderr) to 1 (stdout), combining error output with standard output. Use in crontab lines so cron mails combined output or logs to a file. Always use full paths and ensure the shell executes commands correctly, safely.
Example: 0 2 * * 1 root /usr/local/bin/backup.sh >> /var/log/backup.log 2>&1, runs weekly Monday 02:00. It executes a sh file, appends logs, shows user field in /etc/cron.d, follows file name, actual command and other commands conventions for system startup.
Schedule a script via crontab -e (user) or /etc/cron.d (system). Add a line with time fields and the actual command to run /path/script.sh. Use root for privileged tasks; cron daemon runs at system startup and reliably handles cron tasks daily.


Write A Comment