
Key highlights
- Understand how WordPress anchor links improve UX by guiding website visitors through long pages and helping them find content faster.
- Learn multiple ways to create anchor links in WordPress, from using the block or classic editor to adding them manually with HTML or via plugins.
- Explore best practices for adding anchor links in WordPress, including strategic placement, clean anchor text and accessibility-friendly implementation.
- Uncover common mistakes when creating anchor links, such as broken links, URL clutter and overuse, along with actionable tips to avoid them for better SEO.
- Know how using tools like Easy Table of Contents and conditional menus can automate navigation across your WordPress site and improve engagement.
As a business owner in Canada, you’re always looking for ways to improve user satisfaction on your WordPress website. One key metric that deserves your attention is the bounce rate.
Now, a high bounce rate isn’t always a red flag. The average bounce rate is approximately 50.9%, and for eCommerce sites, it’s around 54.54%—though this varies by industry.
Sometimes, your WordPress site may be so well-structured that visitors find what they need right away and exit. Technically, that still counts as a bounce.
However, if your bounce rate is consistently high, it may signal poor layout or user flow. These issues are worth fixing to keep your WordPress site engaging and effective.
Improving user experience (UX) is a proven way to reduce bounce rates. One simple but powerful UX trick? Add WordPress anchor links. These help WordPress site visitors navigate long form content and quickly jump to the sections they care about most without scrolling endlessly.
What is a hyperlink?
Before we dive deeper into WordPress anchor links, it helps to understand what a hyperlink actually is.
You’ve likely seen hyperlinks all over the internet. They are typically formatted as coloured or underlined text. When clicked, they take you to another web page. These can be:
- Internal links, which keep users on the same website.
- External links, which point to a different page or website altogether.
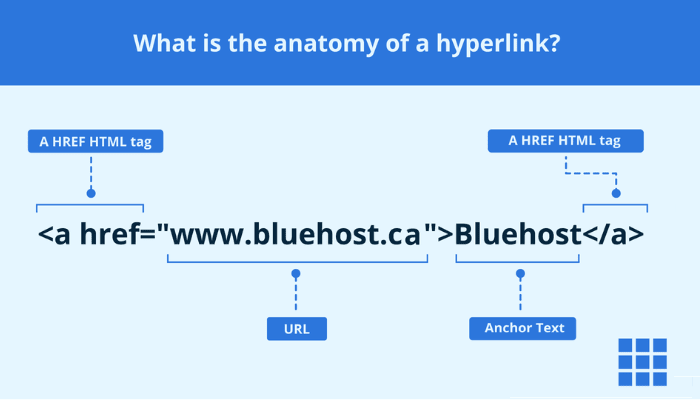
Each hyperlink has two main parts:
- The URL (Uniform Resource Locator) it leads to.
- The anchor text — the visible, clickable words users see.
For example, in the sentence “visit Bluehost for fast web hosting,” the phrase “visit Bluehost” is the anchor text.
In Hypertext Markup Language (HTML), the code for this hyperlink looks like:
<a href="https://www.[bluehost].ca/">visit Bluehost</a> Understanding how hyperlinks work lays the foundation for mastering anchor links in WordPress. They function similarly but point to a specific anchor point on the same page or a different page within your WordPress site.
What is an anchor link?
Anchor links, also known as jump links or page jumps, are a smart way to help your WordPress site visitors move around a long page without scrolling endlessly. Instead of leading to a different page or website like traditional external links, WordPress anchor links guide the user to a specific section on the same page.
Structurally, an anchor link is quite similar to a standard hyperlink. Both use a URL and anchor text. However, an anchor link also includes an anchor ID, a unique identifier that instructs the browser on where to scroll.
We’ll walk through how to create anchor links manually later, but here’s a simple example in action from our post on how to structure a website:

When you click a link in the table of contents, you immediately jump to that section of the page. The actual link updates in the address bar as well.
For instance, selecting the “What Website Structure Is” section changes the URL from: ‘https://www.bluehost.com/en-ca/blog/website-structuring’ to: ‘https://www.bluehost.com/en-ca/blog/website-structuring/#What-Website-Structure-Is’
This is the power of adding anchor links in WordPress. They make it easier for users to navigate long form content and access the desired section in just one click.
Why should you use anchor links?
Adding anchor links help users navigate long pages faster, improve site accessibility and enhance SEO performance—all while boosting engagement on your WordPress website.
Here are 5 reasons why adding WordPress anchor link is worth using on your WordPress site:
- Improved UX and navigation
- Increased engagement
- Better visibility in search engines
- Enhanced accessibility and mobile usability
- Stronger on-page SEO and content structure
Let’s explore each section in more detail to see how anchor links can benefit your WordPress site.
1. Improved UX and navigation
Anchor links enhance your website’s structure and simplify the site’s navigation, especially on content-heavy pages. With a clear table of contents and clickable sections, users can quickly find what they need. This smoother experience keeps WordPress site visitors satisfied and more likely to stay on your WordPress website.
2. Increased engagement
When users struggle to scroll through a long page, they’re more likely to bounce. Even a few seconds of friction can deter them. However, when you easily create anchor links, you empower readers to quickly jump to the desired section. This keeps them engaged and reduces your bounce rate.
3. Better visibility in search engines
Search engines appreciate a well-structured page. When you use clear anchor name and consistent anchor IDs, it helps search engines understand your content. This not only improves SEO, but your anchor links may also appear as jump links beneath your Google listing. A descriptive link architecture boosts your visibility and click-through rate.

4. Enhanced accessibility and mobile usability
Using anchor links also makes your content more user-friendly. Canadians using screen readers or mobile devices simplify navigation across long-form content. Whether it’s a tablet or a smartphone, users can easily reach the anchor point they need without scrolling endlessly.
In short, using anchor links increases satisfaction, improves accessibility and supports your SEO strategy. It also keeps visitors browsing longer on your WordPress site.
Pro tip: Want your anchor links to appear in Google search as jump links? Use descriptive headings and a structured layout to increase the chances.
Where should you place anchor links in WordPress site?
You can create anchor links in Table of contents, lists, indexes, back to top or bottom links, one page websites. Here are a few examples where they can dramatically improve user navigation and experience:
- Table of contents (ToC): On long-form content like detailed guides, blog posts or landing pages, a table of contents lets users quickly jump to any desired section. They are especially helpful for one-page layouts.
- Lists and indexes: Whether you’re building an FAQ page, an alphabetical index or a multi-section resource, using anchor links makes it easy to create custom links that point to each part of the content. They’re ideal for dense WordPress pages with structured layouts.
- Back to top or bottom links: You can use automatic anchor links that return users to the top or bottom of a long page, improving navigation. This is especially useful when your page lacks a sticky menu or sidebar.
- Jump to call-to-action (CTA): Creating anchor links to highlight key actions lets users jump links straight to your contact form, subscription offer or checkout section. This is especially helpful for landing pages where conversions are key.
- One-page websites: If your business or portfolio has a single-page layout, using anchor links in WordPress allows for smooth movement between sections.
Want a cleaner layout?
For long WordPress pages, you can make your table of contents collapsible to reduce clutter. Use the HTML <details> and <summary> tags.
You can also try plugins like Easy Table of Contents or LuckyWP ToC that support toggle features. This helps users focus on the content they care about, especially on mobile.
Helpful tip: Use anchor links only where they enhance navigation. Overusing them on short or simple pages can clutter the experience.
Challenges of using anchor links
Using anchor links without proper care can negatively affect UX, SEO and accessibility. Watch out for these common pitfalls of using WordPress anchor links:
- Damaged SEO: Messy link structure, missing anchor names or blank anchor text can confuse search engines. Ensure your HTML is crawlable and that your anchor tags have clear, descriptive labels to help search engines understand the content.
- URL clutter: Using too many anchor IDs or failing to clean up URLs can lead to messy-looking links. To keep your WordPress website user friendly, aim for clean and readable URLs.
- Accessibility issues: Anchor links can either help or hinder accessibility. If not aligned with Web Content Accessibility Guidelines (WCAG), users with screen readers may miss important navigation. Consider adding a “skip to content” anchor point to improve usability.
- Responsiveness problems: On mobile devices or tablets, poorly created anchor links may be obscured by headers or result in misaligned scroll jumps. Test across devices to ensure a responsive experience for all site visitors.
- Broken links: Updating or reorganising your page content without refreshing anchor targets can result in broken links. Routinely check and update your html anchor tags and anchor IDs to avoid these dead ends.
- Technical glitches: If improperly configured, jump links might conflict with sticky headers or other scroll-based elements. It can cause the linked section to be hidden or misaligned.
- Overuse: Don’t go overboard. Adding too many anchor links to a short post can make the content feel cluttered and confusing rather than helpful.
With careful setup, you can easily create anchor links that enhance navigation without harming usability or SEO on your WordPress site.
How to create WordPress anchor links?
There are a few ways to create anchor links in WordPress, whether you’re using the WordPress Block Editor (formerly known as Gutenberg) or the Classic Editor. You can create an anchor link manually by editing HTML or use the built-in tools to get it done quickly—no advanced coding skills required.
Quick overview: Anchor link methods by editor
Here’s a quick comparison of how you can create anchor links using different tools or editors in WordPress:
| Editor type | Anchor setup method | Tools/notes |
| Gutenberg | Advanced settings > HTML Anchor | Visual-friendly |
| Classic Editor | Manual HTML <id> tags | More control, requires basic HTML |
| Menu items | Custom Link + Conditional Menus | Ideal for one-page navigation |
| Plugin | Easy Table of Contents | Best for non-coders and automation |
Let’s explore step-by-step tutorials to easily add anchor links in both WordPress editors:
How to create an anchor link in WordPress Block Editor?
Let’s start with how to create an anchor link in WordPress Block Editor, ideal for modern WordPress pages.
Step 1: Add the block you want to jump to
This block can be a heading, image, paragraph or any other content block where you want to set your anchor point.

Step 2: Open the Settings tab and go to Advanced
In the top-right corner of your screen, click on the block settings icon. Scroll down and open the ‘Advanced’ tab.
Step 3: Enter a value in the HTML anchor box
In the ‘Advanced’ panel, you’ll see the HTML anchor box. Type in a unique ID (like section-about or features-list). Avoid spaces, and use hyphens or underscores if needed. This value will show up in the actual link URL after a hashtag.
Step 4: Link to your anchor
Now, highlight the text, image or button that will act as your jump link. Click the link icon, then type the anchor ID followed by a hashtag. For example, #features-list.

Use the preview mode to confirm that your created anchor links work. When clicked, the page will quickly jump to the desired section.
How to add an anchor link in WordPress Classic Editor?
If you prefer the WordPress Classic Editor, you can easily add anchor links following a few more steps and a bit of HTML.
Step 1: Switch to the Text editor
- In the upper-right of the editing box, click on the Text tab to switch from the Visual Editor to text mode, where you can edit HTML directly.
Step 2: Add the anchor ID
- Find the element you want to link to, usually a heading in the same page. For example:
<h2>Anchor Link 2</h2> - Add an id attribute to it. Here’s how anchor HTML should look:
<h2 id="anchor-link-two">Anchor Link 2</h2> - You can also apply this to other HTML elements like paragraphs:
<p id="anchor-link-two">Anchor Link 2</p> Step 3: Link to your anchor
- Switch back to the Visual Editor, highlight the clickable text or image and use the link icon. In the URL field, enter your anchor ID prefixed by #. For example, #anchor-link-two.

Preview the page and test your anchor tag. If set up properly, clicking the link should scroll you to the exact anchor point.
How to create a jump link in WordPress manually with HTML?
If you’re comfortable with basic code, you can create anchor links manually using HTML. This method works well across various WordPress editors, providing more control over anchor tags and placement.
Follow these steps on how to create a jump link in WordPress manually:
Step 1: Create an anchor tag
First, assign the anchor name using the HTML id attribute. You can add this anchor tag to various HTML elements like:
<a id="anchor-example"></a> <h1 id="anchor-example">Heading example</h1> <p id="anchor-example">Example text.</p> <span id="anchor-example"></span> Step 2: Link to the anchor tag
Next, create a clickable link that directs users to your anchor. Use a hashtag followed by the anchor ID like this:
<a href="#anchor-example">Example link.</a> This is your actual link, which users click to quickly jump to the desired section on the same page.
Step 3. Insert the HTML code
WordPress gives you multiple ways to edit HTML:
In the Block Editor, add a block, click the three-dot menu and select Edit as HTML.

You can also open the Code Editor by clicking the three vertical dots in the top-right corner of the screen and choosing the editor from the dropdown menu.

If needed, go to Tools > Theme File Editor. But it’s safer to use a child theme rather than editing theme files directly.
You can also use various WordPress plugins to manage HTML anchors more visually, especially if you prefer not to touch code.
Also read: How to Create a WordPress Child Theme, Step by Step
How to add anchor links to a WordPress menu item?
Yes, you can also add anchor links to a WordPress menu. It’s useful on one-page websites or landing pages. These links behave like any other jump link.
If you want these menu items to appear only on specific pages, try using a plugin like Conditional Menus. Here’s how to set it up:
Step 1. Create an anchor ID
Just like earlier, find the section you want to jump to and assign it an anchor ID using HTML. For example:
<h2 id="contact-us">Contact Us</h2> Step 2. Add anchor link to menu
In the WordPress dashboard, navigate to Appearance > Menus. Create a menu, then click the Custom links dropdown. Enter your anchor ID prefixed with a #, such as #contact-us. Then click Add to menu.

Remember, this won’t work properly on pages without the anchor ID. So, creating a global menu like this on a multipage website is not a good idea.
Step 3. Set up conditions
Once you’ve created your menu, click the ‘Manage Locations’ tab. Under one of the provided menu locations, click ‘+ Conditional’ menu, then ‘+ Conditions’. You can set the conditions, so the menu only appears on certain pages.

Helpful tip: Add anchor links in menus only on pages where the matching anchor ID exists to ensure a smooth user experience.
How to use a WordPress plugin to create anchor links?
If the manual steps above seem too technical or time-consuming, you can also add anchor links using a WordPress plugin.
Several plugins let you create anchor links, including “back to top” buttons and dynamic jump links. One of the most popular tools for adding anchor links is Easy Table of Contents.
This plugin is beginner-friendly and works across multiple editors like the WordPress Block Editor, Classic Editor, and popular page builders.
With Easy Table of Contents, you can:
- Automatically insert a clickable table of contents on blog posts or pages.
- Choose where it appears (for example, only on blog posts or custom post types).
- Add anchor links automatically — no coding required.
- Use shortcodes to manually insert the ToC where you want it.
It’s an ideal choice if you manage long form content or frequently publish detailed articles with multiple headings. With just a few settings, you can make it easier for your WordPress site visitors to quickly jump to the desired section and improve both UX and SEO in the process.
In addition to navigation plugins, consider using Yoast SEO to optimize your anchor text and improve visibility in search results. It helps search engines better interpret your content structure, including jump links.
Also, Jetpack includes built-in CDN support and performance features to ensure smooth rendering of anchor-linked sections across devices.
WordPress anchor link best practices
Anchor links improve navigation, but only when used with care. Follow these WordPress anchor link best practices to boost SEO, enhance user experience, and avoid common usability pitfalls:
- Place anchor links strategically
- Use clear, consistent anchor text
- Avoid clutter and overuse
- Test and retest your anchor links
- Style and label them clearly
Let’s explore each section in more detail to help you make the most of your WordPress anchor links.
1. Place anchor links strategically
Add anchor links only where they improve usability. For example, a table of contents can help users quickly jump through a long page, while jump links in FAQ sections can streamline access to answers.
When adding anchor links to your WordPress site, consider a mobile-first approach. A layout that works on a wide monitor may feel cramped or confusing on a phone. Prioritise UX across all screen sizes.
2. Use clear, consistent anchor text
The right anchor text improves both clarity and SEO. Make sure your anchor links are descriptive, so WordPress site visitors know where they’ll land. If you’re linking to a section titled “Contact Us”, your anchor text should say exactly that. Avoid vague phrases like “click here.”
Also, matching anchor text to your section headings helps search engines understand your page structure more effectively.
3. Avoid clutter and overuse
Too many anchor links on one page can overwhelm readers. Keep things clean by limiting use to one table of contents and maybe a “Back to Top” link. On short pages, you may not need them at all.
Also, ensure that your anchor tags don’t open in a new browser tab, as this can break the seamless, same-page experience.
4. Test and retest your anchor links
Check your anchor links after making updates to your WordPress pages or rearranging content. Broken or misaligned links are frustrating and damage credibility.
Test on different browsers, screen sizes and with screen readers. Look out for layout glitches, such as anchor points being hidden under sticky headers or crowded sections lacking whitespace.
5. Style and label them clearly
Make your anchor links stand out from standard hyperlinks with subtle design cues—such as icons, sticky menus or unique colours. You can even use accordions to hide your easy table or ToC behind a collapsible section, making your layout more user friendly.
Above all, ensure that your jump links serve a purpose: they help users navigate, not just jump around for the sake of it.
Pro tip: Anchor links can enhance your SEO when paired with structured content and logical headings.
Final thoughts
Improving UX is always a good goal. Happy users stay longer, browse more pages and are ultimately more likely to become loyal customers.
Anchor links, though a minor feature, can have a significant impact. This is just one small but effective way to improve the UX of your WordPress website.
Another way to boost the UX is to use a faster hosting provider so slow-loading pages don’t have your visitors clicking away.
Bluehost offers affordable WordPress hosting that includes a Cloudflare content delivery network (CDN) for top performance and speeds. We also offer a quick and easy setup plus 24/7 support, so you always have access to help when you need it.
FAQ
An anchor link jumps to a specific section on the same page or external page using an element ID, while a regular hyperlink leads to a different webpage.
Yes. Using anchor text and clear element IDs helps search engines understand your content structure and can even generate jump links in Google search results.
Yes, using anchor links allows users with screen readers or mobile devices to quickly reach the desired section. This improves navigation and meets WCAG/AODA standards.
To create anchor links for WordPress menu items:
1. Go to Appearance → Menus.
2. Choose Custom Links.
3. Insert the anchor ID with a “#” (for example, #contact-us).
4. Add it to the menu and save.
Preview your page and click each jump link to ensure it scrolls correctly. Test on desktop, mobile, multiple browsers and with a screen reader to catch issues.
It’s best to use a unique element ID with lowercase letters, hyphens or numbers. Avoid spaces or special symbols to ensure compatibility and accessibility.
Create an anchor ID on the FAQ heading (for example, id=”faq-section”). Then, use a jump link like href=”#faq-section” so users quickly jump to that question.
No, creating an anchor link doesn’t impact load speed. They only adjust the URL’s hash and scroll position, making them lightweight and easy to use.
Yes. Clicking a jump link updates the entire URL by appending #your-anchor-id. It’s helpful when sharing links that land users directly on specific content.
Yes. You can create an anchor link for another page by including its full URL plus the ID (for example, https://[example].ca/page/#contact-us), leading users straight to that section.


Write A Comment