
Key highlights
- Understand what a URL redirect is and how it guides users from outdated or broken links to the correct page.
- Explore the different types of redirects, including 301, 302, 307, meta refresh and JavaScript, to maintain SEO.
- Learn how to create a URL redirect using Bluehost’s cPanel, WordPress plugins or the .htaccess file effectively.
- Uncover best practices for managing URL forwarding across multiple domains, avoiding redirect loops and improving site performance.
Have you ever clicked a link and ended up on the wrong page or an error screen? Such experiences frustrate visitors and may cause them to leave your site, hurt credibility and reduce search visibility.
That’s where a URL redirect becomes essential. When updating content, changing a web address, launching a new domain or removing pages, redirects guide users to the correct page seamlessly.
Redirecting old URLs helps preserve traffic and SEO value while ensuring search engines continue indexing your updated content properly.
In this guide, you’ll learn how to:
- Understand what a URL redirect is and how it works to guide users effectively.
- Choose the best redirect type to match your site’s goals and structure.
- Create redirects using Bluehost’s cPanel, WordPress plugins or server configuration settings.
- Use the tools we offer at Bluehost to simplify every step of the redirect process.
Let’s get started.
What is a URL redirect?
A URL redirect automatically sends users from an original URL to a different URL, usually because the page has moved, changed or no longer exists.
Think of it like forwarding mail after moving to a new address, visitors accessing the old URL are automatically sent to the new page without taking any action.
For example:
[yourwebsite].com/old-page → [yourwebsite].com/new-page
URL redirects preserve website traffic, maintain SEO value and provide a smooth user experience even when you restructure your site or move to a new domain.
Also read: What is a URL? Understand the Parts, Structure & SEO Benefits
What happens when a user clicks a redirect?
When a user clicks a redirect link, the web server follows a rule that sends the browser to a different URL. The server indicates whether the change is temporary or permanent using status codes such as 301 or 302.
This process prevents 404 errors, eliminates redirect chains and ensures visitors land on the correct page without confusion. It also signals search engines how to treat the change, helping preserve SEO value and page authority.
Understanding these mechanisms is crucial for choosing the right redirect type and sets the stage for exploring the types of redirects and when to use them effectively.
Also read: Everything You Need to Know About 404 Errors
What are the types of redirects and what are they for?
When redirecting a URL, choosing the right method makes all the difference. Each type of redirect has its own behavior, SEO impact and technical setup. Some are best for permanent changes, while others handle temporary redirects or client-side actions.
The table below compares the most common redirect types so you can pick the best option for your site.
| Redirect type | When to use it | SEO impact | Where it’s set |
|---|---|---|---|
| 301 redirect | When a page is moved permanently | Passes most link authority to the new page | .htaccess, Bluehost cPanel, plugins |
| 302 redirect | Temporary content shift (e.g., short-term promotions) | May not pass full SEO value | .htaccess, cPanel, WordPress plugins |
| 307 redirect | Like 302, but HTTP/1.1 compliant | Treated like 302 by search engines | Server headers, CMS platforms |
| Meta refresh redirect | Redirect after a short delay | Weak SEO value; may confuse users | <meta http-equiv=”refresh”> tag |
| JavaScript redirect | Conditional or page-based redirects in web apps | SEO varies; not reliable for all browsers | JS code embedded in the page |
Selecting the correct redirect type is key for both user experience and SEO. 301 redirects are best for permanent moves, while 302 and 307 are ideal for temporary shifts. Meta refresh and JavaScript redirects should be used sparingly, only for special scenario
1. 301 redirect
A 301 redirect signals that a page or URL has been moved permanently to a new location. It passes the majority of SEO value from the original URL to the destination URL, preserving your rankings.
Use it when removing old content, rebranding to a new domain or updating page slugs. You can configure it via server configuration files, your Bluehost cPanel or WordPress plugins.
Also read: 4 Ways To Create a 301 Redirect in WordPress
2. 302 redirect
A 302 redirect is used when a page is temporarily relocated but may return to its original state. Unlike a 301, it does not transfer full SEO authority, which can impact rankings if overused.
It’s ideal for short-term promotions, limited product pages or during A/B testing. You can create this type of redirect using .htaccess, a redirect plugin or hosting tools.
3. 307 redirect
The 307 redirect is the modern alternative to 302 and is compliant with HTTP/1.1. It ensures that the request method (like POST or GET) stays the same after redirection.
While similar in function to a 302, it’s more technically precise and often used in web applications. Some web servers or CDNs default to 307s when headers are configured accordingly.
4. Meta refresh redirect
A meta refresh redirect is placed in the HTML of a page and typically activates after a short delay. You may see this on outdated sites that say, “If you are not redirected in 5 seconds, click here.”
It uses the <meta http-equiv=”refresh”> tag and is not recommended for SEO-critical pages. This method can confuse search engines and frustrate users due to its delay.
5. JavaScript redirect
A JavaScript redirect uses a script to send users to a different URL after the page loads. It’s commonly used in web applications, conditional flows or dropdown menu selections.
Because it relies on client-side execution, it may not be detected or indexed by all search engines. Use it sparingly and avoid it for essential site navigation.
Also read: SEO Fundamentals: Beginners Guide
When should you use a URL redirect?
A URL redirect is more than a technical fix. It helps users reach the correct page, ensures smooth navigation and keeps your website error-free. Here are the most common reasons to implement one:
1. Rebranding or moving to a new domain
When your business undergoes a rebrand or adopts a new domain, redirect old URLs to your updated web address. A 301 URL redirect signals a permanent move, preserving SEO authority and ensuring visitors don’t land on error pages, which could result in lost traffic.
2. Deleting a page or updating a slug
Removing content or changing a URL slug without a proper redirect leads to broken links and frustrated users. Use a 301 redirect to send traffic to a relevant page or different page. Always update internal links whenever you delete old URLs or revise slugs.
3. Switching from HTTP to HTTPS
Migrating your site to HTTPS enhances security and SEO performance. Without a proper server-side URL redirect using a rewrite rule, visitors may still access the unsecured HTTP version. This ensures users access the correct page while avoiding redirection loops.
4. Consolidating duplicate pages
If your website has multiple versions of similar content under different URLs, redirect one version to the main page. Permanent redirects consolidate page authority, prevent search engine confusion and improve user experience across the site.
Also read: What Duplicate Content Is + 9 Steps To Fix and Avoid It
5. Maintenance or temporary downtime
During updates or backend maintenance, a temporary redirect (302 or 307) guides users to an alternate page or message. This keeps the original URL intact while informing browsers and search engines that the move is temporary.
Strategic use of URL redirects ensures users always reach the intended page, prevents broken links and maintains SEO value. Next, we’ll guide you through how to redirect a URL step-by-step, making the process simple and effective.
How to redirect a URL (step-by-step)?
Redirects are essential for maintaining a good user experience and SEO performance. Here’s how to set them up using different methods:
1. Redirect a URL using cPanel
Bluehost offers a user-friendly Redirects tool in its cPanel, making it easy to manage URL redirects for your website. Here’s a quick guide on how to set it up:
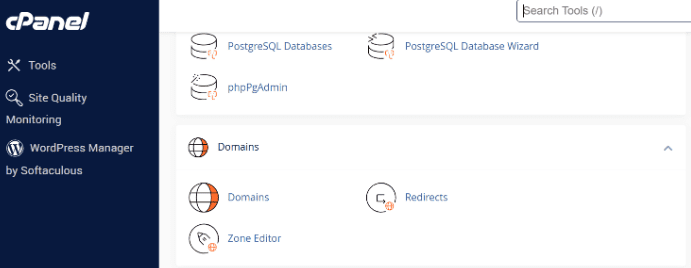
- Log into Bluehost Account Manager: Open your Bluehost account and navigate to the ‘cPanel’.

- Select your domain: Locate ‘Redirects’ in the ‘Domains’ section.
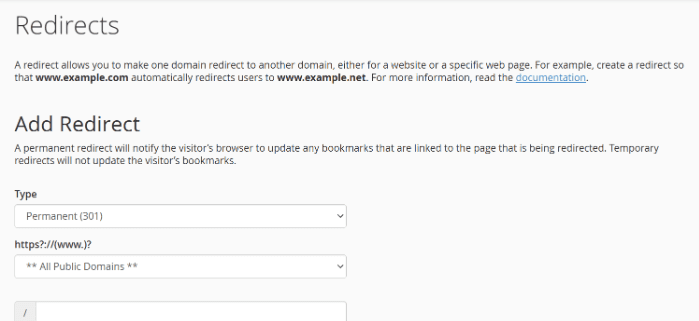
- Choose redirect type: On the Redirect page, select either a 301 (permanent) or 302 (temporary) redirect. Remember to include the protocol (http://, https://).
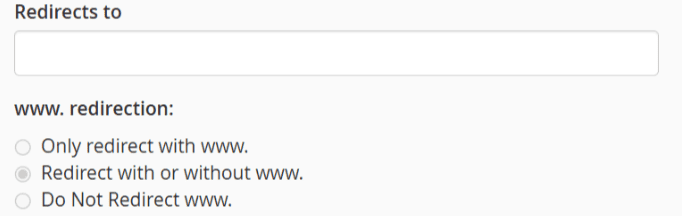
- Redirect options:
- Only redirect with www: Redirects URLs that include www.
- Redirect with or without www: Redirects all variations.
- Do not redirect www: No redirect for www URLs.
- Wild card redirect (Optional): Enable this to redirect all pages (e.g., [www.URL1].com/about to [www.URL2].com/about).
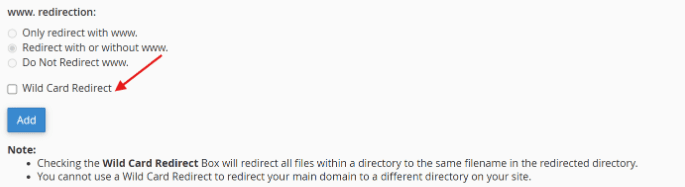
- Finalize: Click to add the redirect. You’ll see confirmation that it’s been successfully set up.
And that’s it! You’ve now created a redirect using Bluehost’s Redirects tool. You can manage or remove redirects from the same page whenever needed.
2. Redirect a URL using WordPress plugins

If you’re using WordPress, setting up a URL redirect is simple with the right plugin. The Redirection plugin is beginner-friendly and requires no coding.
- Go to your WordPress dashboard and click on ‘Plugins’ > ‘Add New’.
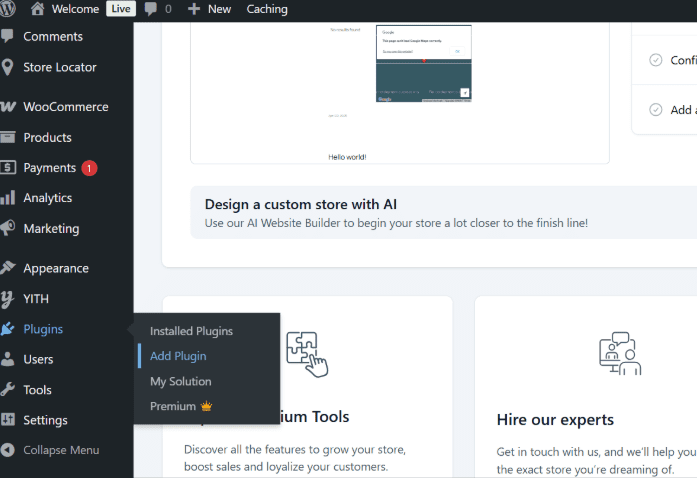
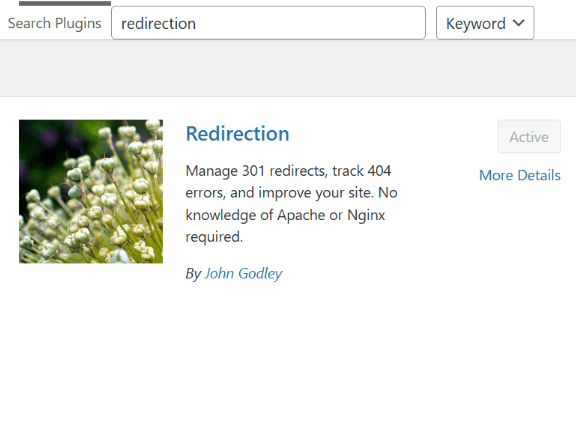
- Search for “Redirection” in the plugin search bar. Click ‘Install Now’ and once the plugin installs, click ‘Activate’.
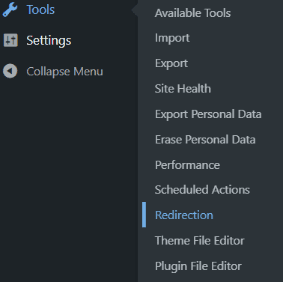
- After activation, go to ‘Tools’ > ‘Redirection’ to begin setup.
- In the Redirection settings, enter the Source URL (original URL) and the Target URL (destination URL). Then, click ‘Add Redirect’ to save your settings.
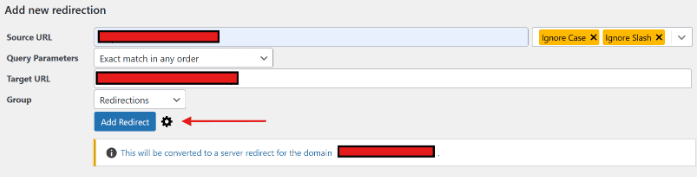
This plugin automatically manages your redirect rules and ensures users land on the correct page without needing any code.
3. Redirect a URL using .htaccess
To set up a redirect using the .htaccess file, first locate the file in your web server configuration files. If it’s hidden, adjust your settings to view hidden files.
Before making changes, back up the existing .htaccess file by downloading a copy. Then, open the file using a text editor and add your redirect code.
For a permanent redirect (301), use:
Redirect 301 /old-url http://www.yoursite.com/new-url
For temporary redirects (302), use:
Redirect 302 /old-url http://www.yoursite.com/new-url
Replace ‘/old-url’ with the URL you’re redirecting from and the new URL with your destination. Save your changes and, if edited locally, upload the modified file back to the server. Finally, test the old URL in your browser to confirm the redirect works correctly.
What are the common URL redirect issues?
URL redirects are essential for maintaining SEO and a smooth user experience during site updates, but mismanaged redirects can create serious technical and performance problems.
1. Redirect chains slow down performance
Problem: When a URL redirect passes through multiple links before reaching the final destination, it increases page load time and frustrates users.
Solution: Minimize redirect chains by linking directly to the final URL. Regularly audit your site using tools or services to identify and resolve chains. This ensures visitors and search engines access the correct page efficiently without unnecessary hops to a different page.
2. Redirect loops cause browser errors
Problem: Redirect loops occur when URLs continuously redirect to themselves or to each other. This often triggers browser errors such as “too many redirects.”
Solution: Map out all redirects during migrations or restructuring. Use redirect checking tools to detect loops early and fix misconfigured rules in server files, .htaccess or other URL redirect settings.
3. Wrong redirect types confuse search engines
Problem: Using a temporary redirect (302) instead of a permanent 301 URL redirect can prevent SEO value from transferring, affecting rankings and visibility in search results.
Solution: Use 301 URL redirects for permanent changes and reserve 302 redirects for short-term website redirects or testing purposes. Correct redirect types help search engines index the new URL properly.
4. Internal links aren’t updated after redirects
Problem: Old internal links pointing to redirected URLs create unnecessary redirect hops, weakening SEO structure and slowing access to content.
Solution: After implementing a URL redirect, update all internal links, menus and blog posts to point directly to the final destination. This ensures users reach the intended different page efficiently.
5. Redirects can break tracking and analytics
Problem: Improperly configured redirects can strip UTM parameters or prevent tracking data from carrying over, causing lost insights from marketing campaigns or blog posts.
Solution: Test all URL redirects with tagged URLs. Ensure query parameters are preserved through the redirect process so traffic, conversions and analytics data remain accurate.
By identifying and resolving common URL redirect issues, you can maintain SEO value, improve site performance and ensure users reach the correct page without confusion. Next, we’ll explore the best practices for URL redirects to prevent these issues and optimize both user experience and search engine performance.
What are the best practices for URL redirects?
Implementing a URL redirect is more than simply pointing one web address to another. Incorrect redirects can harm SEO, frustrate users and disrupt your website’s functionality. Following these best practices ensures smooth site performance, faster page loads and better visibility in search results.
Use a 301 URL redirect for permanent changes
Whenever a page or domain moves permanently, use a 301 URL redirect. This tells browsers and search engines that the original URL should now point to one URL or one page, helping transfer SEO value, preserve traffic and maintain rankings. Avoid temporary redirects like 302 for permanent moves. Always use the correct redirect target URL to ensure users access the intended page.
Avoid redirect chains and loops
Redirect chains occur when one redirect sends users to another URL, which then redirects again. This slows down your website, confuses users and weakens SEO signals. Redirect loops send visitors in circles, causing errors. Test each redirect link to ensure it points directly to one page, avoiding multiple choices or incorrect versions.
Update internal links and navigation menus
After creating redirects, update internal links to point directly to the new URL. This includes links in menus, buttons, footers or blog posts. Direct links reduce server dependency, improve page load times and provide a smoother experience for users accessing your main site or other pages.
Match the redirect type to your intent
Choose the appropriate redirect type for each situation. Use a 301 URL redirect for permanent changes and 302 or 307 redirects for temporary moves. Reserve meta refresh or JavaScript redirects for special scenarios. Correct redirect types ensure users, search engines and different versions of your content interpret the change as intended.
Test every redirect
Before going live, verify that all redirects work correctly. Test the full URL in a browser to confirm users land on the correct page. Check for status code errors, multiple choices or missing paths to ensure your website redirect strategy preserves SEO value and provides seamless access.
Following these best practices ensures your URL redirections maintain SEO value, improve user experience and prevent errors across your site. Next, we’ll see why Bluehost provides tools that make managing redirects simple, efficient and reliable for website owners.
Why does Bluehost make redirect management easy?
At Bluehost, we understand that setting up a URL redirect can feel overwhelming, especially for beginners. That’s why we provide tools and features that make URL redirection fast, code-free and SEO-safe.
1. Simple redirect setup in cPanel
Our cPanel interface lets you create URL redirections for domains, subfolders or individual pages in just a few clicks. You can choose between permanent (301) or temporary (302) redirects without editing server configuration files, ideal for tasks like switching from HTTP to HTTPS or forwarding a root domain.
2. Plugin compatibility for WordPress users
Bluehost integrates seamlessly with popular WordPress plugins like Redirection and Yoast SEO. On select plans, Yoast SEO Premium is included at no extra cost, letting you automate redirects, manage rules and guide users and search engines efficiently, all without coding. These plugin features make URL redirection management effortless.
3. Expert support and SEO-ready hosting
Need help with rewrite directives, web application redirects or avoiding redirect loops? Our 24/7 support team assists with server-side redirects and plugin configurations. Plus, Bluehost hosting plans come optimized with fast servers, built-in SSL, NVMe SSD storage, advanced caching and SEO Checker features to improve performance and protect search engine visibility.
With Bluehost, you don’t need to be a developer to handle URL redirection, just the right tools and a platform built to support your goals.
Final thoughts
A clear URL redirect strategy keeps users on the right page, preserves SEO rankings and strengthens your website’s structure. Proper redirects prevent broken links, consolidate old URLs and ensure a seamless experience for every visitor.
At Bluehost, managing redirects is effortless. Our cPanel tools and WordPress plugins let you set up permanent or temporary redirects without touching code, ensuring smooth navigation across your site.
With just a few clicks, you can redirect a single page, an entire folder or even a full domain. Plus, our 24/7 expert support ensures every redirect works perfectly, giving you confidence in your website’s performance.
Take control of your website today, join Bluehost and simplify URL management, boost site performance and deliver a flawless experience to every visitor.
FAQs
A 301 redirect is permanent, telling browsers and search engines that a page has moved and transferring most SEO value to the new page. In contrast, a 302 redirect is temporary and does not pass full ranking signals.
Yes. With Bluehost or WordPress, you can create a URL redirect without editing server files. Built-in tools and plugins like Yoast SEO or Redirection make it easy to set up, manage and monitor redirects for your website.
Not if done properly. A 301 URL redirect preserves SEO authority, maintains backlinks and prevents traffic loss from outdated links. Properly implemented redirects ensure search engines continue indexing your updated content correctly.
Absolutely. Plugins like Redirection and Yoast SEO Premium let you create and manage redirect rules, handle different status codes and implement complex redirects without coding. They simplify the process for beginners.
Use a 301 redirect for permanent URL changes to maintain SEO value, while a 302 redirect works for temporary moves like promotions or maintenance. Both can be set up easily using Bluehost cPanel or WordPress plugins.


Write A Comment