
Key highlights
- Learn why Ninja Forms email notifications don’t work and how to diagnose the problem quickly.
- Understand how to configure SMTP settings to ensure your form submissions reach the inbox.
- Discover proven methods to prevent Ninja Forms emails from landing in the spam folder.
- Explore solutions for common compatibility issues that cause Ninja Forms not sending email problems.
- Know the best practices for reliable email delivery on your WordPress website.
Using WordPress for your website has plenty of perks, including access to plugins like Ninja Forms. Ninja Forms is a popular contact form builder built specifically for WordPress websites. If you need your customers to fill out forms, then Ninja Forms can become an indispensable part of your workflow. But what happens when you run into issues with these plugins?
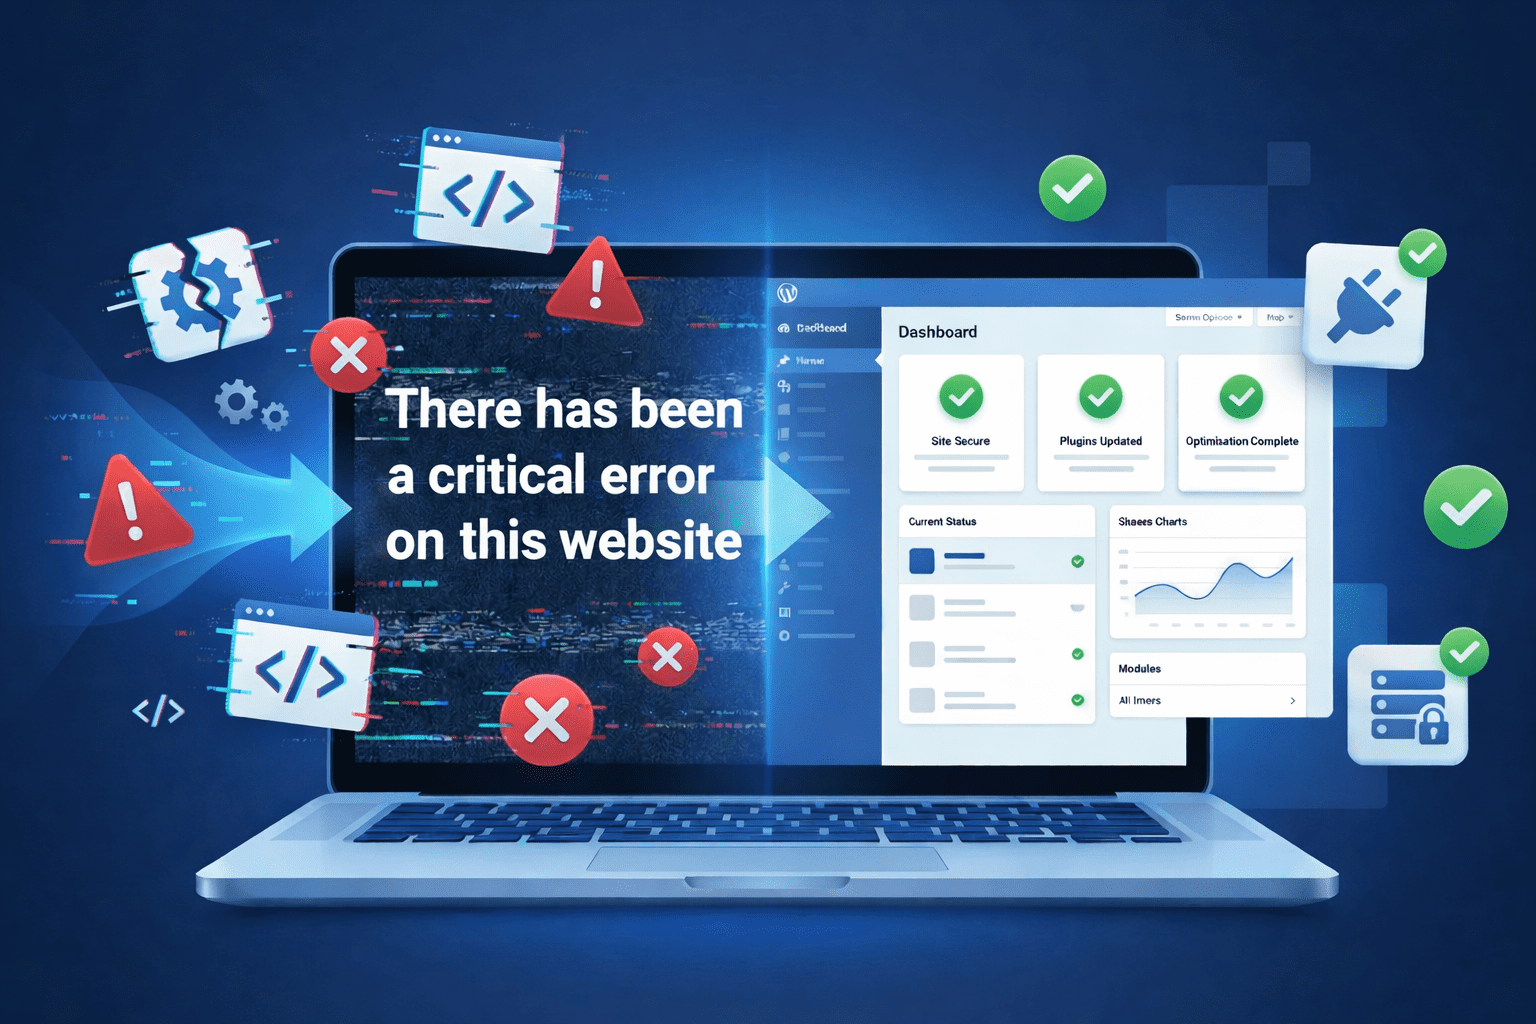
The most common issue that thousands of WordPress users face every day is Ninja Forms not sending emails. A form that doesn’t send notifications is like a phone that doesn’t ring. This can lead to missed feedback opportunities, lost lead connections and stagnant audience growth.
The good news? These issues are usually simple to fix. Most email delivery problems stem from a handful of common causes.
In this comprehensive guide, you’ll discover exactly why Ninja Forms is not sending emails. More importantly, you’ll learn the step-by-step fixes that actually work.
Let’s dive right into it.
Why is Ninja Forms not sending emails?
Ninja Forms not sending email usually happens because of how WordPress sends emails by default. WordPress sites use the PHP mail function to send emails.
The PHP mail function is unreliable. Many email providers, like Gmail, reject emails sent through PHP mail. They see these emails as potential spam.
Here are the main reasons why Ninja Forms emails fail:
1. Server configuration issues: Your web host might not have proper configuration for email delivery. Some hosting providers block outgoing emails to prevent spam.
2. Missing SMTP settings: Without a Simple Mail Transfer Protocol (SMTP) plugin, WordPress relies on the basic PHP mail function. This method has poor deliverability rates.
3. Incorrect email addresses: If your administration email address is wrong, notifications go nowhere. The email address must be valid and accessible.
4. Spam filters: Email services often flag WordPress emails as spam. This happens when emails lack proper authentication, like Sender Policy Framework (SPF) and DomainKeys Identified Mail (DKIM) records.
5. Plugin conflicts: Sometimes other plugins interfere with Ninja Forms email notifications. Compatibility issues between plugins can block email delivery.
6. Form configuration errors: Wrong settings in the Ninja Forms dashboard can prevent emails from sending. A single misconfigured field causes the entire notification to fail.
The root cause is almost always related to email delivery infrastructure. WordPress wasn’t designed with robust email sending in mind. However, a few quick fixes can solve the issues.
Now that you understand why problems arise, let’s learn about the steps you need to follow for fixing Ninja Forms.
Also read: How to Understand and Resolve Email Error Messages
How to fix Ninja Forms not sending emails?
You can fix Ninja Forms not sending email by following the troubleshooting steps provided here. The fixes range from simple settings checks to installing an SMTP plugin. Each solution targets a specific cause of email delivery failure.
Let’s walk through the details of how to fix the problems likely to be responsible for Ninja Forms not sending emails.
Step 1: Test your contact form
Before making changes, confirm that the issue is actually an email problem. Sometimes the form itself has issues. Here’s what you should do:
- Submit a test form on your WordPress site and fill out all required fields with real information. Use your own email address in any email field.
- After submission, check if you see a success message. The success message confirms that the form processed your submission correctly.
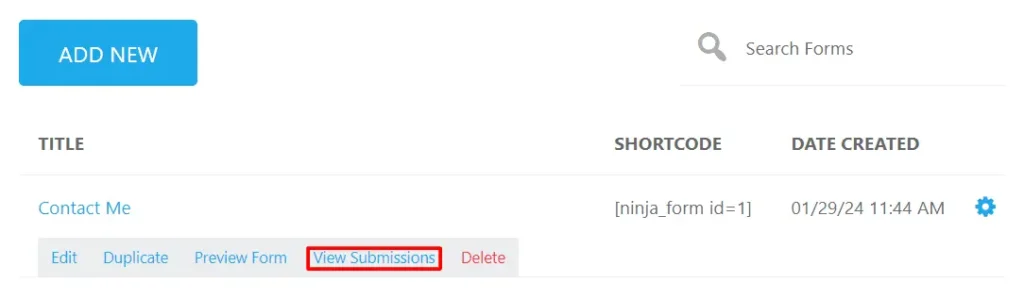
- Next, go to your WordPress dashboard, navigate to Ninja Forms and click on submissions. Look for your test submission in the list.
- If your submission appears here, the form works fine. The problem is only with email notifications. If your submission doesn’t appear, the form itself has problems.
- Check your spam folder too. Sometimes Ninja Forms emails end up there instead of your inbox.
This quick test helps you understand where the problem lies. It saves time by pinpointing the exact issue.
Step 2: Check your Ninja Forms settings
Inspecting your form settings can help you pinpoint why you’re not receiving Ninja Forms emails. To get started, go to your WordPress dashboard. From here, select Ninja Forms and then click on “Dashboard”. Next, select “Emails and Actions”. You’ll see the four actions Ninja Forms includes, which can be turned on or off using the toggle:
- Record Submission
- Email Confirmation
- Email Notification
- Success Message
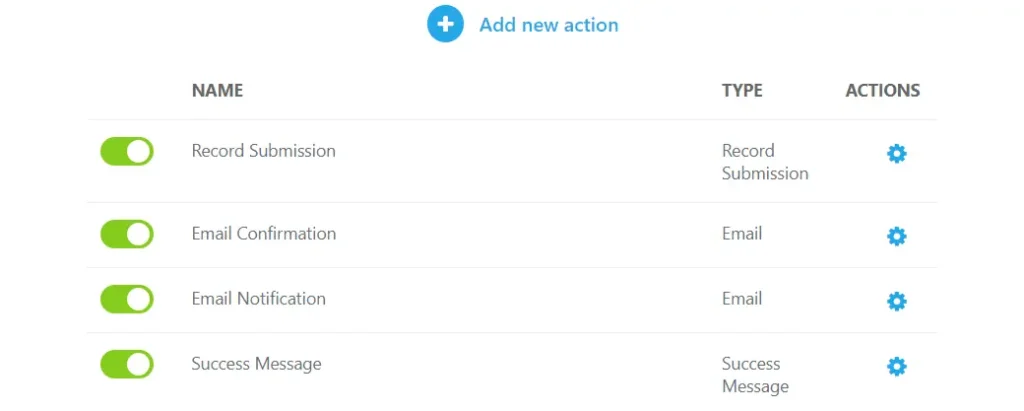
Check that all actions are properly configured to trigger notifications after form submission. If all are enabled but messages aren’t sending, you may need to adjust settings within the actions.
Click the gear icon next to an action to make edits. We’ve already tested the Success Message feature, but if your success message didn’t arrive, you may need to adjust those settings as well. Here’s more details about the options:
1. Record Submission
Record Submission stores all the information website visitors enter on your form and automatically saves it in the WordPress database.
Select “View Submissions” to review the entries for your form.
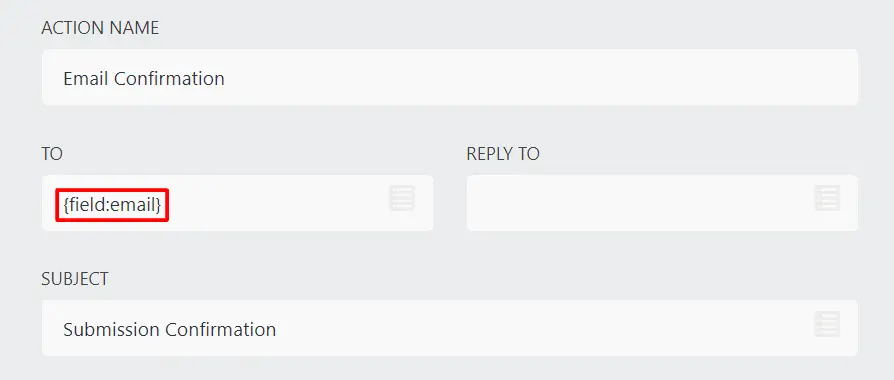
2. Email Confirmation
Email Confirmation manages the emails sent to a website visitor after submitting your form. By default, the confirmation email is sent to the “To” email address provided in the form using the {field:email} merge tag.
3. Email Notification
The Email Notification tool contains your form submission data, which is automatically sent to {system:admin_email}. It’s the email the website owner receives after a user submits the form.
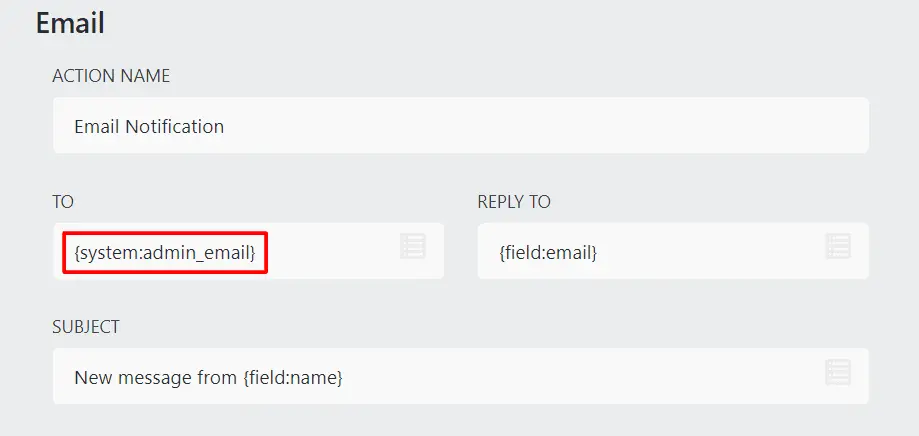
Note that the system:admin_email is the default WordPress admin email address. If your email address is mistyped, Ninja Forms will send emails to the wrong address.
You can check which email address you’ve set as the administration email address by going to “Settings” and then “General”. From here, search for the Administrative Email Address and make any adjustments necessary.
If everything checks out with the form settings, don’t panic. There are still other ways to fix Ninja Forms emails not sending, such as using an SMTP plugin.
Step 3: Install an SMTP plugin
Installing a Simple Mail Transfer Protocol (SMTP) plugin is the most effective fix for Ninja Forms not sending email. A properly configured Ninja Forms SMTP server replaces the unreliable PHP mail function. It sends emails through a proper email service instead.
You can choose from many SMTP WordPress plugins, including free ones like the Gmail SMTP server and each will have its own set of instructions. Here’s the steps you need to take:
1. Choose an SMTP plugin: The most popular option is WP Mail SMTP plugin. This plugin has millions of active WordPress users. Other good choices include Post SMTP and Easy WP SMTP.
2. Install the plugin: From your WordPress dashboard, go to plugins and click add new. Search for “WP Mail SMTP” and click install now. Activate the plugin after installation.
3. Run the setup wizard: WP Mail SMTP includes a setup wizard for easy configuration. The wizard walks you through connecting your email service.
4. Select your email provider: Choose your email provider from the list. Options include Gmail, Outlook, SendGrid and others. Each provider has different setup steps.
5. Configure SMTP settings: You’ll need to enter SMTP server details. Your email provider supplies these settings. Common requirements include:
- SMTP host address
- SMTP port number
- Encryption type (SSL or TLS)
- Authentication credentials
With WP Mail SMTP properly configured, your Ninja Forms plugin can send emails reliably. The SMTP server handles delivery instead of PHP mail.
Also read: How to Send WordPress Emails Using WP Mail SMTP Plugin – Bluehost Blog
Step 4: Test to confirm that Ninja Forms is sending emails
After installing your SMTP plugin, test Ninja Form thoroughly. Testing confirms that all your changes work correctly. Here’s how to test Ninja Forms for successful email delivery:
- Submit a new test form on your WordPress site. Use different information than your previous tests. Include your real email in the email field.
- Check your inbox within a few minutes. Ninja Forms notification emails should arrive quickly. Look for the subject line you configured earlier.
- If you don’t see the email, check your spam folder. Mark the email as “not spam” if you find it there.
- Test multiple scenarios if your form has conditional logic. Submit forms with different answers. Each variation should trigger the appropriate email notification.
- Verify that form submissions still appear in your Ninja Forms dashboard. Both the database and sending email should work simultaneously.
If test emails arrive successfully, congratulations! Your fix Ninja Forms problem is solved. Let’s see what you need to do if your Ninja Forms emails keep landing in spam.
Step 5: Stop emails from going to spam
Fixing delivery is only half the battle. You need to stop Ninja Forms emails from landing in spam.
Email providers use strict filters to block spam. Your WordPress emails must prove they’re legitimate. Here’s how to improve deliverability:
1. Use a professional email address: Don’t send from addresses like noreply@[yoursite].com. Use a real address like contact@[yoursite].com instead. Email services trust real addresses more.
2. Match your domain: Your “from email” should match your website domain. If your site is [example].com, use email@[example].com. Use a business email to avoid domains triggers spam filters.
3. Configure DNS records: Add SPF and DKIM records to your domain’s DNS settings. These records authenticate your emails. Most email services provide these records automatically.
4. Avoid spam trigger words: Don’t use words like “free,” “urgent,” or “act now” in email subjects. These words flag spam filters. Keep subject lines professional and relevant.
5. Send consistent volumes: Sudden spikes in email volume look suspicious. If you suddenly send hundreds of emails, spam filters activate. Warm up your email address gradually.
6. Monitor your sender reputation: Email providers track your sender reputation. Too many spam complaints hurt your reputation. Sending to valid addresses protects your reputation.
The above-mentioned issues can be easily taken care of by opting for a branded email from the right email hosting provider. Bluehost provides a professional email hosting solution that comes with preconfigured settings optimized for WordPress. This eliminates the need for extra configuration to ensure that your emails get delivered.
Our email solution includes:
- Pre-configured SMTP servers optimized for deliverability
- Multiple security options, including TLS encryption
- Simplified setup through your hosting control panel
- Professional email addresses matching your domain name
- Reliable support for email-related issues
On top of that, you get 24/7 access to our support service for help with issues regarding your email hosting. Choose Bluehost Professional Email for an optimized email experience today!
Implementing these practices keeps your Ninja Forms email notifications out of spam folders. Good email hygiene ensures reliable delivery. Now, let’s look at some additional Ninja Forms fixes that you can perform beyond the ones listed above.
What are some additional Ninja Forms fixes?
Sometimes standard solutions don’t solve every problem. These additional fixes address less common Ninja Forms issues.
Try these solutions if the main fixes don’t work. They target specific problems that affect some WordPress sites.
How to solve compatibility issues with Ninja Forms?
Compatibility issues happen when plugins conflict with each other. Two plugins might use the same WordPress functions incorrectly.
1. Update to the latest version: Outdated plugins cause most compatibility problems. Update Ninja Forms to the latest version available. Also, update all other plugins on your WordPress site.
2. Deactivate other plugins: Temporarily deactivate all plugins except Ninja Forms. Submit a test form to see if it works. If emails were sent successfully, another plugin was causing problems.
Reactivate plugins one by one. Test your form after each activation. This process identifies the conflicting plugin.
3. Check for JavaScript errors: JavaScript errors can break form functionality. Open your browser’s developer console while viewing your form. Look for error messages in the console.
If you see errors, they might point to the problematic plugin. Search for solutions to those specific errors.
4. Switch your theme temporarily: Sometimes WordPress themes conflict with Ninja Forms. Activate a default WordPress theme and test your form with the default theme.
If the form works with a different theme, your theme has compatibility issues. Contact your theme developer for a solution.
How to solve blank submissions in Ninja Forms?
Blank submissions are frustrating. You receive an email notification, but the form data is missing. Let’s see how to fix them.
1. Check field mapping: Field mapping tells Ninja Forms which data goes where. Incorrect mapping causes blank submissions. Go to your form actions in the Ninja Forms settings.
Click “Edit” on your email notification. Review how merge tags map to form fields. Each merge tag should reference an actual form field.
2. Review conditional logic: Conditional logic might hide fields during submission. If fields are hidden, their data doesn’t submit. Check all conditional rules in your form.
Make sure required fields always appear. Hidden required fields create blank submissions.
3. Increase PHP limits: Low PHP memory limits can truncate form data. Ask your web host to increase PHP memory limits. A limit of 256MB works well for most WordPress sites.
You can also increase the maximum post size. This setting controls how much data forms can submit.
4. Disable caching temporarily: Caching plugins sometimes interfere with form submissions. Temporarily disable caching on your WordPress site. Test your form to see if blank submissions stop.
If disabling caching fixes the problem, exclude your form page from caching. Most caching plugins allow page-specific exclusions.
5. Check for security plugins: Security plugins might block certain form submissions. They see suspicious patterns and reject the data. Review your security plugin settings.
Add Ninja Forms to your security plugin’s whitelist. This prevents false positives.
How to solve reCAPTCHA not working?
ReCAPTCHA protects forms from spam. When it doesn’t work, users can’t submit forms successfully. Here’s how to fix them.
1. Verify your API keys: Incorrect reCAPTCHA keys cause most problems. Go to your Ninja Forms settings. Find the reCAPTCHA configuration section.
Check that both the site key and the secret key are correct. Even one wrong character breaks functionality. Copy keys directly from your Google reCAPTCHA account.
2. Check your reCAPTCHA version: Google offers reCAPTCHA v2 and v3. Make sure your keys match your version. V2 keys don’t work with v3 and vice versa.
3. Add your domain to Google reCAPTCHA: Your WordPress site domain must be registered with Google. Log in to your Google reCAPTCHA admin panel. Add your exact domain to the authorized domains list.
Include both www and non-www versions of your domain. For example, add both [example].com and www.[example].com.
4. Check for JavaScript conflicts: ReCAPTCHA requires JavaScript to function. Other scripts might interfere with reCAPTCHA loading. Inspect your page with browser developer tools.
Look for JavaScript errors that mention reCAPTCHA. Fix any errors you find.
5. Clear your cache: Cached reCAPTCHA scripts sometimes become outdated. Clear your WordPress cache completely. Also, clear your browser cache and cookies.
6. Test with a different browser: Browser extensions might block reCAPTCHA. Test your form in a private browsing window. Try multiple browsers to isolate the problem.
If reCAPTCHA works in some browsers but not others, browser extensions are interfering. Disable extensions and test again.
These fixes resolve most reCAPTCHA problems with Ninja Forms. ReCAPTCHA should work smoothly after proper configuration.
Also read: How to Troubleshoot Email Deliverability Issues.
How can Bluehost help you fix the Ninja Forms issue?
Choosing the right hosting provider prevents most Ninja Forms email problems before they start. Bluehost WordPress Hosting offers features that make Ninja Forms work reliably from day one.
Being the hosting provider officially recommended by WordPress, our platform is pre-optimized for the best compatibility with WordPress plugins. This means you’ll easily be able to manage all your WordPress plugins, including Ninja Forms, without technical hassles.
Here’s how our hosting solution takes care of plugin compatibility:
- One-click WordPress installation: Setting up WordPress on Bluehost takes just minutes. The automated installation includes recommended settings for email delivery. You start with a solid foundation.
- Performance optimization: Our fast-loading hosting service, supported by global data centers, improves submission success rates. This ensures that your forms load quickly and users complete submissions without timeout errors.
- Built-in email authentication: Bluehost provides configured SPF and DKIM records for your domain. These DNS records authenticate your emails with email providers. Proper authentication keeps your form notifications out of spam folders.
- Reliable SMTP infrastructure: Bluehost provides robust email infrastructure for all hosting plans. The SMTP server settings work seamlessly with WordPress. Your email notifications reach recipients consistently.
Apart from these, our expert support team specializes in WordPress issues. If you encounter problems with Ninja Forms notifications, our experts are available 24/7 to help you troubleshoot.
Don’t want plugin issues affecting your website? Choose Bluehost WordPress Hosting for a reliable hosting experience!
Beyond choosing a good hosting, following the best email practices will ensure your notifications continue working reliably. Let’s explore the most important practices for maintaining healthy email delivery.
What are the best practices for sending Ninja Forms emails?
Following best practices ensures long-term reliability for your WordPress form. These tips prevent future email delivery issues.
- Use descriptive subject lines: Make email subjects specific and clear. Include the form name or purpose. For example: “New Contact Form Submission from Your Website.”
- Send to multiple recipients: Don’t rely on a single email address. Add multiple recipients for important notifications. This prevents missed submissions if one address fails.
- Keep form fields simple: Complex forms with many fields can cause problems. Only ask for information you actually need. Extra fields slow down submissions and increase errors.
- Use reply-to addresses correctly: Set the reply-to address to the person who submitted the form. This lets you respond directly. The merge tag for the email field should go in reply-to.
- Monitor email delivery regularly: Don’t assume emails will always work. Check your notifications regularly. Submit test forms monthly to catch problems early.
Following these best practices keeps your contact form working smoothly. Prevention is easier than troubleshooting broken notifications later.
Also read: Email Marketing Best Practices to Boost Engagement in 2025
Final thoughts
Ninja Forms not sending email doesn’t have to be a mystery. The solution usually involves installing an SMTP plugin and configuring it properly. Most email delivery problems stem from WordPress’s default mail function. Replacing it with SMTP fixes the majority of issues.
You now have the knowledge to fix Ninja Forms emails permanently. Start by testing your forms and installing an SMTP plugin. Then apply the best practices to maintain reliable delivery. Your notifications will reach the inbox every time.
Don’t let broken email notifications cost you leads. Take action today to fix your WordPress website.
Ready to build a reliable WordPress site? Check out Bluehost WordPress Hosting with 24/7 access to our experts for support.
FAQs
A common reason for not receiving emails from your WordPress form is that your web host might not support the PHP mail function that WordPress uses to send emails. Improperly configured settings are another possible reason your WordPress emails aren’t sending.
Form actions in Ninja Forms automatically trigger certain actions after a potential lead successfully submits a form. These actions are found under the Emails and Actions tab of the form builder. Plus, you can add more actions with the blue plus button.
One way to fix emails not receiving messages is to use SMTP rather than the PHP mail function. SMTP enables you to send emails via a third-party email service provider that adds authentication details to your email.
Ninja Forms allows you to set how long you’ll save form submissions. Under the Emails and Actions tab, select the Record Submission action and then Advanced to access the toggle button and enter the number of days.
Test your contact form monthly and after any major plugin or WordPress updates. Regular testing catches problems before you miss important submissions.
Contact your web host to enable email sending. Alternatively, use an external SMTP service that bypasses your host’s restrictions. Bluehost provides WordPress hosting optimized for email deliverability.


Write A Comment