Key highlights
- Split testing helps compare two versions of a web page or element to find what improves conversions and engagement.
- Testing headlines, CTAs, layouts, images and forms can reveal what drives better results for your target audience.
- Tools like VWO, Optimizely and Thrive Optimize simplify split testing for beginners with visual editors and goal tracking.
- Valid test results depend on having enough traffic, a clear goal and reaching statistical significance.
- A proper staging environment allows you to safely test changes before making them live, supporting better decision-making and reducing risk.
Did you know that changing just a few words on your website could dramatically increase your sales? Or that adjusting the position of your sign-up form might double your leads?
These aren’t marketing myths. They’re real possibilities when you discover what actually works for your specific audience.
When you guess what your visitors want, you leave money on the table. But when you test different versions of your pages head-to-head, you uncover exactly what drives people to act.
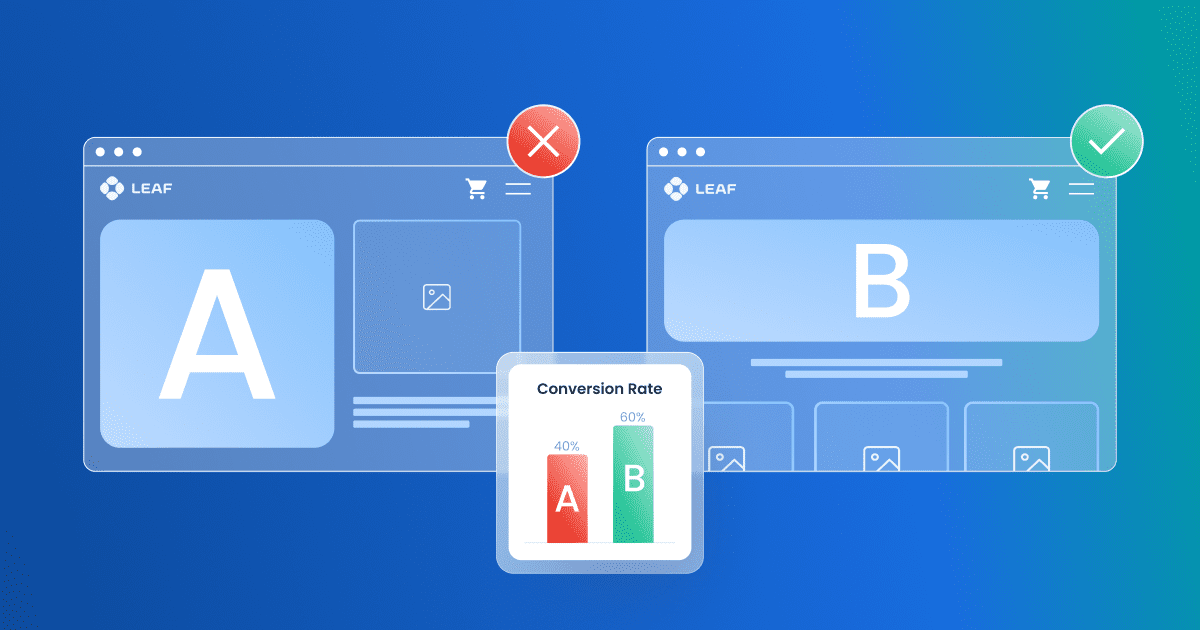
This approach – called split testing or A/B testing – eliminates the guesswork from your website optimization. You create two versions of a page element, show them to different visitors and measure which one performs better.
In this guide, you’ll learn how to implement split testing to boost conversions, engage more visitors and grow your business with data-backed decisions.
What is split testing and why does it matter?
Split testing is a website optimization method where two versions of a web page are compared to determine which performs better based on user behavior and key metrics.
You show these versions to different audience segments and track how users interact with them.
Instead of relying on guesswork, split testing uses data to guide your changes. This approach leads to better decisions and helps you create a more effective website.
Here’s why split testing is so important:
- It helps you test one element at a time or full page layouts.
- You can measure results based on key metrics like bounce rate or average order value.
- The process helps you reach statistical significance, reducing the chances of misleading outcomes.
- It improves visibility in search engines by enhancing the user experience.
- The test results support your business goals with clear, actionable insights.
Split testing not only highlights what works but also shows what doesn’t. Over time, these small adjustments can have a major impact on your conversion rate and overall site performance.
How do you set up a split test step-by-step?
To get accurate split testing results, you need more than just a new version of your page. A well-structured process helps you collect data using the process of statistical analysis and make informed decisions that improve business metrics.
Here’s how to set up and run a split test successfully.
Step 1: Identify a page or funnel that needs improvement
Select a high-traffic page with clear conversion goals. You need at least 1,000 monthly visitors to reach statistical significance in a reasonable timeframe.
Look for these specific opportunities:
- Product pages with conversion rates below 2%
- Landing pages with bounce rates above 70%
- Checkout pages where users abandon their carts
- Signup forms with completion rates under 25%
Open your Google Analytics account and navigate to Behavior > Site Content > All Pages. Sort by pageviews and conversion rate to quickly spot underperforming pages with sufficient traffic.
Step 2: Create a variation with a single, focused change
Duplicate your page and modify just one element. This helps you pinpoint exactly what caused any performance changes.
Here are some examples of high-impact elements to test first:
- Primary CTA button: Change “Buy Now” to “Get Started Today” or adjust the color from blue to orange
- Headline: Test “Save 50% Today” against “Limited-Time Discount Available”
- Form fields: Reduce from 7 fields to 3 essential ones
- Social proof: Add customer testimonials above the fold
For WordPress sites, install Nelio A/B Testing through your dashboard. Navigate to Nelio A/B Testing > Add Test > Page, then select your page and create your variation using the built-in editor.
Step 3: Set a specific, measurable goal
Define exactly what metric determines success. This tells your testing tool how to evaluate performance.
Configure these common goals in your testing tool:
- Click-through rate on a specific button (aim for at least 5% improvement)
- Form submissions (target at least 10% increase)
- Revenue per visitor (look for minimum 3% lift)
- Time on page (aim for 20% increase)
In Nelio A/B Testing, go to your test settings and select “Define a new goal.” Choose “Click on link or button” and specify the exact button ID or URL destination.
Also read: Top 10 Ways to Set Goals for Your Website and Measure Success
Step 4: Launch the test and monitor performance
With your goal in place and both versions ready, it’s time to launch the test. Bluehost offers a reliable staging environment that lets you preview changes before going live. This ensures both versions look and function correctly.
Follow this launch checklist:
- Verify both versions display correctly on mobile and desktop.
- Confirm tracking works by making test conversions.
- Set traffic split to 50/50 between original and variant.
- Run the test for at least 14 days or until you reach 250+ conversions per variation.
Check your test dashboard every 3-4 days. Watch for data collection issues like sudden traffic drops or tracking errors.
Also read: How to Create a Staging WordPress Site
Step 5: Analyze results and implement winners
Wait until your test reaches 95% confidence before declaring a winner. This typically requires 250-400 conversions per variation.
Review these specific metrics:
- Conversion lift percentage (is it positive and significant?)
- Confidence level (aim for 95% or higher)
- User behavior by device type (did mobile and desktop users react differently?)
To implement the winner in WordPress, either publish the winning variant directly from your testing tool or manually update your original page with the successful elements.
Next, document what you learned and plan your follow-up test based on these insights. Successful split testing requires continuous improvement, not just one-off experiments.
What elements should you test on your website?
When you start split testing, choosing the right elements makes a big difference. You don’t need to redesign everything. Focus on specific components that directly impact user engagement, conversion rate and other business metrics.
Below is a quick-reference table showing common elements you can test and what kind of results you can expect from each.
| Test element | Variation examples | Expected outcome |
| Headline | Question vs. statement | Increase in click-through rate |
| CTA button | “Get Started” vs. “Start Free Trial” | Higher conversion rate |
| Page layout | Single-column vs. two-column | Lower bounce rate, better engagement |
| Form fields | 3 fields vs. 7 fields | More form submissions, lower drop-offs |
| Pricing display | Highlighted discounts vs. standard layout | Higher average order value |
| Social proof | Testimonials above fold vs. below | Increased trust, improved conversions |
These quick comparisons help you prioritize what to test first. While the table offers a high-level view, the impact of each element depends on your audience, your goals and your page context.
Now, we’ll explore each element in more detail—so you can decide where to start and how to test for the best possible results.
1. Headlines and CTAs
Your headlines grab attention. Your calls-to-action (CTAs) drive action. Together, they can make or break a page.
Small tweaks in wording or placement can deliver big improvements. Testing different styles helps you understand what appeals most to your target audience.
Here’s what to test:
- Headline tone: Casual vs. direct
- Headline length and clarity: Short vs. descriptive
- CTA button color and placement: Contrasting vs. subtle
- CTA phrasing: “Start Free TriDal” vs. “Get Started Now”
- Placement: Above the fold vs. after scroll
The right headline increases click-through rates. The right CTA boosts conversions. Split testing these two can reveal what drives your users to act.
2. Images and page layout
Visuals matter. They influence how users feel—and whether they stay or leave.
Testing different images and page layouts helps improve bounce rates, guide user attention and create a smoother path to conversion.
Try testing:
- Product images vs. lifestyle images
- Color schemes and visual contrast
- Page layouts: single-column vs. two-column
- Navigation structure and scroll depth
- Visual hierarchy of sections and CTAs
When done right, these tests lead to better split testing results and help deliver a stronger customer experience across your site.
3. Forms and pricing
Your forms and pricing tables are often the final steps before conversion. Even small changes here can impact trust, clarity and conversion success.
Here’s what you can test:
- Number of form fields required
- Field order and label clarity
- Form layout: stacked vs. inline
- Price anchoring or discount placement
- Pricing tiers and value messaging
Testing these elements helps you collect data on user behavior and refine the final steps of your funnel. You’ll see which variation lowers friction and increases average order value.
What tools are best for split testing beginners?
If you’re just starting with split testing, the right tools can make the process smooth and stress-free. Beginner-friendly platforms help you build tests, monitor performance and analyze results without needing advanced technical skills.
Instead of juggling complex setups, you can focus on what matters—testing elements, improving conversion rate and learning what works for your audience.
1. Google Optimize (sunset note)
For many marketers, Google Optimize was the first step into A/B testing. It integrated well with Google Analytics and made it easy to test two versions of a page or create small content variations.
However, Google officially retired Optimize in 2023. If you previously used it, you’ll find similar workflows in other tools, many of which now offer better interfaces and more flexibility for running split tests and tracking key metrics.
2. VWO, Optimizely and easy-to-use alternatives
Several modern tools now fill the gap left by Optimize. These platforms are built with beginners in mind and come with visual editors, real-time data tracking and support for multivariate testing and more.
Here are some of the best options:
- VWO (Visual Website Optimizer):
Designed for both beginners and pros. VWO makes it easy to test landing pages, buttons and copy, while offering additional features like heatmaps and form analytics.
- Optimizely:
Known for its scalability, Optimizely supports split testing across websites, mobile apps and digital products. It’s ideal if you plan to expand beyond basic A/B testing in the future.
- Nelio A/B Testing (WordPress plugin):
A powerful choice for WordPress users. Nelio lets you test different components like headlines, layouts and CTAs—all without leaving your dashboard.
- Thrive Optimize:
Perfect for marketers focused on landing pages and lead generation. It works directly with Thrive Architect and simplifies the process of running and reviewing test results.
Each of these tools allows you to test, track and refine your website elements efficiently. Whether you’re adjusting a form layout, headline or ad copy, these platforms offer the control and clarity you need to make informed decisions.
3. Bluehost staging feature
Bluehost’s built-in staging environment makes testing even easier. It provides a secure space to preview changes before going live—an essential step when accuracy and presentation matter.
Here’s how it helps:
- Create and test multiple versions of your page in a secure setting.
- Run layout experiments without disrupting the live site experience.
- Integrate with WordPress plugins like Thrive Optimize or Nelio A/B Testing.
This environment is perfect for testing new page layouts, pricing updates or email campaign landing pages. With Bluehost’s WordPress hosting, you can confidently launch changes backed by real data—not guesswork. Your tests will run on optimized servers that ensure reliable split testing results and a smoother experience for your visitors.
Final thoughts
Improving your website isn’t about making random changes—it’s about making smart, informed decisions. Split testing gives you the clarity to see what works, what doesn’t and why. It turns user behavior into actionable insight, helping you shape a site that performs better with every test.
Instead of guessing, you test with purpose. Small adjustments—like a clearer headline or a stronger call-to-action—can lead to measurable gains in conversions, engagement and revenue. Over time, each experiment builds momentum and brings you closer to your goals.
To make that process easier, Bluehost offers tools that support safe, confident testing. With features like WordPress staging environments and plugin compatibility, you can run experiments without risking your live site—so you can focus on what really matters: growing with confidence.
Get started with Bluehost today!
FAQs
A/B testing usually compares two versions of a single element, like a headline or a button. Split testing is a broader term that can include testing full page variations, different layouts or multiple design elements at once. Both help you measure performance and improve conversion rates.
You need enough traffic to reach statistical significance. While there’s no exact number, most tools recommend having at least 1,000 visitors per version. This helps ensure your test results are reliable and not influenced by random chance.
Yes, you can. Tools like Nelio A/B Testing offer free versions for WordPress users. Google Analytics can help you track results manually. If you’re on Bluehost, the staging feature allows you to safely test changes before going live.
Most testing tools automatically calculate statistical significance for you. To validate your split testing results, let the test run long enough, make sure you’ve reached the required sample size and aim for at least a 95% confidence level.
Start with something simple and high-impact—like your headline or call-to-action. These elements directly influence click-through rates and conversions, making them a great starting point for beginners.
