Key highlights
- Learn how to create custom WordPress menu systems and their impact on user experience.
- Discover step-by-step processes for creating and customizing navigation menus from your dashboard.
- Master menu hierarchy and organization techniques that improve site usability.
- Understand how proper menu structure enhances SEO rankings and visitor engagement.
- Explore advanced customization options including custom links and category integration.
Your website navigation can make or break visitor engagement within seconds. Imagine a potential customer landing on your WordPress site, searching for your services, but getting lost in cluttered menus and scattered links. They leave frustrated and you lose business. That’s where mastering WordPress custom menus becomes crucial. With the right navigation structure, you guide visitors exactly where they need to go, boost user experience and increase conversions dramatically.
Whether you’re organizing product pages, blog categories or service offerings, learning to create and customize WordPress menus transforms your site from confusing to conversion-ready. This comprehensive guide walks you through every step of building effective custom menus that keep visitors engaged and help your content rank higher in search results.
What are WordPress custom menus?
Custom menus in WordPress are user-defined navigational structures that give you complete control over how visitors browse your site, unlike automatically-generated navigation lists.
These menus let you add any content type—pages, posts, categories, custom links and external URLs—while controlling their order, hierarchy and structure to match your audience’s needs.
You can display custom menus in multiple strategic locations across your website, including primary navigation, footers and sidebars. Advanced WordPress themes may offer additional placement options for greater navigational flexibility.
WordPress stores menu data separately from your site content, enabling you to reorganize navigation without impacting your pages or posts. This architectural independence gives you complete flexibility when designing your site’s navigation system.
With this foundation in place, let’s move on to the practical steps for creating your first custom menu.
Also read: How to Add Navigation Menus in WordPress
Why should you use WordPress custom menus?
Creating custom menus in WordPress delivers four core benefits: improved SEO rankings through better site architecture, increased user engagement from intuitive navigation, a polished professional appearance that builds credibility and mobile-responsive design that works seamlessly across all devices.
1. Better SEO performance
Custom WordPress menus establish organized navigation hierarchies that improve SEO performance by enabling search engines to crawl and index your site more efficiently. These structured menus signal content relationships and page importance to search bots, strengthening your overall site architecture and potentially boosting your search rankings.
2. Enhanced user engagement
Strategic custom menu placement directs visitors seamlessly to your most important content, creating intuitive navigation structures that enhance user experience. This thoughtful organization encourages deeper exploration of your pages, naturally improving visitor retention while boosting conversion rates and minimizing bounce rates.
3. Professional appearance
Custom menus give your site a polished, professional look that builds credibility with visitors. They allow you to highlight your most important pages and organize content strategically to support your business goals while delivering an exceptional user experience.
4. Mobile responsiveness
Modern WordPress themes automatically transform custom menus into mobile-friendly formats like hamburger menus and dropdown navigation. This responsive design ensures visitors on smartphones, tablets and desktops enjoy consistent, intuitive access to your site’s pages and content.
For optimal menu performance, choosing a reliable hosting provider is essential. Bluehost delivers WordPress-optimized environments with automatic updates and performance enhancements that ensure your custom menus load quickly and function smoothly across all devices.
Now that you understand the benefits of custom WordPress menus, let’s walk through the step-by-step process of creating them.
How do you create WordPress custom menus from the dashboard?
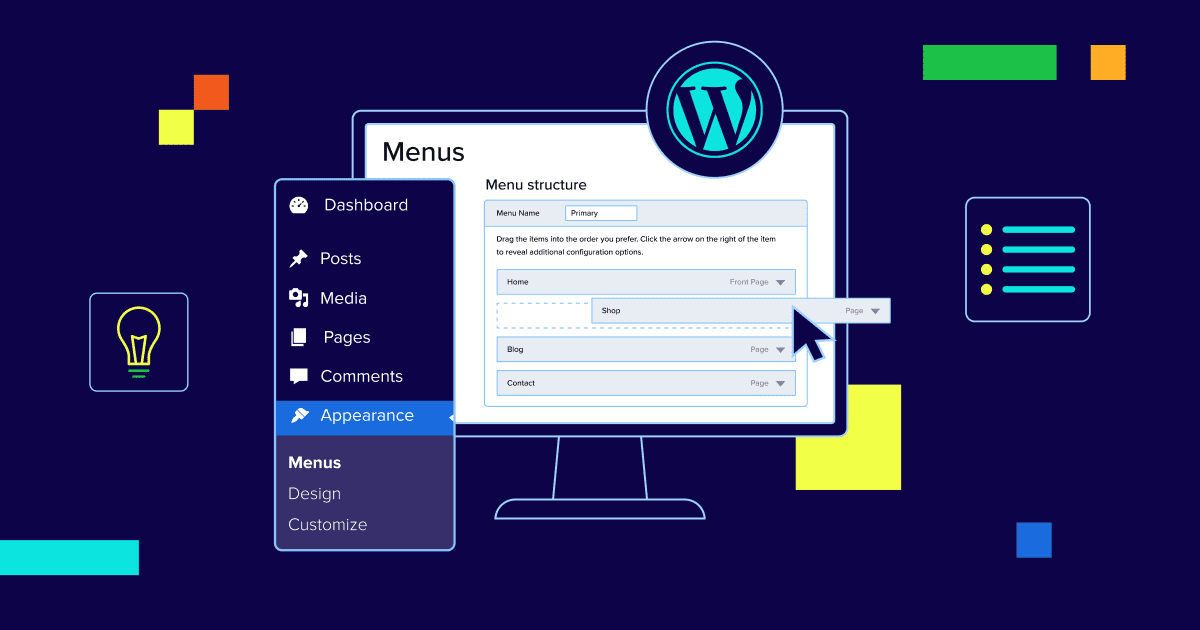
Create custom menus in WordPress by navigating to Appearance > Menus in your dashboard, where you can build organized navigation structures that help visitors explore your site efficiently. The WordPress custom menu system allows you to control exactly how users navigate through your content, organizing pages, posts, categories and custom links into intuitive menu structures complete with dropdown submenus.
Step 1: Access your WordPress dashboard and click Appearance > Menus in the sidebar to open the menu management interface.
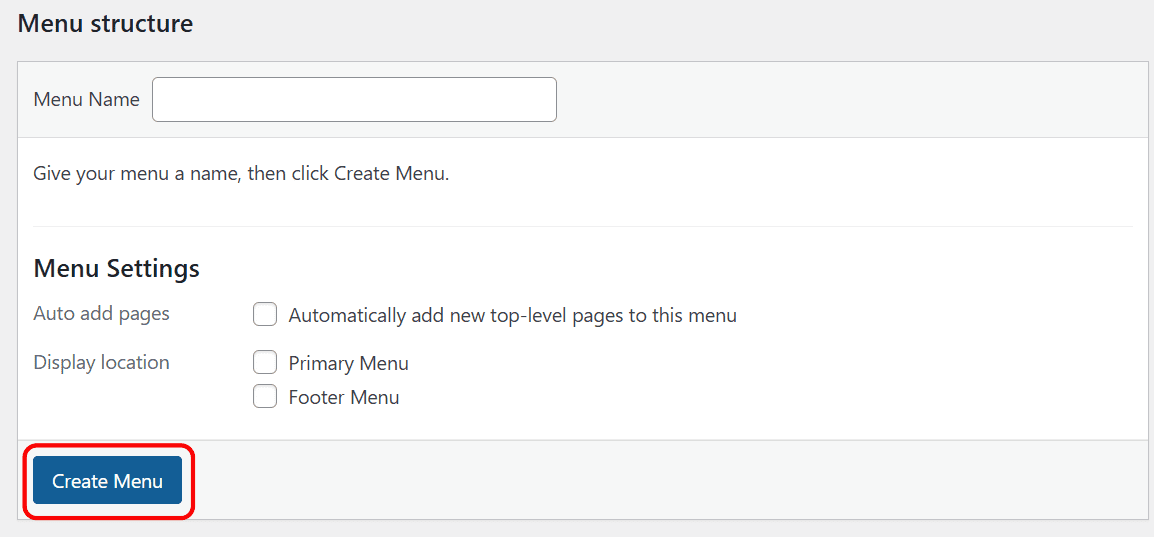
Step 2: Click the “Create a new menu” link at the top of the page to initialize a new navigation menu.

Step 3: Enter a descriptive name such as “Primary Navigation” or “Main Menu” that reflects the menu’s purpose, then click “Create Menu” to establish your navigation foundation.
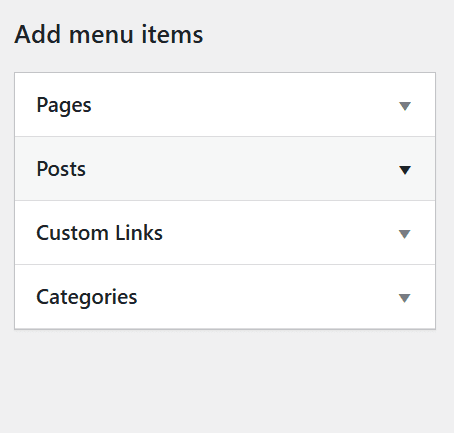
Step 4: Select items from the left sidebar panels—including pages, posts, categories and custom links—by checking the boxes next to the content you want in your WordPress custom menu.
Step 5: Click the “Add to Menu” button to insert your selected items into the menu structure on the right side of the screen.
Step 6: Build hierarchical dropdown menus by dragging items slightly to the right beneath their parent items, creating nested submenu structures.
Step 7: Click the “Save Menu” button to preserve all changes and activate your custom navigation structure.
Your WordPress custom menu is now live and ready to guide visitors through your site. The menu automatically appears in your selected theme location, providing seamless navigation across all pages. Now that your basic menu structure is in place, you can explore advanced menu customization techniques including custom CSS styling, conditional menu items and responsive navigation patterns.
Also read: Best Simple WordPress Themes for Custom Menu Design
How do you customize WordPress menus effectively?
Strategic menu organization improves user navigation, reduces bounce rates and enhances site performance. Implementing WordPress custom menu best practices requires attention to hierarchy, link structure and design consistency.
1. Creating logical menu hierarchy
A logical menu hierarchy groups related content under parent categories with subcategories as dropdown items. Structure your main navigation with a maximum of seven top-level items to prevent cognitive overload and decision paralysis.
Use descriptive, keyword-rich labels that clearly communicate page content. Replace generic terms like “Services” with specific labels such as “Web Design Services” or “WordPress Development.” This approach improves both user understanding and search engine optimization.
Organize product pages under a “Products” parent with specific categories as sub-items. This hierarchical structure enables visitors to quickly locate relevant content while maintaining a clean, professional navigation system.
2. Adding custom links to menus
Custom links expand your WordPress menu functionality beyond standard pages and posts. Access the “Custom Links” option in the menu builder to add external websites, email addresses or internal page anchors.
For external links, include the complete URL with “https://” prefix. Email links require the “mailto:” protocol followed by the email address. Internal anchors use the format “#section-name” to jump to specific page sections.
Apply descriptive anchor text that indicates the link destination. This practice enhances accessibility for screen readers and improves overall user experience across your WordPress site.
3. Incorporating categories and tags
Category integration streamlines content discovery for blogs and content-heavy websites. Add only categories containing substantial, well-developed content to your WordPress custom menu structure.
Exclude empty or sparse categories from navigation menus. Empty category pages frustrate visitors and damage user experience when visitors attempt to explore related content.
Design custom category pages that introduce topics before displaying individual posts. This contextual framework improves content engagement and provides visitors with clear navigation pathways.
Also read: Custom WordPress Mega Menu Navigation Example
4. Menu design best practices
Concise menu labels prevent layout breaks on mobile devices and eliminate visual clutter. Test menu functionality across desktop, tablet and mobile formats to ensure consistent performance and readability.
Maintain consistent styling throughout your menu system including font sizes, colors, spacing and hover effects. This visual consistency reinforces brand identity and improves user navigation patterns.
Integrate icons or visual elements to enhance navigation intuitiveness. Modern WordPress themes support icon integration within menu structures, providing visual cues that complement text labels.
Also read: WordPress Web Design Best Practices
5. Advanced customization options
WordPress enables CSS class assignment for individual menu items, allowing custom styling for specific navigation elements. Configure target attributes to control link behavior—external links typically open in new tabs to retain visitors on your site.
Utilize description fields to add contextual information for menu items. Many WordPress themes display descriptions as tooltips or subtitle text, providing additional guidance without cluttering the main navigation.
Advanced WordPress hosting environments simplify customization implementation. Bluehost WordPress hosting includes built-in caching and performance optimization that maintains fast loading speeds for complex menu structures.
With your menu structure optimized and customization complete, the next step involves managing multiple menus for different site locations and devices.
Also read: How to Create Custom Anchor Links in WordPress
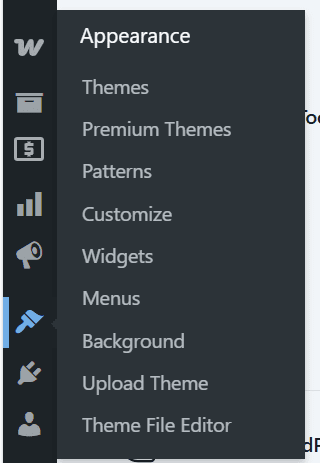
How to add menu support to WordPress themes?
Older themes may not automatically support WordPress custom menus. If your theme lacks this feature, you can add menu support by editing your theme’s functions.php file. This code tells WordPress that your theme can display navigation menus in designated locations.
Navigate to Appearance > Theme File Editor in your WordPress dashboard. Select functions.php from the right sidebar and scroll to find an appropriate location to insert your code—preferably after the opening PHP tag and before any other functions.
Insert this single line of code to activate menu support across your theme:
add_theme_support( 'menus' );
After enabling general menu support, you’ll want to register specific locations where menus can appear. For example, you might register locations for a primary navigation menu in your header, a footer menu, and a mobile menu. This gives you precise control over where different menus display on your site.
Before making any theme modifications, create a child theme to preserve your customizations during theme updates. Direct theme edits will be overwritten when you update your theme, potentially breaking your site’s navigation structure.
How to create a custom menu using the WordPress wp_nav_menu function
The wp_nav_menu function gives you programmatic control over menu placement in your theme files. Unlike drag-and-drop menu assignment, this function lets you specify exact locations, add custom CSS classes, and define fallback behavior. To use this function effectively, first create your menu in Appearance > Menus, then reference it either by theme location or by its specific name.
Open the theme file where you want your menu to appear—typically header.php for main navigation or footer.php for footer menus. Insert wp_nav_menu(array('theme_location' => 'primary')) to display a menu assigned to the “primary” location, or use wp_nav_menu(array('menu' => 'Main Navigation')) to call a specific menu by name. After saving your changes, clear any caching plugins and check your live site to verify the menu displays correctly with proper styling applied.
Also read: How to Create and Customize a WordPress Child Theme
Create a custom menu using the wp_nav_register function
Menu registration connects the menus you create in WordPress to specific template locations in your theme. Without registered locations, WordPress doesn’t know where your menus should appear, and you won’t see location options in the Menu Settings panel.
- Access your functions.php file through Appearance > Theme File Editor in WordPress, or connect via FTP to edit the file directly in your child theme folder.
- Add the registration code using the register_nav_menu function:
register_nav_menu('primary-menu', 'Primary Navigation');
The first parameter (‘primary-menu’) is the location slug referenced in your theme templates, while the second parameter (‘Primary Navigation’) is the human-readable label displayed in the WordPress admin. - Save the file and refresh your WordPress admin area to see the new menu location appear under Appearance > Menus in the Menu Settings box.
- The location slug serves as the technical identifier that connects wp_nav_menu() calls in your templates to menus assigned in your dashboard, creating a bridge between admin settings and frontend display.
Important: Always use a child theme when modifying functions.php to prevent losing your customizations during theme updates. Test all changes on a staging site first to catch potential errors before they affect your live website.
What wp_nav_menu parameters should you use?
The wp_nav_menu function accepts an array of parameters that control menu behavior and appearance. The theme_location parameter connects to registered menu positions, while the menu parameter targets a specific menu by name or ID when you need direct control. For markup customization, container defines the wrapper element (defaulting to ‘div’), container_class adds CSS classes to the wrapper, and menu_class applies classes to the unordered list element itself.
Understanding parameters like depth and fallback_cb gives you precise control over your WordPress custom menu structure. The depth parameter limits menu nesting—set it to 1 for flat menus without dropdowns, 2 for single-level dropdowns, or 0 to allow unlimited nesting for complex hierarchical navigation.
The fallback_cb parameter defines what displays when no menu is assigned to a location—typically wp_page_menu for a basic page list, or false to show nothing. Strategic parameter configuration helps you add specific CSS classes for styling hooks, simplify mobile navigation by limiting dropdown depth, and ensure semantic HTML structure that screen readers can properly interpret for accessibility compliance.
Which wp_nav_menu CSS classes can you style?
- current-menu-item – Automatically applied to the menu item matching the currently displayed page, allowing you to highlight active navigation
- current-menu-ancestor – Applied to parent menu items when viewing a child page, helping users understand their location in the site hierarchy
- menu-item-has-children – Identifies menu items containing sub-menus, essential for adding dropdown indicators or toggle functionality
- sub-menu – Applied to the unordered list containing dropdown items, used for positioning and animating nested navigation
- menu-item-object-page – Indicates the menu item links to a WordPress page rather than a post, category, or custom link
- menu-item-type-post_type – Identifies the content type being linked, useful for applying different styling to various content types
These WordPress-generated classes enable sophisticated styling for active navigation states, hierarchical menu indicators, and dropdown functionality. Target current-menu-item to highlight the active page, use current-menu-ancestor to show breadcrumb trails in your navigation, and apply hover effects to menu-item-has-children to indicate expandable sections. Test your menu styling across all devices since responsive breakpoints may require different CSS approaches—some themes use JavaScript to convert desktop dropdowns into mobile-friendly slide-out panels or accordion menus.
Common WordPress menu issues and solutions
WordPress custom menu creation is straightforward, but users frequently encounter four critical issues: theme compatibility conflicts, mobile responsiveness failures, performance bottlenecks and CSS styling problems. Understanding these challenges and their solutions ensures your navigation remains functional across all scenarios.
1. Theme compatibility and menu location conflicts
Different WordPress themes register unique menu locations with distinct identifiers and positioning requirements. When switching themes, your existing menu assignments may become orphaned because the new theme doesn’t recognize the previous location identifiers. Navigate to Appearance > Menus, verify available theme locations and reassign your menus to the appropriate positions defined by your active theme.
2. Mobile menu functionality failures
Dropdown navigation relies on JavaScript execution for proper mobile rendering. If your mobile menu fails to expand or respond to touch interactions, investigate two primary culprits: verify your theme’s responsive menu settings are properly configured and confirm JavaScript files are loading correctly without console errors. Browser developer tools provide real-time diagnostics for identifying script conflicts or missing dependencies.
3. Menu rendering performance optimization
Slow menu load times typically indicate server-level performance constraints rather than WordPress-specific issues. Your hosting infrastructure directly impacts menu rendering speed through PHP execution time, database query performance and HTTP response latency. Optimize hosting configurations with adequate resources, implement object caching for menu queries and ensure your WordPress installation runs on recommended server specifications for optimal navigation performance.
4. CSS styling conflicts and resolution strategies
Multiple CSS sources—your theme, plugins and custom stylesheets—can create conflicting style declarations that affect menu appearance. When menu styling behaves unexpectedly, use browser developer tools to inspect element styles, identify competing CSS rules and determine their source. Override problematic styles by increasing specificity in your child theme or custom CSS, ensuring your declarations take precedence over conflicting rules.
With these troubleshooting solutions implemented, you’ll maintain consistent, functional navigation across your WordPress site. Now let’s examine the best practices and advanced techniques that elevate your custom menu implementation from functional to exceptional.
Final thoughts
Learning how to Create Custom Menus in WordPress gives you full control over your site’s navigation and user experience. Well-structured menus help visitors find content faster and improve overall engagement. Custom menus also support better site organization as your content grows. With WordPress, building and updating menus does not require technical skills. However, reliable hosting plays a key role in smooth menu performance and site stability.
We at Bluehost provide optimized WordPress Hosting that makes customization easy and secure. Start building cleaner navigation today with Bluehost powering your WordPress site.
FAQs
WordPress custom menus enhance user experience through organized site structure, reduce bounce rates, improve crawlability for search engines and enable strategic internal linking that boosts page authority and SEO rankings.
Navigate to Appearance > Menus in WordPress dashboard, create a new menu, add pages or custom links using drag-and-drop interface, then assign menu to theme location without any coding required.
Yes, WordPress custom menus support responsive design through themes and plugins. You can create mobile-specific menus, adjust breakpoints, use hamburger icons and optimize menu display for different screen sizes automatically.
Common issues include menus not saving properly, items not appearing on frontend, theme location conflicts, missing menu items, incorrect hierarchy structure, caching problems and plugin conflicts causing display errors.
Secure hosting ensures fast loading speeds, prevents downtime, protects menu data from malware, maintains database integrity, provides automatic backups and delivers reliable performance for seamless menu functionality across all devices.


Write A Comment