How to Deactivate or Delete a Theme or Plugin in WordPress
Themes and plugins are important components of a WordPress site. While themes control the design and layout of the site, plugins provide important features and functionality. However, unused or outdated themes and plugins can result in security risks and slow down your site. Knowing when and how to deactivate or delete these components can help streamline your WordPress installation and ensure optimal performance.
This article will show you how to deactivate and delete themes and plugins, both through the WordPress dashboard and other methods. Deactivating stops them from using resources, while deleting completely removes them from your site.
How to Deactivate or Delete a WordPress Theme
When you deactivate themes in WordPress, it does not delete them from your site; it simply stops them from being used or turns them off. If you wish to completely remove a theme from your site, you will need to delete it.
There are several ways to deactivate or delete a WordPress theme. You can do it via the following:
If you need a guide in changing themes without losing content, visit the How to Switch WordPress Themes Without Losing Content article.
If you need to install a new WordPress theme, refer to the How to Install a WordPress Theme article.
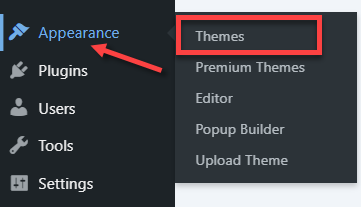
Via the WordPress Dashboard
- Log in to your WordPress dashboard.
- Click Appearance on the left menu, then select Themes.
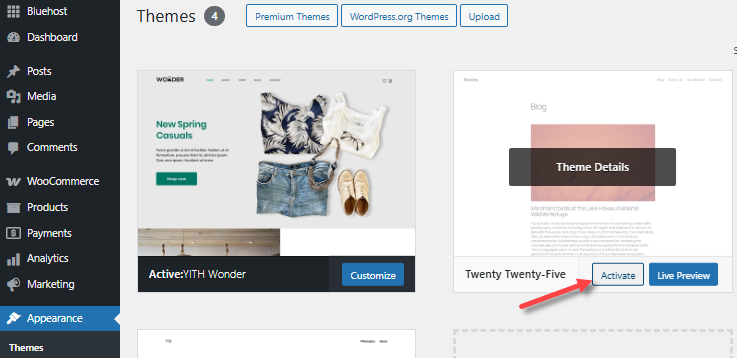
- On the Themes page, you can view all installed themes in your WordPress dashboard, with one currently activated.
- Look for the theme that you would like to deactivate and a theme you'd like to use for your site.
To deactivate:
WordPress can only have one active theme at a time. As there is no "Deactivate" or "Turn off" button for themes in the WordPress dashboard, you can hover your mouse over the theme you want to activate and click the Activate button. This will deactivate the current theme.
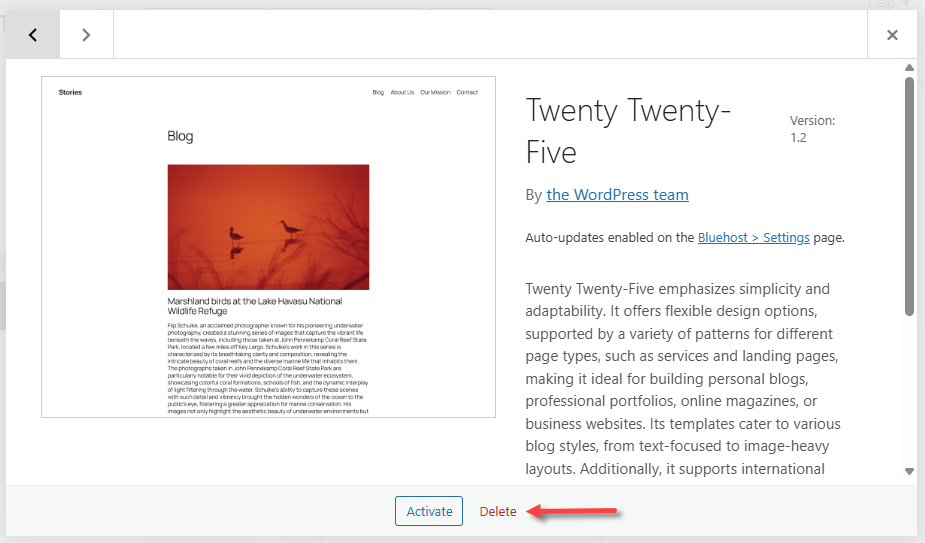
To delete:
Hover your mouse over the theme and click on Theme Details. Click Delete.
Here is a video guide on how to deactivate or delete your theme in the WordPress dashboard.
Alternative Ways to Deactivate or Delete a Theme
While the WordPress dashboard method is the ideal way to deactivate or delete a theme, you can still do this through other methods if you cannot access it.
Via the File Manager
- Log in to your Bluehost Portal.
- In the left-hand menu, click Websites.
- Click the Manage Site button located next to the website you want to manage.

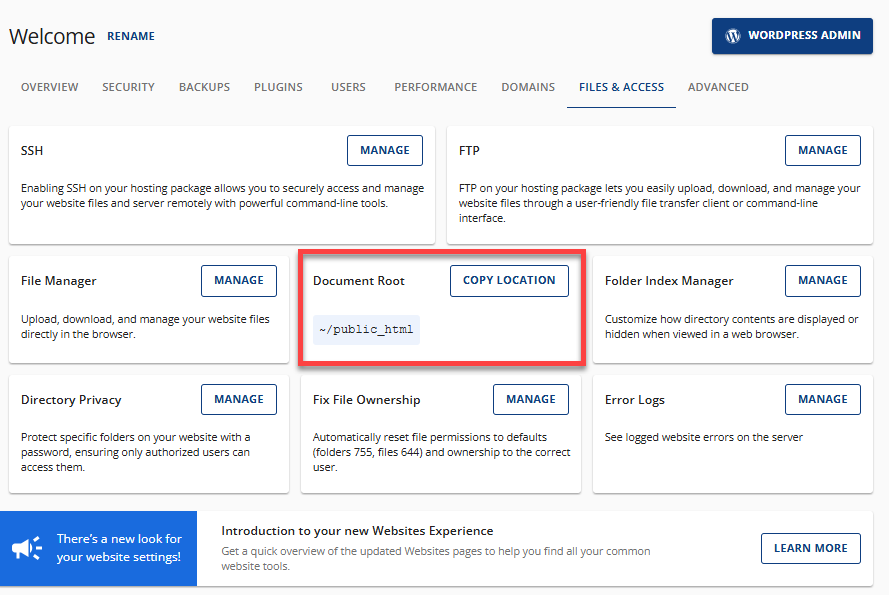
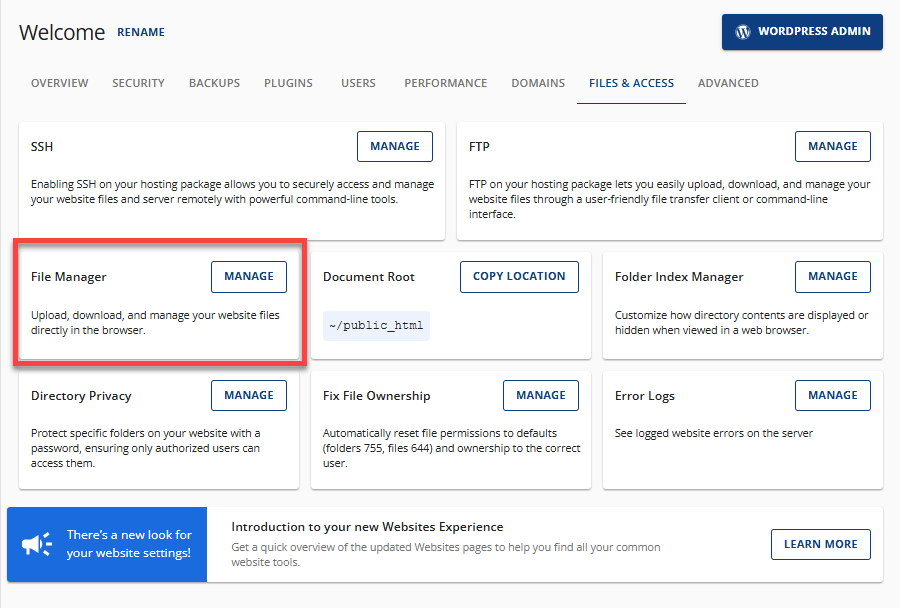
- Identify your site's document root by clicking the Files & Access tab.
- Take note of your document root. Click Copy Location if needed.
- Click Manage under the File Manager card.
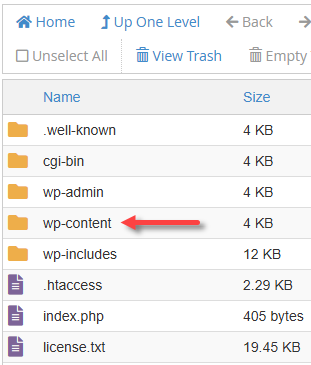
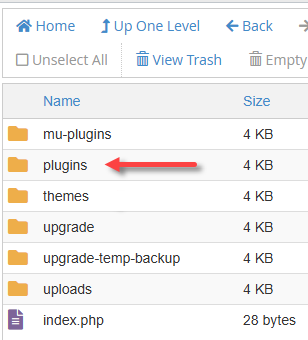
- You'll be redirected to your File Manager in a new tab. Navigate to your document root, which you noted earlier, and then click its wp-content folder.
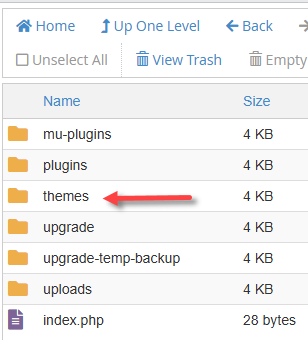
- Click the themes folder.
- Locate the theme folder that you want to deactivate or delete.
- To deactivate:
Rename the theme folder to something like "themename-deactivated."
To delete:
Right-click on the theme folder, then select Delete. Confirm the delete action.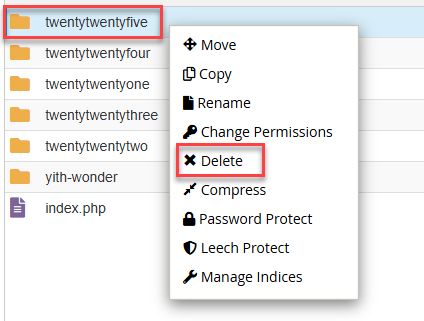
Here is our video guide on how to deactivate or delete your theme through the File Manager.
Via the File Transfer Protocol (FTP)
If you don't have access to the WordPress dashboard or cPanel, you can delete your WordPress theme using FTP. You will need to connect to your website using FTP to access your site files.
- Connect to your site using FTP.
- Navigate to your File Manager.
- Same as above, click your site's root directory or folder.
- Click the wp-contents folder.
- Select the themes folder. You'll see the themes installed in your WordPress dashboard.
- Rename the folder to deactivate the theme.
You can also right-click and select Delete to completely remove the theme folder itself. However, there may be instances when you do not know what your site's current theme is. Deleting the theme could break your site or cause other issues.
Via the Database
The database stores information about the currently active theme for your WordPress site. You can change this active theme via phpMyAdmin, which will deactivate the current theme. However, keep in mind that you won't be able to delete the theme files directly using phpMyAdmin.
For detailed instructions on changing the theme via the database method, refer to the How to Change WordPress Theme in the Database via phpMyAdmin article.
Once you've deactivated your old theme in phpMyAdmin, you can safely delete it either through your File Manager, FTP, or directly from the WordPress dashboard.
After you've made changes to your theme, check your website to ensure it is running properly. Verify that everything looks as it should and that there are no broken links, images, forms, etc.
How to Deactivate or Delete a WordPress Plugin
When you deactivate a WordPress plugin, it stays on your site and can be turned back on at a later time. Deactivating only turns off its features but keeps its settings safe. To completely remove a plugin, you need to delete it. Deleting a plugin wipes out any settings or data it had.
Some plugins are integral to your site's layout or security, so deleting them carelessly can break your site or cause other issues. Always ensure to back up your site before making any changes so you can restore it if something goes wrong.
You can deactivate or delete a plugin through the following methods:
Via the Bluehost Portal
You can deactivate your WordPress plugins through the Bluehost Portal. To completely delete it, you may need to use the other methods discussed below.
- Log in to your Bluehost Portal.
- In the left-hand menu, click Websites.
- Click the Manage Site button located next to the website you want to manage.
- Click on the Plugins tab.
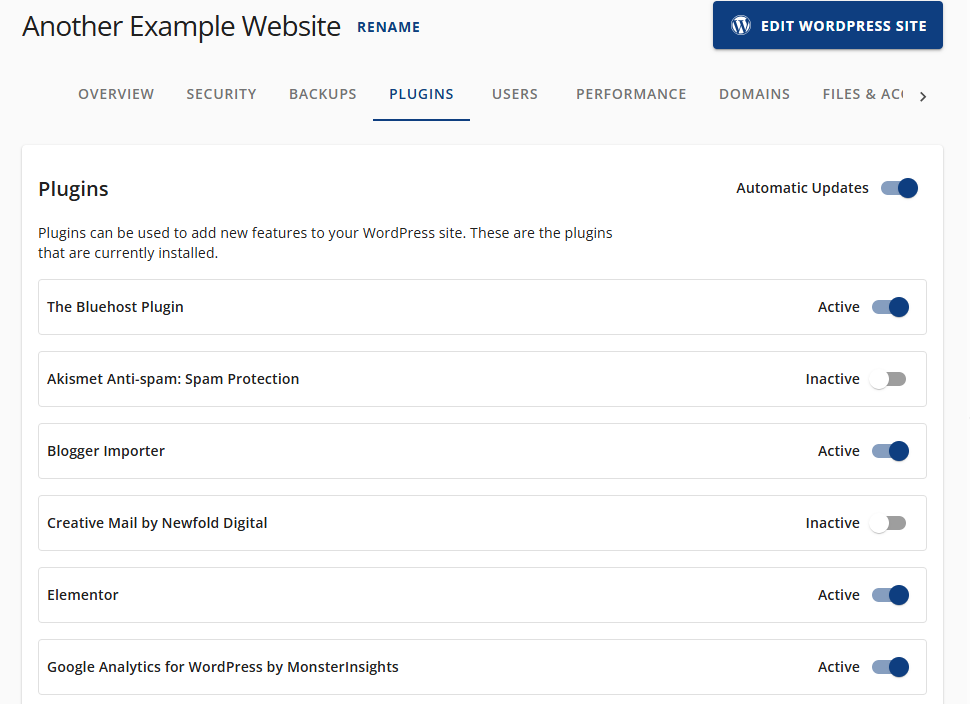
- You will see all plugins in your WordPress website, along with a toggle to activate or deactivate them.
- Search for the plugin and then use the toggle button to deactivate it.
Here is a video guide on how to deactivate your plugin through the Bluehost Portal.
Via the WordPress Dashboard
- Log in to your WordPress dashboard.
- Click Plugins on the left menu, then select Installed Plugins.
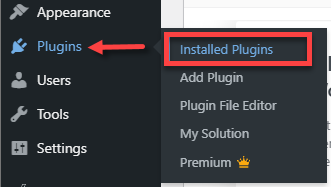
- On the Plugins page, you'll find all the plugins currently installed. Locate the plugin you want to deactivate or delete.
- To deactivate:
- Click the Deactivate link below the plugin's name.
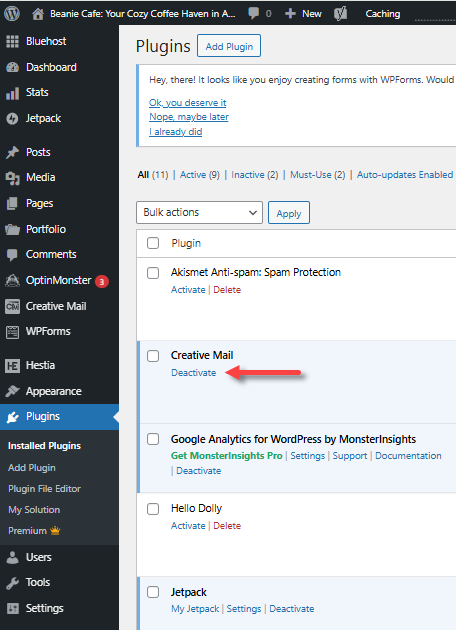
- In the pop-up, confirm deactivation.
To delete:
- After deactivating the plugin, you will see the Delete link. Click Delete.
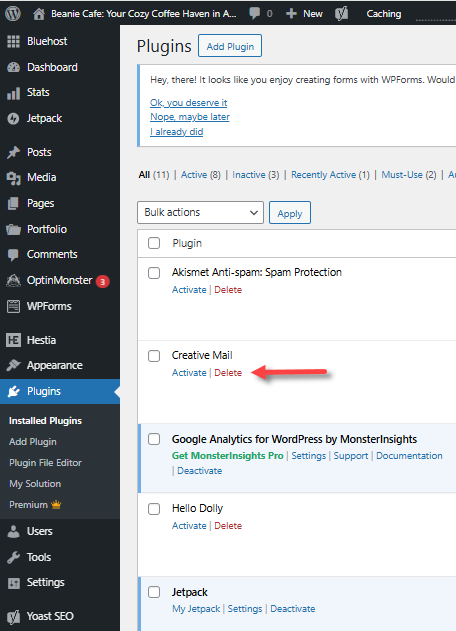
- In the pop-up, confirm that you'd like to delete the plugin and any data it contains.
- Click the Deactivate link below the plugin's name.
Here is a video guide on how to deactivate or delete your plugin in the WordPress dashboard.
Alternative Ways to Deactivate or Delete a Plugin
Here are the other methods of deactivating or deleting a plugin.
Via the File Manager
- Log in to your Bluehost Portal.
- In the left-hand menu, click Websites.
- Click the Manage Site button located next to the website you want to manage.
- Click the Files & Access tab to identify your site's document root. Take note of it.
- Click Manage under the File Manager card.
- In the File Manager, navigate to your site's document root, which you noted earlier.
- Click on the wp-content folder, where you'll find the themes, plugins, and media of your website.
- Click the plugins folder, then locate the specific plugin folder you want to deactivate or delete.
- To deactivate:
Right-click and then Rename the plugin folder to something like "pluginname-deactivated."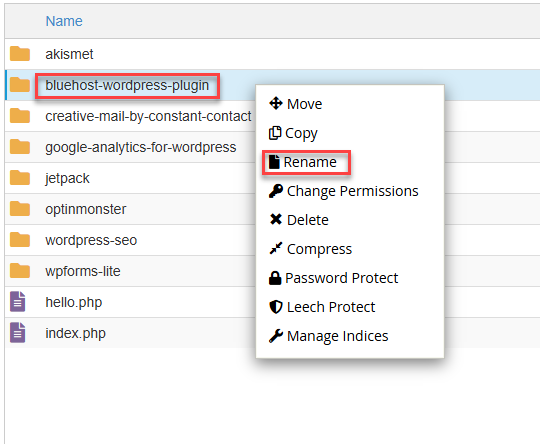
To delete:
Right-click the folder, then select Delete. Confirm the delete action.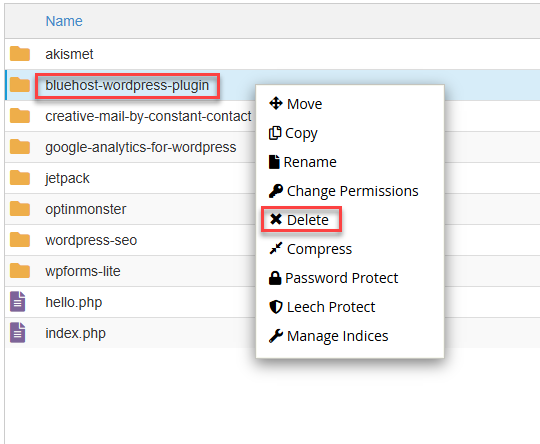
Here is our video guide on how to deactivate or delete your plugin through the File Manager.
Via File Transfer Protocol (FTP)
If you don't have access to the Bluehost Portal, WordPress dashboard, or cPanel, you can delete the plugin via FTP.
- Connect to your site using FTP.
- Navigate to your File Manager.
- Click your site's root directory or folder.
- Click the wp-contents folder.
- Select the plugins folder.
- Look for the plugin and rename it to deactivate it. You can also delete the entire folder to completely remove the plugin folder itself.
Via the Database
If you're unable to access your Bluehost Portal or WordPress dashboard, you can deactivate all your plugins in phpMyAdmin. This is especially helpful when troubleshooting site issues. If you're uncomfortable modifying your site's database, you may want to use other methods for managing your plugins (and theme) instead.
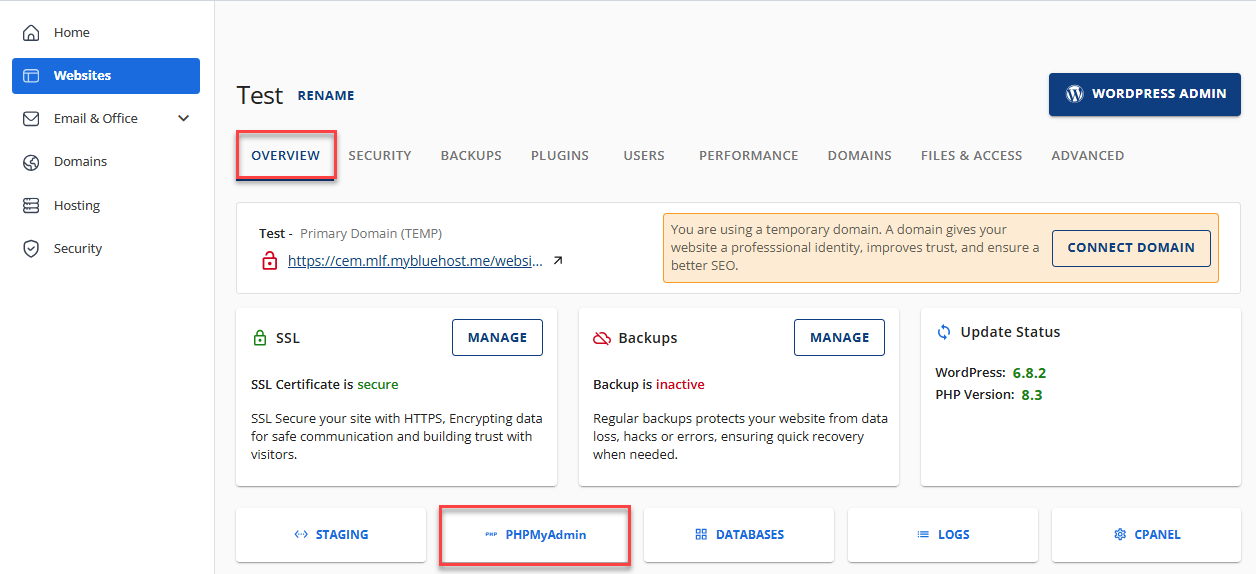
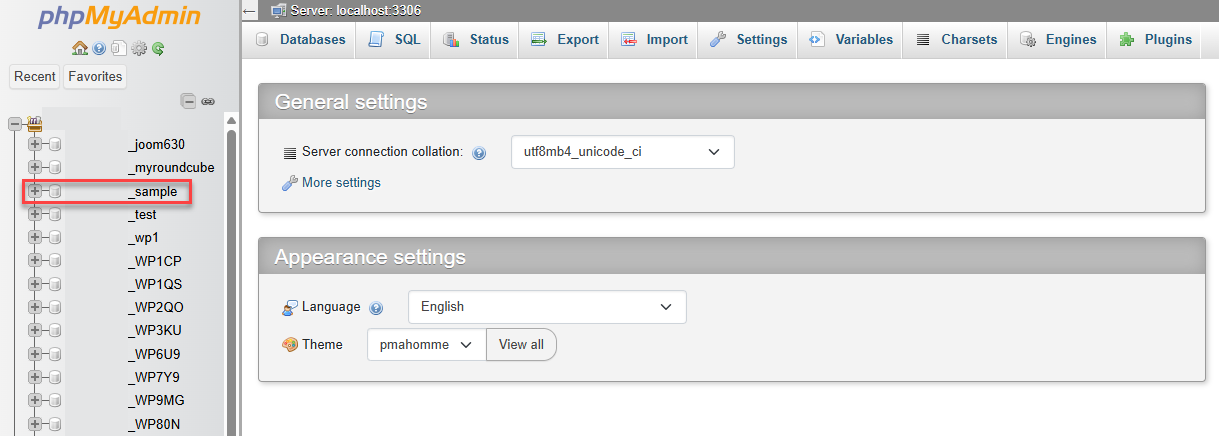
- Navigate to your website's Overview tab, then click on the PHPMyAdmin button.
-
Within phpMyAdmin, click your database name in the left pane.
- Under your database, look for the table "_options." The "wp" is the default prefix. Your phpMyAdmin could show a different prefix, but that's okay as long as you navigate to the "_options" table.

- Under the options_name column, look for active_plugins, and then click its Edit link.
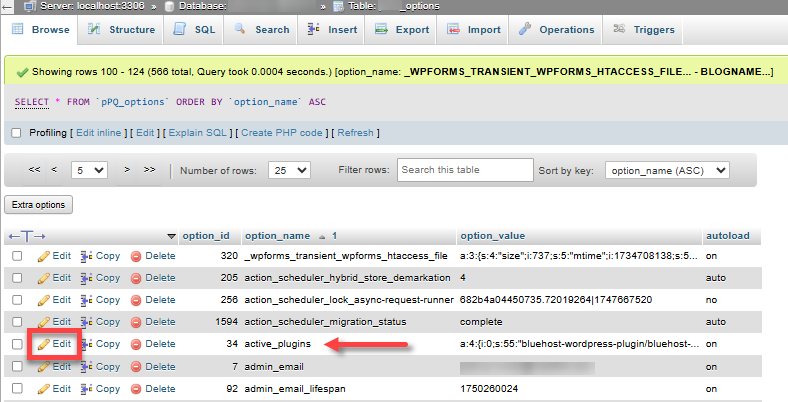
- Check the option_value box to see a string of codes. You can copy and save these codes in a text editor (just in case you'll need them again). To disable all plugins at once (not to delete), replace them with this string: a:0:{}
- Scroll down and click on Go to save your changes.
Effects of Deactivating or Deleting a Theme or Plugin in WordPress
Before you deactivate or delete a theme or plugin on your website, it's important to understand how this change might affect your site's design and functionality.
Deactivating a theme:
- Data and content: Changing your themes won’t delete your site data and content (like posts, pages, or media), but it can change how that content appears.
- Design and layout changes: Layouts, fonts, and visual styles may look different, and you may need to reconfigure menus, widgets, and other settings.
- Loss of theme-specific features: Some themes include custom shortcodes, widgets, or proprietary page builder elements. These features may stop working or disappear entirely when the theme is removed.
- Site security and performance: Deactivated theme files still remain on your hosting server, consuming storage space. They can also cause security risks if they are outdated, causing slowness when the admin dashboard checks for updates.
Deactivating a plugin:
- Data and content: Deactivating a plugin will not cause changes in the site's content, such as posts or pages. However, the data and settings remain stored on your site's database, allowing for quick reactivation with the previous settings intact if needed in the future.
- Loss of plugin features/functionalities: The features or functionalities provided by the plugin will stop working immediately once you deactivate it on your website via the Bluehost Portal or the WordPress dashboard. Examples are the elements in a contact form, if you're using one.
- Impact on performance and storage: While deactivated plugins do not directly slow down your site's performance, they still consume storage space. They are also still included in your backups when you generate it.
Deleting a theme:
- Improved security: Outdated or inactive themes may cause security risks and vulnerabilities on your site. Deleting them eliminates potential entry points for hackers.
- Improved performance: Deleting a theme frees up storage space on your server.
- Permanent removal: Deleting the theme also removes all theme files and custom coding for the theme. This action is irreversible.
- For active themes: You cannot delete an active theme in the WordPress dashboard, unless done so via other methods, such as deleting the theme folder itself via the File Manager or FTP. If that is the case, WordPress will automatically switch to the available default theme.
- For child themes: Caution! Deleting the parent theme will break your child theme if you're using one.
Summary
Deleting themes and plugins in WordPress is important for maintaining a secure and "clutter-free" website, as well as a way to optimize it. While themes define your site's appearance and plugins add functionality, unused or outdated ones can raise security risks and slow down performance. This article walks you through how to deactivate and delete themes and plugins through different methods—through the Bluehost Portal, WordPress dashboard, File Manager, FTP, or database. It also discusses the difference between deactivation and deletion and emphasizes the importance of backing up your site before making changes. Whether you're troubleshooting issues or optimizing your site, learning how to deactivate or delete themes and plugins effectively is a key part of WordPress maintenance.
If you need further assistance, Bluehost Chat Support is available 24 hours a day, 7days a week while Bluehost Phone Support is available 7 days a week from 7 am-12 midnight EST.
- Chat Support - While on our website, you should see a CHAT bubble in the bottom right-hand corner of the page. Click anywhere on the bubble to begin a chat session.
- Phone Support -
- US: 888-401-4678
- International: +1 801-765-9400
You may also refer to our Knowledge Base articles to help answer common questions and guide you through various setup, configuration, and troubleshooting steps.