
Proper theme selection is key to a successful site, whether for an e-commerce site, blog, or personal portfolio. Free themes are a good start in building your dream site. However, Premium WordPress themes go beyond the basics and often stand out for their advanced features, deep customization, and dedicated support.
This article will help you install a premium WordPress theme to enhance your site’s design and performance.
WordPress Theme Installation
How Do I Install Premium Themes? You can manually install a theme for your WordPress website or use Bluehost’s Theme Auto Installer.
Note: If you purchased a theme on Bluehost’s Marketplace, your theme files (in most cases) would be installed automatically.
How to Use Our Theme Installer
1. Log in to your Bluehost Account Manager.
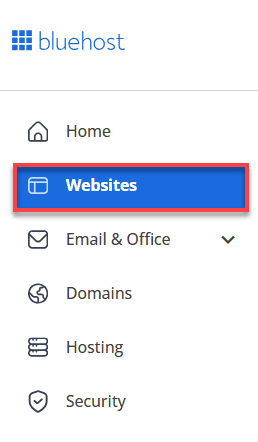
2. Click on the Websites tab on the left side of your screen.

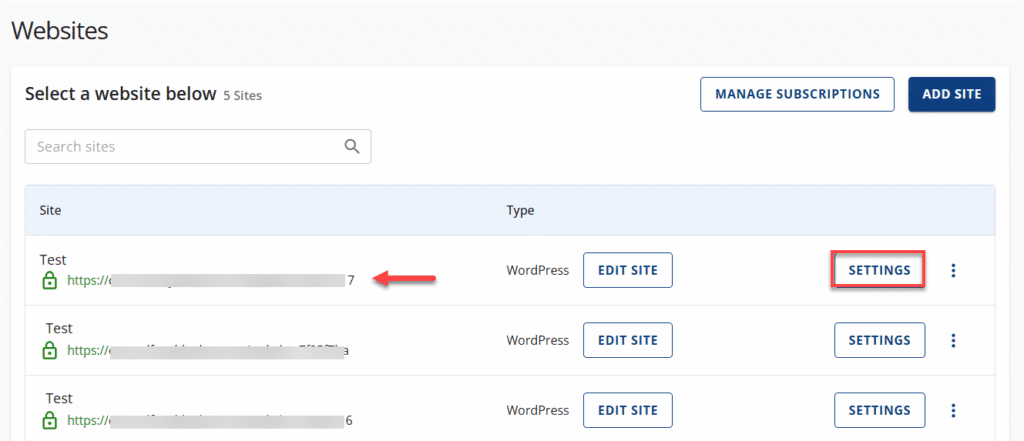
3. Select the website you want to manage, and then click SETTINGS.

4. On the Website Overview page, click the EDIT WORDPRESS SITE button.
5. Click the Appearance (paintbrush icon) tab, then click the Premium Themes option on the left side of the WordPress Dashboard.
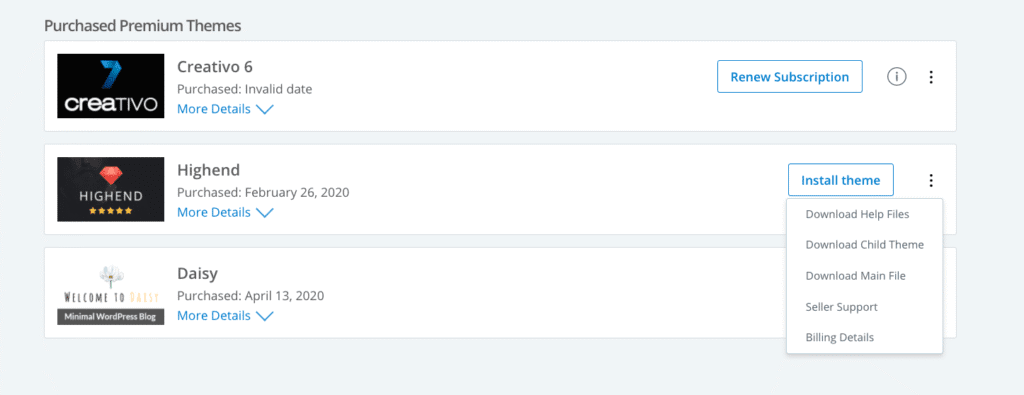
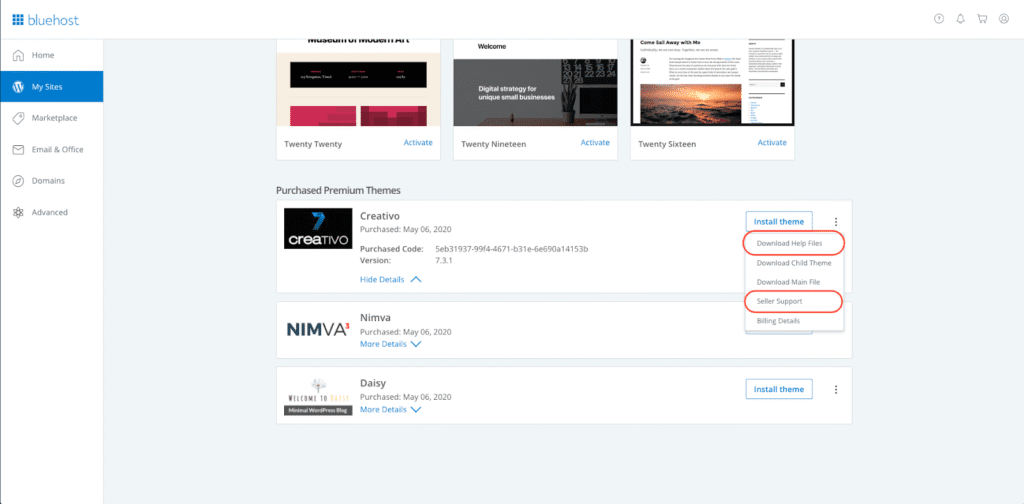
6. Scroll to the bottom of the page, and you’ll see a Purchased Premium Themes section with your purchased themes.
7. Click the Install Theme button. Next, a prompt will ask you to install the theme.
How to Manually Install a Theme (Optional)
1. Log in to your Bluehost Account Manager.
2. Click on the Websites tab on the left side of your screen.

3. Select the website you want to manage, and then click SETTINGS.
4. On the Website Overview page, click the EDIT WORDPRESS SITE button.
5. Click the Appearance (paintbrush icon) tab, then click the Premium Themes option on the left side of the WordPress Dashboard.
6. Scroll to the bottom of the page, and you’ll see a Purchased Premium Themes section with your purchased themes.
7. Click the ⋮ (ellipses) menu to the far right, and select WordPress theme files from the drop-down that appears.
8. Download your WordPress theme here.
9. If you purchased your theme elsewhere, locate the necessary theme files.
10. Next, you will need to log in to your WordPress Admin Dashboard.
11. From the Appearance menu, select Themes.
12. Click the Add New button.
13. Click Upload Theme or Choose File, and upload your theme .zip file to WordPress.
Once your theme is installed, it is important to also install AND activate any required plugins included with your theme. Your theme may also provide a simple but unique process for installing included plugins. Please refer to the theme documentation for step-by-step instructions. For more information, please see WordPress – Installing Plugins.
Tip: Save time designing your site by installing a ‘demo’ layout – Most themes come with several sample layouts called “theme demos.” Once your theme files have been installed, you can also install the demo content to help speed up building your site (additional step). To learn more, please see WordPress – Importing Demo Theme Content.
Theme Support
Please refer to the WordPress theme documentation for step-by-step instructions if you need further clarification.
Need more WordPress Theme Support? View Bluehost’s guide: WordPress – Theme Seller Support.
Download Theme Documentation
1. Log in to your Bluehost Account Manager.
2. Click on the Websites tab on the left side of your screen.
3. Select the website you want to manage, and then click SETTINGS.

4. On the Website Overview page, click the EDIT WORDPRESS SITE button.
5. Click the Appearance (paintbrush icon) tab, then click the Premium Themes option on the left side of the WordPress Dashboard.
6. Scroll to the bottom of the page, and you’ll see a Purchased Premium Themes section with your purchased themes.
7. Click the ⋮ (ellipses/three-vertical-dots) menu to the far right, and select Download Help Files from the drop-down that appears.
You can also click Seller Support to be directed to the item page support forum. Here, you can leave questions and/or comments for the theme seller or find answers to commonly asked questions. To learn more, please see WordPress – Seller Support.
Tip: To begin customizing the look and feel of your website theme, you may need to look for a new menu option in your WordPress dashboard associated with your new theme. Alternatively, some themes may use the standard ‘WordPress Customize” tool.
Summary
When creating a website with WordPress, you have the flexibility to choose between free WordPress themes and Premium WordPress themes. Premium themes offer additional customization possibilities and direct support from theme creators so you can tailor your site to your exact needs. A Pro Design Live support subscription can be practical help if you need further support with website or theme customization. Our team is prepared to provide the guidance and support you need.
Learn more about optimizing your WordPress experience with our specialized WordPress Hosting solutions and discover how our WonderSuite services can elevate your website’s design and functionality.


Write A Comment