Key highlights
- Learn how to clone a WordPress website safely using both plugin-based and manual methods for complete control and flexibility.
- Understand how to test, redesign or migrate your WordPress site without risking downtime or affecting your live website.
- Explore simple tools like the Duplicator plugin and Bluehost staging site to clone and deploy your site in just a few clicks.
- Know how to manually duplicate your entire WordPress site, including files and databases, for full technical control and reliability.
- Uncover post-cloning best practices to secure your cloned site, update URLs and maintain strong SEO and site performance.
Whether you’re testing a new theme, redesigning your site or moving to a new host, learning how to clone a WordPress website is a valuable skill for any site owner.
Cloning creates an exact copy of your site, including files, themes, plugins and the database, so you can work safely without risking your live website.
In this guide, you’ll learn how to duplicate a WordPress site using both plugin-based and manual methods, along with best practices to keep your cloned site secure, SEO-friendly, and performant.
Why do you need to clone your WordPress website?
Cloning a website isn’t just for developers, it’s a practical step for any WordPress site owner who wants to make updates safely or prepare for future changes. By working on a duplicate version of your site, you can experiment, migrate or back up data without affecting your live website.
Below are a few reasons why you may need to clone a WordPress site:
- Testing new features: To try a new WordPress theme, page builder or plugin on a staging site first. If something conflicts, your production site stays stable and your website traffic isn’t affected.
- Redesigns & web design experiments: To refresh layouts or rebuild the entire page experience on a cloned site and push changes when ready.
- Migration process: To move your entire WordPress site to a new domain, new server or different hosting provider with minimal downtime.
- Complete backup & recovery: To keep a complete backup (files + database) so you can restore your live WordPress site quickly if needed.
Now, let’s go step by step through the most reliable ways to clone your WordPress site.
How to clone a WordPress website (Step-by-step)?
There are two reliable ways to clone a WordPress website:
- Use a plugin (easiest for most website owners).
- Clone a WordPress site manually (more control, a bit more technical).
Method 1: Clone a WordPress site using a plugin (recommended for beginners)
Tools like the Duplicator plugin or All-in-One WP Migration make it simple to clone WordPress websites without touching code.
Step 1: Install a cloning plugin
- Log in to the WordPress dashboard on your original site.
- Go to Plugins → Add New and search for “Duplicator” (popular and beginner-friendly).
- Click Install → Activate.
Tip: Bluehost lets you manage WordPress plugins and staging sites from a centralized dashboard, reducing setup errors. ur entire website organized.
Step 2: Build the site package (files + database)
- Go to Duplicator → Packages → Create New.
- Run the scan; if all checks pass, click Build.
- Download the archive file (a ZIP file containing all the files and site data) and the Duplicator installer script (installer.php).
This package is a portable snapshot of your own website, perfect for a new location or new domain.
Step 3: Prepare the destination
Decide where the cloned website will live:
- Subdomain (e.g., staging.[yourdomain].[com])
- Subfolder (e.g., /staging under your root directory / root folder)
- Separate domain on a hosting server (e.g., moving to a new hosting plan)
Create a new database on the destination host (Bluehost makes this simple via cPanel home page → MySQL). Note your database information: name, database user and database password.
Step 4: Upload the package to the destination
Use the Bluehost File Manager (or FTP client) to upload:
- The archive file (site backup ZIP file)
- The Duplicator installer script (installer.php)
Place them in the target directory (e.g., the subdomain’s root directory).
Step 5: Run the installer
Visit https://[yournewdomain]. [com]/installer.php.
- Enter your MySQL database credentials (host, DB name, database user, database password).
- The installer imports your WordPress files and database export automatically.
- When prompted, update the Site URL if the domain has changed.
Step 6: Finalize and test
- Log into the cloned site’s WordPress dashboard.
- Go to Settings → Permalinks and click Save to refresh links.
- Verify site files (media, styles), forms, menus and wp config-dependent behavior.
- Remove installer files for security.
- If the clone will stay public, attach SSL and confirm the site URL is correct.
Bluehost tip: Creating and managing a staging site takes just a few clicks. You can clone, test and deploy without risking your production site.
Method 2: Clone a WordPress site manually (without a plugin)
If you prefer full control or your site is too large for a plugin’s free version, you can clone a WordPress site manually. It’s straightforward if you go step by step.
Step 1: Copy website files from the original site
- Open your Bluehost cPanel home page and launch File Manager (or connect via File Transfer Protocol/FTP client).
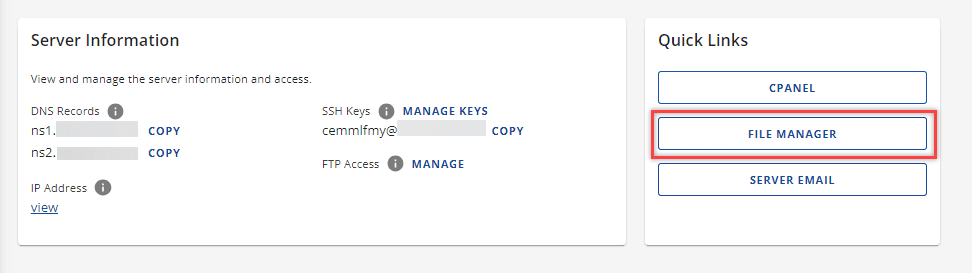
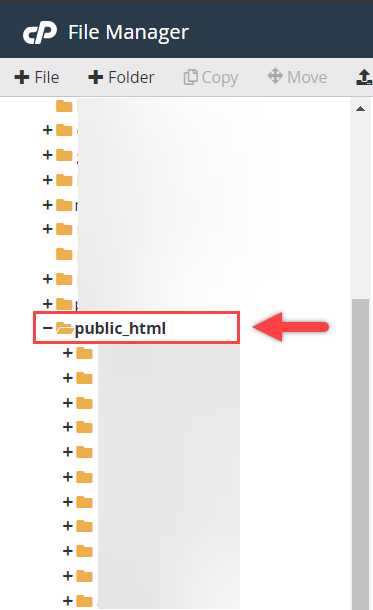
- Find your site’s root folder (often public_html for the primary domain).
3. Select all the files (including wp-content, wp-admin and core WordPress files) and compress them into a single ZIP file.
4. Download the ZIP to your computer.
Step 2: Export the WordPress database
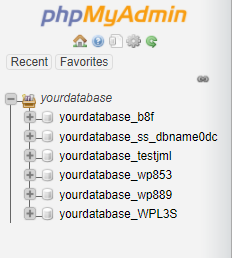
- In cPanel, open phpMyAdmin.
- Select the WordPress database used by your original website.
- Click Export → Quick → SQL to download the database export (.sql file).
Also read: How to Import or Export a MySQL Database using phpMyAdmin
Step 3: Create a new database on the destination
- In the destination hosting account, create a new database, new user and assign full privileges.
- Save the database settings (DB name, user, password), you’ll add these to your wp config file.
Step 4: Upload files to the new location
- On the destination hosting server, go to the correct root directory.
- Upload your ZIP file and extract it so that all the files appear (same structure as the original).
- Confirm the wp config file (wp-config.php) is present.
Step 5: Import the database
- Open phpMyAdmin on the destination.
- Select the new database and go to Import.

- Choose the .sql file you exported and click Go.
Step 6: Connect files to the new database (wp-config.php)
Edit wp-config.php in the destination:
define(‘DB_NAME’, ‘your_new_db’);
define(‘DB_USER’, ‘your_new_user’);
define(‘DB_PASSWORD’, ‘your_new_password’);
define(‘DB_HOST’, ‘localhost’);
Save the file. This connects your WordPress installation to the MySQL database you just imported.
Step 7: Update URLs and fix paths
If you changed domains or paths:
- In the WordPress dashboard (or directly in wp_options via phpMyAdmin), update Site URL and Home.
- If you used absolute URLs in content, run a safe search-and-replace (plugin or CLI) to align the entire website with the new location.
Step 8: Test thoroughly
- Open pages, posts, media and menus.
- Re-save Permalinks.
- Confirm forms, logins and wp config-controlled features.
- Add SSL and check the site URL uses HTTPS.
Pro tip: A web developer workflow often includes cloning to a staging site first, testing with real site data, then swapping DNS to the new domain when everything’s perfect.
Why use Bluehost to clone your WordPress website?
Cloning your WordPress site is much easier when your web host gives you the right tools and that’s exactly what Bluehost does. Whether you’re creating a staging site, performing a migration process or setting up a new domain, we simplifies every step so even beginners can clone a WordPress website confidently.
Here’s why Bluehost is the perfect choice for cloning and managing your site:
1. One-click staging environment
With Bluehost built-in staging site feature, you can clone your WordPress website in just a few clicks. Test new themes, plugins or designs safely before pushing updates to your live website, no coding required.
Also read: How to Create a Staging WordPress Site
2. Easy access to files and databases
Bluehost intuitive cPanel gives you everything you need in one place, from File Manager for website files to phpMyAdmin for your MySQL database. You can easily manage your wp config file, create a new database or import/export data during the cloning process.
3. Automatic backups and restore options
Cloning often goes hand in hand with backups. Bluehost provides daily automated backups and one-click restores, ensuring your entire WordPress site is always protected. If something goes wrong during cloning, you can recover instantly.
4. Optimized for WordPress performance
Every Bluehost hosting plan is fine-tuned for WordPress performance, with fast SSD storage, caching and CDN integration. That means your cloned website or staging site will load quickly and work smoothly while you test changes.
5. 24/7 expert WordPress support
Bluehost dedicated WordPress experts are available anytime to help you troubleshoot plugin issues, database errors or migration challenges. Whether you’re a web developer or a first-time website owner, you’ll always have reliable support.
Using Bluehost doesn’t just make it easy to clone a WordPress website, it makes the entire process faster, safer and stress-free. From file management and database setup to automatic backups and staging environments, everything you need to duplicate, test or migrate your entire website is already built in.
What are the post-cloning best practices?
Once you’ve successfully cloned your WordPress website, it’s important to fine-tune your cloned site so everything runs smoothly. Following a few best practices ensures your new or staging site stays secure, optimized and ready for future changes.
1. Update URLs and internal links
If your cloned website is on a new domain or in a different folder, update all internal URLs so they point to the correct location.
- Go to Settings → General in your WordPress dashboard to update the Site URL and WordPress Address.
- Use a plugin like Better Search Replace to update links within content and the WordPress database.
2. Re-save permalinks
After cloning, go to Settings → Permalinks, then click Save Changes without editing anything. This refreshes your URL structure and prevents 404 errors.
3. Verify SSL and HTTPS
If your new site or staging site uses HTTPS, make sure the SSL certificate is active.
On Bluehost, SSL certificates can be enabled or renewed directly from your hosting dashboard in one click.
4. Check media, plugins and widgets
Review your entire website to ensure:
- All media files load correctly
- Plugins are active and compatible
- Sidebar widgets and menus are configured properly
5. Optimize for performance
Clean up unnecessary files and optimize your WordPress installation.
- Clear cache plugins and CDN cache
- Optimize images and database tables
- Remove leftover installer or migration files
6. Secure your cloned site
If you cloned your site for testing, make sure it’s not indexed by search engines.
- Go to Settings → Reading and enable Discourage search engines from indexing this site.
- Update admin passwords and ensure correct user roles for your new WordPress site.
7. Take a fresh backup
Once your cloned site is fully functional, create a complete backup of it.
You can use a backup plugin or your host’s built-in tools to generate a new backup ZIP file that includes all site files and the WordPress database.
Final thoughts
Cloning your WordPress website is one of the smartest ways to keep your work safe, test new ideas or prepare for growth. Whether you’re building a business website, testing a new WordPress theme or migrating to a new domain, a cloned site gives you flexibility. It lets you make changes freely without disrupting your live website.
For most website owners, using a plugin like the Duplicator plugin is the fastest way to create an exact copy of your site. If you prefer more control, cloning your WordPress site manually using the file manager, FTP client and MySQL database tools is a reliable alternative.
So go ahead, clone your WordPress website today and give yourself the freedom to experiment, migrate or redesign safely. With Bluehost WordPress hosting, creating a copy of your site is just a few clicks away.
FAQs
Cloning a WordPress website means creating an exact copy of your original site, including your theme, plugins, content and WordPress database. It’s like taking a snapshot of your entire website that you can move to a new location, such as a staging site or new domain.
Yes! You can clone a WordPress site manually by copying your website files and exporting your WordPress database through phpMyAdmin, then uploading them to your new hosting account. You’ll need to update the wp config file with the new database settings to connect your new site correctly.
For beginners, using a plugin like Duplicator or All-in-One WP Migration is the easiest method. These tools package your entire WordPress site (files + database) into a single archive file that you can upload and install on your new WordPress site in minutes.
With Bluehost, you can also use staging environment, a built-in feature that lets you clone WordPress sites and test changes safely in just a few clicks.
No, cloning your site won’t hurt SEO as long as your cloned site isn’t publicly indexed while testing. If you create a staging site, make sure it’s set to “noindex” under Settings → Reading so search engines don’t treat it as duplicate content.
When migrating to a new domain, always set proper redirects and update internal links to maintain your SEO value.

Write A Comment