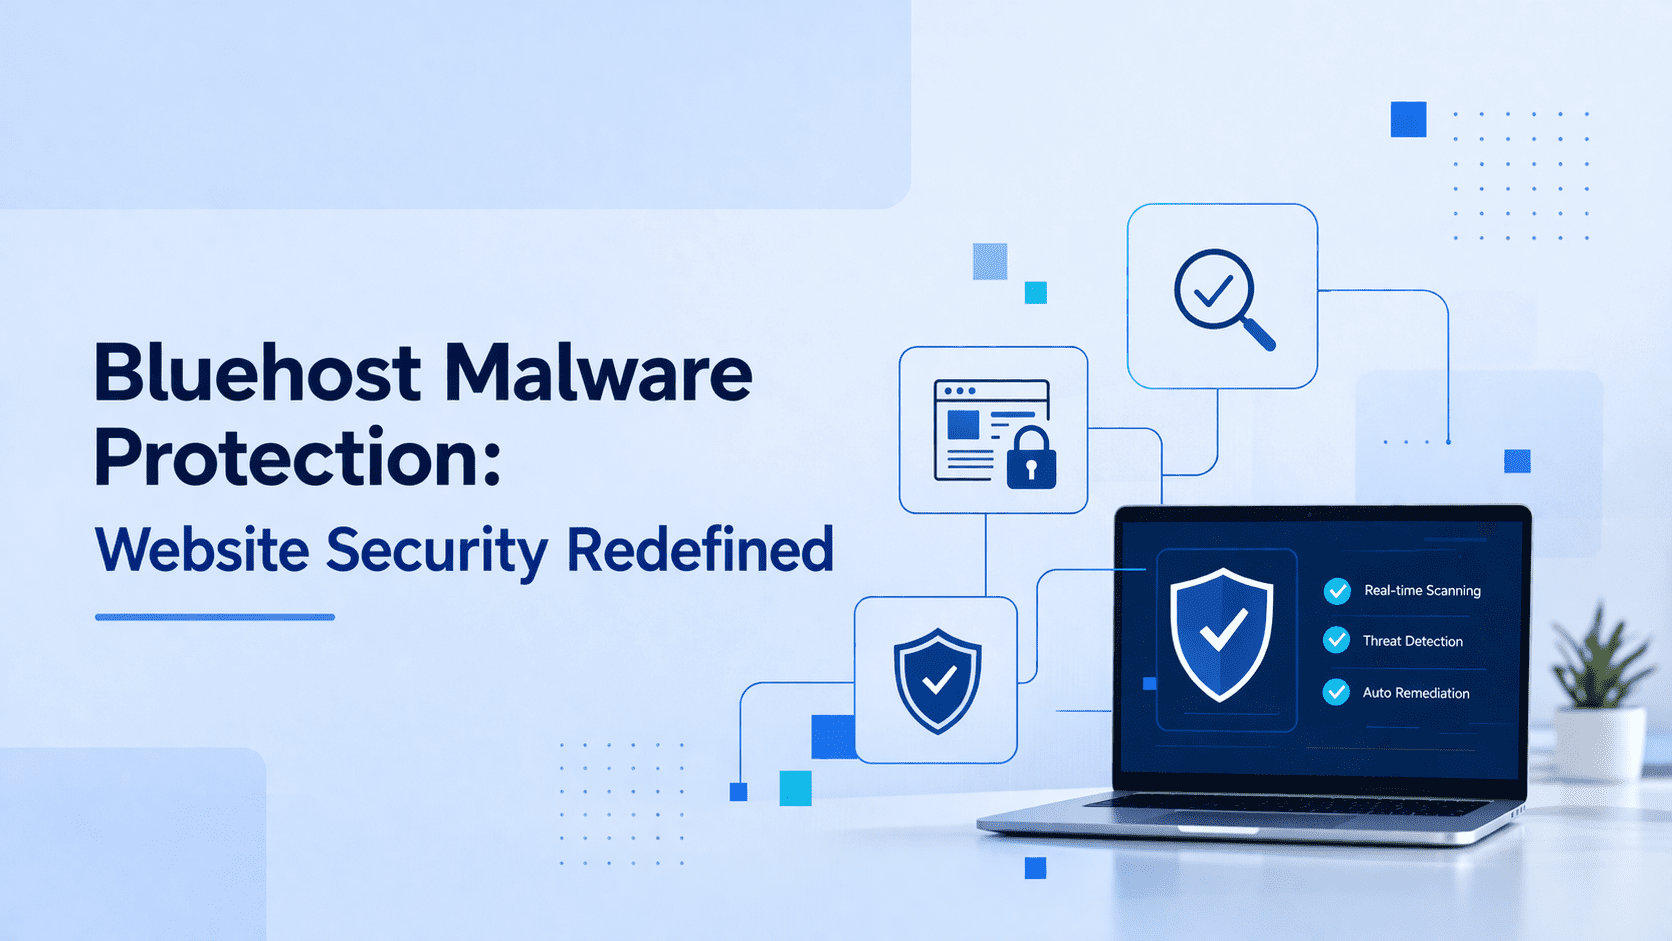
Key highlights
- Update your PHP version to improve WordPress speed, security and compatibility.
- Check your current PHP version easily from your WordPress dashboard or cPanel.
- Use MultiPHP Manager in Bluehost cPanel to update PHP in just a few clicks.
- Adjust php.ini settings carefully to manage limits like memory and upload size.
- Rely on Bluehost’s automatic PHP handler configuration and 24/7 support for safe updates.
When your site slows down or a checkout page breaks, it’s rarely bad luck – it’s outdated PHP. The engine that powers your entire website quietly decides how fast, secure and stable it feels. When PHP gets outdated, your site starts to lag, plugins break and visitors bounce. The fix? A simple upgrade.
Knowing how to update PHP version in WordPress isn’t just a technical task, it’s how you keep your WordPress site fast, secure and future-proof.
The best part? You don’t need to be a developer.
In this guide, you’ll learn how to update PHP version through cPanel, fine-tune php.ini settings and let Bluehost’s built-in tools handle the heavy lifting all in a few clicks.
But before we start, you might wonder what difference a newer PHP version really makes. Here’s how it directly impacts your website’s speed, security and reliability.
Why should you update your PHP version?
Updating your PHP version is one of the easiest ways to boost your WordPress site’s performance, safety and reliability. Each new PHP release includes essential fixes that protect your website from vulnerabilities found in older versions.
Here’s why updating matters:
- Stronger security: PHP 8.1 and newer include essential patches that safeguard your website against modern threats.
- Faster performance: The latest PHP versions process requests up to 25% faster than PHP 7.4, helping pages load quicker and keeping visitors engaged.
- Better compatibility: Many themes and plugins now require newer PHP versions. Upgrading ensures your site runs smoothly without unexpected PHP errors or broken features.
- Ongoing support: Hosting companies phase out older PHP versions. Staying updated keeps you eligible for bug fixes, security updates and performance enhancements.
When you update your PHP version, your WordPress site becomes more efficient and easier to maintain. You’ll enjoy:
- Faster page loads that help retain visitors and improve search rankings.
- Lower memory usage, meaning your server runs more efficiently.
- Access to new features and better plugin compatibility for future WordPress updates.
Running your website on an outdated PHP version might save time now, but it risks security and functionality later. By keeping your PHP version current, you’re protecting your investment and ensuring your WordPress website delivers the best possible experience for every visitor.
Now that you know why updating matters, the next step is to find out which PHP version your site is currently using.
How can you check your current PHP version?
Before you update your PHP version, you need to confirm which one your WordPress site is using. This helps you plan the update safely and avoid compatibility issues.
You can check your current PHP version in several ways:
1. From your WordPress dashboard
- Log in to your WordPress dashboard.
- Go to Tools › Site Health › Info.
- Scroll to the Server section.
- You’ll see your current PHP version listed clearly.
This method is the quickest way to check directly inside WordPress.
2. Through your hosting account’s control panel
Most hosting providers display the PHP version inside your hosting account’s control panel.
- Open your hosting dashboard.
- Look under Software or Advanced Settings.
- Select PHP Manager or Select PHP Version to view or change the version.
This view is helpful if you manage multiple sites or need access to more PHP settings.
3. Using a PHP info file (advanced option)
If you want a detailed look at your server configuration, you can create a PHP info file:
- Open a text editor and add this line of code:
<?php phpinfo(); ?>
- Save it as info.php and upload it to your site’s root directory.
- Visit [yoursite].com/info.php to view detailed PHP data, including the version number, PHP modules and configuration settings.
Important: Delete this file immediately after checking. Leaving it on your site can expose sensitive server information.
Confirm your current PHP version before upgrading. It helps you update safely and keeps your WordPress site fast, secure and compatible with modern plugins and themes.
Once you’ve identified your current version, updating it through Bluehost’s cPanel is simple. Here’s how to do it safely.
How can you update your PHP version (Bluehost cPanel)?
You can easily update your PHP version in cPanel without touching a single line of code. Bluehost’s built-in MultiPHP Manager tool makes the process quick, safe and beginner-friendly.
This process works the same whether you’re updating PHP manually or learning how to update PHP on WordPress using the Bluehost dashboard.
Here’s how to update your PHP version step by step:
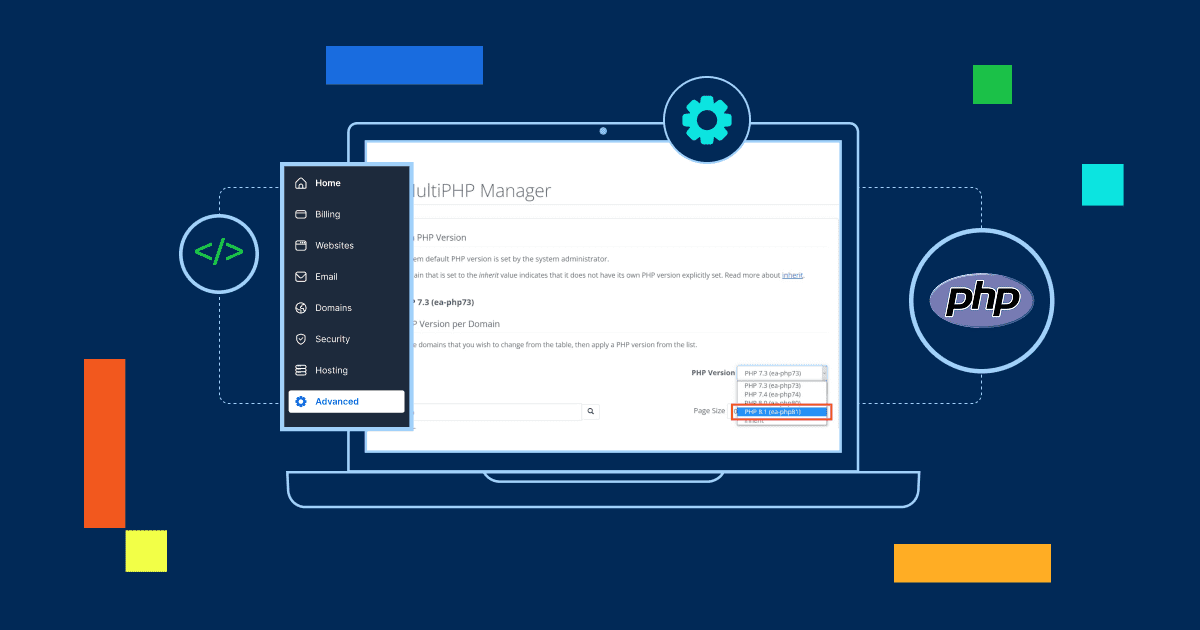
1. Log in to your Bluehost Account Manager
- Go to Hosting>>cPanel
- Scroll to the Software section.
- Click MultiPHP Manager to open the PHP version selector.
2. Select your website domain
- You’ll see a list of all your domains with their current PHP versions.
- Check the box next to the domain you want to update.
3. Choose the new PHP version
- Open the dropdown menu at the top of the page.
- Select your preferred version. PHP 8.1 or 8.2 is recommended for most WordPress websites.
- Click Apply to confirm.
The system will automatically begin the update process. Within 5–10 minutes, your site will start running on the latest PHP version.
4. Verify and test your site
- Go to your WordPress dashboard › Tools › Site Health › Info.
- Check the Server section to confirm the update.
- Test your pages and plugins to ensure everything works correctly.
Updating your PHP version through Bluehost’s cPanel not only improves your site’s performance but also ensures compatibility with new WordPress themes, plugins and security updates. You get better stability, faster load times and long-term protection for your website.
After updating PHP, you may want to fine-tune performance or upload limits. That’s where the php.ini file comes in.
How can you modify php.ini settings safely?
The php.ini file controls key PHP settings that directly affect how your WordPress site runs. It defines metrics like how much memory PHP can use or the maximum file size allowed for uploads.
Common settings include:
- memory_limit: Maximum memory PHP can use
- upload_max_filesize: Largest file size you can upload
- post_max_size: Maximum size of POST data
- max_execution_time: How long a script can run before timing out
Also read: How To Increase the PHP Memory Limit
1. Check if your hosting provider allows custom php.ini files
Most shared hosting plans don’t permit direct php.ini editing, but Bluehost and similar providers let you create a custom php.ini or .user.ini file to override specific limits.
2. Create a php.ini or .user.ini file
- Log in to your hosting account’s control panel.
- Open the File Manager and go to your website’s root directory.
- Create a new file named php.ini or .user.ini (depending on your web host).
- Add your preferred settings, for example:
memory_limit = 256M
upload_max_filesize = 64M
post_max_size = 64M
max_execution_time = 300
- Save the file and wait a few minutes for the changes to apply.
3. Verify your new PHP settings
You can confirm the update by:
- Checking your WordPress dashboard › Tools › Site Health › Info
- Opening your phpinfo() page to view all active configuration values
Important: Always test these changes in a staging environment before applying them to your live site. Incorrect PHP settings can lead to errors or downtime. Keep a backup of your original configuration so you can easily revert if needed.
If you’d rather skip manual php.ini edits, Bluehost has you covered. Our hosting platform automatically manages PHP configuration for optimal speed and security so you can focus on your website, not server settings.
Beyond php.ini settings, PHP handlers determine how your server processes PHP itself and understanding them can help you get the best performance.
What are PHP handlers and why do they matter?
PHP handlers control how your web server processes PHP files. In simple terms, they determine how efficiently your website runs behind the scenes. Choosing the right handler impacts your WordPress site’s performance, memory usage and compatibility with your PHP version.
Common PHP handlers include:
- mod_php: One of the older handler types. It’s easy to configure but less efficient for shared hosting environments.
- FastCGI: A more advanced option that keeps PHP processes active for faster response times.
- PHP-FPM (FastCGI Process Manager): The modern standard for most WordPress websites. It delivers faster execution, better memory management and improved stability.
How Bluehost manages PHP handlers?
You don’t have to manage handlers manually when you host your site with Bluehost. The system automatically selects the most suitable handler for your current PHP version to ensure optimal performance.
- Bluehost uses ea-php handlers, specifically optimized for shared hosting environments.
- When you update your PHP version in cPanel, Bluehost automatically configures the right handler for you.
- This setup ensures maximum compatibility and speed without any technical setup required.
When you might need to adjust handlers manually?
In most cases, you won’t need to touch PHP handler settings. However, if you manage a VPS or dedicated server, you have more flexibility. For advanced users or developers, PHP-FPM is usually the best choice. It offers:
- Better memory control for high-traffic sites.
- Faster PHP processing for dynamic WordPress pages.
- Improved reliability under heavy workloads.
By letting Bluehost handle your PHP configuration automatically, you get a secure, high-performing website without worrying about the technical details. Everything runs smoothly in the background so your focus stays on growing your WordPress site, not maintaining its backend.
Also read: How to Add Handlers to Change PHP Version in File Manager
Once your PHP version is updated, it’s time to make sure everything still runs smoothly, from plugins to site speed.
What should you check after updating PHP?
Once you update your PHP version, it’s crucial to test your website thoroughly. A few quick checks ensure your WordPress site runs smoothly and takes full advantage of the new PHP features.
1. Test your website’s functionality
Start by visiting your live site and browsing different pages. You must:
- Check homepage, blog posts, contact forms and any interactive sections like shopping carts or membership areas.
- Test all dynamic features forms, search bars, user logins and custom widgets.
- Pay close attention to plugins or integrations that rely heavily on PHP code.
Next, check your website’s loading speed using tools like GTmetrix or Google PageSpeed Insights.
A successful PHP update should maintain or even improve your site’s performance compared to the previous version.
2. Review plugin and theme compatibility
After updating, head to your WordPress dashboard and review your active plugins.
- Look for error messages or compatibility warnings.
- Deactivate and reactivate plugins one at a time if you notice issues.
- Update all themes and plugins to their latest versions. Developers often release updates to ensure PHP compatibility.
If you use a custom or older WordPress theme, test its layout and features carefully. Some may need minor updates to work with the latest PHP version.
3. Check your error logs
Your hosting account’s control panel stores detailed logs that capture PHP errors and warnings.
- Open your Error Logs section and look for entries like “PHP Fatal Error” or “PHP Warning.”
- Note when these appear issues starting after your update usually indicate outdated code or incompatible plugins.
You can also enable WordPress debug mode to spot hidden issues. Add these lines to your wp-config.php file:
define(‘WP_DEBUG’, true); define(‘WP_DEBUG_LOG’, true); define(‘WP_DEBUG_DISPLAY’, false);
This creates a debug log in your site’s wp-content folder, helping you track any PHP-related errors safely without displaying them to visitors.
Follow these checks to confirm a successful PHP update. Your WordPress site will stay stable and perform better on the latest PHP version.
If you notice issues after updating PHP, don’t panic. Here’s how to troubleshoot and get your site back online fast.
How can you fix errors after a PHP update?
Even with careful preparation, issues can sometimes appear after you update your PHP version. The key is to identify the cause quickly so your WordPress site stays online and stable.
1. White screen of death (WSOD)
This is one of the most common PHP-related issues. It usually occurs when PHP encounters a fatal error that prevents WordPress from loading.
Here’s how to fix it:
- Enable WordPress debug mode by adding these lines to your wp-config.php file:
define(‘WP_DEBUG’, true); define(‘WP_DEBUG_LOG’, true); define(‘WP_DEBUG_DISPLAY’, false);
This reveals the exact error causing the blank screen.
- Check your error logs in your hosting control panel to locate the faulty plugin or theme.
- Temporarily deactivate all plugins. If your site loads, reactivate them one by one to identify the culprit.
- If the issue continues, switch to a default WordPress theme (like Twenty Twenty-Five) to confirm whether your theme is incompatible with the new PHP version.
2. Incompatible plugins
Sometimes, plugins built for older PHP versions trigger errors after an update.
- Check for plugin updates in your WordPress dashboard. Developers often release compatibility patches for latest PHP versions.
- If no update is available, reach out to the plugin developer to confirm PHP support.
- For critical plugins that have no alternatives, you may temporarily downgrade your PHP version until an updated release becomes available.
- Long term, consider switching to alternative plugins that are actively maintained and compatible with newer PHP versions. This ensures better security, performance and support.
3. Missing PHP modules
Certain plugins require specific PHP modules like php-curl, php-mbstring or php-xml. If these modules are missing, your website may show partial functionality or plugin errors.
To resolve this:
- Contact your hosting provider’s support team and request installation of the missing modules. Bluehost’s 24/7 support can usually handle this quickly.
- If you’re on a VPS or dedicated server, you can manually install modules using a package manager such as apt or yum (depending on your server’s operating system).
Fixing PHP errors after an update is usually straightforward once you isolate the problem. With quick debugging and help from your hosting provider, you can restore full functionality and ensure your WordPress website continues running smoothly on the latest PHP version.
Also read: How to Troubleshoot PHP Script Throws Server 500 Error
Final thoughts
Learning how to update PHP version isn’t just maintenance, it’s an upgrade for your entire WordPress experience. Each new release strengthens security, improves speed and ensures your plugins and themes stay fully compatible. When your site runs on the latest PHP version, you’ll see faster load times, fewer errors and smoother performance across every page.
Make it part of your regular website care routine. Check your current version, back up your data and switch to the newest release to keep your WordPress site stable and search-friendly.
With Bluehost, it’s even simpler. Our hosting automatically manages PHP handlers, optimizes performance and keeps your site configured for success. And if you ever need guidance, our 24/7 support team has your back.
Update your PHP today and let Bluehost handle the technical aspects, so you can focus on growing your website.
FAQs
You should update your PHP version at least once a year or whenever new security updates are released. Each major PHP version receives active support for about three years, so plan upgrades before your current version reaches end of life.
It can, but only if your plugins, themes or custom code aren’t compatible with the new version. Test your WordPress site on a staging environment first and keep a recent backup to minimize risks.
Use the PHP Compatibility Checker plugin from the WordPress repository. It scans your plugins and themes for issues with newer PHP versions before you update, helping you catch problems early.
Yes. Most hosting providers let you switch back to a previous PHP version in the control panel. Use this only as a short-term fix while you resolve compatibility issues it’s not recommended as a long-term solution.
Start by checking your error logs for details. Disable all plugins and switch to a default WordPress theme to restore access. If your WordPress website still won’t load, contact your hosting provider’s support team for help.
You can still upgrade manually by requesting help from your hosting provider or using a hosting dashboard that supports version switching. This method is ideal if you don’t have direct cPanel access.

Write A Comment