Key highlights:
- Import WordPress to local environments in under 30 minutes using migration plugins
- Prevent live site errors by testing changes in a secure local environment first
- Access your WordPress site offline for development and testing
- Maintain a perfect copy of your live site for risk-free experimentation
- Save time with automated migration tools and built-in debugging features
Introduction
Every WordPress developer and site owner faces the challenge of making site updates without affecting the live environment. Local WordPress development solves this crucial need. A local development environment exists as your private testing ground.
Developers can experiment with new features; designers can try theme changes and site owners can test major updates. The local environment removes all risks to your live or new site yet keeps full functionality for development.
This guide demystifies the process of moving your live WordPress site to a local server and makes development both efficient and secure. You’ll learn the exact process, troubleshooting steps and best practices for a smooth transition.
But first, let’s understand why you should import WordPress site to local machine.
Who should consider local development?
Local WordPress development offers a secure environment to test and refine website changes. A local setup proves invaluable for professionals who need to experiment without risking their live websites.
Website developers and designers
A local site provides the perfect playground for testing new features. Developers can create a new WordPress website locally to experiment with themes and layouts. This safe environment prevents those nerve-wracking moments when changes could break the live site or cause error messages.
Plugin developers
Building plugins requires a robust local WordPress installation with a proper database setup. The local environment lets developers export their work, test thoroughly and fix errors before deployment. Using the root access of a local machine enables deeper testing of plugin features and functionality.
Digital agencies and freelancers
Professional teams need to import WordPress files and create a separate test site and environment for each client project. By working with a local database and zip archives of client sites, agencies can safely implement updates without touching the production environment. This workflow helps backup important changes while preventing website downtime.
Site owners planning major updates
Before modifying a live WordPress website, testing changes locally helps catch potential issues early. Working with a zip file of the site and importing media files locally creates a safe space for major updates. The local environment makes it easy to fix problems before they affect the real site.
WordPress theme creators
Theme development requires extensive testing across different WordPress versions. Creating a local environment allows developers to import test content, switch between themes and verify compatibility. This controlled setup helps identify and resolve formatting issues early.
Beginners learning WordPress development
New developers benefit from having a local machine to practice WordPress skills. The ability to create multiple test sites, experiment with plugins and learn database management provides invaluable hands-on experience. Even if errors occur, the local environment ensures no live websites break during the learning process.
While local development is crucial for testing, you’ll eventually need reliable hosting for your live site. Bluehost WordPress hosting plans include development tools and staging environments that make the transition from local to live seamless. This two-environment approach ensures you can develop with confidence while maintaining a stable production site.
Prerequisites and preparation
Before you import to local WordPress, proper preparation ensures a smooth transition. Here’s the essential groundwork needed to successfully move your WordPress site to a local environment.
Essential tools and software you’ll need
Local development environment
Start by choosing reliable local server software. Popular options let you create a new local environment with just a few clicks. You’ll need:
- XAMPP, MAMP, Local by Flywheel or local development tools from WP Engine to create your local server
- A file compression tool to handle zip archives
- MySQL database management tools
- FTP client software to export WordPress files
Backup solutions
Securing your website data is crucial before any migration:
- WordPress backup plugins for complete site export
- Database management tools to export SQL files
- File compression software to manage zip file creation
- External storage for backup files
Browser and testing tools
Ensure you have these essential testing tools:
- Multiple web browsers for compatibility testing
- Developer tools for error message monitoring
- Screen capture software for logging issues
- Database testing tools for SQL verification
Creating a complete backup of your live site
Before you attempt to import your WordPress website locally, create comprehensive backups:
- Export the complete database using phpMyAdmin
- Download all WordPress files via FTP
- Save plugin and theme configurations
- Create a zip archive of your media folder
- Document current site settings and permalinks
Checking server requirements and compatibility
Your local machine needs to match specific requirements:
- PHP version matching your live WordPress site
- MySQL or MariaDB database compatibility
- Adequate storage space for WordPress files
- Proper server configurations for running WordPress
Common compatibility checks include:
- Verifying PHP modules and extensions
- Confirming database table prefix matches
- Checking plugin compatibility with local setup
- Testing theme functionality in local environment
Remember to note your current hosting details, including database credentials and file paths. These details prove invaluable when you need to modify configuration files during the local import process.
Pro tip: This guide covers local development basics. But Bluehost users have another option. Our built-in staging environments let you test changes right in your hosting dashboard. This integrated approach simplifies your development workflow by keeping everything in one place.
Method 1: Import to local WordPress using migration plugins
The most beginner-friendly approach to import to local WordPress involves using WordPress migration plugins. Think of these plugins as specialized moving companies that package up your entire website – files, database and all – and deliver them safely to your local machine.
Let’s walk through this process using the Duplicator plugin, a powerful tool designed specifically for WordPress migrations.
Setting up Duplicator plugin
Before getting into the migration process, proper plugin setup is crucial. Here’s how to get started:
- Log into your WordPress site and navigate to Plugins > Add New
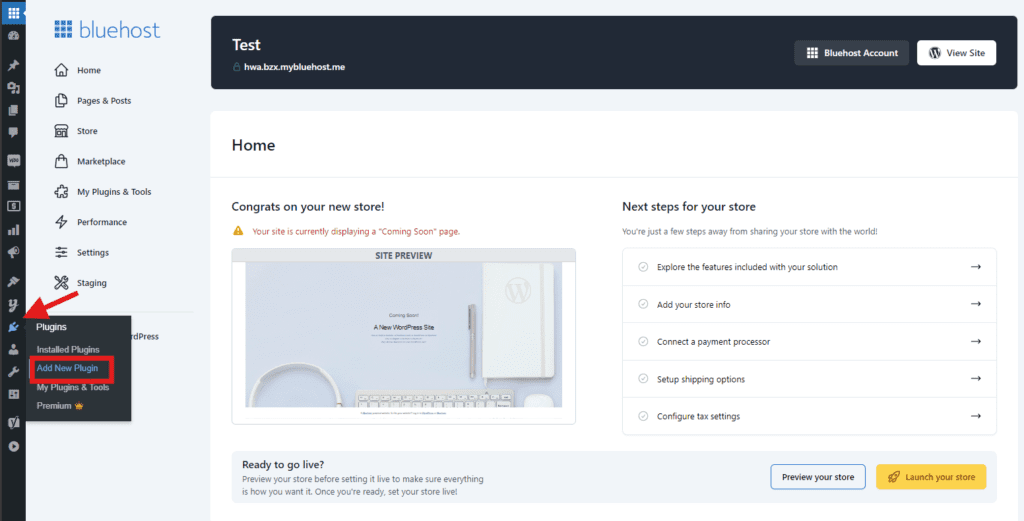
- Search for “Duplicator” and install the free version

- Click Activate to enable the plugin features
The free version of Duplicator works perfectly for most websites. However, if your site has extensive media files or complex database structures, consider the pro version for additional features.
Exporting your live WordPress site
Now comes the exciting part – creating your site package:
- Click Backups >> Create New in the Duplicator menu

- Name your package something memorable like “Local_Migration”

- Click “Next” and let the plugin scan your website for potential issues

- If the scan shows warnings about large files, adjust the archive settings
- Click the “Build” button to create your package

During this process, Duplicator creates two essential files:
- A zip archive containing all WordPress files
- An installer.php file for easy deployment

The plugin will notify you once the export is completed. Download both files to your local machine and keep them handy for the next step.
Installing WordPress locally with Duplicator
The final phase transforms your exported files into a working local WordPress site.
- Create a new database in your local environment
- Copy both Duplicator files to your local server’s root folder
- Access the installer.php through your browser (example: localhost/installer.php)
The installation wizard guides you through four main steps:
- Initial checks to verify your local environment meets all requirements
- Database connection setup where you’ll enter local database details
- Site configuration where you update URLs and paths
- Final testing and cleanup

The installer handles crucial tasks automatically:
- Extracts all WordPress files
- Imports your database
- Updates file paths
- Modifies the wp-config.php file
Watch for any error messages during installation. If you see database connection errors, double-check your local database credentials and try again.
After installation is complete, Duplicator helps clean up temporary files and provides access to your newly created local site. Remember to save the migration report – it contains valuable information if you need to troubleshoot.
Pro tip: Test your local site thoroughly after migration. Check that plugins activate correctly; media files display properly and your theme functions as expected. This verification step helps catch any issues early in the process.
Method 2: Import to local WordPress using manual migration process
The manual approach to importing to local WordPress requires careful attention but provides complete control over the migration process. This method helps you understand WordPress’s core components while creating a robust local development environment.
While this process works with any hosting provider, we’ll use Bluehost in our examples. The steps and interface may vary slightly with other hosts, but the core process remains the same.
Prerequisites before starting:
- Active hosting account with your provider
- A local server environment (XAMPP, WAMP, or MAMP) installed on your computer
- An FTP client like FileZilla installed
- Basic understanding of database operations
- Approximately 30-60 minutes of time
- Notepad or another text editor
Step 1. Export your live site’s WordPress database
Note: We’re showing screenshots from Bluehost dashboard.
To export your live site’s WordPress database, you need to log into your Bluehost dashboard and click Hosting >> cPanel.

Inside cPanel, scroll to Databases >> phpMyAdmin.

Select your WordPress database from the left sidebar – it typically starts with your Bluehost username. Click the Export tab at the top of the screen.

Choose ‘Custom’ as your export method rather than ‘Quick’. This option lets you control exactly what data transfers. Under the export settings:
- Select SQL as the format
- Enable the ‘Add DROP TABLE’ option
- Choose ZIP compression for the output
- Keep all tables selected unless you specifically want to exclude some

If certain WordPress plugins have created their own tables you no longer need, you can uncheck these to keep your local database clean. Click ‘Go’ to download your compressed database file.
Step 2: WordPress files backup
Now it’s time to secure your WordPress files. Using your FTP client, establish a connection to your website.
You’ll need to download all WordPress files and folders from your server to your local computer. This includes your themes, plugins, uploads and core WordPress files. Maintaining the original file structure is essential for a successful migration.

Step 3: Local environment setup
Your local environment needs to be properly configured to host the WordPress site. Create a new folder in your local server’s root directory.
For WAMP users, this would be in C:\wamp\www, while MAMP users should use /Applications/MAMP/htdocs/.
Next, create a new database through phpMyAdmin on your local server:
- Access http://localhost/phpmyadmin
- Create a new database
- Make note of the database name for later configuration

Step 4: Database import
With your local database created, it’s time to import your Bluehost data. Access phpMyAdmin on your local server and select your newly created database. The import process is straightforward:
- Click the Import tab
- Choose your exported ZIP file
- Ensure UTF-8 character set is selected
- Initiate the import process

Step 5: Configuration updates
WordPress needs to know how to connect to your new local database. Open wp-config.php in your text editor and update the following database connection details:
define('DB_NAME', 'your-local-database-name');
define('DB_USER', 'root');
define('DB_PASSWORD', '');
define('DB_HOST', 'localhost');
Step 6: URL updates
The final technical step is updating your site URLs in the database. This ensures your site knows it’s now running locally. Execute the following SQL queries in phpMyAdmin:
UPDATE wp_options SET option_value = replace(option_value, 'http://oldsite.com', 'http://localhost/your-site-name');
UPDATE wp_posts SET post_content = replace(post_content, 'http://oldsite.com', 'http://localhost/your-site-name');
UPDATE wp_postmeta SET meta_value = replace(meta_value, 'http://oldsite.com', 'http://localhost/your-site-name');Testing and finalization
After completing the migration, access your site through http://localhost/[your-site-name].
Log in using your existing WordPress credentials and perform a thorough check of your site’s functionality.
Visit Settings > Permalinks and click “Save Changes” to refresh your URL structure.

When your local development is complete, Bluehost makes the transition simple with one-click WordPress installation and integrated development tools. This means you can focus on development instead of technical setup details.

Troubleshooting common issues on local site
Even after you carefully import to local WordPress, technical issues can arise that prevent your site in local machine from functioning correctly. Common problems range from simple configuration errors to complex database connection issues.
Let’s go through each major issue and learn how to resolve them efficiently.
Database connection errors
One of the most frustrating errors occurs when WordPress can’t establish a connection with your local database. This issue typically displays the message “Error establishing a database connection” and can happen due to incorrect credentials, server misconfigurations or corrupted database files.
First check wp-config.php configuration:
define('DB_NAME', 'your_database_name');
define('DB_USER', 'root');         // Default for local setups
define('DB_PASSWORD', '');         // Often blank in XAMPP
define('DB_HOST', 'localhost');    // Sometimes '127.0.0.1'
define('DB_CHARSET', 'utf8mb4');
define('DB_COLLATE', '');
Systematic database troubleshooting:
- Verify MySQL service status in XAMPP/MAMP
- Confirm database existence in phpMyAdmin
- Test database user permissions
- Check for corrupted database tables
- Verify correct port settings (default 3306)
Missing files and permissions
File permission issues occur when WordPress can’t access or modify necessary files and directories. These problems commonly manifest as upload errors, plugin installation failures or update issues. Incorrect permissions can also create security vulnerabilities.
Essential permission settings:
WordPress directory: 755
wp-config.php: 600
wp-content directory: 755
Uploads directory: 755
Theme/plugin files: 644
.htaccess: 644
URL-related problems
After migration, URLs in your database might still point to your live site, causing broken links, missing images and redirect loops. These issues affect both front-end appearance and backend functionality.
Database URL correction queries:
/* Update WordPress URLs */
UPDATE wp_options SET option_value = 'http://localhost/yoursite'
WHERE option_name IN ('siteurl', 'home');

/* Fix content URLs */
UPDATE wp_posts SET post_content = REPLACE(
    post_content,
    'https://oldsite.com',
    'http://localhost/yoursite'
);

/* Update attachment URLs */
UPDATE wp_posts SET guid = REPLACE(
    guid,
    'https://oldsite.com',
    'http://localhost/yoursite'
);
White screen of death solutions
The white screen of death occurs when PHP encounters a fatal error but cannot display the error message. This commonly happens due to memory limits, plugin conflicts or syntax errors in theme files.
Enable comprehensive debugging:
// Add to wp-config.php
define('WP_DEBUG', true);
define('WP_DEBUG_LOG', true);
define('WP_DEBUG_DISPLAY', true);
define('WP_MEMORY_LIMIT', '256M');
error_reporting(E_ALL);
ini_set('display_errors', 1);
Systematic troubleshooting steps:
- Check PHP error logs for specific errors
- Disable all plugins temporarily
- Switch to default theme
- Increase PHP memory limit
- Verify PHP version compatibility
- Check file permissions
- Rebuild .htaccess file
Additional troubleshooting tips:
- Keep detailed logs of changes made
- Test after each modification
- Maintain regular backups
- Document successful configurations
- Monitor error logs consistently
Best practices and tips for local WordPress website
Creating an efficient local WordPress development environment goes beyond simply importing files and databases. Here are essential practices that will help you build a professional, secure and well-organized development workflow.
Local development workflow
Think of your development workflow as a well-oiled machine where every component works in harmony. The key is establishing consistent patterns and processes that make your work more efficient and reliable.
Start by implementing version control through Git. Every change you make should be tracked, documented and reversible. Create meaningful commit messages that explain not just what changed, but why.
For example, instead of “Updated header,” write “Fixed mobile menu alignment in header for devices under 768px.”
Structure your development process into clear phases:
Planning → Development → Testing → Review → Deployment
Each phase should have its own checklist and acceptance criteria. This systematic approach prevents common issues like forgotten dependencies or untested features from reaching production.
Security considerations
Even though you’re working locally, security should never take a backseat. Your local environment often contains sensitive data and configurations that could compromise your live site if exposed.
First, establish secure password practices. While it’s tempting to use simple passwords locally, this can lead to bad habits. Instead, use a password manager to generate and store strong credentials, even for local development.
When working with production data, always sanitize sensitive information. Create a script that automatically removes customer details, order histories and other private data when importing to your local environment. Here’s a simple example:
UPDATE wp_users SET
    user_email = CONCAT('user_', ID, '@example.com'),
    user_pass = MD5(RAND());
Performance optimization
Your local environment should strike a balance between development convenience and production similarity. Start by matching your local PHP configuration to your production server – this prevents the “works on my machine” syndrome.
Configure your PHP settings for optimal development:
// Development-friendly php.ini settings
memory_limit = 256M
max_execution_time = 300
display_errors = On
error_reporting = E_ALL
Install debugging tools that help identify performance bottlenecks. Query monitors and debugging plugins provide insights into database operations, slow functions and memory usage. This information is invaluable for optimization work.
Syncing local and live sites
Maintaining synchronization between environments is crucial for smooth development. Create a documented process for pushing and pulling changes between local and live sites.
Develop a systematic approach to database synchronization:
- Create pre-sync backups of both environments
- Document all custom tables and configurations
- Use dedicated migration tools or scripts
- Test synchronization process regularly
- Maintain logs of all synchronization activities
Remember to handle media files separately from your code. Large media libraries can make synchronization slow and complicated. Consider using a development-specific media library or placeholder images for local work.
To maintain this harmony between environments, create detailed deployment checklists that cover:
- Database changes and migrations
- File system modifications
- Configuration updates
- Cache clearing procedures
- Security checks
If you’re looking to move your local site to a live environment, Bluehost WordPress hosting includes a free domain and one-click WordPress installation. This means you can focus on development instead of technical setup details.
Final thoughts
Moving WordPress sites to a local environment empowers developers and site owners to work confidently on their projects. The methods outlined in this guide establish a foundation for secure, efficient website development. Remember to follow the security practices, maintain regular backups and implement a systematic development workflow.
Your local WordPress installation now stands ready for productive development work.
Ready to take your WordPress site live? Explore Bluehost web hosting solutions that offer the perfect balance of performance, security and development tools for your website needs.
FAQs
The time to import to local WordPress depends on your site’s size and complexity. A basic website might take 30-45 minutes, while larger sites with extensive media libraries and complex databases could require 2-3 hours. Your internet speed and server response time also affect the duration of file transfers.
Yes, once you import your WordPress site locally, you can work without an internet connection. The local server runs entirely on your computer. However, some features like external APIs, CDN resources and certain plugins might require internet connectivity to function properly.
No, local WordPress development happens independently from your live site. The migration process only copies your website data and files to your computer. Your live website continues to operate normally throughout the process and remains unaffected by any changes you make locally.
The process involves exporting your local database, uploading modified files via FTP and updating your live site’s database. Many developers use deployment tools or plugins to streamline this process. Always create backups before pushing local changes to your production environment.
Local by Flywheel stands out for its user-friendly interface and WordPress-specific features. XAMPP offers reliability for Windows users, while MAMP works excellently on Mac systems. Your choice depends on your operating system, technical expertise and specific development needs.

Write A Comment