Key highlights
- File permission errors trigger 403 Forbidden pages that can halt your website instantly
- Permissions control read, write and execute access, balancing security with functionality
- Wrong permission settings either block legitimate site operations or expose security vulnerabilities
- Most WordPress update, plugin install and theme edit failures stem from incorrect file permissions
- This guide covers cPanel File Manager permissions, chmod commands and WordPress-specific best practices
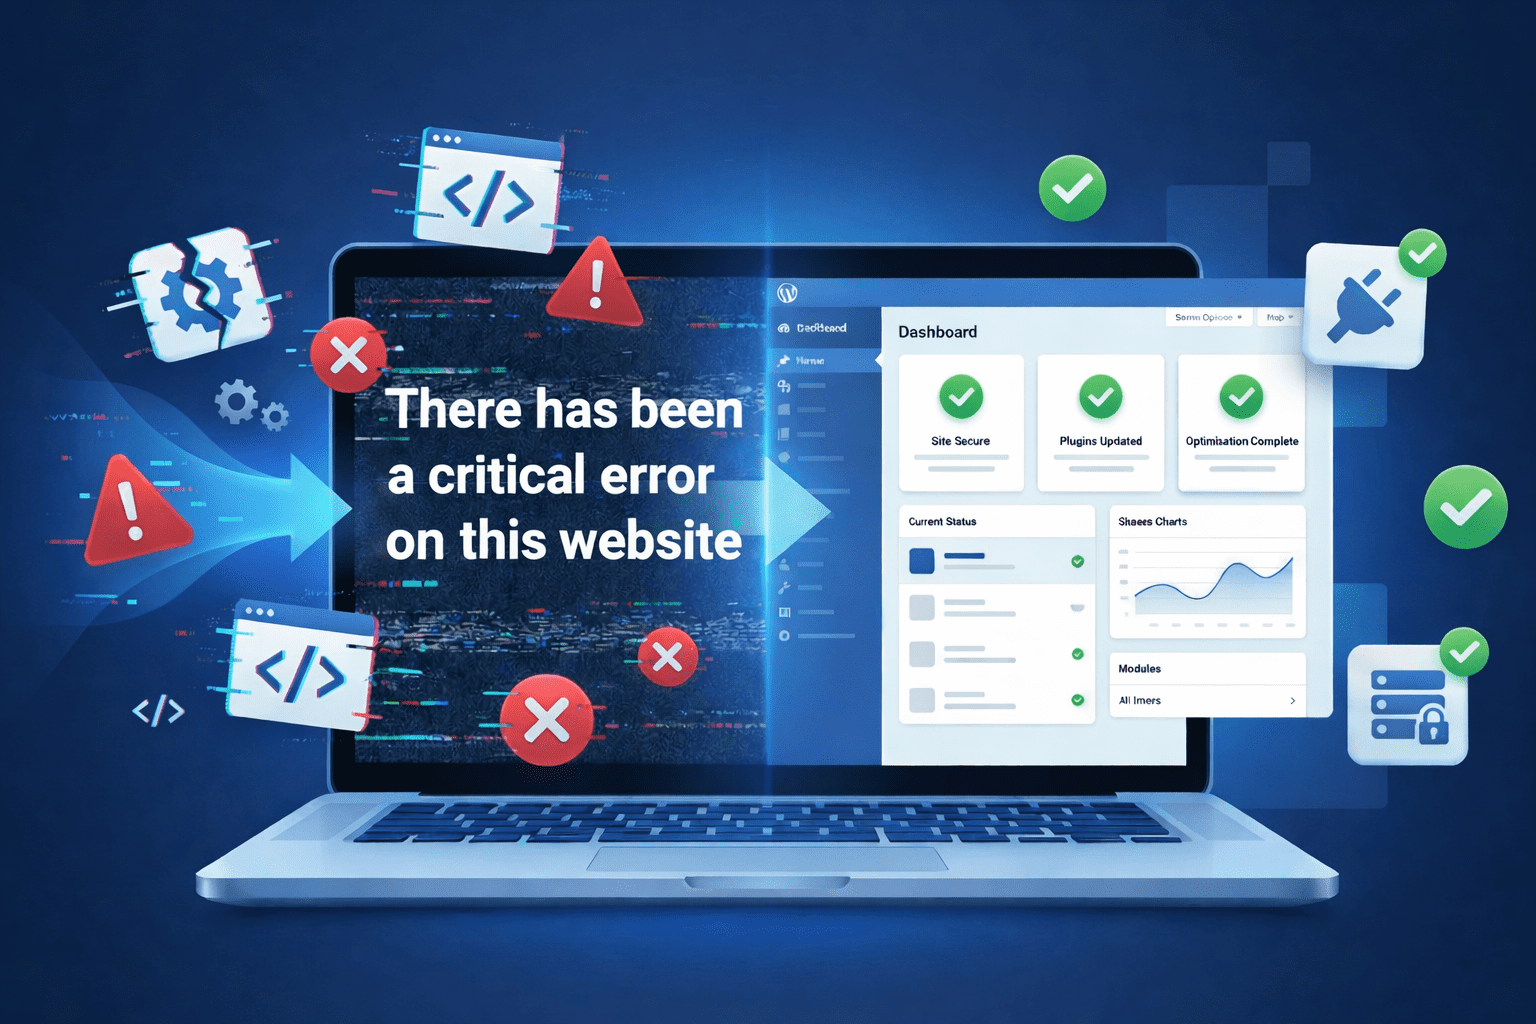
File permission errors can bring your website to a grinding halt, and nothing triggers panic faster than a 403 Forbidden page. That frustration is predictable because permissions sit at the intersection of security and basic site functionality. Once you know how to change file permissions in cPanel, you can fix problems fast without accidentally opening your site to risk.
File permissions decide who can read, write or execute files on your server. When those settings are wrong, you either block legitimate actions or you create vulnerabilities that attackers love. This matters because most “random” WordPress failures during updates, plugin installs or theme edits are actually permission failures in disguise.
This guide covers cPanel File Manager permissions, chmod commands for Linux environments and practical best practices for WordPress file structure. You will learn how to spot permission problems, correct them safely and prevent repeats.
Now that the goal is clear, we can start with the fundamentals that make every later fix predictable.
Understanding file permissions fundamentals
File permissions are the foundation of server security and functionality. Every file and directory has a permission set that controls access. Those permissions are defined at three levels and expressed using numeric codes or symbolic strings.
The three permission levels explained
Linux based servers group permissions into three user categories. The owner is the account that created the file, the group is a set of users tied to the owner and others includes everyone else. Consequently, you usually want the owner to have control while everyone else gets only what is needed.
Each category can be granted three permission types:
- Read: view file contents or list a directory
- Write: modify, delete or create files
- Execute: run a file as a program or access a directory
Once you know who permissions apply to, the next step is understanding how the numeric codes express those same rules.
Numeric permission codes decoded
The numeric system uses three digits. Each digit maps to owner, group and others in that order. cPanel and the command line both rely on these codes to apply changes precisely.
| Number | Permission | Symbolic | Meaning |
|---|---|---|---|
| 0 | No permission | — | Cannot read, write or execute |
| 1 | Execute only | –x | Can execute or access directory |
| 2 | Write only | -w- | Can modify but not read |
| 3 | Write and execute | -wx | Can modify and execute |
| 4 | Read only | r– | Can view contents only |
| 5 | Read and execute | r-x | Can view and execute |
| 6 | Read and write | rw- | Can view and modify |
| 7 | Full permissions | rwx | Can read, write and execute |
Now that the codes are clear, the common “good defaults” will make more sense.
Common permission combinations
Some permission combinations appear constantly in web hosting. 644 (rw-r–r–) is a strong default for most files because the owner can read and write while everyone else can only read. That balance matters because it keeps public access possible without allowing random edits.
Directories typically use 755 (rwxr-xr-x). The owner gets full control while others can list and enter the directory. 777 grants full access to everyone and should be avoided except for rare, temporary troubleshooting situations.
With the basics in place, you can now apply them using cPanel without touching the command line.
How to change file permissions in cPanel File Manager
cPanel includes a visual interface for permission management through File Manager. That GUI removes the need for command line familiarity while still giving you full control. It reduces “one wrong command” mistakes when you are in a hurry.
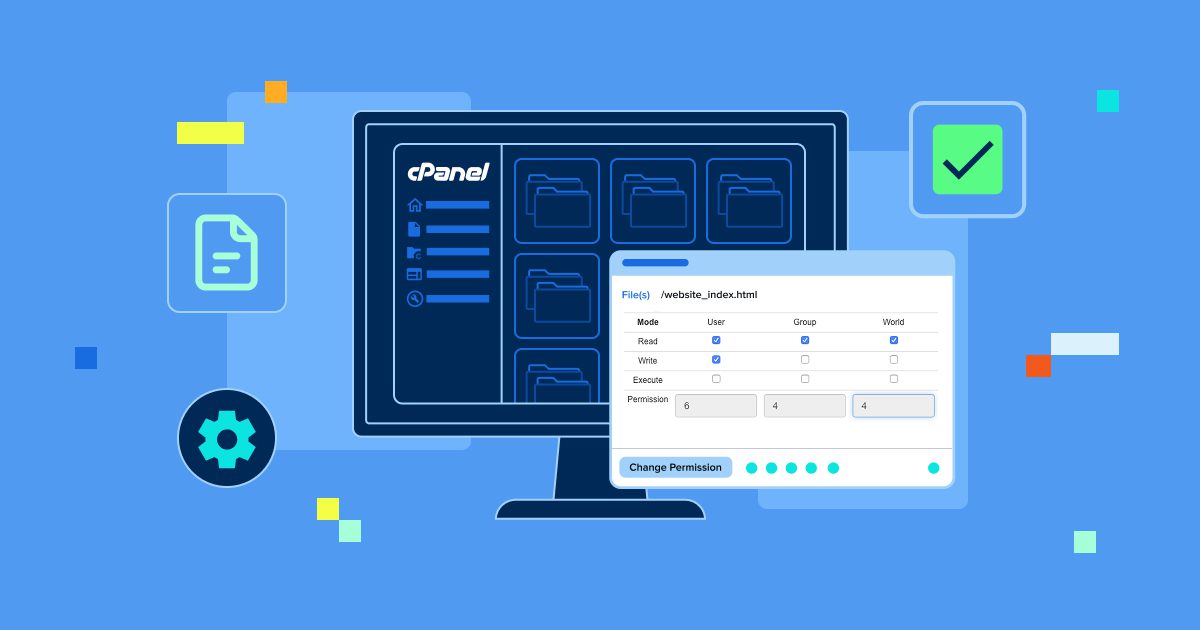
1. Accessing cPanel File Manager
Log into cPanel using your hosting credentials. Open the Files section and select File Manager, then review the folder tree for your site. As you navigate, keep an eye on the directory path shown at the top because it confirms where you are making changes.
For most sites, your primary web root is public_html. WordPress installs often live there alongside key configuration files. Once you are in the right location, you can adjust individual files safely.
2. Changing permissions for individual files
Find the file you want to modify in File Manager. Right click the file, select Change Permissions and review the current settings in the dialog box. In practice, the current value often hints at what went wrong.
In the permissions dialog, you can:
- Use checkboxes to toggle read, write and execute for owner, group and others
- Enter a numeric code directly, such as 644 for files or 755 for directories
- Click Change Permissions to apply immediately
Once you can fix one file, the next useful capability is fixing many files at once without creating collateral damage.
3. Modifying permissions recursively for folders
Select the folder that contains the affected files. Right click, choose Change Permissions and look for the Recurse into subdirectories option. Recursive changes can fix widespread issues quickly, but they can also break a site if aimed at the wrong directory.
When using recursion, choose what to apply:
- Apply to files only
- Apply to directories only
- Apply to both files and directories
Critical warning: Recursive permission changes affect every nested file and folder. Verify the target directory before you apply the change because one bad recursive run can break your website or create serious security exposure.
If your host provides automation, you may also have a faster option for restoring standard WordPress permissions. On Bluehost managed WordPress environments, default permission safeguards and guided File Manager controls reduce the chance of site breaking mistakes during bulk changes.
See how managed WordPress hosting removes manual friction from routine site tasks.
4. Using a cPanel Fix Permissions script
Some hosting providers include a Fix Permissions tool inside cPanel or File Manager. These scripts usually apply recommended defaults based on file type. That matters because it resolves broad permission drift in minutes.
Typically, the script sets:
- Files to 644
- Directories to 755
Manually correcting permission drift across dozens of files is time consuming and easy to misapply. Bluehost simplifies this recovery step by providing automated permission reset tools that restore WordPress safe defaults in minutes instead of manual trial and error.
This automated approach often solves widespread WordPress permission problems, but custom apps may need different settings. If you want maximum control or need to operate at scale, the command line becomes the next step.
How to manage permissions with chmod commands in a Linux terminal
Command line tools give you speed and precision. The core command is chmod, which changes permissions directly. Consequently, chmod works the same way across most Linux environments, including many hosting servers.
1. Connecting via SSH to your hosting account
Connect to your server via SSH using a terminal app. macOS and Linux users can use Terminal, while Windows users can use PuTTY or Windows Subsystem for Linux. Once connected, you can run permission commands against your site folders.
Use:
[email protected]Replace username with your hosting username and yourdomain.com with your domain, then enter your password when prompted. With a connection established, you can apply permissions quickly and consistently.
2. Basic chmod command syntax
chmod uses this structure:
chmod [permissions] [filename]Permissions can be numeric like 644 or symbolic, but numeric is usually faster for hosting work. For example:
chmod 644 filename.phpThat sets the file to readable and writable by the owner and readable by everyone else. If you need to repair an entire folder tree, recursion is the next tool.
3. Changing permissions recursively with chmod
Recursive changes apply permissions across an entire directory structure. Use the recursive flag to do this, which is commonly used during large WordPress fixes. Without this, recursive mistakes impact many files at once.
Example:
chmod -R 755 /path/to/directoryThat command modifies the target directory and everything inside it. Use it carefully because “fast” also means “wide impact.”
4. Applying different permissions to files and directories
Best practice is to separate file permissions from directory permissions. Files usually need 644, while directories usually need 755 for normal site behavior. Yet giving files execute permissions or making directories writable by everyone increases risk with no upside.
To apply permissions precisely, use find commands:
- Files only:
find /path/to/directory -type f -exec chmod 644 {} \; - Directories only:
find /path/to/directory -type d -exec chmod 755 {} \;
These commands target exactly what you intend and preserve the separation between file and folder rules. Once you have that baseline, platform specific scenarios become easier to reason about.
Ubuntu and Linux specific permission commands
Ubuntu uses the same chmod rules as other Linux distributions. Many Ubuntu web roots live in /var/www/html, so you may start with:
cd /var/www/htmlFor temporary troubleshooting, some users apply full permissions:
sudo chmod 777 foldernameThe sudo prefix grants administrative privileges, but you should restore secure permissions immediately after the task. To inspect current permissions, use:
ls -laThat output shows permission codes, ownership data and modification dates, which helps you confirm whether your changes did what you intended. Now that the mechanics are covered, we can lock in WordPress specific best practices.
What are the best practices for WordPress file permissions?
WordPress runs best when permissions are strict but functional. The goal is to allow updates and uploads without leaving writable surfaces exposed. As a result, WordPress sites are frequent targets and permissions are a common weak point.
1. Recommended WordPress permission settings
Use these defaults for most WordPress installations:
- WordPress root directory: 755
- All WordPress files: 644
wp-config.php: 600 or 640wp-contentdirectory: 755wp-content/uploads: 755wp-content/themes: 755wp-content/plugins: 755- All PHP files: 644
.htaccess: 644
The stricter setting on wp-config.php matters because it contains database credentials. Once those basics are correct, update failures become much easier to diagnose.
2. Fixing “the update cannot be installed” errors
WordPress update failures often trace back to permissions. If you see “the update cannot be installed because some files could not be copied,” WordPress likely cannot write where it needs to write. That matters because updates touch multiple folders during extraction and replacement.
A common fix is to ensure directories like wp-admin and wp-includes are set to 755 and their files to 644. After the update completes, restore restrictive permissions immediately because leaving writable directories increases security risk. Before major updates, backups are your safety net, which is why many users rely on automated backup tools.
3. .htaccess file permissions
.htaccess controls key server behavior such as rewrites and security rules. Set it to 644 to balance protection with readability by the server. Otherwise, permissive .htaccess settings can be abused to inject malicious redirect rules or expose sensitive paths.
Some plugins may need temporary write access to modify .htaccess. After configuration, return it to 644 and periodically review it for unexpected changes. If you manage Laravel apps as well, the permission rules differ in specific folders.
4. Laravel application folder permissions
Laravel needs writable access in a few specific locations. The storage folder and bootstrap/cache typically require 775 for proper operation. This is important because caching and logging fail immediately when those paths are not writable.
Common commands from the Laravel root directory include:
chmod -R 775 storage

chmod -R 775 bootstrap/cache

chmod -R 644 .env
The .env file contains sensitive variables, so it should not be publicly accessible and should never be committed to version control. With best practice targets set, the next step is diagnosing real error messages quickly.
How to troubleshoot common permission errors?
Permission errors show up as specific messages across browsers, terminals and applications. The fastest path is to identify the error pattern and apply the smallest safe fix. That said, overcorrecting often creates bigger security problems than the original issue.
1. Resolving 403 Forbidden errors
A 403 error means the server refuses the request due to access restrictions. Confirm your index file such as index.php or index.html is 644 and the containing directory is 755. If those are correct, the next likely culprit is .htaccess.
To test .htaccess, temporarily rename it and try again. If the error disappears, the rules were blocking access. Once you have confirmed the cause, you can restore the file and correct the rules safely.
2. Fixing “permission denied” terminal errors
Errors like “zsh permission denied” or “bash permission denied” often happen when you try to execute a script without execute permissions. Make the script executable:
chmod +x scriptname.shIf the file is protected and you still get permission denied, you may need administrative privileges:
sudo chmod +x scriptname.shOnce scripts run correctly, the next class of errors involves apps that cannot copy or create files.
3. Addressing “operation not permitted” errors
Errors like “EPERM: operation not permitted, copyfile” usually mean the application lacks permission to create or modify a file. Start by checking ownership:
ls -laIf ownership is wrong, update it with:
sudo chown -R username:username /path/to/directoryReplace username with your account name. Once ownership and permissions align, file operations typically succeed again.
4. Resolving “cannot paste files” errors
Messages like “permissions do not allow pasting files in this directory” point to missing write permission on the target folder. Set the directory to 755:
chmod 755 /path/to/directoryIf you do not own the folder, change ownership:
sudo chown username /path/to/directoryTo be precise, ownership problems cannot be solved by chmod alone. On macOS, the same pattern shows up with clearer wording.
5. Fixing macOS “you do not own it” warnings
macOS may show “could not add write permission to the file because you do not own it.” Use Terminal to change ownership:
sudo chown username filenameYou can also fix this in Finder using Get Info, then adjust Sharing & Permissions after unlocking with your password. Once you can resolve common errors, advanced permissions become the next layer of control.
Advanced permission management techniques
Complex environments sometimes require more granular tools than basic chmod. Special bits and ownership control expand what permissions can do. This matters because shared systems and multi user setups need stronger guardrails.
1. Understanding SUID, SGID and sticky bits
Special permission bits add behaviors beyond standard read, write and execute. SUID allows a file to execute with the owner’s privileges, while SGID applies group behavior to newly created files. These features can be useful, but they should be used carefully.
The sticky bit restricts file deletion to the file owner, which is helpful in shared directories. Set it with:
chmod +t /path/to/directoryYou will see a t in the execute position of the permission string. Once you understand special bits, ownership becomes the next lever.
2. Using chown for ownership changes
chown changes file and directory ownership. The pattern is:
chown user:group filenameFor recursive ownership changes, use the recursive flag:
chown -R user:group /path/to/directorySecurity warning: do not use sudo chown 777. That is incorrect because chown changes ownership, not permissions, so you must use chmod when your goal is permission changes.
3. Creating permission scripts for automation
If you repeat the same fixes, automate them with a shell script. Save your commands in a file such as fix-permissions.sh, then make it executable:
chmod +x fix-permissions.shA WordPress oriented script often includes commands like:
find /path -type d -exec chmod 755 {} \;

find /path/to/wordpress -type f -exec chmod 644 {} \;
Run it with:
./fix-permissions.shAutomation reduces mistakes, but it also increases blast radius, so it pairs best with clear standards and backups. Shared file systems like Samba add another layer of translation to consider.
4. Managing Samba file permissions
Samba shares map Unix permissions into Windows style access rules. Because of that mapping, setting shares to 777 creates major security exposure. Secure defaults matter even more in shared networks.
Samba can be configured in smb.conf using settings like create mask = 0644 and directory mask = 0755. Those values mirror common web hosting defaults while keeping Windows access practical. With advanced techniques covered, we can shift to security strategy so your fixes stay safe.
Security considerations and best practices
Permissions are your first line of defense against unauthorized access. Good defaults keep most sites safe, but security comes from consistency and restraint. Attackers often look for a single overly permissive folder, not a complex exploit.
Why 777 permissions are insecure
777 grants read, write and execute access to everyone. That effectively removes all permission based security controls from the file or directory. If a directory is 777, malicious scripts can be uploaded and executed immediately.
Attackers actively scan for 777 because it is an easy entry point. Use 777 only for temporary troubleshooting, then restore secure permissions immediately. Once you avoid the obvious traps, least privilege becomes your daily operating principle.
Implementing least privilege principles
Grant only the minimum permissions required for the task. Files that never need to execute should not have execute permissions. Most sites need the server to read files, but they rarely need everyone to write them.
Audit permissions regularly and remove write access after administrative work is complete. This limits the damage of compromised accounts or vulnerable plugins. The same logic is even more important for configuration files.
Protecting sensitive configuration files
Configuration files often contain database credentials, API keys and secrets. Set wp-config.php to 600 for maximum protection, or 640 when group access is required. For environment files like .env, use 600 or 640 and keep them out of public repositories.
When possible, keep sensitive configuration outside the web root. That layout matters because it reduces exposure even if web server rules are misconfigured. To ensure your standards stay intact over time, you need routine auditing.
Regular permission auditing
Add permission reviews to your regular maintenance routine. You can locate dangerous file permissions with:
find /path/to/site -type f -perm 0777Document your standard permission targets so you can restore them quickly after troubleshooting. Some hosting platforms also provide file integrity monitoring and alerts, which can catch unauthorized permission changes early.
Before you apply wide permission changes, you also need a safety net, which is where backups earn their keep.
Backup before permission changes
Back up before modifying permissions on a production site. Permission mistakes can break functionality or unintentionally expose sensitive data. A backup makes recovery a fast revert instead of a long rebuild.
Permission changes affect live files immediately, which makes mistakes costly on production sites. Bluehost mitigates this risk by pairing permission management with CodeGuard backups. If a permissions change causes unexpected behavior, you can roll back quickly and reapply the fix more carefully.
With safety covered, the next step is learning how to verify permissions confidently.
How to check and verify file permissions?
You cannot fix what you cannot verify. Reading current permissions accurately helps you diagnose issues and confirm your changes. Guesswork like “it should work now” is not a verification strategy.
1. Using ls to view permissions
Use ls -l to view file permissions in a directory. The output shows the permission string, ownership, size and modification date. When you are troubleshooting, that single line often tells you whether the problem is permissions or ownership.
The permission string is ten characters long. The first character indicates type, such as d for directory or - for file, and the remaining nine characters represent owner, group and others permissions. For example, -rw-r--r-- corresponds to 644.
2. Interpreting permission output
Read the string in three character groups. Characters 2 through 4 represent owner permissions, 5 through 7 represent group and 8 through 10 represent others. The letters r, w and x map to read, write and execute, while a dash means the permission is not granted.
To convert symbolic to numeric, add the values r=4, w=2 and x=1. That conversion matters because it lets you move smoothly between what tools display and what commands require. If you prefer GUIs, you still need to understand what they are changing.
3. GUI tools for permission management
Many file manager tools provide permission controls. FTP clients like FileZilla show permissions and let you modify them via a context menu. These tools are helpful when you want visibility without command line work.
Some file manager apps also support batch permission updates and visualize permission inheritance. GUIs reduce friction, but they do not replace judgment, so you still need to confirm effective user access when something fails.
4. Checking effective user permissions
Use id to see your current user, user ID and group memberships. That context matters because permission denials often come from being in the wrong group. You can also test access directly:
- Read test:
test -r filename && echo "readable" - Write test:
test -w filename && echo "writable" - Execute test:
test -x filename && echo "executable"
These tests confirm what your current user can actually do, not what you think should happen. With verification in hand, platform specific setups become easier to standardize.
Final thoughts
Correct file permissions keep your website secure and functional, and they turn scary errors into routine maintenance. Once you understand chmod, cPanel tools and best practice targets, you can resolve most issues quickly without overexposing your site. For most WordPress installs, the 644 and 755 scheme remains the reliable baseline.
Make permission audits part of your security routine and pair changes with a backup strategy so mistakes are reversible. If you want to avoid repeated permission issues altogether, using a hosting environment that handles safe defaults makes a real difference.
Bluehost simplifies file permission management with managed WordPress updates and automated backups that let you fix issues confidently without risking your live site.
You can explore Bluehost plans to run WordPress on an infrastructure designed to reduce permission errors rather than recover from them.
FAQs
WordPress files should use 644 while directories need 755. wp-config.php should be more restrictive at 600 or 640. These settings balance security with the permissions WordPress needs to operate normally.
Ensure wp-content, wp-admin and wp-includes directories are 755 and that your account owns them. Confirm files inside those directories are 644. After the update, restore restrictive permissions to reduce exposure.
No. 777 grants full access to everyone, which creates serious security vulnerabilities. Use it only temporarily for troubleshooting, then revert to secure settings immediately.
755 gives the owner full permissions and gives group and others read plus execute. This is ideal for directories that must be accessible but not writable by everyone. It keeps navigation possible without inviting edits.
Use chmod +x filename to add execute permission. If you want a standard executable permission set, use chmod 755 filename. That keeps owner control while allowing execution where appropriate.
They occur when your user lacks access rights or does not own the file or folder. Check permissions and ownership with ls -la. Fix with chmod for permissions changes or chown when ownership is wrong.
In cPanel File Manager, right click the folder and choose Change Permissions. Select Recurse into subdirectories and apply changes to files, directories or both. Verify the target folder first to avoid breaking the site.
.htaccess should be 644. That allows the server to read rules while limiting unauthorized modifications. Avoid making it writable by everyone.

Write A Comment