Key highlights
- Learn how to add an SPF record using Bluehost’s DNS management tools to authenticate your email sending and reduce the risk of spoofing.
- Understand what SPF records do and why SPF record management is crucial for your business email security.
- Master the Bluehost DNS SPF configuration process step-by-step for comprehensive email authentication.
- Discover SPF requirements and best practices to ensure optimal email delivery performance.
- Explore advanced SPF record examples and troubleshooting techniques for complex scenarios to maintain secure email communications across your business operations.
Ever wondered why your business emails end up in spam folders? The answer often lies in a missing or misconfigured SPF record. A Sender Policy Framework (SPF) record is a specialized DNS TXT record that acts as an authorized sender list, telling receiving mail servers which IP addresses can send emails on behalf of your domain.
When you learn how to add SPF record protection and maintain effective SPF record management practices, you’re creating a shield against email spoofing and phishing attempts while protecting your domain reputation.
Setting up your SPF record properly is essential for maintaining strong email authentication and ensuring your messages reach their intended destination. Whether you’re sending marketing campaigns, customer notifications or everyday business communications, understanding how to add SPF record protection helps safeguard your domain from unauthorized use while improving your overall email deliverability rates and building trust with recipients.
What is the SPF record? What does SPF record do?
An SPF (Sender Policy Framework) record is a type of DNS (Domain Name System) record that identifies which mail servers are permitted to send email on behalf of your domain. By listing authorized sending IPs in the SPF record, it helps prevent email spoofing, where attackers send emails from your domain without permission.
When an email is received, the recipient’s server checks the SPF record to verify if the sending server is authorized. This enhances email authenticity and security.
The primary function of an SPF record is to improve email deliverability and protect your domain’s reputation by minimizing the risk of your emails being marked as spam or phishing attempts. It acts as a first line of defense against email spoofing by ensuring that only emails sent from approved servers reach their intended recipients. This increases the trust in your domain’s email communications.
What should be included in an SPF record?
A properly configured SPF record consists of three essential components that work together to authenticate your domain’s email sending capability:
- Version identifier (v=spf1): This tag identifies the record as SPF to receiving mail servers.
- Authorization mechanisms: These specify which servers are authorized to send email on behalf of your domain.
- Policy qualifier: This determines the enforcement level for your SPF policy.
For example, an SPF record for a domain hosted on Bluehost may look like:
v=spf1 a mx ip4:198.51.100.123 ~all
- Authorizes your domain’s A and MX records
- Authorizes your specific server IP address
- Authorizes Bluehost’s mail servers
- Recommends soft rejection of all other sources
These components work together to protect your domain from email spoofing while ensuring legitimate emails from your authorized sources reach their intended recipients successfully.
SPF record syntax and mechanisms explained
SPF records follow a specific left-to-right syntax structure that begins with the version tag “v=spf1” followed by mechanisms that define authorized mail servers.
The most common mechanisms include “a” (authorizes the domain’s A record), “mx” (authorizes MX record servers), “ip4” and “ip6” (specify exact IP addresses), “include” (references another domain’s SPF record) and “exists” (checks for domain existence). The record concludes with an “all” mechanism that sets the default policy using qualifiers like “~all” (soft fail) or “-all” (hard fail).
Proper ordering and spacing are crucial for SPF functionality, mechanisms are evaluated from left to right and the first match determines the result.
For example, a typical Bluehost setup might look like: “v=spf1 +a +mx +ip4:198.51.100.123 include:_spf.bluehost.com ~all”. Remember to maintain only one SPF TXT record per domain, as multiple records can cause authentication failures and negatively impact your email deliverability across all major email providers.
Using SPF records with VPS and Dedicated hosting servers
This article outlines what you need to know about SPF records and how they can be implemented at Bluehost for VPS and Dedicated hosting.
Email is sent directly from the server in our VPS and dedicated hosting plans. On VPS and Dedicated hosting, email is commonly sent directly from the server’s IP address, and SPF records are often configured to authorize that IP. You should always confirm your current SPF record before making changes. Here is an example of a default SPF record for a server at 198.51.100.123.
v=spf1 +a +mx +ip4:198.51.100.123 ~allThis record is composed of three parts:
- v=spf1 specifies that this is an SPF record.
- +a +mx +ip4:198.51.100.123 authorizes sending from the domain’s A record, MX record and IPv4 address 198.51.100.123.
- This is the record where you can add IP addresses and include SPF rules for other domains.
- Third-party email marketing tools often require that you update your SPF record to accommodate their servers.
- ~all specifies how hosts should regard servers that are not on the list. There are a few modifications you can use here:
- -all “Hard Fail” means to reject all mail that isn’t on the allowed list.
- ~all “Soft fail” means accept mail not on the allowed list, but treat it with more scrutiny.
- ?all “Neutral” means accept all mail; there isn’t a policy for servers not on the list.
The process of SPF validation
SPF (Sender Policy Framework) records involve a series of steps that receiving mail servers follow to validate the authenticity of incoming emails. Here’s the process broken down:
- Email sent: An email is dispatched from the sender’s email server.
- SPF record lookup: Upon receiving an email, the recipient’s mail server performs a DNS lookup to find the SPF record of the sender’s domain.
- Retrieve SPF record: The SPF record, which is a list of IP addresses authorized to send emails on behalf of the domain, is retrieved from the DNS.
- Compare IP addresses: The recipient’s mail server compares the IP address of the mail server that sent the email against the list of authorized IPs in the SPF record.
- Validation outcome:
- If the sending server’s IP matches an authorized IP in the SPF record, the email passes the SPF validation. This indicates that it’s from a legitimate source.
- If there’s no match, the email fails the SPF validation. This would raise suspicions of email spoofing or unauthorized use of the domain.
How to customize SPF records?
If you’re using another host to send an email for your domain, customize your SPF record by adding additional servers and IPs to the second part of the record. And if you want to make your record more strict to defend the domain from email spoofing, adjust the policy for “all.”
For example, if your domain only used the address 198.51.100.123 for outgoing mail and you want to make the sending policy as strict as possible, you could use this SPF record:
v=spf1 ip4:198.51.100.123 -allThis record authorizes sending mail from 198.51.100.123 only; no other servers are authorized.
SPF record examples for common email setups
Here are practical SPF record examples tailored to common Bluehost hosting scenarios. For a basic setup sending email only through your Bluehost server, use: v=spf1 include:bluehost.com ~all. This record starts with the version identifier (v=spf1), includes Bluehost’s mail servers (include:bluehost.com) and applies a soft fail policy (~all) for unauthorized senders.
If you use Bluehost alongside an email marketing platform, your SPF record might look like: v=spf1 include:bluehost.com include:_spf.emailmarketing.com ~all. The additional include mechanism authorizes your marketing platform’s servers while maintaining Bluehost authorization. For businesses using transactional email services for automated messages, combine both services: v=spf1 include:bluehost.com include:_spf.transactionalemail.com ~all.
Each “include” mechanism tells receiving servers to check the specified domain’s SPF record for authorized IP addresses. The soft fail policy (~all) marks emails from non-authorized servers as suspicious but doesn’t reject them outright, providing a balance between security and deliverability. When managing multiple email services, list all necessary includes before the final “all” mechanism to ensure comprehensive SPF record management and proper email authentication.
How to add an SPF record?
SPF records are added to your Zone File as TXT records. Keep in mind that, by default, in many cases, Bluehost automatically adds a default SPF record to your domain’s DNS zone. However, you should always review existing TXT records before making changes, as SPF configurations can vary by hosting plan and email setup.
For further guidance on how to add or modify a DNS Record such as an SPF Record, more details can be found in this guide: DNS Management: How to Add, Edit or Delete DNS Entries — DNS Zone Editor and Advanced DNS Records.
- Log in to your Bluehost Account Manager.
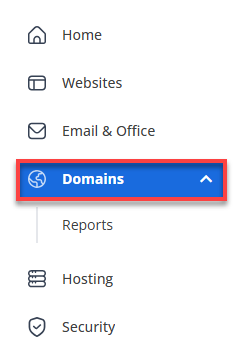
- In the left-hand menu, click Domains.

- If you have one domain in your account, you will be taken directly to the domain management panel.

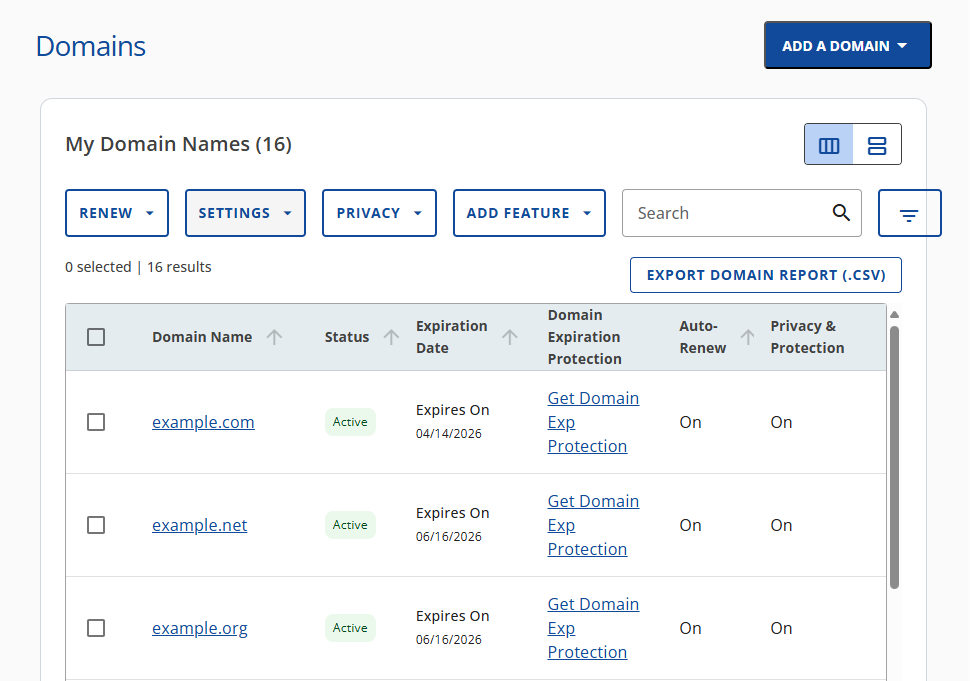
- If you have multiple domains in your account, click the domain you wish to manage to access the domain management panel.
- If you have one domain in your account, you will be taken directly to the domain management panel.

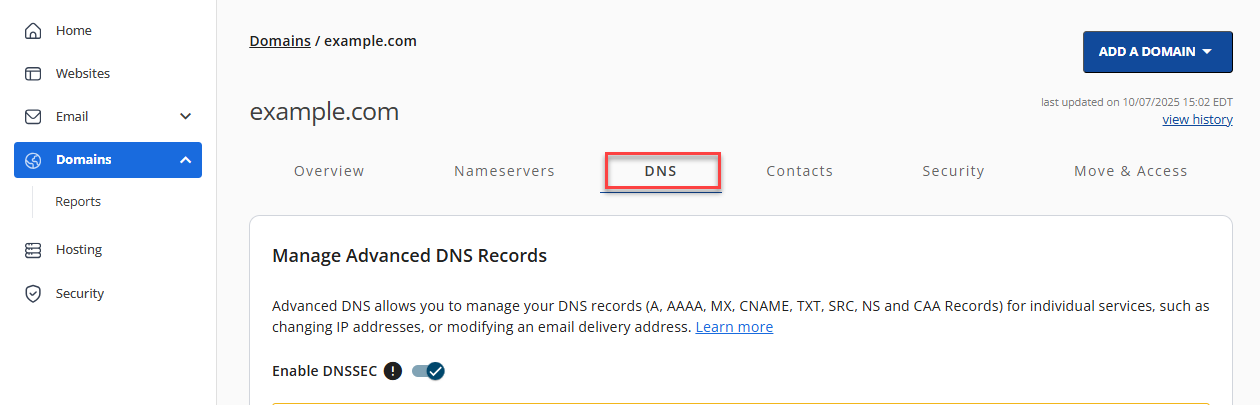
- Click the DNS tab.
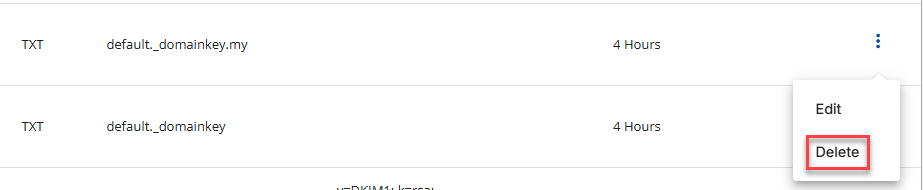
- If you’re removing an existing SPF record, scroll down to the TXT record section, click the ellipsis and then click Delete.
- To add a new SPF record, click the + ADD RECORD button. You will have the option to add a Single record or Multiple records.

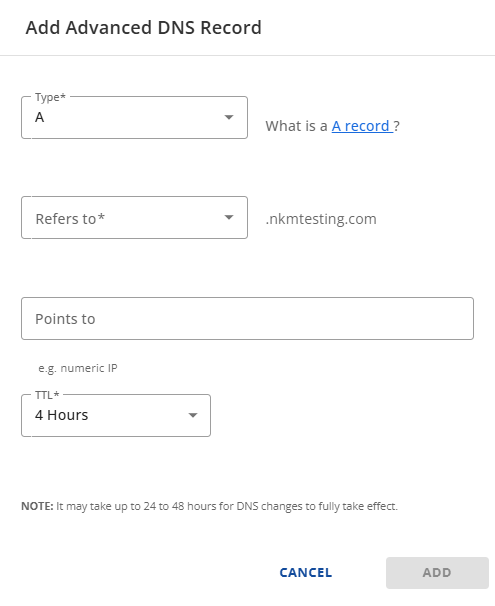
- A box will appear. Next, enter this information under Add Advanced DNS Record at the top of the Zone Editor:
- Name: Type your domain name (without the www)
- TTL: 14400
- Type: TXT
- TXT Value: This is where you paste your new SPF record.
- Click ADD.You’re done!

Adding SPF entries in the Bluehost DNS zone editor
When you’re working in the Bluehost DNS zone editor, you’ll need to select your domain from the dropdown menu at the top of the page, then choose TXT as your record type. In the Host/Name field, enter either “@” (for the root domain) or leave it blank – both work the same way in Bluehost’s interface.
For the Value field, paste your complete SPF record string (starting with “v=spf1”). The TTL field typically defaults to 14400, which works well for most users.
The most common mistake users make is accidentally creating duplicate SPF records instead of replacing the existing one. Always delete any existing SPF TXT record first before adding your new one, as having multiple SPF records will cause validation failures.
Also avoid typing extra characters in the Host field – stick to “@” or leave it empty rather than adding your full domain name, which can create DNS conflicts.
How to set up a DNS SPF record step by step?
Setting up an SPF record for your Bluehost-hosted domain requires a systematic approach to ensure optimal email deliverability. Begin by identifying all legitimate email sources for your domain, including your Bluehost server, any third-party email services and marketing platforms you use.
Next, generate the correct SPF string by combining these sources with proper syntax—typically starting with “v=spf1” followed by your authorized mechanisms like “a,” “mx,” and “include” statements. Before making changes, back up your current DNS settings through your Bluehost control panel for security.
Update your DNS zone by adding or modifying the TXT record with your new SPF configuration, then test the setup using SPF validation tools to confirm it’s working correctly. Each step protects your domain reputation and prevents email spoofing while ensuring your messages reach recipients’ inboxes.
Remember, you can always adjust and re-test your SPF record if you change email providers or add new sending services, this flexibility allows your email authentication to grow with your business needs.
Arguments and qualifiers used in SPF records
SPF records use specific arguments and qualifiers to define which servers can send email for your domain. Use direct and easy to understand sentences. The reader must be able to feel there’s a person behind the piece and not a machine!
Common mechanisms include ip4 and ip6 for specifying exact IP addresses, a to authorize your domain’s main server and mx to allow your mail servers. The include mechanism lets you reference other domains’ SPF records, perfect when using email services like newsletters or transactional email providers.
Each mechanism pairs with qualifiers that determine the result: + (pass – recommended for most uses), – (hard fail – strict but can block legitimate email), ~ (soft fail – safe default that flags suspicious mail) and ? (neutral – rarely needed).
Do stick with common mechanisms like ip4, a, mx and include with + or ~ qualifiers. Don’t use advanced options like exists or ptr unless you’re technically experienced, as they can cause delivery issues and are generally discouraged by email providers.
Best practices for SPF record management
Proper management of SPF (Sender Policy Framework) records is important to safeguard your email deliverability and maintain the security of your email communications. Adhering to best practices ensures that your legitimate emails reach their intended recipients without being blocked or marked as spam. Observe these key strategies:
1. Keep your sender list updated:
- Regularly review and update your SPF record to include all IP addresses and domains authorized to send emails on your behalf.
- Conduct periodic audits to add new services or remove those no longer in use to keep the SPF record accurate.
2. Avoid common SPF record pitfalls:
- SPF record flattening. Use SPF record flattening cautiously to simplify your SPF record and avoid exceeding DNS lookup limits, but ensure it’s kept up-to-date as IP addresses change.
- DNS lookup limit. Be mindful of the SPF 10 DNS lookup limit. Exceeding this limit can lead to SPF check failures. Optimize your SPF record by consolidating entries where possible.
- Regular testing and validation. Use SPF validation tools to test your SPF record for potential issues. This ensures that it’s correctly configured for optimal email deliverability.
How to check your SPF record from the command line?
For users comfortable with command line tools, checking your SPF record is straightforward using the dig or nslookup utilities. To query your SPF record with dig, open your terminal and run dig [yourdomain].[com] TXT, replacing [yourdomain].[com] with your actual domain name. You can also use nslookup -type=TXT [yourdomain].[com] for the same results. Both commands will return all TXT records for your domain, so look for the entry that begins with “v=spf1” – this is your SPF record.
When reviewing the output, ensure your SPF record includes the correct mechanisms like +a, +mx and any ip4: or include: statements for your mail servers. The record should end with a policy like ~all or -all to specify how to handle unauthorized senders.
If you don’t see an SPF record in the results or if the mechanisms don’t match your current email sending setup, you’ll need to update your DNS settings through your hosting provider’s control panel.
How does an SPF record checker help you?
Online SPF record checkers are valuable diagnostic tools that analyze your domain’s SPF configuration to ensure proper email authentication. These tools automatically validate your SPF syntax, count DNS lookups to prevent exceeding the 10-lookup limit and highlight missing or conflicting mechanisms that could cause email delivery issues.
For Bluehost users, these checkers provide an easy way to verify that your SPF record correctly authorizes your mail servers and any third-party services you use for newsletters or transactional emails.
Using an SPF checker after any DNS changes helps you catch configuration errors before they impact your email deliverability. Regular validation ensures your emails reach recipients’ inboxes instead of spam folders, reduces the risk of domain spoofing attacks and maintains your sending reputation. This proactive approach protects your business communications and preserves the trust your customers place in your domain’s email security.
Troubleshooting common SPF record errors
Email authentication problems often trace back to SPF record configuration errors that are surprisingly simple to resolve. If your messages are landing in spam folders or failing authentication checks, the issue typically stems from one of a few common mistakes in your DNS settings.
The most frequent problem is having multiple SPF TXT records for the same domain. Receiving servers can only process a single SPF record, so duplicate entries cause immediate authentication failures. Another critical issue is exceeding the 10 DNS lookup limit, which happens when your SPF record includes too many “include” mechanisms referencing external domains.
This triggers a “permerror” result that blocks legitimate emails from reaching their destination.
| Common SPF issue | Problem | Quick fix |
|---|---|---|
| Multiple SPF records | Servers can’t process duplicates | Consolidate into one record |
| Exceeding 10 DNS lookups | Triggers permerror status | Flatten SPF entries, reduce includes |
| Syntax errors | Breaks validation entirely | Correct typos (ip4 not ipv4) |
| Missing email sources | Unauthorized sending domains | Add all sending services to record |
To diagnose these authentication issues, use online SPF validation tools or command-line checkers to verify your record syntax and count DNS lookups.
Review all your email sending sources including newsletter platforms, CRM systems and transactional email services to ensure they’re properly authorized in your SPF record. If you’re using an overly restrictive “-all” policy that’s blocking legitimate mail, consider switching to “~all” for a softer fail while you troubleshoot.
The fastest path to resolution involves removing any duplicate records, flattening your SPF entries to stay under the lookup limit and correcting obvious syntax mistakes. Always test changes incrementally and monitor your email delivery metrics to confirm the fixes resolve your authentication problems without creating new issues.
Final thoughts
Learning how to add SPF record configurations to your DNS TXT records is a crucial step in protecting your domain name and ensuring reliable email delivery.
By implementing email authentication standards like SPF record and DKIM (DomainKeys Identified Mail), you’re adding a powerful layer of protection that keeps your emails out of spam folders and maintains your sender reputation.
FAQs
SPF records act as a security checkpoint for your domain’s email reputation. When someone receives an email claiming to be from your domain, their mail server checks your SPF record to verify if the sending server is authorized. This process helps prevent spammers from forging your domain name and protects your brand reputation while improving legitimate email delivery rates to your customers’ inboxes.
Creating an SPF record with multiple IPs involves listing each authorized IP address using the “ip4:” or “ip6:” mechanisms. For example: “v=spf1 ip4:192.168.1.1 ip4:192.168.1.2 ip4:192.168.1.3 include:mailprovider.com ~all”. Remember that you can only have one SPF record per domain, so all your authorized sending sources must be included in this single record using proper multiple SPF records syntax.
SPF soft fail (~all) suggests that emails from unauthorized sources should be marked as suspicious but not rejected outright, while hard fail (-all) instructs receiving servers to reject unauthorized emails completely. Most experts recommend starting with soft fail to monitor your email flow and identify any legitimate sources you might have missed before switching to the more restrictive hard fail policy.
SPF record changes typically propagate within 24-48 hours, depending on your TTL value settings. If you set TTL 14400 (4 hours), DNS servers will cache your record for that duration before checking for updates. During this propagation period, some emails might still fail SPF checks until all DNS servers worldwide have updated their cached records with your new SPF configuration.
Yes, you can absolutely configure SPF records for multiple domains on your hosting account. Each domain requires its own separate SPF record in its respective DNS zone. When managing SPF multiple domains, ensure each record includes all the mail servers that send emails for that specific domain, including your hosting provider’s servers and any third-party email services like Google Workspace or Office 365 that you use for business communications.


Write A Comment