
Starting an online business has never been easier. New entrepreneurs can open an online store in minutes with Shopify and BigCommerce. The downside of these platforms is that you’d be renting space on a third-party platform. As such, you have less control over how your shop looks and functions.
But if you’re a WordPress user, there’s a more elegant solution – WooCommerce.
WooCommerce powers millions of eCommerce sites worldwide, and it’s the only WordPress plugin to make the list of top eCommerce platforms. WooCommerce is available directly from WordPress or as an eCommerce option offered by most web hosting providers.
Continue reading to discover the process of integrating and configuring WooCommerce within your WordPress website.
What is WooCommerce?
WooCommerce is a plugin, a small bit of code that you install onto your existing WordPress website. Once installed and activated, WooCommerce adds all the necessary features for setting up an online store. WooCommerce is the most popular WordPress eCommerce plugin as it is flexible, customizable, and free. It eliminates the fees and third-party control over significant aspects of an online store.
Websites using WooCommerce are everywhere – this versatile, flexible platform is a great option for any e-commerce solution. Like many other WordPress plugins, it’s completely free to use and can be installed on any compatible WordPress site. Because WooCommerce is a plugin, it integrates seamlessly with a site’s existing WordPress theme and runs alongside its other parts.
Keep reading: What is WooCommerce for WordPress?
Top features of WooCommerce
- The ability to sell physical products, services, and digital products or downloadable products
- Support for various payment options, such as PayPal, Stripe, credit cards, or bank transfers
- Inventory tracking
- Currency and shipping settings calculators for all countries
- Analytics for all product types
- Unlimited product image uploads and product pages
- Full shopping cart and checkout setup
It’s also worth mentioning that Automattic, the company behind WordPress.com, developed WooCommerce. It’s included in the official WordPress plugin directory.
You can install WooCommerce on your new or existing WordPress site in a few simple steps.
Why is WooCommerce so popular?
WooCommerce has gained immense popularity for several reasons. Here are a few key factors that contribute to its widespread appeal:
- Ease of use: WooCommerce is user-friendly, making it accessible to both beginners and experienced users. It seamlessly integrates with WordPress, simplifying the process of setting up an online store.
- Extensive customization: It offers a wide range of customization options, allowing users to tailor their online stores to meet specific needs. You can choose from various themes, plugins, and extensions to enhance functionality and appearance.
- Scalability: Whether you’re a small business or a large enterprise, WooCommerce can scale to accommodate your growing needs. It can handle a few products or thousands, making it versatile for various business sizes.
- Vast plugin ecosystem: WooCommerce boasts an extensive library of plugins and extensions that can add features like payment gateways, shipping options, and more. These plugins make it highly adaptable to different business requirements.
- Integration capabilities: WooCommerce can seamlessly integrate with various third-party tools and services, such as email marketing platforms, inventory management systems, and CRM software.
How to add WooCommerce to a WordPress website?
In just a few simple steps, you can start selling your products or services and tap into the power of e-commerce. Let’s explore how to integrate WooCommerce and unlock the potential of your WordPress site.
Step 1: Prepare Your WordPress Site and Add the WooCommerce Plugin
Step 2: Set up WooCommerce on WordPress and configure your store
Step 3: Add products to your store
Step 4: Customize your WooCommerce store’s appearance
Step 5: Add extensions for more features
Step 6: Manage payments with WooCommerce
Step 7: Fulfilling orders through WooCommerce
Step 8: Managing your checkout page

Step 1. Prepare Your WordPress Site and Add the WooCommerce Plugin
Before learning how to set up WooCommerce on WordPress, it’s helpful to prepare your WordPress website. For starters, ensure your WordPress website is updated to the latest version.
That ensures that your e-commerce website is compatible with the latest version of WooCommerce.
The next thing you should do is install a theme that supports WooCommerce. These WooCommerce themes come with additional templates that support key WooCommerce features, such as WooCommerce products and checkout pages. We’ve identified some of the best WooCommerce themes, but there are many different designs available from highly trusted developers.
In addition, they were designed to be responsive for best viewing on mobile devices. That will ensure that your WordPress store is optimized for mobile shopping.
After that, you can add the WooCommerce plugin to your site. Here’s a straightforward step-by-step guide to adding WooCommerce to WordPress.
Adding WooCommerce to WordPress
- Log in to your WordPress dashboard
- Go to Plugins > Add New
- Search for WooCommerce and press Install
- When the plugin is done installing, click Activate
- Set up and configure your store

Step 2. Set Up WooCommerce on WordPress and Configure Your Store
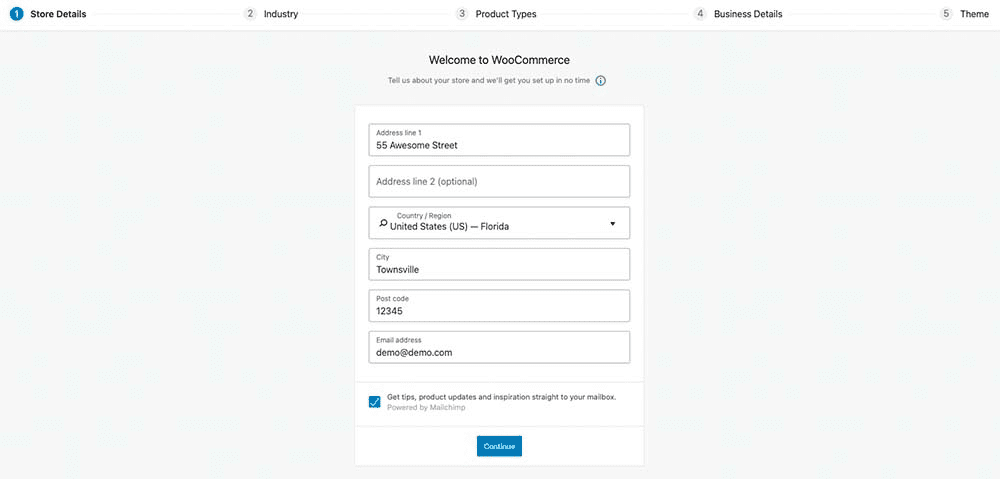
Once you activate WooCommerce, you’ll be taken to the WooCommerce setup wizard.
The wizard allows you to configure key features of your store. You’ll be able to set preferences for the type of products you want to start selling, currencies accepted, and shipping methods.
You’ll also need to specify your store’s business address and choose a theme for your store if you haven’t already done so.
Step 3. Add Products to Your Store

Once you’ve configured the basic details for your store, it’s time to add your new products.
WooCommerce allows you to sell just about anything. That includes services, physical products, music and video files, and digital goods.
To sell products, click on Products > Add New. As shown in the screenshot below, you can add a product title, description, and featured image.
You can also set a category for your product and add product tags. When you’re done filling out all the details, click Publish. That will make the product appear in your shop where every visitor can buy it.
To add more products, simply repeat the steps above.
Step 4. Customize your WooCommerce store’s appearance
WooCommerce is compatible with most WordPress themes. However, for optimal performance, consider choosing a WooCommerce-specific theme. Navigate to ‘Appearance’ and ‘Customize’ to tweak your website’s look and feel, aligning it with your brand’s identity.
Step 5. Add Extensions for More Features
WooCommerce comes with all the basic tools for setting up an online shop. But, some businesses may have more complex and specific needs. For those situations, you can customize your WooCommerce store even more with extensions and add-ons.
As mentioned earlier, numerous WooCommerce extensions are available from the official WooCommerce site and third-party sites.
Some extensions are free. Others are paid.
But you can install them on an as-needed basis to expand the features of your store to customize search engine optimization (SEO) better, add more product data, add additional payment methods, variable product options, subscriptions, memberships, shipping options, coupons, tax rates, expanded SSL support and more.
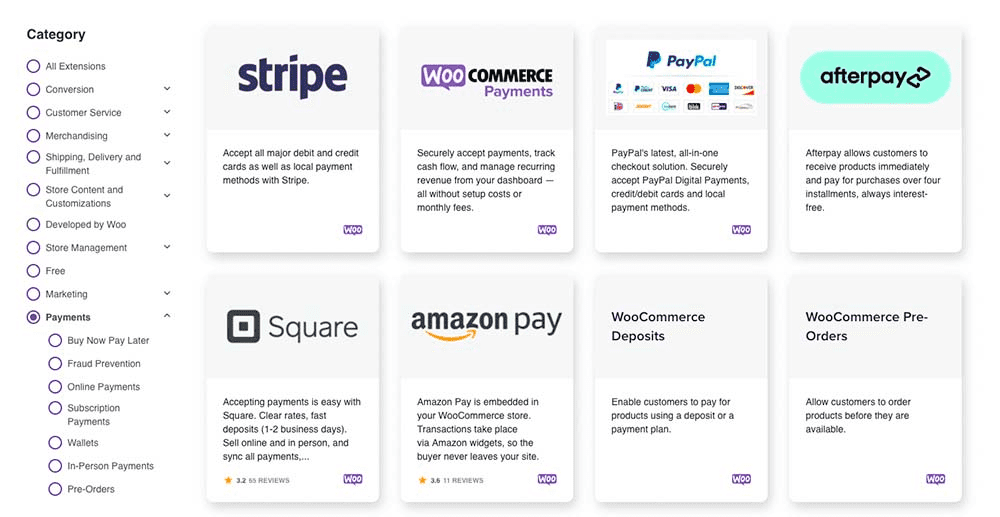
Step 6 Manage Payments With WooCommerce
WooCommerce has solutions for a wide range of payment gateways and shipping functions. WooCommerce extensions allow users to customize these options for world currencies, collect taxes, and calculate shipping rates.
Users can choose from more than 120 free and paid payment gateway applications such as PayPal, Stripe, or Square to install on the checkout page.
Step 7. Fulfilling Orders Through WooCommerce
WooCommerce includes tools for collecting payments and calculating shipping costs to destinations worldwide or specific locations only. Extensions can add functions such as tracking orders and creating PDF invoices, packing slips, and shipping labels.
Sellers of digital products can set up instant downloads upon payment, and WooCommerce also allows users to include affiliate products sold on external websites to the store.
Step 8. Managing your checkout page
The checkout experience can make or break a sale. Customize it by going to ‘WooCommerce’ > ‘Settings’ > ‘Checkout’. Streamline the process, consider offering guest checkouts, and ensure trust signals (like security badges) are visible.
Insider tips and tricks when using WooCommerce
- Choose a Reliable Hosting: Opt for a hosting provider that is optimized for WordPress. Web hosting providers like Bluehost offer specialized WooCommerce hosting solutions that can handle high traffic and e-commerce functionalities.
- Responsive, WooCommerce-optimized Theme: Not every WordPress theme is optimized for WooCommerce. Choose a theme that is responsive (for mobile users) and designed to work seamlessly with WooCommerce.
- High-Quality Product Images: Visual appeal is crucial for online sales. Always use high-resolution images and consider offering multiple views. A zoom-in feature can also enhance the user experience.
- Secure Your Store: E-commerce sites handle sensitive data. Ensure you have an SSL certificate (for HTTPS) to encrypt data between the server and browser.
- Simple Checkout Process: Reduce cart abandonment by streamlining the checkout process. Eliminate unnecessary fields, provide a guest checkout option, and be transparent about shipping costs and times.
- Test Payment Gateways: Before going live, conduct multiple test purchases to ensure your payment gateways (like PayPal, Stripe) work smoothly. WooCommerce provides a ‘sandbox’ mode for this purpose.
- Stay Updated & Educated: WooCommerce, like any other software, gets periodic updates for features, compatibility, and security. Always keep your WooCommerce plugin, themes, and extensions updated. Join WooCommerce forums, communities, or blogs to stay informed about the latest trends and best practices.
Final thoughts
While popular eCommerce hosting platforms like Shopify and Magento can offer users a wide range of e-store services with the convenience of third-party management – for a price.
But for online store owners who want flexibility, scalability, and complete control over their digital storefront, WooCommerce offers all the tools for creating a fully functioning online enterprise – completely for free.
If you’re ready to get started with WordPress and WooCommerce, check out our WooCommerce hosting plans. Pick the one that fits your budget, and get started building your online store today.
FAQ’s about adding WooCommerce
– First, log in to your WordPress dashboard.
– Navigate to ‘Plugins’ and click on ‘Add New’.
– In the search bar, type “WooCommerce” and hit enter.
– Once you find the WooCommerce plugin, click on ‘Install Now’ followed by ‘Activate’.
– After activation, the WooCommerce Setup Wizard will launch. Follow the step-by-step guide to configure your store, including details like your store location, currency, payment methods, and shipping options.
Absolutely! Adding WooCommerce to an existing WordPress site is straightforward.
Just follow the same steps as above.
When you install WooCommerce, a Shop page is automatically created. To customize this page, go to your WordPress dashboard and find ‘Pages’. Look for the ‘Shop’ page and click ‘Edit’ to customize it according to your needs. You can also set this page as your default shop page in WooCommerce settings under ‘Products’ > ‘Display’.


Write A Comment