 ChatGPT,
  Claude,
  Gemini,
  Grok — all four for
Purchase a Virtual Dedicated Server with HestiaCP Installation
HestiaCP is a lightweight, user-friendly control panel that simplifies managing websites, email, databases, DNS, and other hosting services on a Virtual Dedicated Server (VDS) or Self-Managed VPS. Its intuitive web interface makes server administration easy while providing full control over your hosting environment.
This article explains how to purchase a Bluehost VDS hosting plan with HestiaCP installed.
Why Choose HestiaCP?
Managing VDS hosting often involves time-consuming manual configurations and complex Linux commands. HestiaCP simplifies server management by centralizing websites, email, databases, DNS, SSL certificates, backups, and user accounts in a single, intuitive dashboard. When paired with your Bluehost VDS hosting, it streamlines administration so you can focus on building and growing your websites and applications.
Uses of HestiaCP
HestiaCP supports a wide range of hosting and server management tasks, including:
- Host Multiple Websites: Manage multiple websites from a single, centralized dashboard.
- Integrated Email Hosting: Create and manage custom email accounts, set up forwarding, mailing lists, and spam protection.
- Database Management: Create and manage MySQL and PostgreSQL databases with ease.
- Domain and DNS Management: Configure domains, subdomains, and DNS records from one convenient interface.
- Free SSL Certificates: Secure websites with Let’s Encrypt SSL certificates and automatic renewals.
- Automated Backups: Schedule, manage, and restore backups for websites, databases, email, and server data.
- User and Package Management: Create user accounts and assign customizable hosting packages with resource limits.
- Server Monitoring: Track server resource usage and performance.
Server Requirements
Before deployment, make sure your server meets the minimum hardware requirements. For optimal performance and stability in production environments, higher specifications are recommended.
- Do not purchase a server that only meets the minimum requirements (3 GB RAM). The minimum specification of 3 GB RAM represents the software's bare minimum operating requirement and does not account for operating system overhead or additional services running on the server. Running with only the minimum memory may result in performance slowdowns or instability during periods of increased resource usage.
- For a more stable deployment, we suggest using the recommended configuration (8 GB RAM). Extra RAM provides better performance, improved responsiveness, and more headroom for future growth or additional applications.
| Resource | Minimum | Recommended |
|---|---|---|
| RAM | 3 GB | 8 GB |
How to Purchase a Virtual Dedicated Server with HestiaCP Installation
- In your browser, go to https://www.bluehost.com.
- Click Hosting in the top menu, then select Virtual Dedicated Server.

You can also go to this link directly: https://www.bluehost.com/vds-hosting.
- On the Virtual Dedicated Server Hosting page, click Explore Plans. You can also scroll down to the hosting plans section.

- Choose a plan from either tab — Standard or High Performance — by clicking Choose Plan.
 Pricing is subject to change. Please visit https://www.bluehost.com/vds-hosting for the current introductory/sign-up offer for the Bluehost Virtual Dedicated Server hosting. For the most up-to-date renewal pricing, visit your Bluehost Portal's Renewal Center.
 - On the next page, configure your VDS hosting to meet your requirements. The configuration options are divided into the following sections:
- Location: Select your data center in this section.

- Hardware: This section shows your pre-selected plan. You can also switch to another Virtual Dedicated Server plan in this section.

- Software:
If the selected plan does not meet the app's minimum requirements, the app will be grayed out.
- Click the OS With Panel tab, then select HestiaCP.
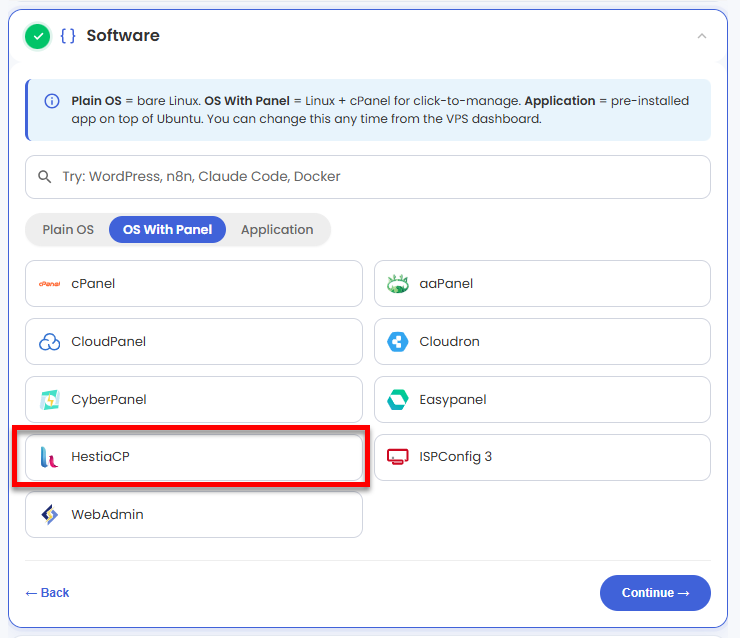 You can install only one application per purchase; the system will automatically select the best operating system for it.
 - In the pop-up, click Confirm.
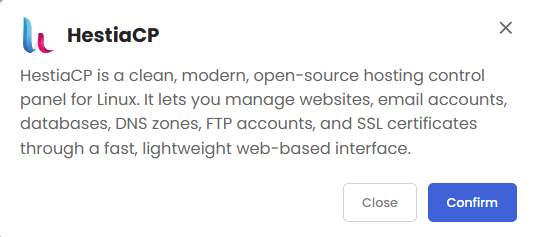
- Click the OS With Panel tab, then select HestiaCP.
- Location: Select your data center in this section.
- Support & Security: You can add Premium Support - Recurring, which provides priority access to expert assistance and faster response times.

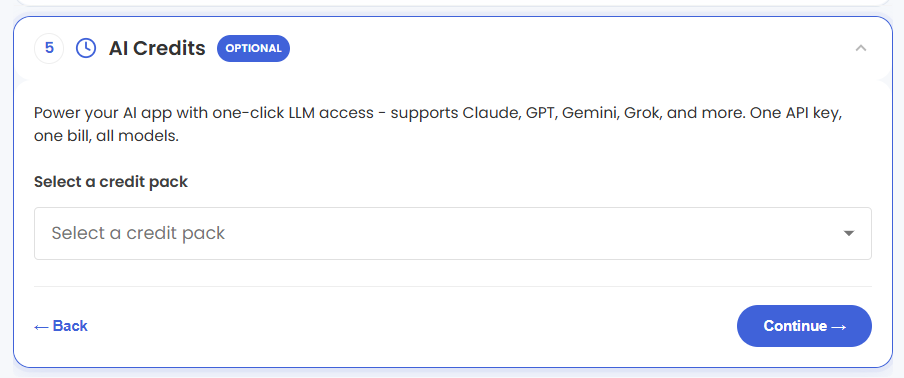
Pricing for optional add-ons is subject to change. Please visit https://www.bluehost.com/vds-hosting for current add-on pricing. - AI Credits: Select a credit pack to access multiple AI models with one API key and consolidated billing.
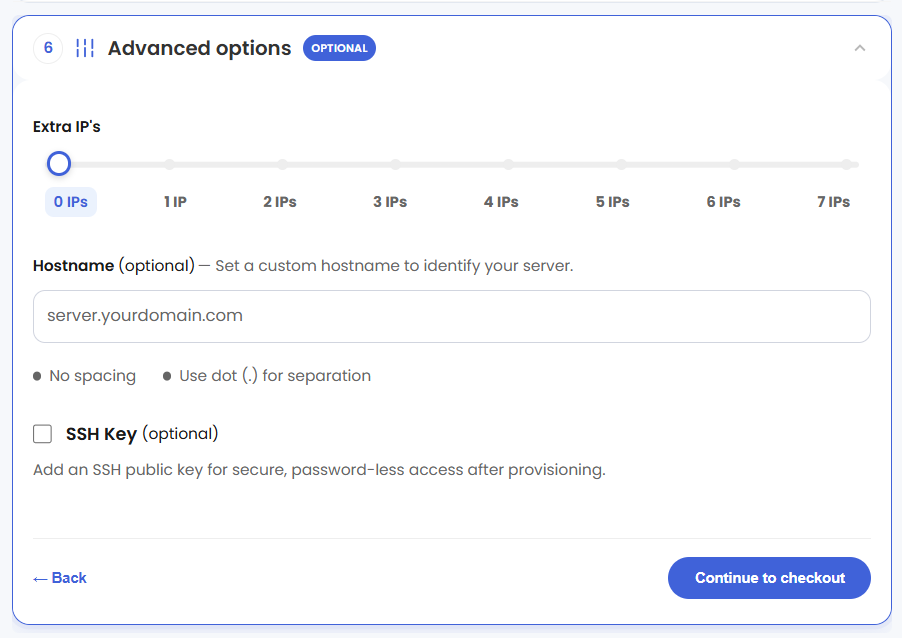
Pricing for optional add-ons is subject to change. Please visit https://www.bluehost.com/vds-hosting for current add-on pricing. - Advanced Options:
- Extra IPs: You can add IP addresses for an additional fee. Pricing changes based on how many IPs you add.
- Hostname (Optional): Assign a custom hostname to identify your server.
- SSH Key (Optional): Add an SSH public key to enable secure, passwordless access after provisioning.
Pricing for optional add-ons is subject to change. Please visit https://www.bluehost.com/vds-hosting for current add-on pricing.
- Select your billing term and review your selected items on the right pane, along with the summarized total cost.
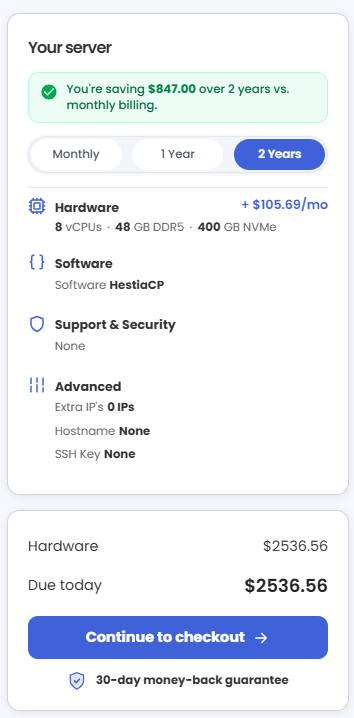
*Please review the current pricing plans available on Bluehost.com.
- Click Continue to checkout.
- Do the following on the Checkout page:
If you're new to Bluehost:- Create your Bluehost account by using your email address or by connecting with your Google, Apple, or GitHub account — whichever you prefer!

- Select your preferred payment method: credit card, Google Pay, or PayPal. Enter your billing information.

If you already have a Bluehost account, click Log In. If you're already signed in to your Bluehost Portal, your account details will be filled in automatically.

- Create your Bluehost account by using your email address or by connecting with your Google, Apple, or GitHub account — whichever you prefer!
- In the Shopping Cart, choose your billing term if you did not choose one on the previous page.
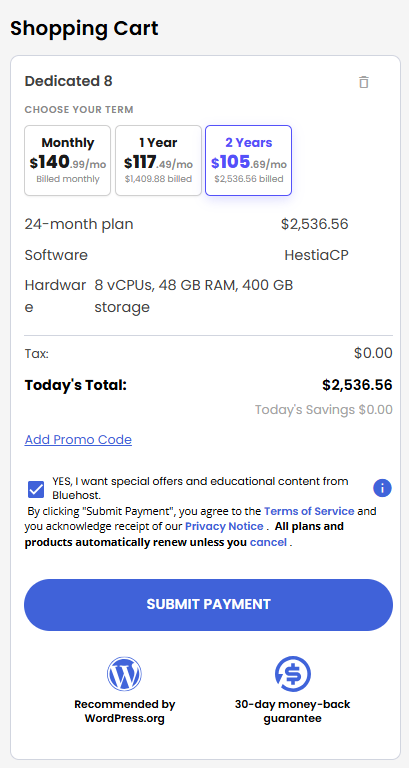
- Add a Promo code if you have one and then click Submit Payment to complete your purchase.
After completing the purchase, your VDS hosting will begin provisioning. You can access and manage your new VDS hosting in the Hosting tab of your Bluehost Portal.
How to Set Up and Secure Your HestiaCP Server
HestiaCP is a lightweight control panel that requires a few key setup steps before production use. This guide covers the initial configuration process, including retrieving credentials, accessing the web interface, securing it with an SSL certificate, and following security best practices for web and email hosting. Follow these steps to access your HestiaCP dashboard.
Phase 1: Reset Your Root Password
- Log in to your Bluehost Portal.
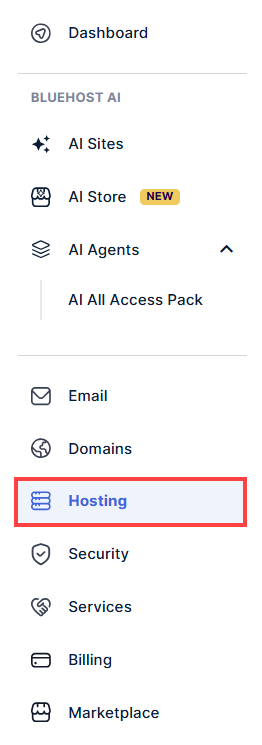
- In the left-hand menu, click Hosting, then select My Plans.
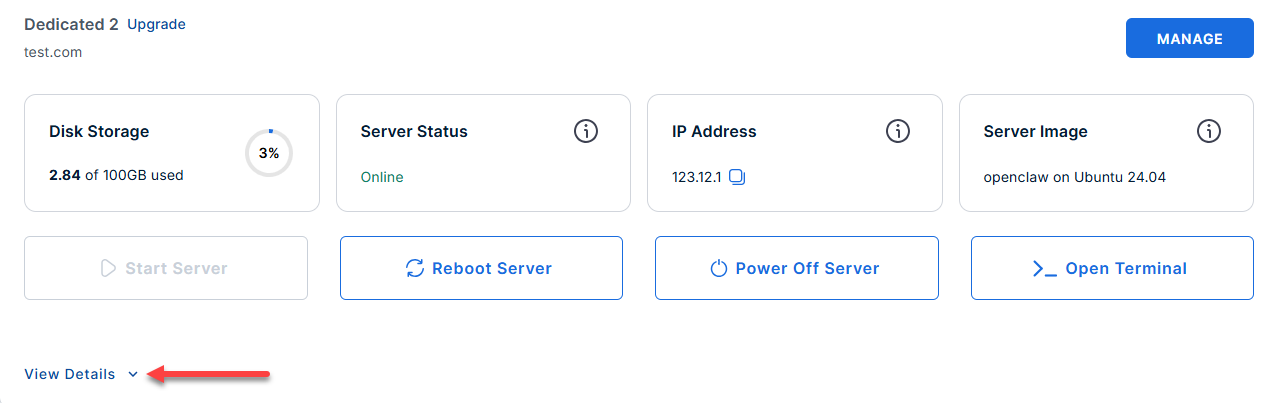
- Locate the server you want to manage, then click View Details in the bottom-left corner to expand the section and access additional server information.
- Click the Reset Password.
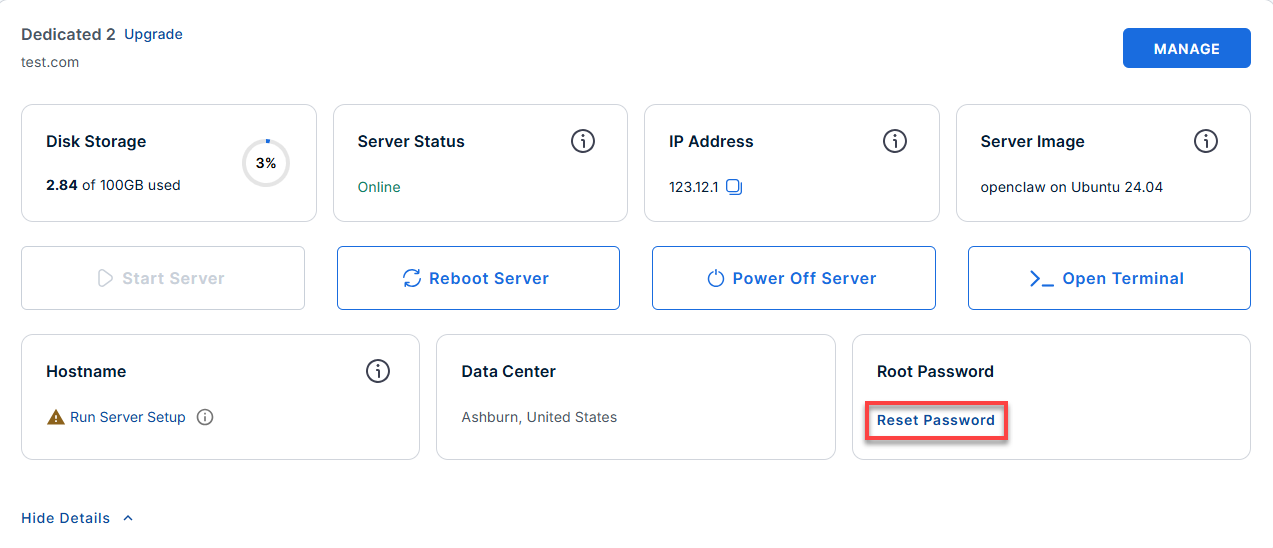
- In the pop-up window, type your new root password, then click Reset Password again to confirm and save the changes.
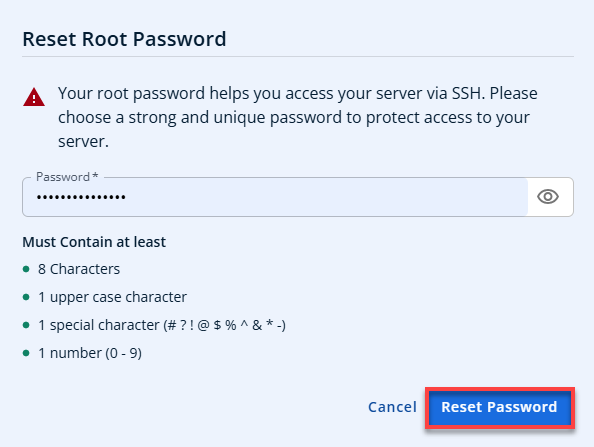
Phase 2: Connect to Your Server Through SSH
- Connect to your server via SSH.
Open your computer's terminal (or an SSH client like PuTTY) and run the following command to log into your server as the administrator, using your server's public IP address:ssh root@your_server_ipReplaceyour_server_ipwith your actual server IP address. - Follow the prompts and enter the new root password you created in the step above.
- If you ever need to quickly review the system's deployment notes directly inside your server terminal, you can print out the original README file by running:
cat /root/README.md
Phase 3: Retrieve Your Login Credentials
Since you are already logged in via SSH, the automated background setup (which takes 2 to 3 minutes) should already be complete.
- Retrieve your password: Run the following command in your terminal to view the auto-generated credentials:
cat /root/.app_passwords
- Save it: Look for the line that says HESTIA_ADMIN_PASSWORD=... and copy that password. You will need it in the next step.
Example Output:
root@hal-server-123456:~#  cat /root/.app_passwords
HESTIA_ADMIN_PASSWORD=example9e37c85c2799cc6b4876d94dc539cb6d37f9ea9t3st
Phase 4: Access the Web Panel
Now, you will leave the terminal for a moment and move to your web browser.
- Navigate to the panel: Go to
https://<your-server-ip>:8083/Replaceyour_server_ipwith your server's actual public IP address.Example:
https://12.3.456.789:8083/ - Bypass the security warning: Your browser will likely warn you that the connection is not private. This is perfectly normal and safe for this initial setup because HestiaCP uses a temporary, self-signed certificate out of the box. Click Advanced, then Proceed.
- Log in: Use the following credentials:
- Username: hestiaadmin
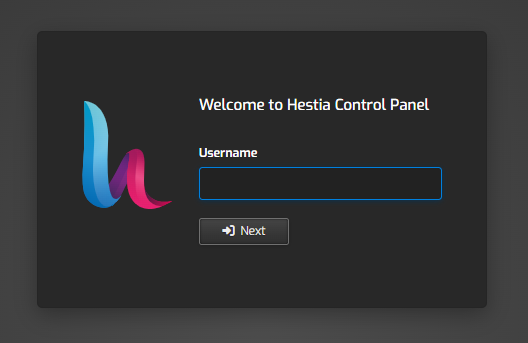
- Password: The password you copied in Phase 3.
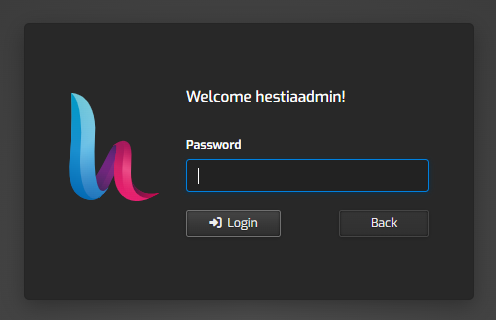
- Username: hestiaadmin
- You are now logged in to your Dashboard.
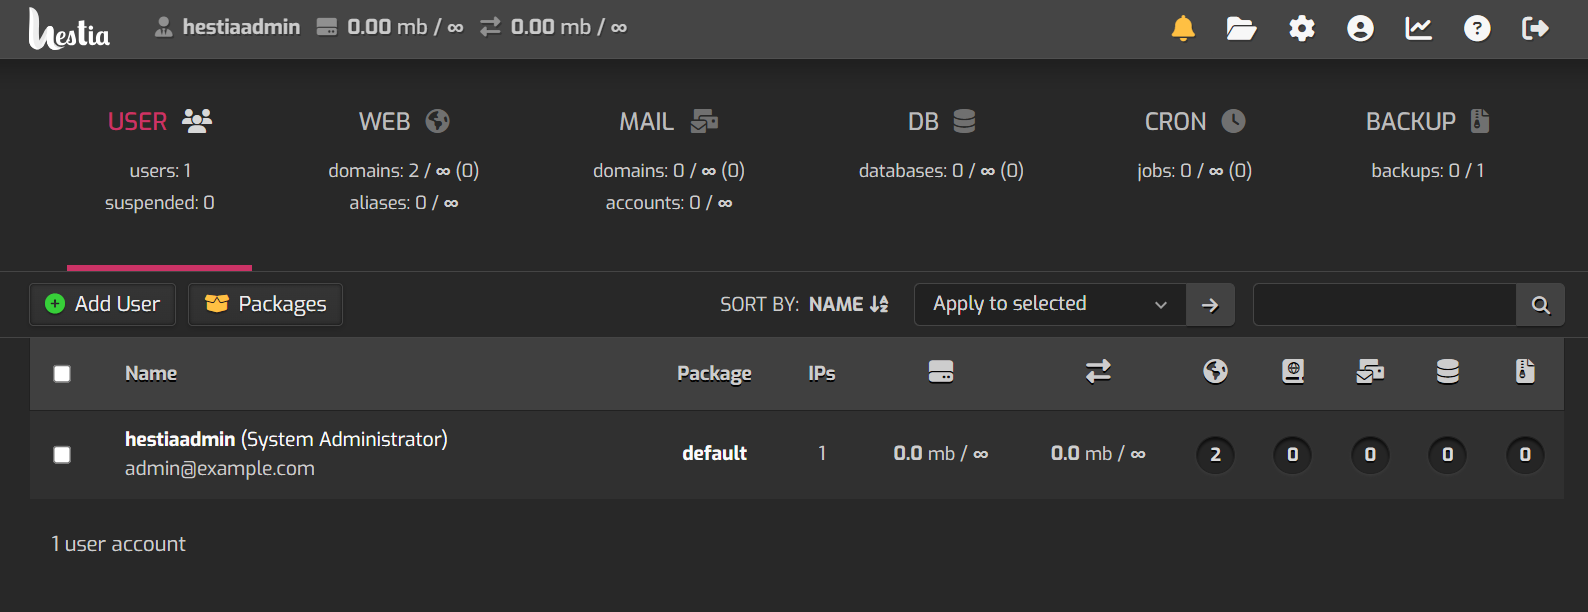
Phase 5: Configure and Secure the Server (Crucial Step)
Once you are logged into the web interface, your immediate priority is to set up your server's hostname and secure the panel with a real, trusted SSL certificate.
- Set the OS Hostname: Go back to your SSH terminal and set your fully qualified domain name (FQDN), such as panel.yourdomain.com:
sudo hostnamectl set-hostname panel.yourdomain.com - Update your Hosts file: Open
/etc/hostsin a text editor (such as Nano) and ensure the 127.0.1.1 line reflects your new hostname:127.0.1.1 panel.yourdomain.com panel - Sync the Panel: In the HestiaCP web interface, navigate to Server -> Configure. Update the Hostname field to match (panel.yourdomain.com) and Save.
- Install a Trusted SSL: Ensure your domain (panel.yourdomain.com) points to your server's IP address in your DNS settings. Once that DNS record has propagated, run this script in your SSH terminal:
sudo /opt/hestiacp/setup-ssl.sh panel.yourdomain.comThis will automatically replace that temporary self-signed certificate with a trusted Let's Encrypt certificate, so you won't see browser warnings anymore.
Phase 6: Start Hosting
With the foundation set, you can now use the control panel for its main purpose:
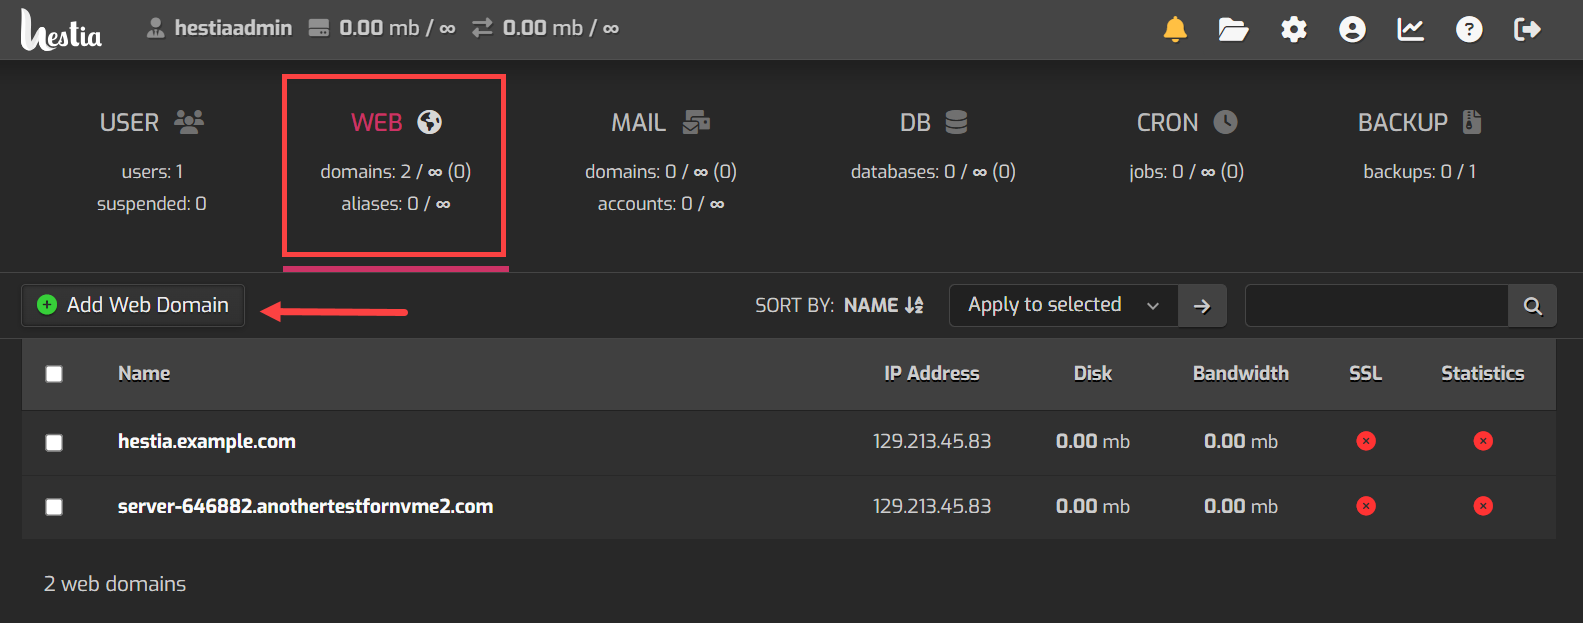
- To host a website: Go to Web -> Add Web Domain. Enter your domain name (example.com), check the boxes for SSL Support and Let's Encrypt, and hit Save. HestiaCP will handle the web directory, Nginx routing, and SSL generation automatically.
To keep your server as secure as possible, we highly recommend creating a standard user account in HestiaCP to host your websites. Setting them up outside the main admin account is a best practice, as it ensures your website files remain safely isolated from the core control panel.
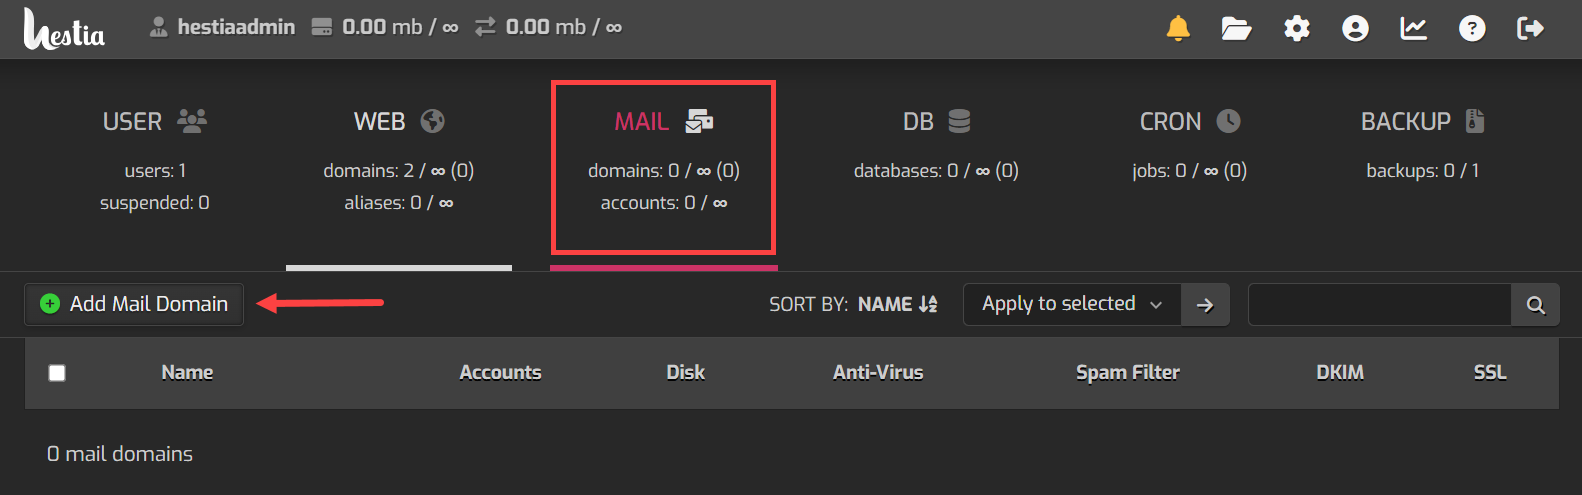
- To host email: Go to Mail -> Add Mail Domain. Once added, click the domain and select Add Mail Account to create your inboxes.
Just like with your websites, we highly recommend setting up your email domains under a standard user account rather than the main admin account. This keeps your inboxes and email settings safely isolated, giving your server an extra layer of security.
Supporting Information and Sample Output
You can run cat /root/README.md to see more information and useful commands:
Example Output:
root@hal-server-123456:~# cat /root/README.md
# HestiaCP

## Description

HestiaCP is a clean, modern, open-source hosting control panel for Linux. It lets you manage websites, email accounts, databases, DNS zones, FTP accounts, and SSL certificates through a fast, lightweight web-based interface.

Unlike heavier panels, HestiaCP is designed for speed and simplicity - built on Nginx, PHP-FPM, and MariaDB. It ships with a full mail stack (Exim4 + Dovecot), Fail2ban intrusion prevention, and built-in Let's Encrypt SSL automation.

This image comes with a complete HestiaCP stack pre-installed and configured on Ubuntu 24.04 LTS. On first boot, a secure, randomized administrator password is automatically generated for you.

---

## Minimum Requirements

| Resource | Minimum |
|----------|---------|
| RAM | 3 GB |

> The full mail stack (Exim4, Dovecot, SpamAssassin) requires at least 3 GB of RAM to run reliably alongside Nginx, MariaDB, and the HestiaCP panel.

---

## Quick Start

Follow these three steps to get up and running.

### Step 1 - Wait for first boot to complete

After launching your instance, wait 2-3 minutes for the first-boot setup to finish.

The setup runs automatically in the background. It generates your randomized admin password, updates the panel credentials, sets up system hostnames, and starts all panel services.

You do not need to do anything during this time.

### Step 2 - Get your login credentials

SSH into your server as the `root` user and run:

```bash
cat /root/.app_passwords
```

You will see output like this:

```
HESTIA_ADMIN_PASSWORD=your_secure_randomized_password
```

Save this password - you will need it to log in.

### Step 3 - Open the panel in your browser

Open your browser and navigate to:

```
https://<your-server-ip>:8083/
```

For example:

```
https://203.0.113.10:8083/
```

> **Browser warning:** HestiaCP uses a self-signed SSL certificate by default.
> When your browser shows a security warning, click **Advanced** then **Proceed** to continue.
> This is expected and safe for initial setup.

Log in with the following credentials:
- **Username:** `hestiaadmin`
- **Password:** The password retrieved in Step 2.

---

## Next Steps

Once you are logged into the HestiaCP Control Panel, here is what to do next.

### 1. Configure Server Hostname Properly

HestiaCP relies on the OS-level hostname for mail certificates and DNS matching. Follow this 3-step process to set it properly:

1. **Set the OS Hostname:** SSH into your server and run:
   ```bash
   sudo hostnamectl set-hostname panel.yourdomain.com
   ```
2. **Update the Hosts File:** Edit `/etc/hosts` and ensure the `127.0.1.1` line maps to your new hostname:
   ```
   127.0.1.1 panel.yourdomain.com panel
   ```
3. **Sync inside HestiaCP Panel:** Log into the control panel, navigate to **Server** -> **Configure**, and update the **Hostname** field to `panel.yourdomain.com`. Then run the SSL setup script to generate trusted certificates.

### 2. Add your first website

Go to **Web** -> **Add Web Domain**.

Enter your domain name (e.g., `example.com`), select the PHP version, configure SSL preferences, and click **Save**.

HestiaCP will automatically create the web root directory, configure Nginx virtual hosts, and optionally issue a Let's Encrypt certificate.

### 3. Create Mail Domains and Mailboxes

Go to **Mail** -> **Add Mail Domain** to register your mail domain.
Once registered:
- Go to **Mail** -> select your domain -> **Add Mail Account** to create individual email accounts.
- Use ports `25`, `465`, or `587` for sending mail (SMTP) and `110`, `995`, `143`, or `993` for receiving (IMAP/POP3).

### 4. Set up a real SSL certificate for websites

HestiaCP has built-in Let's Encrypt integration. To secure a website, edit the domain under **Web**, check **SSL Support** and **Let's Encrypt**, then click **Save**.

HestiaCP will automatically request, install, and renew the certificate.

### 5. Set up a real SSL certificate for the Control Panel itself

On first boot, the HestiaCP panel uses a temporary self-signed SSL certificate. Once you have pointed a domain (e.g., `panel.example.com`) to your server's public IP, run:

```bash
sudo /opt/hestiacp/setup-ssl.sh panel.example.com
```

This helper script automatically stops Nginx, requests the Let's Encrypt certificate, updates HestiaCP's panel SSL configuration, restarts services, and installs a secure auto-renewal deploy-hook.

---

## Access

| URL | Purpose |
|-----|---------|
| `https://<server-ip>:8083/` | HestiaCP Control Panel (HTTPS) |
| `http://<server-ip>/` | Default HTTP website landing page |
| `https://<server-ip>/` | Default HTTPS website landing page |
---

## Credentials

All credentials generated during deployment are stored in:

```bash
cat /root/.app_passwords
```

| Field | Description |
|-------|-------------|
| `HESTIA_ADMIN_PASSWORD` | Randomized admin password generated securely on first boot |

To view the first boot setup logs:

```bash
cat /var/log/cloud-init-output.log
```

---

## Managing the Server

### Services

```bash
# Check service statuses
systemctl status nginx
systemctl status mariadb
systemctl status exim4
systemctl status dovecot
systemctl status fail2ban
systemctl status hestia

# Restart a service (e.g. Nginx)
systemctl restart nginx
```

### Running Health Checks

To run the built-in system validation and health check suite, execute:

```bash
prove /root/app_test/main.t
```

### Firewall

```bash
# View open ports and firewall status
ufw status verbose
```

### Logs

```bash
# View HestiaCP panel logs
tail -f /var/log/hestia/nginx-access.log
tail -f /var/log/hestia/nginx-error.log

# View Nginx web server error logs
tail -f /var/log/nginx/error.log

# View mail server logs (Exim4 & Dovecot)
journalctl -u exim4 -u dovecot -f
```

---

## Troubleshooting

### Panel URL not opening in browser

1. Verify that Nginx is running: `systemctl status nginx`
2. Verify that HestiaCP is running: `systemctl status hestia`
3. Check that the HestiaCP port 8083 is listening: `ss -tlnp | grep 8083`
4. Verify that the UFW firewall allows traffic on port 8083: `ufw status | grep 8083`
5. Make sure you are explicitly typing `https://` in the browser (e.g., `https://<ip>:8083/`).
### First boot did not run

If `/root/.app_passwords` does not exist or the password is not set, you can trigger the initialization script manually:

```bash
sed -i 's/\r//' /var/lib/cloud/scripts/per-instance/001_onboot
bash /var/lib/cloud/scripts/per-instance/001_onboot
```

Then read your credentials again:

```bash
cat /root/.app_passwords
```

---

## Security

| Feature | Detail |
|---------|--------|
| Firewall | UFW enabled - only minimal essential ports open by default |
| SSH Security | Rate limited on port 22 to block brute force attempts |
| Dynamic Passwords | Never baked into the image - uniquely randomized at first boot |
| File Credentials | `/root/.app_passwords` is owned by `root:root` with secure permissions (`0600`) |
| Intrusion Prevention | Fail2ban monitors log files and automatically bans abusive IPs |
| HTTPS Panel | SSL encryption active by default on the control panel (port 8083) |

---

## Services

| Service | Port | Purpose |
|---------|------|---------|
| HestiaCP (Nginx) | 8083 | Web administration interface |
| OpenSSH | 22 | Secure remote server access |
| Nginx | 80 / 443 | Web server (HTTP / HTTPS) |
| Exim4 | 25 / 465 / 587 | Mail server (SMTP / SMTPS) |
| Dovecot | 110 / 995 / 143 / 993 | Mail server (POP3 / POP3S / IMAP / IMAPS) |
| MariaDB | 3306 | Local SQL Database (internal only) |

---

## Links

- Manage: [https://<server-ip>:8083/](https://<server-ip>:8083/)
- HestiaCP Official Website: [https://hestiacp.com/](https://hestiacp.com/)
- HestiaCP Documentation: [https://docs.hestiacp.com/](https://docs.hestiacp.com/)
- Ubuntu 24.04 LTS Release Notes: [https://wiki.ubuntu.com/NobleNumbat/ReleaseNotes](https://wiki.ubuntu.com/NobleNumbat/ReleaseNotes)
Summary
This article explains how to purchase and set up a Bluehost Virtual Dedicated Server (VDS) with HestiaCP, a lightweight control panel for managing websites, email, databases, DNS, SSL certificates, and backups from a single dashboard. It also covers recommended server requirements, the VDS checkout process, and essential post-installation steps, including accessing HestiaCP, securing the control panel with SSL, configuring your server, and launching web and email hosting services.