 ChatGPT,
  Claude,
  Gemini,
  Grok — all four for
 Purchase a Self-Managed VPS with Magento 2 Installation
Magento 2 is a powerful Ecommerce platform that allows businesses to have full control over the appearance, performance, and growth of their online stores.
For optimal performance with Magento 2, consider a Self-Managed VPS hosting plan.
This article covers why Magento 2 is important, its common uses, and how to purchase and set up VPS hosting for it.
For more information about Magento 2, please visit the What is Magento 2? A Complete Overview article.
We’ve created a short video on how to purchase a Self-Managed VPS with Magento 2 Installation.
Why Use Magento 2?
Magento 2 enables business owners to create highly customizable and scalable online stores, featuring advanced product, customer, and order management capabilities. Its functionalities include: Among its functionalities are the following:
- Support growing businesses with large product catalogs
- Accommodates stores that anticipate high sales volume or traffic
- Allows businesses to implement custom features or integrations
Uses of Magento 2
Magento 2 is designed to enhance conversions and improve usability. It improves the checkout process by:
- Implementing a faster, two-step checkout process makes completing your order effortless.
- Offering a convenient guest checkout option.
- Enabling multiple payment and shipping methods to meet your needs.
- Allowing easy customization of order preferences and management of account settings.
- Creating wishlists and saving your favorite items in your cart for later.
- Tailoring personalized shopping experiences based on your preferences.
How to Purchase a Self-Managed VPS with Magento 2 Installation
To get started with Magento 2 on Bluehost, you first need to purchase a Self-Managed VPS plan. Follow the steps below:

New to VPS or not sure where to start? No worries! At the top of the Self-Managed VPS purchase page, you’ll see the Pre-configured Setup section. This handy feature is perfect if you’re feeling a bit unsure—just pick the type of project you want, like WordPress Site, AI Agent/Claude Code, Dev/Staging, or eCommerce Store. We’ll take care of the rest by automatically filling in the best plan, operating system, and template for you.
- Super simple for beginners or anyone who just wants a quick setup
- Instantly get the recommended settings for your project
- Skip the guesswork and save time
- You can still customize things later if you want
- In your browser, go to https://www.bluehost.com/vps-hosting.
- Click the Choose Plan button under your preferred VPS hosting plan.
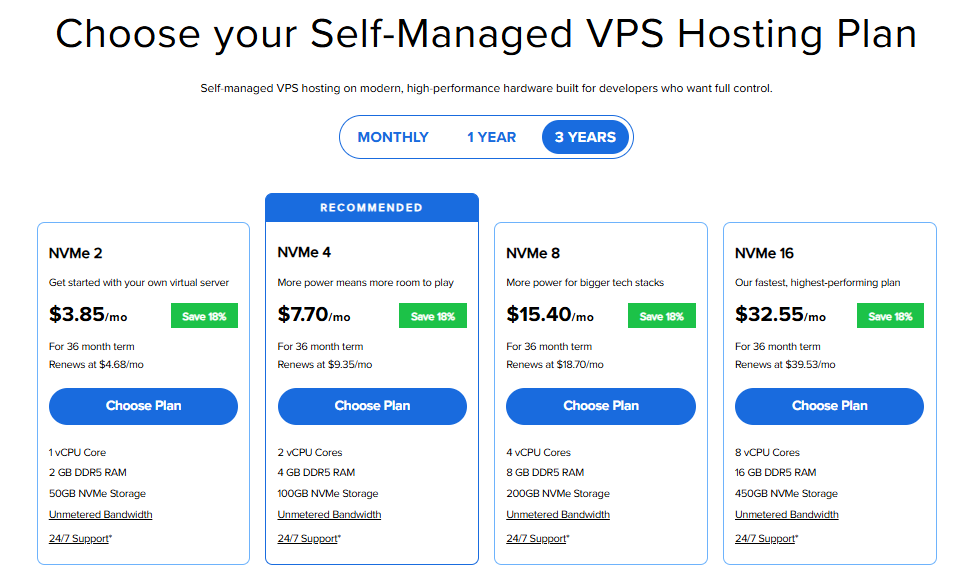 Important: Pricing is subject to change—please visit https://www.bluehost.com/vps-hosting for the current introductory/sign-up offer for Bluehost VPS Hosting. For the most up-to-date renewal pricing, visit your Bluehost Portal Renewal Center.
 - Select your preferred Data Center location.

- On the Cart page, you can configure your server to fit your needs in the following section:
- Hardware:
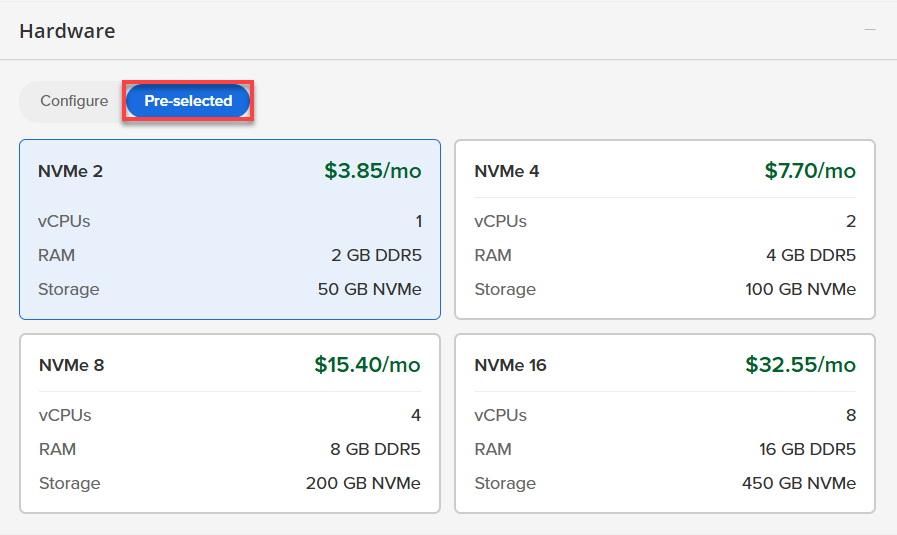
- Pre-selected:
You can select a different Self-Managed VPS plan in this section.
- Configure:
Click Configure to customize your package.
Note that your changes help customize your plan, and the overall cost will adjust accordingly to fit your needs.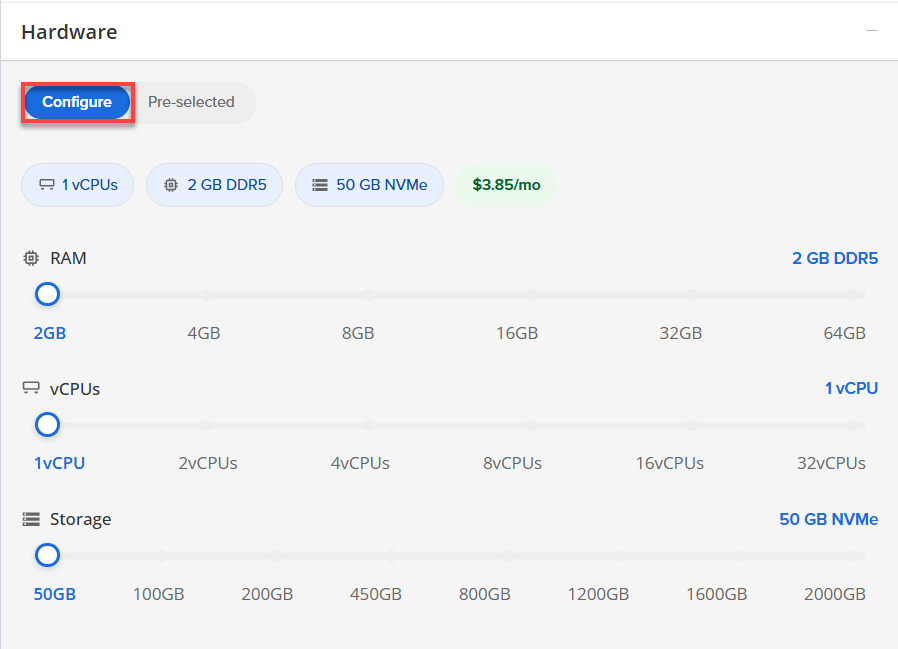
- Pre-selected:
- Software:
If the selected plan does not meet the app's minimum requirements, the app will be grayed out.
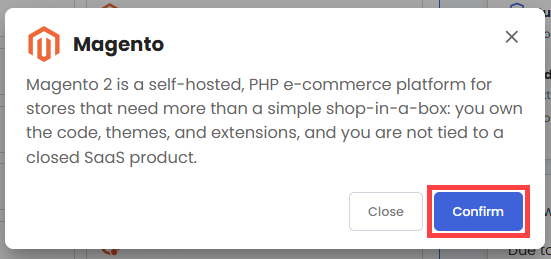
- Click the Application tab.
- Select Magento.
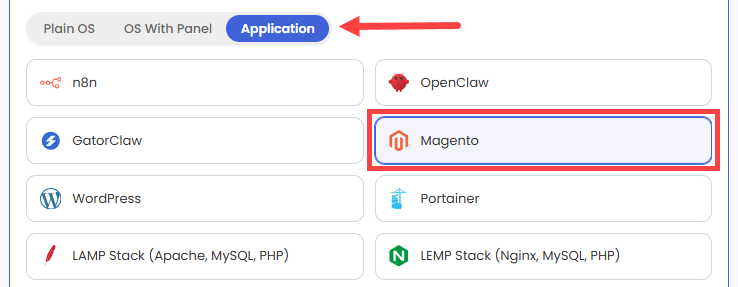
- In the pop-up, click Confirm.
- Hardware:
- Add-Ons: You can add Premium Support here, which gives you priority access to expert assistance and faster response times.

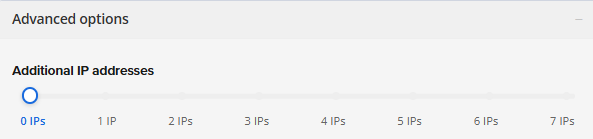
- In the Advanced options:
- Extra IP's: You can add extra IP addresses for an additional fee.
Pricing changes based on how many IPs you add. - Hostname: Assign a custom hostname to easily identify your server. This is optional.
- Extra IP's: You can add extra IP addresses for an additional fee.
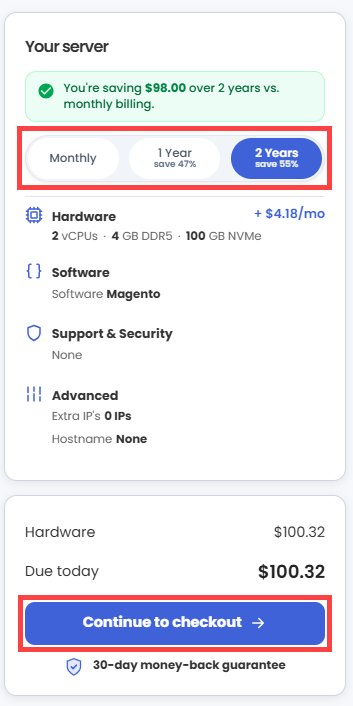
- Next, select your preferred billing term and review your Order Summary, then click Continue to Checkout.
- Do the following on the Checkout page:
If you're new with Bluehost:
- Create your Bluehost account by using your email address or by connecting with your Google, Apple, or GitHub account — whichever you prefer!

- Select your preferred payment method: credit card, Google Pay, or PayPal. Enter your billing information.

If you have an account with us, you will see your Bluehost login details when you are logged into your Bluehost Portal. If you are not logged in, please click the Log In link.

- Create your Bluehost account by using your email address or by connecting with your Google, Apple, or GitHub account — whichever you prefer!
- In the Shopping Cart section, you can still adjust your billing term if needed.
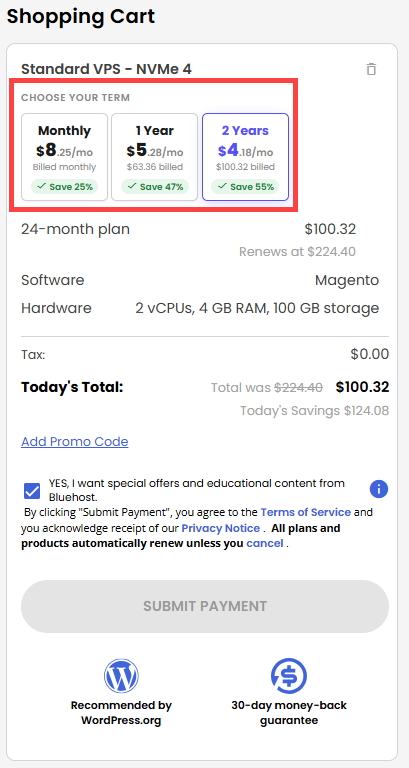
- Review the items in your cart, add a Promo Code if you have one, and then click Submit Payment to complete the purchase.
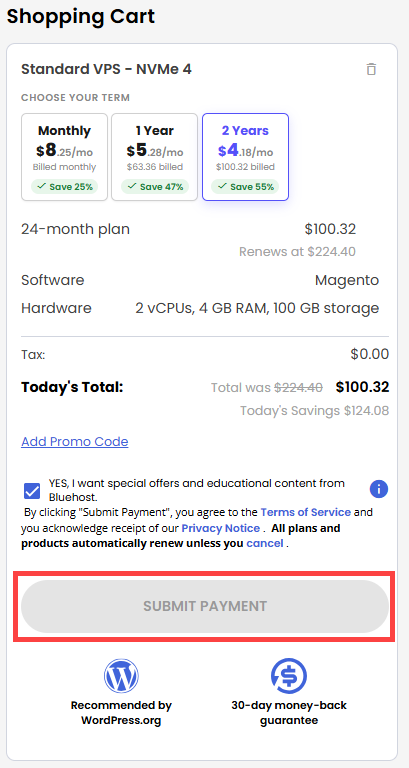
After completing the purchase, your VPS hosting will begin provisioning. You can access and manage your new VPS hosting in the Hosting tab of your Bluehost Portal.
Setting Up Your Magento 2 Server
Welcome to your new Magento 2 server! Your server comes pre-installed with Magento 2, Nginx, PHP 8.3, MySQL, and OpenSearch. Follow this guide to log in, secure your account, and connect your custom domain.
Here is the absolute stripped-down, bare-minimum list required just to get Magento 2.4+ to install and run without crashing immediately:
- Hardware Minimums
- RAM: 2 GB (but you must enable a Linux swap file, or compilation will crash the server). 4 GB is the realistic minimum if you want it to run without a swap file.
- Storage: At least 10 GB of free disk space just for the core files, database, and generated cache.
- Core Software
- Operating System: Linux 64-bit (Ubuntu, Debian, CentOS, or RHEL). Windows and macOS are not natively supported.
- Web Server: Apache 2.4 or Nginx 1.x.
- Database: MySQL 8.0 or MariaDB 10.11.
- Search Engine: OpenSearch 2.x or Elasticsearch 7.17+ (Magento 2.4+ will literally refuse to install or open pages if this isn't running on the server).
- Package Manager: Composer 2.x.
- PHP Minimums
- PHP Version: PHP 8.3 or 8.2 (depending on your exact Magento subversion).
- PHP Memory Limit: Minimum
memory_limit = 2Ginside yourphp.inifile. - Required Base Extensions:
curl,dom,gd,intl,mbstring,openssl,pdo_mysql,soap,xsl,zip, andsockets.
Step 1: Log In and Retrieve Your Credentials
Your temporary login details and administrative URLs are securely stored directly on your server.
- Log in to your Bluehost Portal.
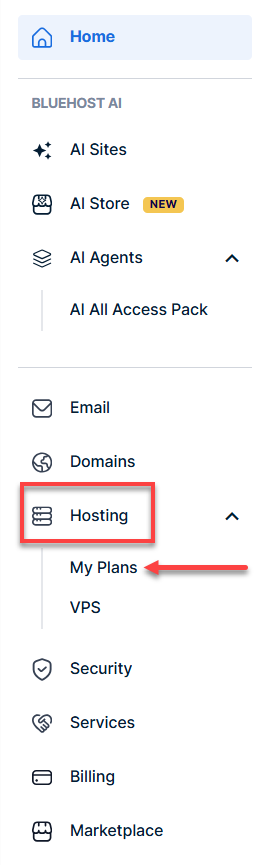
- In the left-hand menu, click Hosting, then select My Plans.
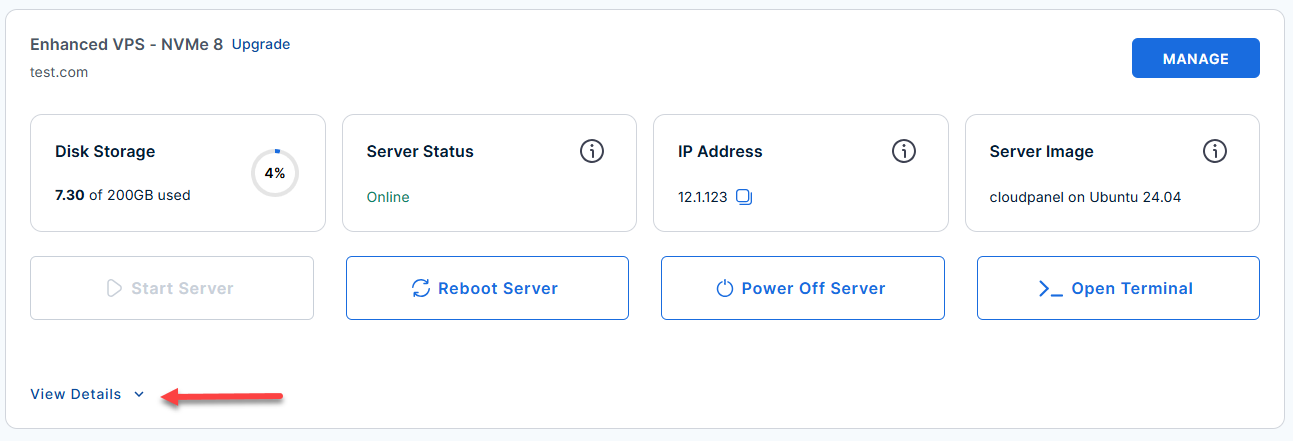
- Locate the server you want to manage, then click View Details in the bottom-left corner to expand the section and access additional server information.
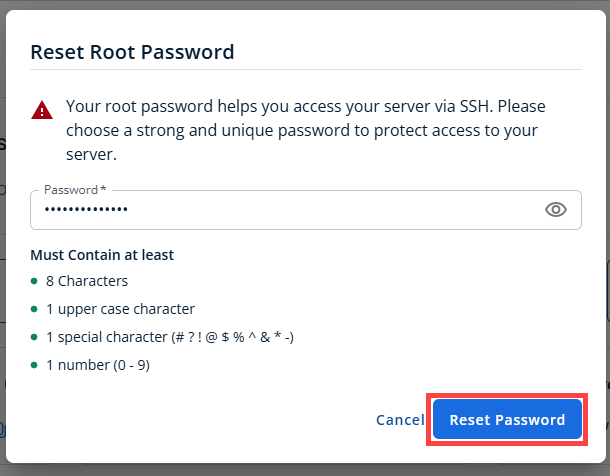
- Click the Reset Password.
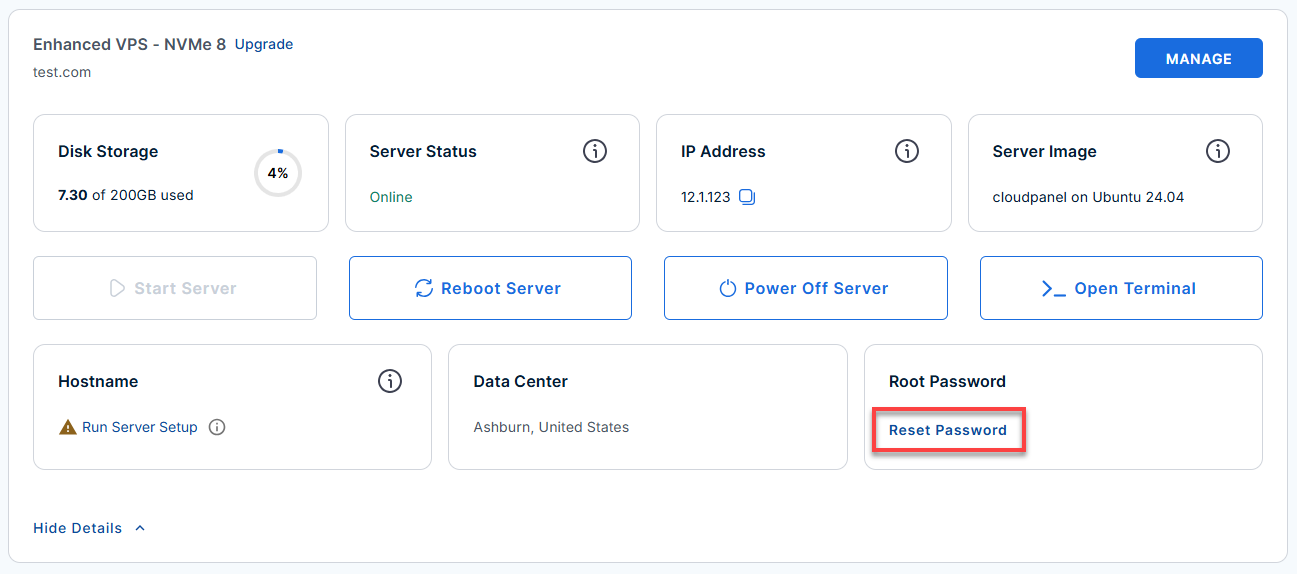
- In the pop-up window, type your new root password, then click Reset Password again to confirm and save the changes.
Choose one of the following options based on what you want to do:
Your choice [d/i/q]
- Press i – Use Server IP (Recommended)
Choose this to finish setup instantly using your server's IP address (12.1.1.123). You can easily switch to a custom domain later. - Press d – Connect a Domain
Choose this only if you already own a domain (e.g.,myshop.com) and have pointed its DNS to12.1.1.123. This option will ask for your domain and install an SSL security certificate. - Press q – Quit
Choose this to exit the installer and access the command line. To restart this wizard later, run/root/domain_connect.
Type i, d, or q, then press Enter.
- Connect to your VPS via SSH.
Open your computer's terminal (or an SSH client like PuTTY) and run the following command to log into your server as the administrator, using your server's public IP address: Follow the prompts and enter the new root password you created in the step above.Replaceyour_server_ipwith your actual server IP address.ssh root@your_server_ipExample Output:
Welcome to Ubuntu 24.04.4 LTS (GNU/Linux 6.8.0-111-generic x86_64) ******************************************************************************** Welcome to your Magento 2 installation! Store URL: https://12.1.1.123/ Admin URL: https://12.1.1.123/admin_dqfm2f1 Admin user: testing Admin email: [email protected] Your admin login and service credentials are saved in the following file: /root/.app_passwords See /root/README.md for more information about using magento This prompt is shown automatically only once. To run it again later, execute: /root/domain_connect [d] — Connect a domain name to magento (nginx + SSL will be updated for that host) [i] — Keep using the server's IP address (current behavior) [q] — Quit Your choice [d/i/q]: - If you ever need to quickly review the system's deployment notes directly inside your server terminal, you can print out the original README file by running:
cat /root/README.md
- View your credentials:
cat /root/.app_passwords
Example Output:
root@server-123456:~# cat /root/.app_passwords
root_mysql_pass="99c5db785d3f281c50ec9ddfba60ee80"
admin_mysql_pass="d41cb09d23abd5395b9b82cea14cbf73"
app_mysql_pass="334b29c7de73e35703437ccf4a013f95"
opensearch_pass="dK-v_9!^*SF)3^Gd"
magento_admin_pass="02d9e05bb6e4f716bdec7419c06404a3"
[email protected]
magento_admin_user=testing
magento_admin_pass=02d9e05bb6e4f716bdec7419c06404a3
magento_admin_url=https://12.1.1.123/admin_dqfm2f1
magento_store_url=https://12.1.1.123/
Step 2: Access the Magento Dashboard
Open your web browser and navigate to the admin URL you found in the previous step. Log in using the default admin username and the password from your password file.
- Store URL: https://your-ip-address/
Replace
your_server_ipwith your actual server IP address.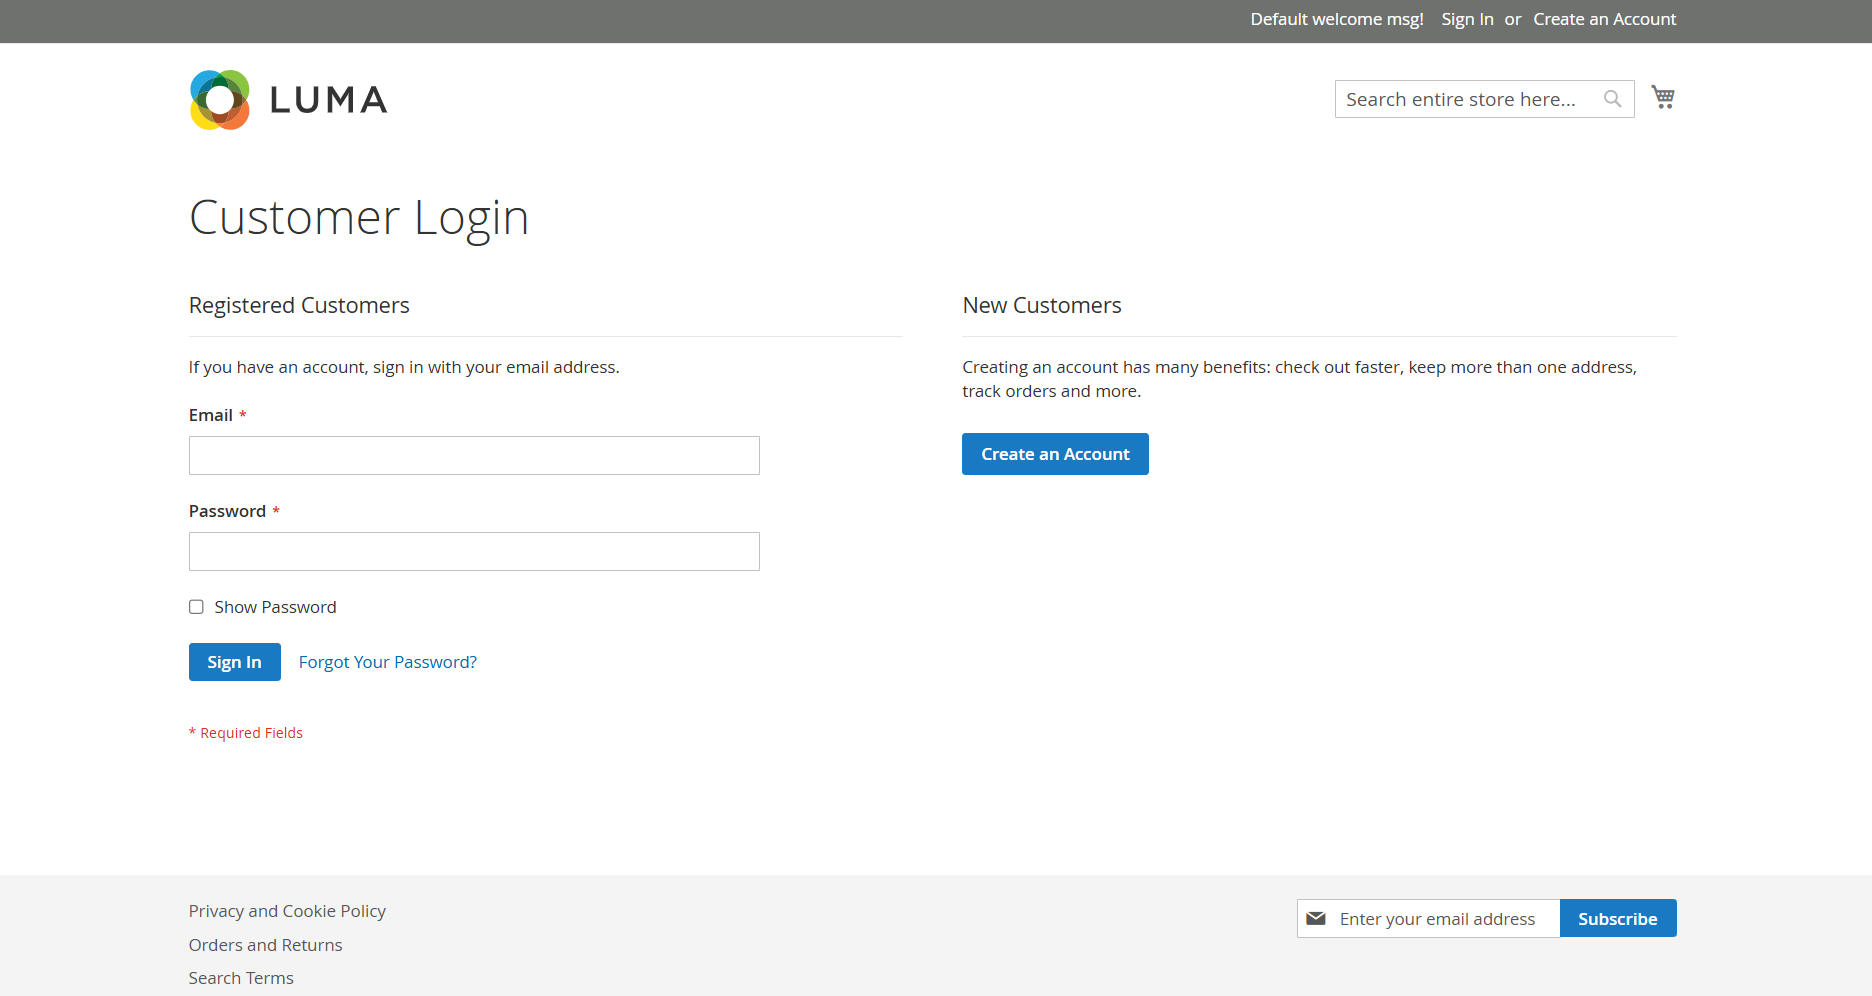
- Admin URL: https://your-ip-address/admin_dqfm2f1
Replace
your_server_ipwith your actual server IP address.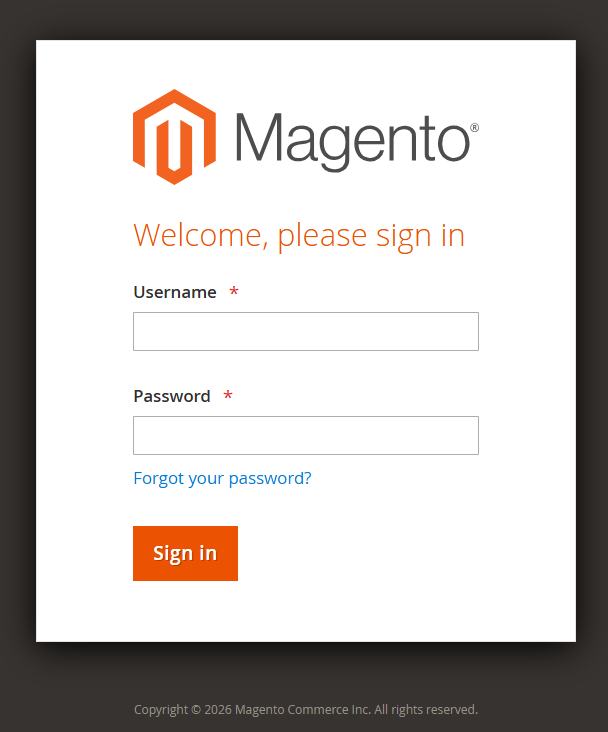
Step 3: Secure Your Admin Account
For security purposes, you must create a personal administrator account and remove the default one.
- Run the user creation script in your terminal:
Follow the on-screen prompts to set up your unique username, password, and email.
/root/user_createExample Output:
root@server-123456:~# /root/user_create --- New Magento admin account --- First name [q=quit]: Test Last name [q=quit]: Account Email address [q=quit]: test [email protected] Admin username (letters, digits, underscore only) [q=quit]: jc Admin password: at least 12 characters with upper and lower case, a digit, and one of !@#$%^&* — or press Enter or type r to generate a random password. Password [Enter/r=random, q=quit]: Remove the existing admin user 'testing' after creating 'jc'? If you choose no, both accounts will remain. [y] — Remove the old admin after creating the new one [n] — Keep the old admin and add the new account [q] — Quit Your choice [y/n/q]: y - Go back to your Magento Admin Dashboard, log out of the default account, and log back in using the brand-new credentials you just created.
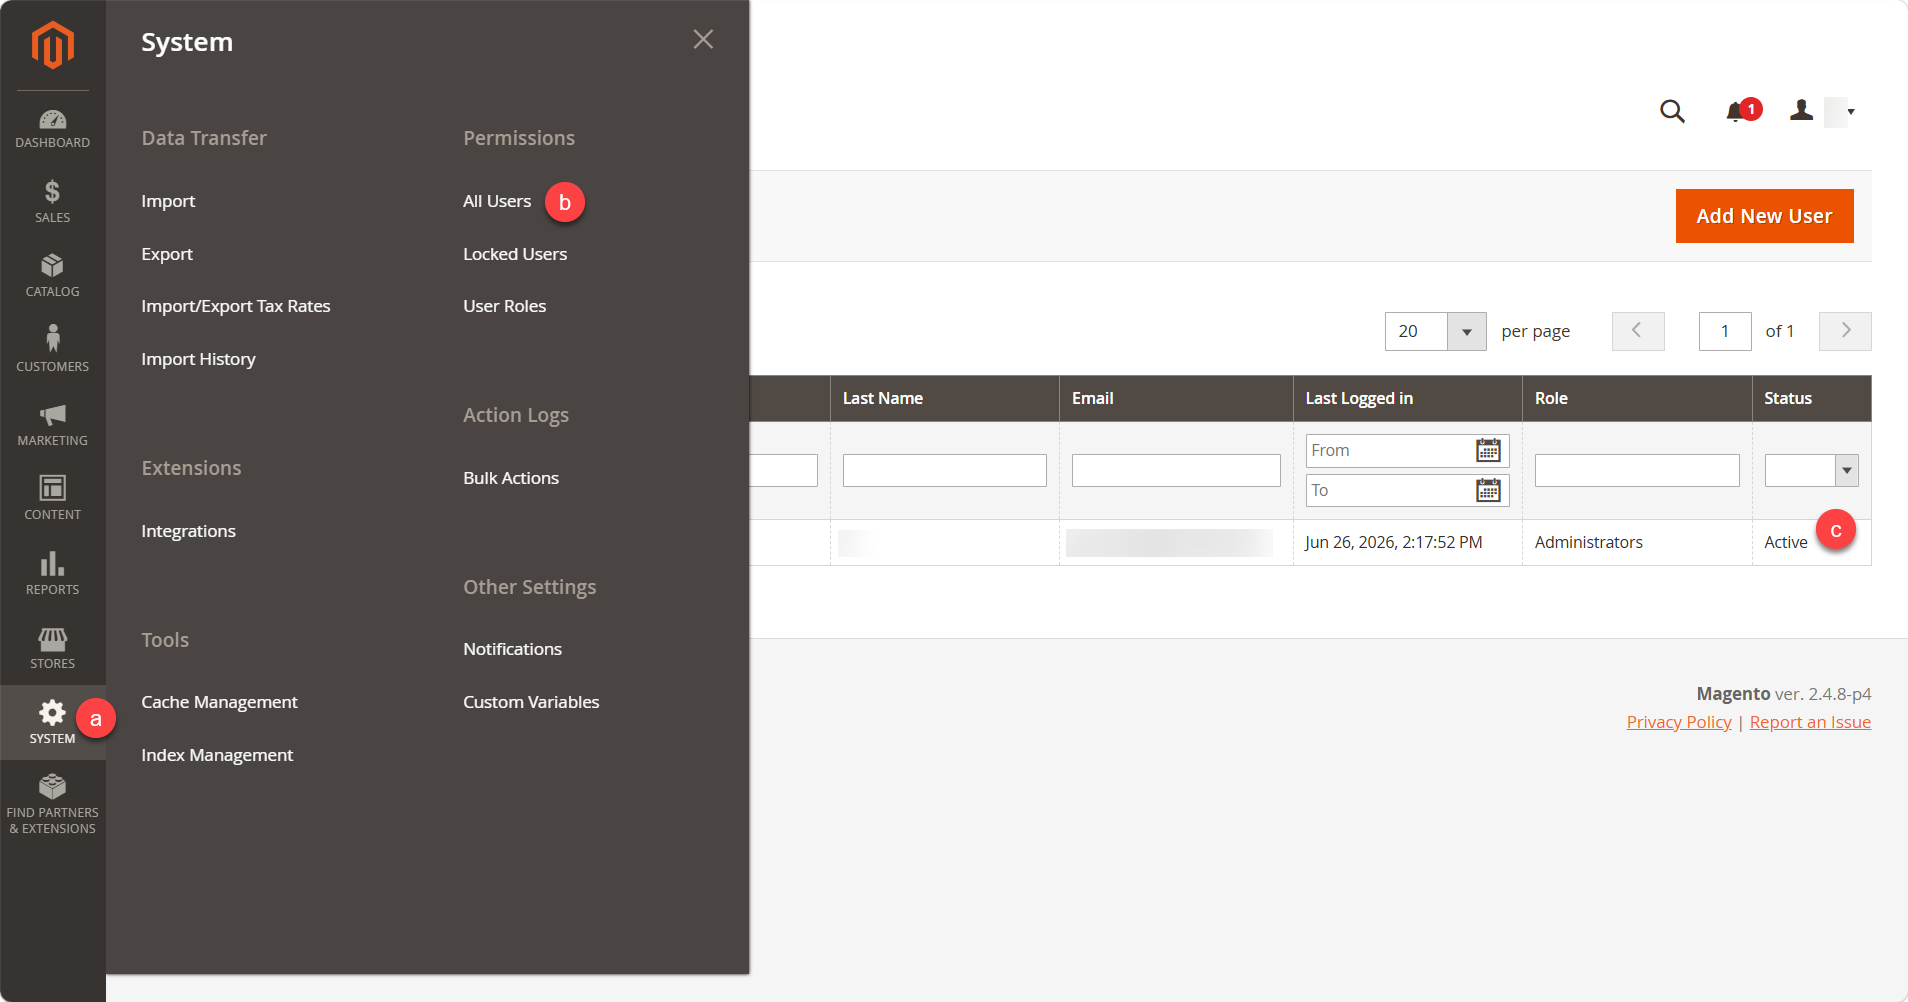
- Once you successfully log in with your new account, navigate to System ➔ Permissions ➔ All Users. Locate the default admin user and delete it to secure your store.
Step 4: Configure Your Domain Name & HTTPS
Right now, your site is running on the raw server IP address. To connect your actual domain name:
- Update your DNS: Go to your domain registrar and point your domain's A Record to your server's primary IP address.
- Wait for DNS to propagate.
- Once DNS is pointing to the server, run the built-in connection script as root:
/root/domain_connect
- Enter your domain name when prompted. The script will automatically update Magento, configure Nginx, and attempt to install a free, trusted Let's Encrypt SSL certificate.
Note: If the Let's Encrypt process fails or you need to manually force/renew the trusted certificate later, run this command (replace with your actual domain and email):certbot --nginx -d yourdomain.com -m [email protected] --non-interactive --agree-tos --force-renewal
Step 5: Update Store Email Addresses
The automated installer uses a placeholder email ([email protected]). You need to change this so you can receive system and order notifications.
- Log into your Magento Admin Dashboard.
- Update Store Emails: Navigate to Stores ➔ Configuration ➔ General ➔ Store Email Addresses and replace the placeholders with your operational emails.
- Update Admin Account Email: Navigate to System ➔ Permissions ➔ All Users, click on your user profile, and ensure your admin email address is correct.
Quick Maintenance Commands
Your server has a built-in shortcut alias (magento) so you don't have to switch users constantly to manage the store. Whenever you make layout changes or configuration updates, run:
Flush Cache:
Reindex Data:
Additional Information and Example Documentation Output
You can run cat /root/README.md to see more information and useful commands:
root@server-123456:~# cat /root/README.md
# Magento

## Description

Magento 2 is a self-hosted, PHP e-commerce platform for stores that need more
than a simple shop-in-a-box: you own the code, themes, and extensions, and you
are not tied to a closed SaaS product.

It shines when you need **scale and flexibility**-one admin for multiple
stores, strong catalog and order workflows, merchandising (promotions,
cross-sells), and integrations for search, checkout, and marketing-backed by
a large extension ecosystem and solid vendor documentation.


## Services

Service          | Ports | Purpose
----------------|-------|---------
OpenSSH         | 22    | SSH
Nginx           | 80/443| Magento
OpenSearch      | 9000  | Magento Search

Ports are protected using ufw.


## How-to-use

On first boot, Magento is installed automatically using the server's
primary IP as the site URL. A Let's Encrypt certificate is requested
and installed for that address so HTTPS works out of the box. A
default Magento user is created so the installation can
finish. **Create your own administrator account** by running
`/root/user_create`. **You should remove the default admin** once your
account is in place.


### Custom domain and HTTPS

To point Magento at your own hostname, run **`/root/domain_connect`** as **root** (same as `python3 /root/domain_connect`). The script updates Nginx and Magento base URLs and (re)issues TLS for the chosen host.

**First SSH session:** The same wizard runs **automatically once** when you first log in as root-root's `.bashrc` starts it and records that it has run, so you are prompted immediately. **Later sessions:** Run `/root/domain_connect` yourself whenever you want to switch between a domain and the server IP or change the hostname.

**Let's Encrypt vs self-signed** (see `create_nginx_config` in `/opt/magento_util.py`):

- **Domain name (not an IP literal):** If **DNS for that name resolves to this server's primary IP**, the tool uses **Let's Encrypt** (`certbot` with the nginx plugin). If **DNS does not** resolve to this server yet, a **self-signed** certificate is generated so HTTPS can still be enabled until DNS is correct (you can run `/root/domain_connect` again after DNS propagates).
- **Primary IP as hostname:** When you keep using the IP and the hostname is that IPv4 address, **Let's Encrypt** is requested with Certbot's **IP certificate** flow (`certonly` / short-lived profile).
- If a Let's Encrypt request **fails** while DNS already points at this host (or in the IP flow), Certbot errors are surfaced and the script **does not** silently fall back to self-signed in those paths-fix DNS/rate limits/etc. and re-run.

This server is provisioned with **Magento 2** under `/home/magento/www` (web root: `/home/magento/www/pub`). The stack includes **Nginx**, **PHP 8.3** (FPM), **MySQL** (database `magento`), and **OpenSearch** for catalog search.


## First-boot installation

On first boot, cloud-init runs `/root/magento_install.py` as **root**. That script:

- Uses this machine's **primary IPv4 address on `ens3`** as the hostname for the initial **HTTPS base URL** and for **Nginx** `server_name`.
- Creates a **self-signed TLS certificate** and an **Nginx virtual host** (HTTP redirects to HTTPS).
- Runs **`bin/magento setup:install`** as the `magento` user, deploys static content, then records **admin credentials** and URLs.

You do not need to run `magento_install.py` yourself unless you are re-running or troubleshooting an install (it must be run as root).


## Where to find passwords and URLs

- **`/root/.app_passwords`** - MySQL app password, Magento admin password, admin URL, and related values.
- **`/etc/update-motd.d/99-magento`** - Shown when you log in via SSH: store URL, admin URL (path only; no password), admin user, and a pointer to the password file.


## Magento CLI

As root, the shell alias **`magento`** runs CLI commands as the `magento` user, for example:

```bash
magento cache:flush
Summary
Magento 2 is a powerful Ecommerce platform that empowers businesses to build customizable, scalable online stores with advanced product, customer, and order management features. This article explains why Magento 2 is useful for expanding businesses. It shows how it can improve checkout and customer experience. It also gives clear steps for purchasing Self-Managed VPS hosting for optimal performance.