Key highlights
- EasyApache simplifies Apache and PHP management on cPanel servers running VPS or dedicated hosting.
- You can customize web server configurations without manual compilation or complex command-line operations.
- EasyApache 4 uses a package-based system that makes updates faster and more reliable than older versions.
- Managing multiple PHP versions becomes straightforward with profile-based configuration tools.
- Your server performance and security improve through controlled module selection and regular updates.
Managing your web server configuration can be overwhelming, especially when you’re running a VPS or dedicated hosting environment. If you’ve ever struggled with Apache updates, PHP version management or server customization, you’re not alone. This is where EasyApache comes in as a game-changing solution for server administrators.
EasyApache is an automated tool designed specifically for cPanel servers that simplifies Apache web server management. It allows you to customize your Apache installation, manage multiple PHP versions simultaneously and keep your server secure and up-to-date with minimal technical complexity.
In this comprehensive guide, we’ll explore how EasyApache functions in VPS and dedicated hosting environments effectively. We’ll also explain why it is essential for server performance, security and how to enhance your hosting experience. Let’s dive in.
What is EasyApache?
EasyApache is a web server configuration tool that comes pre-installed with cPanel hosting control panels. It automates the process of building and customizing your Apache web server environment.
The tool handles three main components: Apache web server software, PHP processing modules and additional server extensions. You access EasyApache through your Web Host Manager (WHM) interface, where you can make changes without touching configuration files directly.
Think of EasyApache as a bridge between your hosting needs and your server’s technical setup. It translates your choices into working configurations that power your websites.
On VPS and dedicated servers, you have full control over these settings. Shared hosting users typically cannot access EasyApache because the hosting provider manages server-wide configurations for all accounts.
The name “EasyApache” reflects its core purpose: making Apache management easier. Before this tool existed, server administrators had to compile Apache from source code, track dependencies manually and debug configuration errors without visual feedback.
Now that you know what EasyApache is, let’s explore how it works in VPS and dedicated server environments.
How does EasyApache work in VPS and dedicated environments?
EasyApache operates through a structured workflow that separates selection from execution. You choose your desired configuration, preview the changes and then apply them to your live server.
The system maintains a record of your current setup. When you request changes, EasyApache calculates what needs to be modified, downloaded or recompiled to match your specifications.
1. Apache build and rebuild process
Building Apache through EasyApache follows a multi-step sequence. The tool first downloads the Apache source code version you selected. Then it compiles this code with your chosen modules and settings. Compilation transforms human-readable source code into executable binaries your server can run. EasyApache handles compiler flags, dependency resolution and path configuration automatically during this stage.
After compilation finishes, EasyApache installs the new Apache build. It stops your current web server, swaps in the updated version and restarts services. Your websites experience brief downtime during this transition, typically lasting 30 to 90 seconds.
Rebuilds preserve your existing Apache configuration files. Your virtual hosts, SSL certificates and custom directives remain intact unless you specifically change them. The rebuild process creates backup snapshots before making changes. If something goes wrong, you can restore your previous Apache setup through WHM’s restoration tools.
2. Managing PHP versions and extensions
PHP version management stands out as one of EasyApache’s most valuable features. Modern web applications often require specific PHP versions to function correctly. You can install multiple PHP versions simultaneously on your server. EasyApache configures each version with its own set of extensions and settings. Different websites on your server can then use different PHP versions based on their requirements.
PHP extensions add functionality to the base PHP installation. Common extensions include database connectors (mysqli, pdo), image processing tools (GD, ImageMagick) and security modules (mcrypt, OpenSSL).
EasyApache presents PHP extensions as checkboxes in the interface. You select which extensions each PHP version needs and the system compiles them during the build process. Version switching happens at the account level through cPanel’s MultiPHP Manager. This tool works alongside EasyApache to assign PHP versions to individual domains or directories.
3. Role of profiles and packages
Profiles serve as configuration templates in EasyApache. A profile defines a complete server stack: Apache version, PHP versions, modules and extensions bundled together. cPanel ships with default profiles that work for most hosting scenarios. You can use these as-is or create custom profiles tailored to your specific needs.
Packages represent individual software components within a profile. Each Apache module, PHP version and extension exists as a separate package that you can enable or disable.
The package system in EasyApache 4 uses RPM (Red Hat Package Manager) or DEB formats depending on your Linux distribution. This approach allows for faster updates and better dependency tracking compared to compiling everything from scratch.
When you modify a profile, you’re essentially selecting which packages should be installed. EasyApache then ensures all necessary dependencies are present and compatible with each other.
With a clear understanding of how EasyApache manages Apache, PHP and server configurations, let’s look at EasyApache 4 and why it’s an important upgrade.
What is EasyApache 4 and why is it important?
EasyApache 4 represents a complete redesign of the original EasyApache system. It shifted from a monolithic compilation approach to a package-based architecture. This change matters because it makes your server more maintainable. Updates apply faster, rollbacks become simpler and you spend less time waiting for rebuilds to complete.
EasyApache 4 also introduced better PHP version management. You can now run virtually any combination of PHP versions from 5.4 through 8.3 on the same server.
EasyApache 4 architecture and package-based system
The architectural shift to packages changed how EasyApache installs and updates software. Instead of recompiling Apache every time you make a change, EasyApache 4 installs pre-compiled packages from repositories.
These repositories contain tested, stable versions of all available Apache and PHP components. When you select a configuration, EasyApache downloads the appropriate packages and installs them using your operating system’s native package manager.
Package-based management reduces rebuild times from 20-30 minutes down to 2-5 minutes. Your server spends less time offline during updates. The system also handles dependencies automatically. If a PHP extension requires a specific library, EasyApache 4 installs that library without requiring manual intervention.
Version control becomes more granular. You can update individual components without rebuilding your entire web server stack. This targeted approach minimizes risk and saves time.
Supported PHP versions, MPMs and Apache modules
EasyApache 4 supports a wide range of PHP versions to accommodate different application requirements. You can install PHP 5.4, 5.5, 5.6, 7.0, 7.1, 7.2, 7.3, 7.4, 8.0, 8.1, 8.2 and 8.3 on the same server. Multi-Processing Modules (MPMs) determine how Apache handles concurrent connections. EasyApache 4 offers three MPM options: Prefork, Worker and Event.
Prefork MPM creates a separate process for each request. It’s the most compatible option but uses more memory. Worker MPM uses threads within processes for better resource usage. Event MPM improves on Worker by handling keep-alive connections more effectively.
Apache modules extend web server functionality. Popular modules available through EasyApache include mod_security (web application firewall), mod_rewrite (URL manipulation) and mod_ssl (HTTPS encryption).
You choose which modules to enable based on your hosting needs. Fewer modules mean better performance, but you need enough functionality to support your websites properly.
Compatibility with LiteSpeed and NGINX setups
EasyApache was designed specifically for Apache web servers. If you replace Apache with LiteSpeed or NGINX, EasyApache’s functionality changes.
LiteSpeed offers a drop-in Apache replacement that can read Apache configuration files. When you install LiteSpeed on a cPanel server, you can still use EasyApache to manage PHP versions and extensions. The Apache-specific modules won’t apply, but PHP management continues working.
NGINX works differently. It typically runs as a reverse proxy in front of Apache rather than replacing it completely. In this configuration, NGINX handles static content while Apache processes PHP requests in the background.
Your EasyApache settings still control the backend Apache server in a reverse proxy setup. NGINX operates independently with its own configuration files outside of EasyApache’s scope.
Some hosting providers offer custom tools for managing NGINX alongside EasyApache. These tools vary by provider and aren’t part of the standard cPanel installation.
Understanding the features and improvements of EasyApache 4 sets the stage for exploring why EasyApache is crucial for optimizing server performance and maintaining security.
Why does EasyApache matter for server performance and security?
Server performance and security depend heavily on proper web server configuration. EasyApache gives you the tools to tune these settings according to your needs.
Without a management tool like EasyApache, you would need deep Linux expertise to achieve the same results. The learning curve would be steep and mistakes could break your entire server.
1. Performance optimization and resource control
Performance optimization starts with choosing the right Apache MPM. Event MPM handles high-traffic scenarios better than Prefork, but it requires compatible PHP handlers. PHP version selection affects speed too. PHP 8.x runs significantly faster than PHP 5.x for most applications. Upgrading your PHP version through EasyApache can reduce page load times by 30-50% without any code changes.
Module selection impacts memory usage and processing overhead. Each enabled Apache module consumes RAM and adds processing steps to every request. Disabling unused modules frees up resources for actual web traffic. You can monitor the performance impact of your EasyApache configuration through server monitoring tools. Watch for metrics like CPU usage, memory consumption and request processing time.
Resource control also involves limiting what applications can do. PHP extensions and Apache modules can restrict file access, memory limits and execution times to prevent runaway processes from consuming all available resources.
2. Security hardening through module management
Security starts with keeping your software updated. EasyApache makes it simple to apply security patches to Apache and PHP as they become available. ModSecurity, available as an EasyApache module, acts as a web application firewall. It monitors incoming requests and blocks common attack patterns like SQL injection and cross-site scripting.
Removing unused PHP extensions reduces your attack surface. Each extension represents potential vulnerability points that attackers might exploit. If your applications don’t need an extension, disabling it improves security.
PHP version management supports security too. Older PHP versions eventually stop receiving security updates. EasyApache lets you test newer PHP versions on staging sites before applying them to production, ensuring compatibility while maintaining security.
SSL/TLS configuration happens through Apache modules that EasyApache manages. You can enable strong encryption protocols and disable weak ciphers to protect data in transit.
3. Stability and predictable server behavior
Stability comes from tested, known configurations. EasyApache’s default profiles represent configurations that thousands of servers run successfully. The tool prevents incompatible combinations of software. If you select modules or versions that conflict with each other, EasyApache warns you before applying the changes.
Predictable behavior means your server responds consistently to identical requests. Proper Apache and PHP configuration ensures that application behavior remains stable under varying load conditions. EasyApache 4’s package-based approach reduces unexpected behavior. Pre-compiled packages undergo quality testing before release, catching potential issues before they reach your server.
The backup and restore system adds another layer of stability. If a configuration change causes problems, you can roll back to your previous working setup within minutes.
With a clear understanding of how EasyApache improves server performance, security and stability, the next step is learning how to install and configure EasyApache on your server.
How do you install and configure EasyApache?
EasyApache comes pre-installed with cPanel on VPS and dedicated servers. You don’t need to install it separately. Configuration happens through the WHM interface using a guided workflow.
1. Accessing EasyApache from WHM
Log into your Web Host Manager using your root credentials. The login URL typically follows the format https://yourservername.com:2087.
Once logged in, locate the Software section in the left sidebar. Click on “EasyApache 4” to open the configuration interface.
The EasyApache dashboard displays your current configuration. You’ll see which Apache version you’re running, what PHP versions are installed and which modules are enabled.
From this dashboard, you can start a new customization session, restore previous configurations or update your current setup.
2. Selecting Apache and PHP profiles
Click “Customize” to begin making changes. EasyApache displays available profiles as a starting point.
The default profile works well for most hosting scenarios. It includes Apache with commonly used modules and multiple PHP versions for compatibility.
You can select a different profile if you have specific needs. For example, some profiles optimize for WordPress hosting, while others focus on Joomla or Drupal.
After selecting a base profile, you proceed to the customization screens. These screens let you modify Apache settings, choose PHP versions and select extensions. The interface groups related settings together. Apache modules appear on one screen, PHP versions on another and PHP extensions on a third.
3. Customizing modules and extensions
The module selection screen lists all available Apache modules with checkboxes. Enabled modules appear checked, while disabled ones remain unchecked. Click on any module name to see a description of what it does. This helps you make informed decisions about which modules you need.
Critical modules like mod_ssl and mod_rewrite are typically enabled by default. You can disable them if you have specific reasons, but most servers need these modules.
PHP version selection happens on the next screen. Check the boxes next to each PHP version you want to install. Remember that you can have multiple versions installed simultaneously. After selecting PHP versions, you configure extensions for each version. EasyApache displays a grid where rows represent extensions and columns represent PHP versions.
Check the boxes to enable specific extensions for specific PHP versions. Some extensions are recommended and come pre-selected.
4. Applying changes and rebuilding Apache
After making your selections, review the summary screen. This screen shows what will change when you apply your configuration. EasyApache lists packages that will be installed, updated or removed. Review this list carefully to ensure the changes match your intentions.
Click “Provision” to start the build process. EasyApache downloads necessary packages and begins installation.
A progress indicator shows what’s happening at each step. The entire process takes 2-10 minutes depending on how many changes you’re making. Your websites will be offline briefly while Apache restarts. Plan your rebuild during low-traffic periods if possible.
After the rebuild completes, EasyApache displays a success message. Test your websites to confirm everything works correctly with the new configuration.
Once EasyApache is installed and configured, it’s helpful to understand the common use cases on VPS and dedicated servers where these settings make the biggest impact.
What are common EasyApache use cases on VPS and dedicated servers?
EasyApache shines in environments where you need flexibility and control. VPS and dedicated servers give you the access rights needed to manage Apache and PHP configurations.
1. Hosting PHP-based websites and applications
Most websites run on PHP. WordPress, Joomla, Drupal, Magento and countless other platforms depend on PHP processing.
Each application has minimum PHP version requirements. WordPress 6.4 requires at least PHP 7.4, but recommends PHP 8.0 or higher. Older WordPress versions might need PHP 5.6 support. EasyApache lets you maintain multiple PHP versions to accommodate different applications. You might run WordPress sites on PHP 8.2 while keeping a legacy application on PHP 7.4.
PHP extensions determine what functions are available to your applications. Database connectors like mysqli and pdo are essential. Image processing through GD or ImageMagick enables thumbnail generation and image manipulation. Caching extensions like OPcache can dramatically improve PHP performance. EasyApache makes these extensions easy to enable across all your PHP versions.
2. Managing multiple sites and user accounts
VPS hosting and dedicated servers often host multiple websites or serve multiple clients. Each site might have different technical requirements. EasyApache configurations apply server-wide, but PHP version assignments happen per account or domain. You use MultiPHP Manager in cPanel to assign different PHP versions to different websites.
This flexibility means you can host a modern PHP 8.2 application alongside a legacy PHP 5.6 application on the same server. Each runs with appropriate extensions and settings.
Account isolation improves when you use appropriate MPM settings and PHP handlers. Each user’s scripts run in their own context, preventing one account from affecting others. Resource limits set through PHP configuration help prevent individual accounts from consuming excessive server resources. You configure memory limits, execution times and other restrictions through php.ini files that EasyApache manages.
3. Scaling server resources as traffic grows
As your traffic increases, your server configuration needs to adapt. EasyApache helps you adjust Apache and PHP settings to handle higher loads. Switching from Prefork MPM to Event MPM can handle more concurrent connections with the same hardware. This change requires compatible PHP handlers, which EasyApache configures automatically.
Enabling PHP OPcache reduces the need to recompile PHP scripts on every request. This optimization becomes more valuable as traffic increases.
You might add caching modules like mod_cache or mod_expires through EasyApache. These modules reduce server load by serving cached content instead of regenerating it for every request. As you scale, you may also need to upgrade PHP versions to benefit from performance improvements in newer releases. EasyApache makes testing and deploying these upgrades straightforward.
To better understand EasyApache’s practical value, let’s explore the most common issues and how to troubleshoot them.
What are common EasyApache issues and how can you troubleshoot them?
Even with a user-friendly interface, problems can occur during Apache builds or after applying configuration changes. Understanding common issues helps you resolve them quickly.
1. Apache rebuild failures and dependency conflicts
Build failures happen when packages can’t be downloaded or when dependencies conflict. Network issues sometimes prevent EasyApache from reaching package repositories.
Check your server’s internet connectivity first. Try pinging common websites from the command line to verify network access. Repository problems can cause failures too. The EasyApache repository might be temporarily unavailable or your server’s repository configuration might be outdated.
Dependency conflicts arise when you select incompatible modules or versions. EasyApache usually catches these during the review phase, but some conflicts only appear during installation. Read the error messages carefully. They often point to the specific package causing problems. You can try removing that package from your configuration and rebuilding.
If rebuilds consistently fail, check the EasyApache logs in WHM. These logs provide detailed information about what went wrong during the build process.
2. PHP incompatibility and extension errors
Websites sometimes break after PHP version changes. Applications may call functions that don’t exist in newer PHP versions or they may use deprecated features. Check your PHP error logs to identify specific compatibility issues. These logs show which functions or features are causing problems.
Missing PHP extensions create obvious errors. If your application requires a specific extension and it’s not installed, you’ll see fatal errors or blank pages. Go back into EasyApache and verify that all necessary extensions are enabled for your PHP version. Common oversight includes forgetting to enable extensions like mbstring, zip or curl.
Some applications require specific extension configurations. For example, upload limits, memory limits or execution times might need adjustment in your php.ini files.
You can modify PHP settings through WHM’s MultiPHP INI Editor after EasyApache completes. This tool lets you adjust values without rebuilding your entire server.
3. Rollback and recovery best practices
EasyApache stores snapshots of your previous configurations. If a new configuration causes problems, you can restore an earlier version. Access the restore function from the EasyApache dashboard. Select a previous snapshot from the list and click restore.
The restoration process works like a regular rebuild. It downloads the packages from your chosen snapshot and applies them to your server. Keep documentation of your configurations. Note which PHP versions, extensions and modules you enable. This documentation helps you recreate working configurations if needed.
Test major changes on a staging server before applying them to production. Many hosting providers offer staging environments where you can verify that your EasyApache configuration works as expected.
Schedule configuration changes during maintenance windows. This gives you time to test and roll back if necessary without impacting peak traffic periods.
After understanding common EasyApache issues and troubleshooting methods, it’s important to follow best practices for managing EasyApache effectively.
What are best practices for managing EasyApache?
Effective EasyApache management balances performance, security and stability. Following established practices helps you maintain a healthy server environment.
1. Keeping Apache and PHP versions up to date
Regular updates protect your server from security vulnerabilities. Subscribe to cPanel’s update notifications to learn about new releases. PHP releases follow a predictable schedule. Each major version receives active support for two years, followed by one year of security-only fixes. Plan your PHP upgrades around this timeline.
Test updates on non-production environments first. Create a staging server that mirrors your production configuration and apply updates there. Monitor your applications after updates. Watch error logs and check website functionality to catch any compatibility issues early.
Don’t wait until a PHP version reaches end-of-life to upgrade. Start planning upgrades 6-12 months before support ends to allow time for testing and fixing compatibility issues.
2. Avoiding unnecessary modules and extensions
Each enabled module and extension consumes system resources. More components also mean more potential security vulnerabilities to patch. Audit your configuration periodically. Review which modules and extensions are enabled and verify that your applications actually use them.
Disable anything you don’t need. If you’re not sure whether something is necessary, research its purpose or test disabling it in a staging environment.Balance minimalism with functionality. You want enough features to support your websites properly without carrying unnecessary baggage.
Document your rationale for enabling specific components. When someone reviews your configuration later, they’ll understand why each piece is there.
3. Monitoring performance and server health
Track key metrics to understand how your EasyApache configuration affects server performance. Watch CPU usage, memory consumption and request processing times. Use tools like top, htop or dedicated monitoring services to collect performance data. Look for trends over time rather than focusing on momentary spikes.
Monitor Apache’s error logs for recurring issues. Patterns in error messages can reveal configuration problems or resource bottlenecks. Set up alerts for critical metrics. You want to know immediately if your server runs out of memory or if Apache processes start consuming excessive CPU.
Benchmark your server after making configuration changes. Compare response times and resource usage before and after to measure the impact of your changes. Review your configuration quarterly. Technology and requirements change over time. Regular reviews ensure your EasyApache setup continues meeting your needs effectively.
How to configure EasyApache on Bluehost VPS and dedicated hosting?
Bluehost VPS and Dedicated Hosting plans provide full access to Web Host Manager (WHM), allowing you to manage Apache and PHP configurations using EasyApache 4. While the setup process is similar on both server types, dedicated servers offer greater flexibility and performance tuning options.
How to use EasyApache on Bluehost VPS
On Bluehost VPS hosting, EasyApache 4 enables you to manage Apache modules, PHP versions and extensions for all hosted domains through a centralized interface.

Log in to WHM
- Sign in to your Bluehost Account Manager
- Click Hosting in the left-hand menu
- Open your VPS hosting details
- Click the WHM button to launch Web Host Manager
Access EasyApache 4
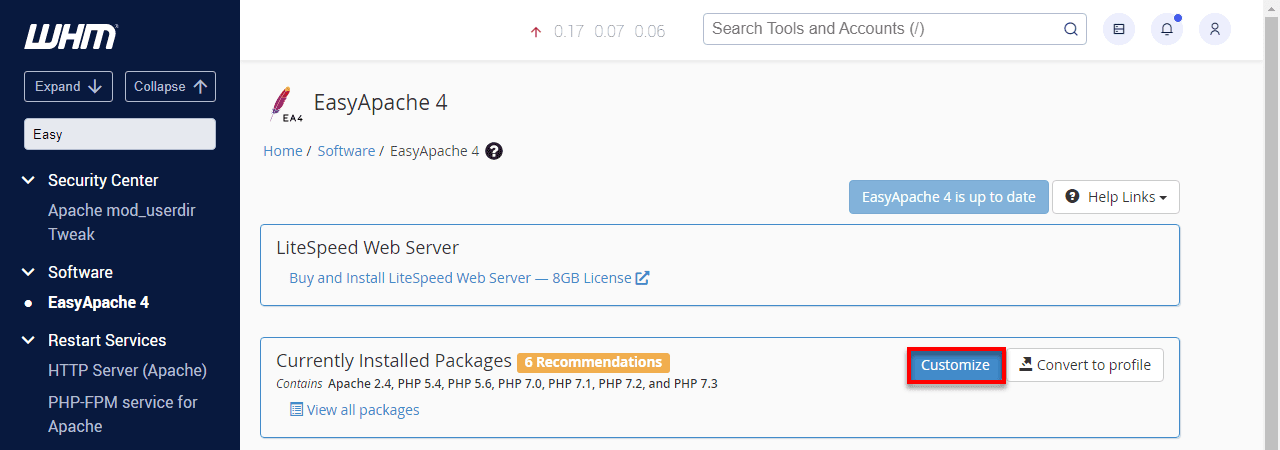
- In WHM, type Easy in the search box
- Click EasyApache 4 under the Software section
Customize your build
- In the Currently Installed Packages block, click Customize
- Modify Apache modules, PHP versions, PHP extensions and additional packages
Select PHP versions and extensions
- Choose the PHP versions you want to install or update
- Add or remove PHP extensions required by your applications
Configure apache modules and MPM
- Enable or disable Apache modules based on your server requirements
- Select the Apache Multi-Processing Module (MPM) that best suits your performance needs
Review and provision
- Review your selected configuration carefully
- Click Provision to apply the changes
- The process may take several minutes, depending on the scope of updates
Verify and manage PHP versions
- After provisioning, open MultiPHP Manager in WHM
- Assign PHP versions to specific domains hosted on your VPS
How to use EasyApache on Bluehost Dedicated Hosting
Bluehost Dedicated Hosting provides full server control and higher performance capacity, making EasyApache 4 an essential tool for optimizing Apache and PHP configurations at scale.

Access EasyApache 4
- In WHM’s search box, type Easy
- Click EasyApache 4 under the Software section
- Wait for your current profile to load, then click Customize in the Currently Installed Packages block
Select your build options
- Choose Apache modules, PHP versions and PHP extensions to install or remove
- Use the search bar to quickly locate specific modules or extensions
- Modify Apache MPMs and other advanced settings only if you understand their performance impact
Review and build
- Review all planned changes, including packages to be installed, removed or retained
- Click Provision to apply the configuration
- The build process may take several minutes, depending on the changes
Manage PHP versions (Optional)
- Use MultiPHP Manager in WHM to assign PHP versions to specific domains or accounts
Configure PHP settings
- Open MultiPHP INI Editor in WHM
- Adjust PHP settings such as memory limits and execution time to optimize performance
Finish and test
- Once provisioning completes, test all hosted websites
- Verify compatibility, performance improvements and error logs to ensure a stable configuration
Final thoughts
EasyApache simplifies complex server management tasks on VPS and dedicated hosting environments. You get control over Apache and PHP configurations without needing extensive Linux expertise. The tool’s package-based approach in version 4 makes updates faster and more reliable. You can maintain multiple PHP versions, customize server modules and optimize performance through an accessible interface.
Success with EasyApache comes from understanding your hosting requirements and making informed configuration choices. Regular maintenance, including updates and audits, keeps your server secure and performing well. Take advantage of EasyApache’s backup and restore capabilities. Test changes in staging environments when possible. Document your configurations to make future management easier.
Ready to take control of your server environment? Start exploring EasyApache through your WHM interface today and discover how flexible server management can be.

FAQs
Is EasyApache available on shared hosting?
No, EasyApache is not accessible to shared hosting users. It requires root-level access to WHM, which only VPS and dedicated server customers have. Your shared hosting provider manages Apache and PHP configurations for all accounts on the server.
Can EasyApache manage multiple PHP versions on one server?
Yes, EasyApache 4 fully supports running multiple PHP versions simultaneously. You can install PHP versions from 5.4 through 8.3 on the same server and assign different versions to different websites through cPanel’s MultiPHP Manager.
Is EasyApache suitable for beginners or only advanced users?
EasyApache is designed to be accessible to users with basic server management knowledge. The interface guides you through configuration choices with helpful descriptions. You don’t need to be a Linux expert, but you should understand web hosting concepts and basic server administration.
How is EasyApache different from manual Apache configuration?
Manual configuration requires editing text files and compiling software from source code. EasyApache provides a graphical interface that handles compilation, dependency management and configuration file updates automatically. It reduces configuration time from hours to minutes and catches common errors before they affect your server.
Does EasyApache affect website uptime during rebuilds?
Yes, your websites experience brief downtime when Apache restarts during the rebuild process. This typically lasts 30-90 seconds. Plan your rebuilds during low-traffic periods to minimize impact on your visitors. EasyApache 4’s package-based system reduces total rebuild time compared to older versions.

Write A Comment